ELK日志分析系统(ELasticsearch+Logstash+Kibana)——超详细实验+理论!!!
文章目录
- 前言
- 一、ELK日志分析系统简介
-
- 1.ELK日志分析解析图
- 二、ELK日志分析系统解析
-
- 2.1 Elasticsearch介绍
- 2.2 Logstash介绍
- 2.3 Kibana介绍
- 三、部署ELK日志分析系统
-
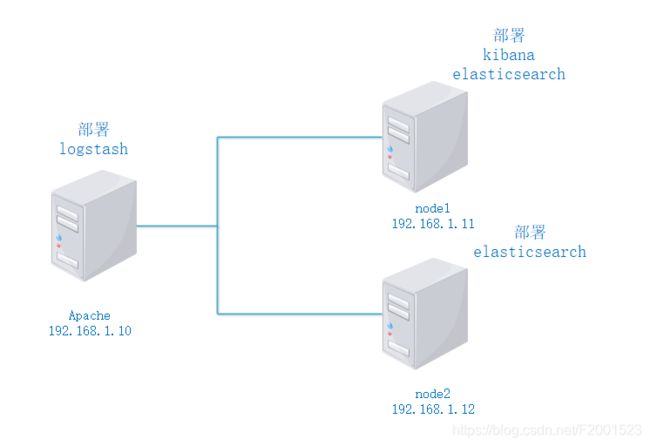
- 3.1 拓扑图
- 3.2 需求
- 3.3 流程
-
- 3.3.1 配置elasticsearch环境
-
- 3.3.1.1 本机网页上测试
- 3.3.1.2 查看集群健康检查和状态
- 3.3.1.3 查看集群属性
- 3.3.2 安装elasticsearch-head插件
- 3.3.3 安装logstash
- 3.3.4 安装Kibana
- 3.3.5 对接Apache
前言
在平常系统中会产生一些系统日志、应用程序日志和安全日志,如出现了错误可以通过日志去查看错误产生的原因,正因如此日志对于运维工程师处理问题的重要手段,但是日志是一个非常庞大的数据,它在分析的时候很困难,较复杂,所以,这章我们需要借助一个专门处理日志的系统就非常必要,这章介绍的是ELK日志分析系统(Elasticsearch、Logstash、Kibana)。
一、ELK日志分析系统简介
日志服务器
- 提高安全性
- 集中存放日志
缺陷:
- 对日志的分析困难
1.ELK日志分析解析图
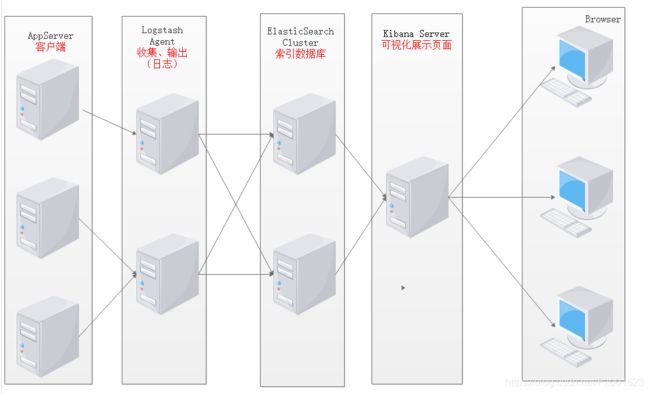
1.将日志进行集中化管理
2.将日志格式化(Logstash)
3.对格式化后的数据进行索引和存储(Elasticsearch)
4.前端数据的展示(Kibana)
5.用户通过的自已的浏览器访问Kibana页面查看
二、ELK日志分析系统解析
ELK日志分析系统
- ELK是由这个三种(Elasticsearch、Logstash、Kibana)工具组成
2.1 Elasticsearch介绍
Elasticsearch的概述
- 提供了一个分布式多用户能力的全文搜索引擎
Elasticsearch核心概念
- 接近实时
- 集群
- 节点
- 索引
- 索引(库)> 类型(表)> 文档(记录)
- 分片和副本
2.2 Logstash介绍
Logstash概述
- 一款强大的数据处理工具
- 可实现数据传输、格式处理、格式化输出
- 数据输入、数据加工(如过滤,改写等)以及数据输出
LogStash主要组件·
- Shipper
- lndexer
- Broker
- Search and Storage
- Web Interface
2.3 Kibana介绍
Kibana概述
- 一个针对Elasticsearch的开源分析及可视化平台
- 搜索、查看存储在Elasticsearch索引中的数据
- 通过各种图表进行高级数据分析及展示
Kibana主要功能
- Elasticsearch无缝之集成
- 整合数据,复杂数据分析
- 让更多团队成员受益
- 接口灵活,分享更容易
- 配置简单,可视化多数据源
- 简单数据导出
三、部署ELK日志分析系统
3.1 拓扑图
3.2 需求
- 配置ELK日志分析群集
- 使用logstash收集Apache日志信息
- 由elasticsearch存储和建立索引
- 使用Kibana查看分析日志
3.3 流程
3.3.1 配置elasticsearch环境
node1与node2除了节点名和主机名分别为node1和node2,其他配置都一样
[root@server2 ~]# hostnamectl set-hostname node1    #切换主机名为node1
[root@server2 ~]# bash             #刷新
[root@node1 ~]# vi /etc/hosts     #映射一下主机名和ip地址
添加:
192.168.1.11  node1
192.168.1.12  node2

elk是用java写的,需要查看支不支持java环境
[root@node1 ~]# java -version          #查看java版本
openjdk version "1.8.0_131"
OpenJDK Runtime Environment (build 1.8.0_131-b12)
OpenJDK 64-Bit Server VM (build 25.131-b12, mixed mode)


[root@node1 ~]# cd elk/
[root@node1 elk]# ll
[root@node1 elk]# rpm -ivh elasticsearch-5.5.0.rpm    安装rpm包
[root@node1 elk]# systemctl daemon-reload
[root@node1 elk]# systemctl enable elasticsearch.service
#给原配置文件做一下备份,在修改配置
[root@node1 elasticsearch]# cp -p elasticsearch.yml elasticsearch.yml.bak

更改配置文件,:set nu显示行号,以下为对应行号修改的内容
[root@node1 elasticsearch]# vim elasticsearch.yml
17: cluster.name: my-elk-cluster  # 集群名称
23: node.name: node1  # 当前节点名
33: path.data: /data/elk_data   # 数据存储的位置(目录不存在,需要创建)
37: path.logs: /var/log/elasticsearch/  # 日志文件存放的位置(软件自带,不需要创建)
43: bootstrap.memory_lock: false
 # true:允许内存中的数据交还给SWAP,flase:不允许内存中的数据交还给SWAP。
 选择false,因为swap分区实在硬盘上建立的,如果内存不够,数据溢出,分到硬盘上的话,会影响速度
55: network.host: 0.0.0.0   # 监听地址,0.0.0.0表示所有网段
59: http.port: 9200   # ES端口号,外部通信的端口号   PS:9300是集群内部通信端口
68: discovery.zen.ping.unicast.hosts: ["node1", "node2"]   # 群集中包含的节点名


[root@node1 elasticsearch]# mkdir -p /data/elk_data  ## 创建数据存放目录
[root@node1 elasticsearch]# id elasticsearch            ## ES的程序用户,安装的时候自动创建的用户
uid=990(elasticsearch) gid=985(elasticsearch) 组=985(elasticsearch)
[root@node1 elasticsearch]# chown elasticsearch.elasticsearch /data/elk_data/    ## 授权,交给用户 elasticsearch去管理
[root@node1 elasticsearch]# systemctl start elasticsearch.service   ## 开启服务
[root@node1 elasticsearch]# netstat -anpt | grep 9200   ## 过滤9200端口(外部访问集群端口)
tcp6       0      0 :::9200                 :::*                    LISTEN      59536/java
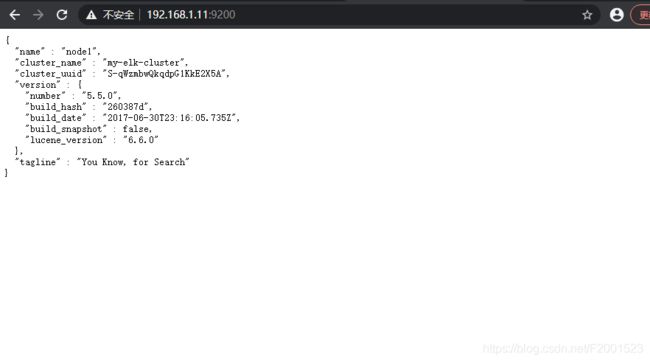
3.3.1.1 本机网页上测试
查看节点1的相关信息
{
  "name" : "node1",   ## 节点名称
  "cluster_name" : "my-elk-cluster",   ## 集群名称
  "cluster_uuid" : "",    ## 集群id
  "version" : {
    "number" : "5.5.0",  ## ES版本
    "build_hash" : "260387d",
    "build_date" : "2017-06-30T23:16:05.735Z",   ## 这个日期是ES版本诞生的日期,也就是5.5版本的诞生日期
    "build_snapshot" : false,
    "lucene_version" : "6.6.0"
  },
  "tagline" : "You Know, for Search"
}
3.3.1.2 查看集群健康检查和状态
在浏览器输入  http://192.168.1.11:9200/_cluster/health?pretty    ## 这里用11或12测试都可以
{
  "cluster_name" : "my-elk-cluster",   ## 集群名称
  "status" : "green", ## 健康值,green就是ok的
  "timed_out" : false,
  "number_of_nodes" : 2,
  "number_of_data_nodes" : 2,
  "active_primary_shards" : 0,
  "active_shards" : 0,
  "relocating_shards" : 0,
  "initializing_shards" : 0,
  "unassigned_shards" : 0,
  "delayed_unassigned_shards" : 0,
  "number_of_pending_tasks" : 0,
  "number_of_in_flight_fetch" : 0,
  "task_max_waiting_in_queue_millis" : 0,
  "active_shards_percent_as_number" : 100.0
}
3.3.1.3 查看集群属性
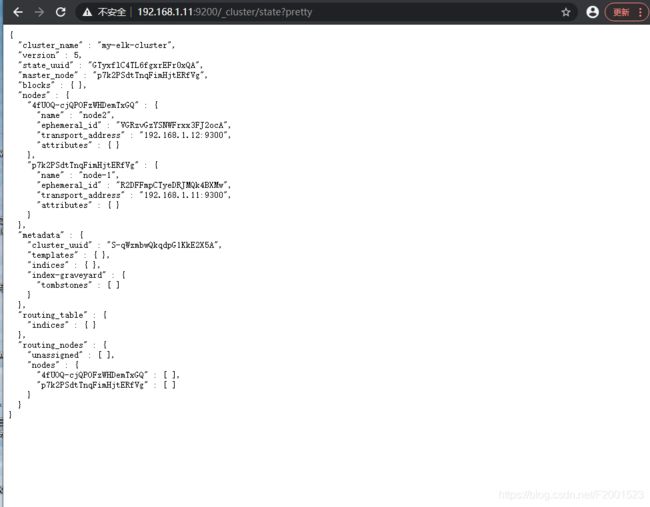
群集属性状态 ,可以看到群集内部通信端口9300
输入网址  http://192.168.1.11:9200/_cluster/state?pretty
{
  "cluster_name" : "my-elk-cluster",
  "version" : 5,
  "state_uuid" : "GTyxflC4TL6fgxrEFr0xQA",
  "master_node" : "p7k2PSdtTnqFimHjtERfVg",
  "blocks" : { },
  "nodes" : {
    "4fUOQ-cjQPOFzWHDemTxGQ" : {
      "name" : "node2",
      "ephemeral_id" : "VGRzvGzYSNWFrxx3FJ2ocA",
      "transport_address" : "192.168.1.12:9300",
      "attributes" : { }
    },
    "p7k2PSdtTnqFimHjtERfVg" : {
      "name" : "node-1",
      "ephemeral_id" : "R2DFFmpCTyeDRJMQk4BXMw",
      "transport_address" : "192.168.1.11:9300",
      "attributes" : { }
    }
  },
。。。。。
3.3.2 安装elasticsearch-head插件
2台节点服务器都需要做
1.安装elasticsearch-head插件,上述查看集群的方式极其不方便,我们可以通过安装elasticsearch-head插件来管理集群
节点1服务器 192.168.1.11
上传node-v8.2.1.tar.gz 到 /opt
[root@node1 ~]# yum -y install gcc gcc-c++ make
## 编译安装node
[root@node1 ~]# cd /opt
[root@node1 /opt]# tar zxvf node-v8.2.1.tar.gz
[root@node1 /opt]# cd node-v8.2.1/
[root@node1 /node-v8.2.1]# ./configure
[root@node1 /node-v8.2.1]# make -j3 && make install   ## 这里编译安装时间会有点长
2.安装phyantomjs前端框架
上传phantomjs-2.1.1-linux-x86_64.tar.bz2
[root@node1 ~]# tar jxvf phantomjs-2.1.1-linux-x86_64.tar.bz2
[root@node1 ~]# cd phantomjs-2.1.1-linux-x86_64/
[root@node1 phantomjs-2.1.1-linux-x86_64 ]# cd bin/
[root@node1 bin ]# cp phantomjs /usr/local/bin/
3.安装elasticsearch-head 可视化工具
上传elasticsearch-head.tar.gz
[root@node1 ~]# tar zxvf elasticsearch-head.tar.gz
[root@node1 ~]# cd elasticsearch-head/
[root@node1 elasticsearch-head]# npm install  ## 安装
4.修改主配置文件
[root@node1 ~]# vim /etc/elasticsearch/elasticsearch.yml    ## 这里的配置文件插在末尾
http.cors.enabled: true      ## 开启跨域访问支持,默认为false
http.cors.allow-origin: "*"     ## 跨域访问允许的域名地址
[root@node1 ~]# systemctl restart elasticsearch.service

## 启动服务器 ##
[root@node1 ~]# cd elasticsearch-head/
[root@node1 elasticsearch-head]# npm run start &    #切到后台运行
[1] 108188
[root@node1 elasticsearch-head]#
> elasticsearch-head@0.0.0 start /root/elasticsearch-head
> grunt server

Running "connect:server" (connect) task
Waiting forever...
Started connect web server on http://localhost:9100

[root@node1 elasticsearch-head]# netstat -anpt | grep 9100
tcp        0      0 0.0.0.0:9100            0.0.0.0:*               LISTEN      108198/grunt
在浏览器输入 192.168.1.11:9100(12也可以) 测试一下
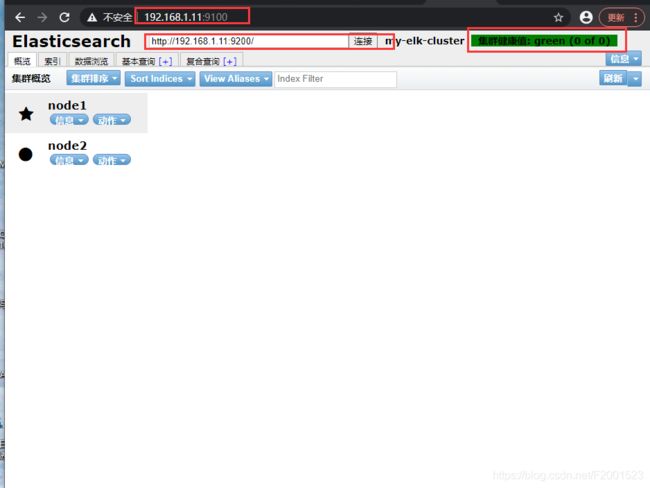
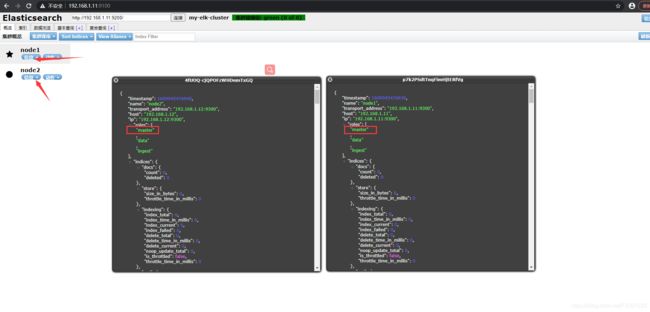
查看他们的节点信息,可以看到两个都是主节点,不存在主从关系
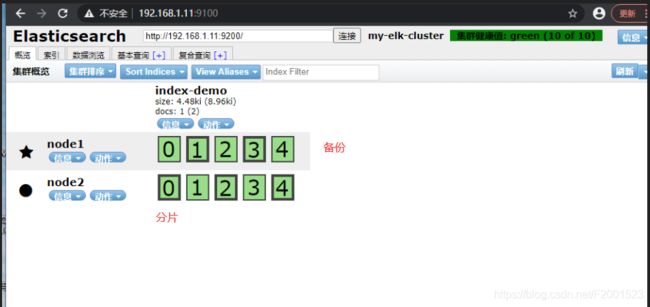
创建一个索引信息,创建索引为index-demo,类型为test,可以看到成功创建
这里的数据会被存储到ES集群中
[root@node1 ~]#  curl -XPUT 'localhost:9200/index-demo/test/1?pretty&pretty' -tent-Type: application/json' -d '{"user":"zhangsan","mesg":"hello world"}'
{
  "_index" : "index-demo",
  "_type" : "test",
  "_id" : "1",
  "_version" : 1,
  "result" : "created",
  "_shards" : {
    "total" : 2,
    "successful" : 2,
    "failed" : 0
  },
  "created" : true
}
刷新一下,可以看到存储的分片处理与备份。加粗的是分片(主文件),细框的是备份文件,不论哪个节点宕机,存储都不会丢失,可以确保文件中数据的安全性
3.3.3 安装logstash
安装logstash并做一些日志搜集输出到elasticsearch中,登陆主机192.168.1.10,关闭防火墙和核心防护
1.安装apache服务(httpd)
[root@apache ~]# yum  -y  install  httpd
[root@apache ~]# java -version     #查看是否java环境,如没有安装就yum  -y install  java
openjdk version "1.8.0_131"
OpenJDK Runtime Environment (build 1.8.0_131-b12)
OpenJDK 64-Bit Server VM (build 25.131-b12, mixed mode)
[root@apache ~]# cd /var/log/httpd/
[root@apache httpd]# ll      #apache服务还未开启,可以看到是查不到日志的产生的
总用量 0
[root@apache httpd]# systemctl start httpd
[root@apache httpd]# ll       #开启apache服务后,是可以查看到日志文件的
总用量 4
-rw-r--r--. 1 root root   0 1月   6 12:23 access_log
-rw-r--r--. 1 root root 941 1月   6 12:23 error_log
2.安装logstash
上传logstash-5.5.1.rpm
[root@apache httpd]# rpm -ivh logstash-5.5.1.rpm
[root@apache httpd]# rpm -qc logstash    ## rpm -qc  查看配置文件位置
/etc/logstash/jvm.options
/etc/logstash/logstash.yml
/etc/logstash/startup.options

[root@apache httpd]# systemctl start logstash.service
[root@apache httpd]# systemctl enable logstash.service
[root@apache  httpd]# ln -s /usr/share/logstash/bin/logstash /usr/local/bin/   # 建立软链接,便于被系统所识别
3、logstash(Apache)与elasticsearch (node)功能是否正常,做对接测试
logstash字段描述解释:

4、输入采用标准输入,输出采用标准输出----登录 192.168.1.10 在apache服务器上
[root@apache httpd]# logstash -e 'input { stdin{} } output { stdout{} }'   # 测试
www.baidu.com   #  输入www.baidu.com
2021-01-06T15:40:04.913Z apache www.baidu.comwww.baidu.com
5、使用 rubydebug 显示详细信息输出,code为一种编解码器
[root@apache httpd]# logstash -e 'input { stdin{} } output { stdout{ codec=>rubydebug } }'
www.baidu.com    ## 输入www.baidu.com
{
    "@timestamp" => 2021-01-06T15:32:59.945Z,
      "@version" => "1",
          "host" => "apache",
       "message" => "www.baidu.com"
}
6.使用logstash将信息写入elasticsearch输入 输出 对接
[root@apache httpd]# logstash -e 'input { stdin{} } output { elasticsearch { hosts=>["192.168.1.11:9200"] } }'
直到出现Successfullys
The stdin plugin is now waiting for input:
12:46:06.728 [Api Webserver] INFO  logstash.agent - Successfully started Logstash API endpoint {:port=>9600}
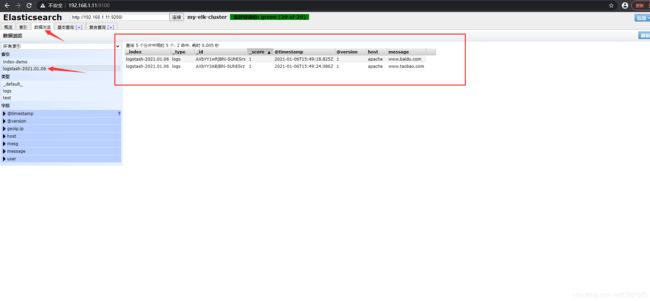
www.baidu.com
www.taobao.com
可以看到网页中的数据,可以成功查看记录
7.测试系统日志能否被采集
[root@apache httpd]# chmod o+r /var/log/messages    //对系统日志加other读权限
[root@apache httpd]# ll /var/log/messages         #查看权限
-rw----r--. 1 root root 180190 1月   6 12:57 /var/log/messages
[root@apache httpd]# vim /etc/logstash/conf.d/system.conf   //写入配置文件
input {
       file{
         path => "/var/log/messages"
         type => "system"
         start_position => "beginning"
         }
      }

output {
        elasticsearch {
          hosts => ["192.168.1.12:9200"]
          index => "system-%{+YYYY.MM.dd}"
          }
       }

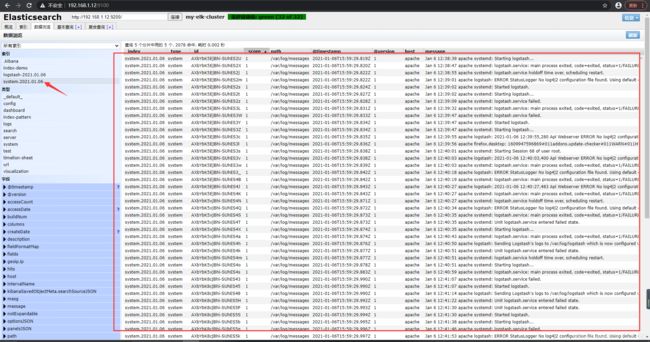
[root@node1 elasticsearch-head]# systemctl restart elasticsearch.service
F5刷新一下,就可以查看到192.168.1.12上的日志数据
3.3.4 安装Kibana
在node2节点上
#将kibana-5.5.1-x86_64.rpm 放在/usr/local/src
[root@node2 ~]# cd /usr/local/src/
[root@node2 src]# rpm -ivh kibana-5.5.1-x86_64.rpm
[root@node2 src]# cd /etc/kibana/
[root@node2 kibana]# ll       #可以看到有一个kibana的配置文件
总用量 8
-rw-r--r--. 1 root root 4649 7月  19 2017 kibana.yml

[root@node1 kibana]# vim kibana.yml

2 server.port: 5601			#Kibana端口号
7 server.host: "0.0.0.0"		#监听所有网段
21 elasticsearch.url: "http://192.168.1.12:9200"   	#和 ES建立联系
30 kibana.index: ".kibana"		#建立索引
[root@node2 kibana]# systemctl start kibana.service
[root@node2 kibana]# systemctl enable kibana.service
去页面看 192.168.1.12:5601
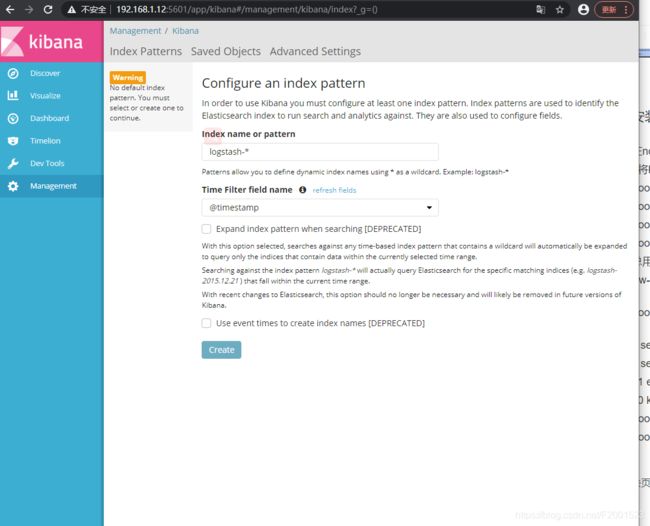
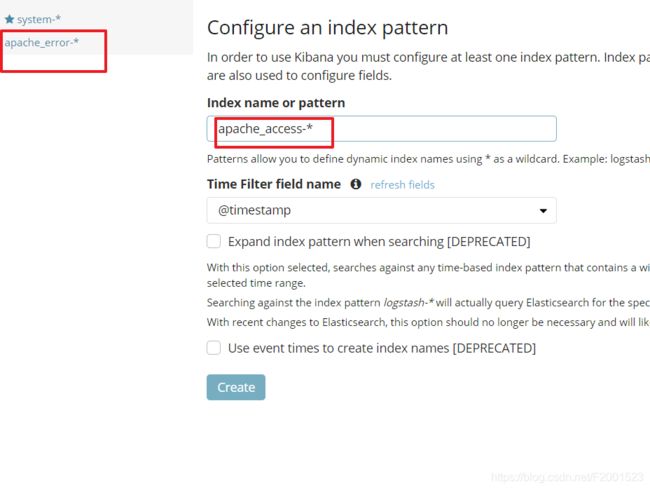
创建一个索引名字Index name pattern:system-* ## 这是对接系统的日志文件
然后点击 create 创建按钮
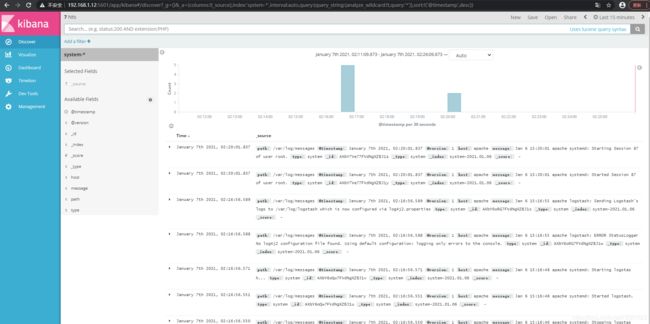
Discover里查看 ,非常清晰
3.3.5 对接Apache
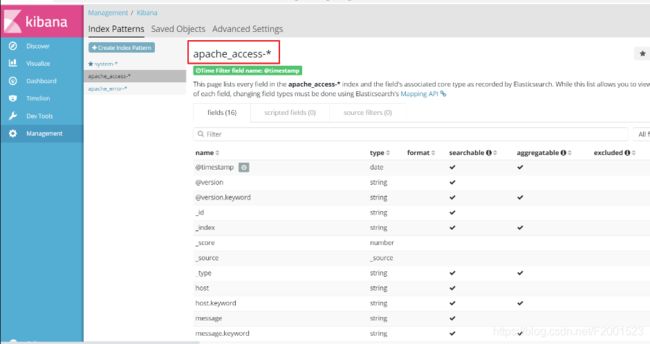
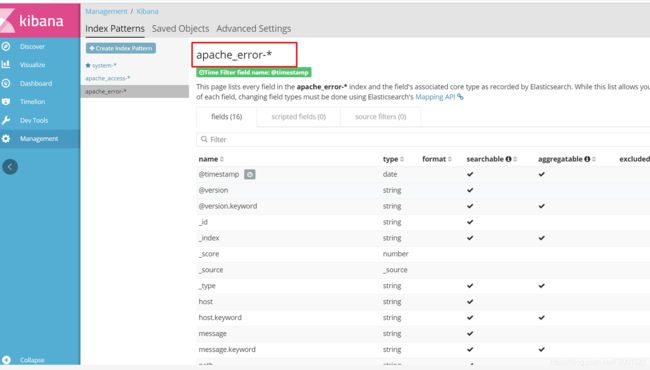
对接apache主机的apache的日志文件(访问的、错误的)
[root@apache ~]cd /etc/logstash/conf.d
[root@apache conf.d]# vim apache_log.conf
input {
       file{
         path => "/var/log/httpd/access_log"    ## apache 的 access日志位置
         type => "access"                                     ## 类型为 access,就是类似于索引,在kibana可以便于查看
         start_position => "beginning"                 ## 从日志的开头开始
         }
       file{
         path => "/var/log/httpd/error_log"    ## apache 的 error日志位置
         type => "error"
         start_position => "beginning"
         }
      }

output {
        if [type] == "access" {            ## 做一个判断,对应上面的索引名。如果匹配为access,则把内容导向节点,然后名称为apache_access.%{+YYYY.MM.dd}格式
        elasticsearch {
          hosts => ["192.168.1.12:9200"]
          index => "apache_access-%{+YYYY.MM.dd}"
         }
        }
        if [type] == "error" {
        elasticsearch {
          hosts => ["192.168.1.12:9200"]
          index => "apache_error-%{+YYYY.MM.dd}"
         }
        }
       }

[root@apache conf.d]# logstash -f apache_log.conf    #启动指定
