ActiveMQ学习笔记(一)
MQ:消息队列/中间件
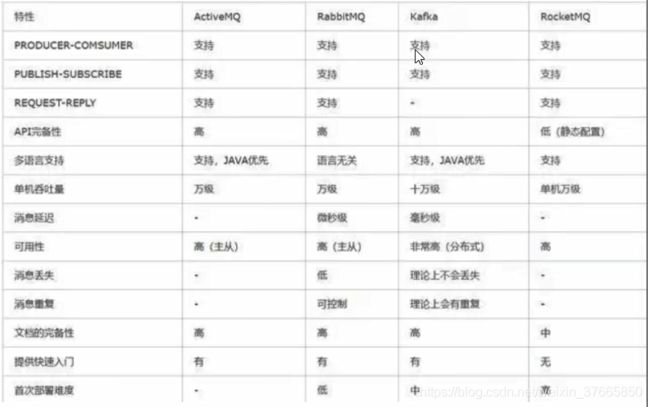
MQ产品种类:RabbitMQ、Kafka、RocketMQ、ActiveMQ
作用:解耦、削峰、异步
MQ之ActiveMQ:

activeMQ前台端口8161 后台端口61616
activeMQ启动命令:./activemq start
activeMQ关闭命令:./activemq stop
activeMQ重启命令:./activemq restart
查询是否正常启动:netstat -anp|grep 61616 查看61616端口是否被占用
关闭防火墙:service iptables stop
ActiveMQ实践:
1:新建maven工程activeMq_demo,依赖如下:
<dependencies>
  <!--activeMQ需要的jar包-->
  <dependency>
    <groupId>org.apache.activemq</groupId>
    <artifactId>activemq-all</artifactId>
    <version>5.15.9</version>
  </dependency>
  <dependency>
    <groupId>org.apache.xbean</groupId>
    <artifactId>xbean-spring</artifactId>
    <version>3.16</version>
  </dependency>

  <!--下边是junit/log4j等基础配置-->
  <dependency>
    <groupId>org.slf4j</groupId>
    <artifactId>slf4j-api</artifactId>
    <version>1.7.25</version>
  </dependency>
  <dependency>
    <groupId>ch.qos.logback</groupId>
    <artifactId>logback-classic</artifactId>
    <version>1.2.3</version>
  </dependency>
  <dependency>
    <groupId>org.projectlombok</groupId>
    <artifactId>lombok</artifactId>
    <version>1.16.18</version>
    <scope>provided</scope>
  </dependency>
  <dependency>
    <groupId>junit</groupId>
    <artifactId>junit</artifactId>
    <version>4.12</version>
  </dependency>
</dependencies>
编写生产者编码:
import org.apache.activemq.ActiveMQConnectionFactory;

import javax.jms.*;

public class JmsProduce {
    public static final String ACTIVEMQ_URL = "tcp://192.168.215.129:61616";
    public static final String QUEUE_NAME = "queue01";
    public static void main(String[] args) throws JMSException {
        //1:创建连接工厂,按照给定的url地址,采用默认的用户名密码
        ActiveMQConnectionFactory activeMQConnectionFactory = new ActiveMQConnectionFactory(ACTIVEMQ_URL);
        //2:通过连接工厂获取连接connection
        Connection connection = activeMQConnectionFactory.createConnection();
        connection.start();

        //3:创建会话session
        //两个参数:第一个事务,第二个叫签收
        Session session = connection.createSession(false, Session.AUTO_ACKNOWLEDGE);
        //4:创建目的地(具体是队列还是主题Topic)
        Queue queue = session.createQueue(QUEUE_NAME);
        //5:创建消息生产者
        MessageProducer messageProducer = session.createProducer(queue);
        //6:通过使用消息生产者生产3条消息发送到MQ队列里
        for (int i=0;i<3;i++){
            //7:创建消息
          TextMessage textMessage =   session.createTextMessage("msg-----"+i);
          //8:通过messageProducer发送给mq
          messageProducer.send(textMessage);
        }
        //9:关闭资源
        messageProducer.close();
        session.close();
        connection.close();

        System.out.println("*************消息发布到MQ完成");
    }
}
运行JmsProduce的main方法,结果如下:
import org.apache.activemq.ActiveMQConnectionFactory;

import javax.jms.*;

public class JmsCustomer {

    public static final String ACTIVEMQ_URL = "tcp://192.168.215.129:61616";
    public static final String QUEUE_NAME = "queue01";
    public static void main(String[] args) throws JMSException {
        //1:创建连接工厂,按照给定的url地址,采用默认的用户名密码
        ActiveMQConnectionFactory activeMQConnectionFactory = new ActiveMQConnectionFactory(ACTIVEMQ_URL);
        //2:通过连接工厂获取连接connection
        Connection connection = activeMQConnectionFactory.createConnection();
        connection.start();

        //3:创建会话session
        //两个参数:第一个事务,第二个叫签收
        Session session = connection.createSession(false, Session.AUTO_ACKNOWLEDGE);
        //4:创建目的地(具体是队列还是主题Topic)
        Queue queue = session.createQueue(QUEUE_NAME);
        //5:创建消息消费者
        MessageConsumer messageConsumer = session.createConsumer(queue);
        while(true){
        /*
        1:同步阻塞方式 receive()
        订阅者或接收者调用MessageConsumer的receive()方法来接收消息,receive方法在能够接收到消息之前(或超时之前)将一直阻塞
        */
           // TextMessage textMessage = (TextMessage) messageConsumer.receive();
           TextMessage textMessage = (TextMessage) messageConsumer.receive(4000L);//带时间参数,4秒内接收,超出时间则不再接收
            if(null != textMessage){
                System.out.println("*******消费者接收到消息:"+textMessage.getText());
            }else{
                break;
            }
        }
        messageConsumer.close();
        session.close();
        connection.close();
    }

}
运行JmsCustomer ,结果如下:
 public static final String ACTIVEMQ_URL = "tcp://192.168.215.129:61616";
    public static final String QUEUE_NAME = "queue01";
    public static void main(String[] args) throws JMSException , IOException {
        //1:创建连接工厂,按照给定的url地址,采用默认的用户名密码
        ActiveMQConnectionFactory activeMQConnectionFactory = new ActiveMQConnectionFactory(ACTIVEMQ_URL);
        //2:通过连接工厂获取连接connection
        Connection connection = activeMQConnectionFactory.createConnection();
        connection.start();

        //3:创建会话session
        //两个参数:第一个事务,第二个叫签收
        Session session = connection.createSession(false, Session.AUTO_ACKNOWLEDGE);
        //4:创建目的地(具体是队列还是主题Topic)
        Queue queue = session.createQueue(QUEUE_NAME);
        //5:创建消息消费者
        MessageConsumer messageConsumer = session.createConsumer(queue);
        while(true){
        //2:通过监听的方式来接收消息
            messageConsumer.setMessageListener(new MessageListener() {
                @Override
                public void onMessage(Message message) {
                    if(message != null && message instanceof TextMessage)
                    {
                        TextMessage textMessage = (TextMessage) message;
                        try {
                            System.out.println("******消费者接收到消息:"+textMessage.getText());
                        } catch (JMSException e) {
                            e.printStackTrace();
                        }
                    }
                }
            });
            System.in.read();//保证控制台不灭
            messageConsumer.close();
            session.close();
            connection.close();

        }

    }

}
先启动生产者,再启动消费者1号,再启动消费者2号,则1号消费者接收到所有消息,2号消费者接收不到
先启动2个消费者,在生产6条消息,则每个消费者获取3条
Topic模式
import org.apache.activemq.ActiveMQConnectionFactory;

import javax.jms.*;

public class JmsProduce_Topic {
    public static final String ACTIVEMQ_URL = "tcp://192.168.215.129:61616";
    public static final String TOPIC_NAME = "topic_atguigu";
    public static void main(String[] args) throws JMSException {
        //1:创建连接工厂,按照给定的url地址,采用默认的用户名密码
        ActiveMQConnectionFactory activeMQConnectionFactory = new ActiveMQConnectionFactory(ACTIVEMQ_URL);
        //2:通过连接工厂获取连接connection
        Connection connection = activeMQConnectionFactory.createConnection();
        connection.start();

        //3:创建会话session
        //两个参数:第一个事务,第二个叫签收
        Session session = connection.createSession(false, Session.AUTO_ACKNOWLEDGE);
        //4:创建目的地(具体是队列还是主题Topic)
        Topic topic = session.createTopic(TOPIC_NAME);
        //5:创建消息生产者
        MessageProducer messageProducer = session.createProducer(topic);
        //6:通过使用消息生产者生产3条消息发送到MQ队列里
        for (int i=0;i<3;i++){
            //7:创建消息
            TextMessage textMessage =   session.createTextMessage("TOPIC--msg-----"+i);
            //8:通过messageProducer发送给mq
            messageProducer.send(textMessage);
        }
        //9:关闭资源
        messageProducer.close();
        session.close();
        connection.close();

        System.out.println("*************TOPIC--消息发布到MQ完成");
    }
}
创建消息消费者
public class JmsCustomer_Topic {

    public static final String ACTIVEMQ_URL = "tcp://192.168.215.129:61616";
    public static final String TOPIC_NAME = "topic_atguigu";
    public static void main(String[] args) throws JMSException , IOException {
        //1:创建连接工厂,按照给定的url地址,采用默认的用户名密码
        ActiveMQConnectionFactory activeMQConnectionFactory = new ActiveMQConnectionFactory(ACTIVEMQ_URL);
        //2:通过连接工厂获取连接connection
        Connection connection = activeMQConnectionFactory.createConnection();
        connection.start();

        //3:创建会话session
        //两个参数:第一个事务,第二个叫签收
        Session session = connection.createSession(false, Session.AUTO_ACKNOWLEDGE);
        //4:创建目的地(具体是队列还是主题Topic)
        Topic topic = session.createTopic(TOPIC_NAME);
        //5:创建消息消费者
        MessageConsumer messageConsumer = session.createConsumer(topic);
        while(true){
            messageConsumer.setMessageListener(new MessageListener() {
                @Override
                public void onMessage(Message message) {
                    if(message != null && message instanceof TextMessage)
                    {
                        TextMessage textMessage = (TextMessage) message;
                        try {
                            System.out.println("******消费者接收到Topic消息:"+textMessage.getText());
                        } catch (JMSException e) {
                            e.printStackTrace();
                        }
                    }
                }
            });
            System.in.read();//保证控制台不灭
            messageConsumer.close();
            session.close();
            connection.close();

        }

    }

}
先启动topic消费者
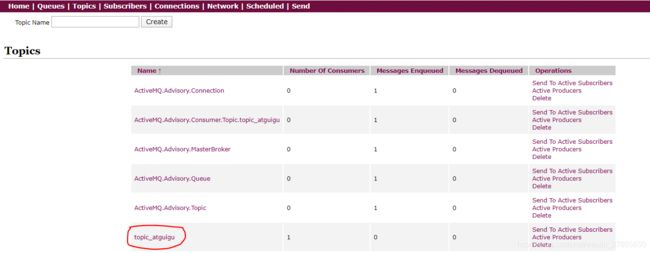
再启动生产者

凡是订阅者,皆可以收到
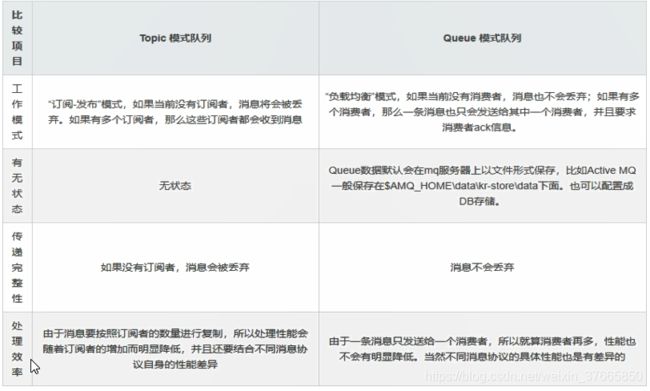
queue和Topic对比
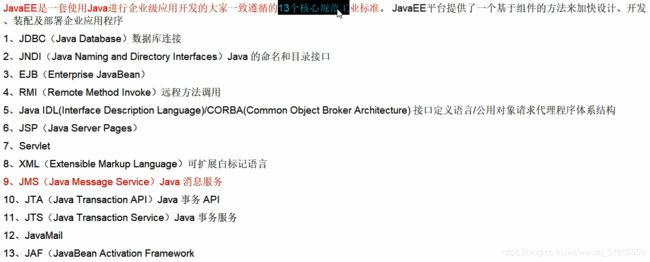
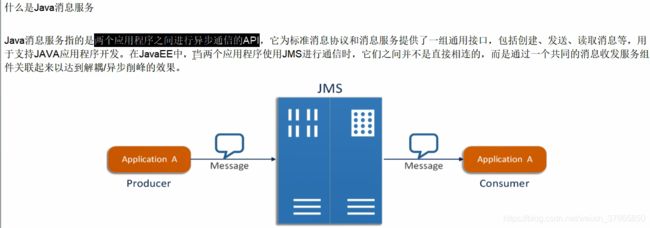
JMS与JavaEE关系
JMSDestination:
消息发送的目的地,主要指Queue和Topic
JMSDeliveryMode:
持久和非持久模式,一条持久性的消息:应该被传送一次仅仅一次,这意味着如果JMS提供者出现故障,该消息并不会丢失,他会在服务器恢复之后再次传递。
一条非持久消息:最多会传送一次,这意味着这服务器出现故障,该消息将永远丢失。
JMSExpiration:
消息的过期时间,可以设置消息在一定时间后过期,默认是永不过期。消息过期时间等于Destination的send方法中的timeToLive值加上发送时刻的GMT时间值。如果timeToLive值为零,则JMSExpiration被设为零,表示该消息永不过期。如果发送后,在消息过期时间之后消息还没被发送到目的地,则该消息被清除。
JMSPriority:
消息优先级,从0到9十个级别,0到4是普通消息,5到9是加急消息。JMS不严格按照这十个级别发送消息,但必须保证加急消息要优先于普通消息到达,默认级别是4级
JMSMessageID:
唯一识别每个消息的标识由MQ(消息中间件)产生
消息体:用来封装具体的消息数据
5种消息体格式:
消息属性:

消息的可靠性
 持久性:
持久性:


队列 :

Topic:
topic生产者开启持久化,connection.start()需要在设置持久化属性之后进行
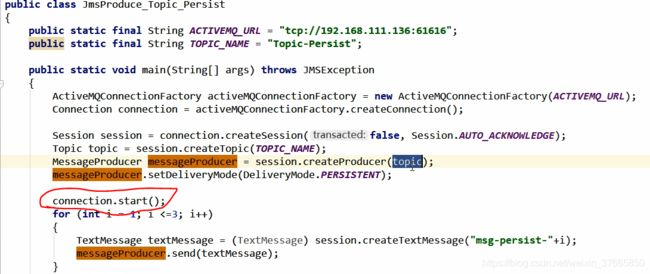
topic消费者开启持久化,需要修改之前消费者接收代码:
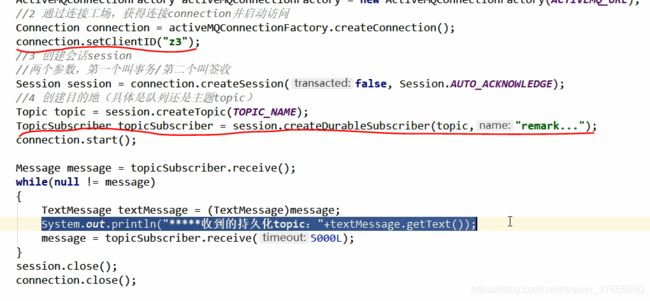 线运行先启动订阅,在启动生产,可见activemq控制台的订阅模块
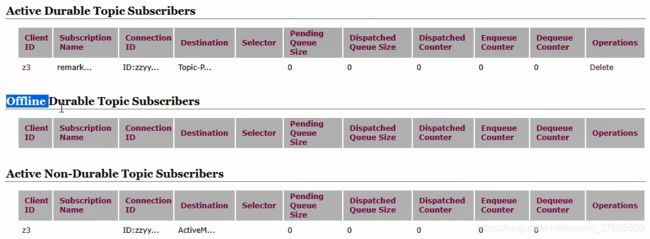
可见活跃的持久化的订阅者信息和离线的订阅者信息

消息生产者和消费者事务介绍

设置事务为true,需在session关闭之前,提交session

生产者不提交事务,消息发送不出去,消费者不提交事务,消息消费不了。
签收
事务偏生产者,签收偏消费者。签收有三种:

手动签收 ,消费者需调用ackonwledeg(),否则消息重复接收
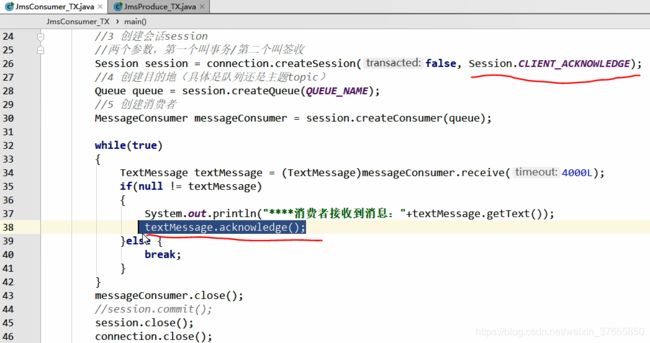
事务和签收的关系:


ActiveMQ Broker:相当于哥ActiveMQ服务器实例,其实就是实现了用代码的形式启动ActiveMQ将MQ嵌入到Java代码中,以便随时用,随时启动,在用的时候再去启动,这样能节省了资源,也保证了可靠性。

启动时通过不同的conf.xml文件模拟不同的实例。
eg:
1:在POM文件 中添加如下依赖:
>
>com.fasterxml.jackson.core >
>jackson-databind >
>2.9.5 >
>import org.apache.activemq.broker.BrokerService;
public class EmbedBroker {
public static void main(String[] args) throws Exception{
//activeMQ也支持在vm中通信基于嵌入式的broker
BrokerService brokerService = new BrokerService();
brokerService.setUseJmx(true);
brokerService.addConnector("tcp://localhost:61616");
brokerService.start();
}
}启动运行,相当于在Windows上启动了一个小型的activeMQ服务,修改之前生产者和消费者的访问服务器地址为本地的localhost,测试可正常发送接收消息。
工作中使用linux的activemq.
![]()
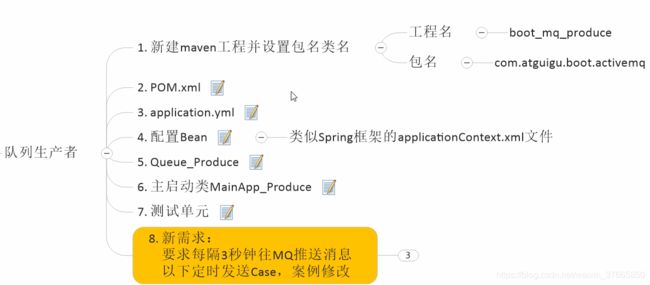
Spring整合ActiveMQ之队列生产者
添加POM依赖
<!--activemq对MS的支持,整合Spring和Activemq-->
<dependency>
  <groupId>org.springframework</groupId>
  <artifactId>spring-jms</artifactId>
  <version>4.3.23.RELEASE</version>
</dependency>
<dependency>
  <groupId>org.apache.activemq</groupId>
  <artifactId>activemq-pool</artifactId>
  <version>5.15.9</version>
</dependency>

  <!--Spring-AOP相关jar-->
<dependency>
  <groupId>org.springframework</groupId>
  <artifactId>spring-core</artifactId>
  <version>4.3.23.RELEASE</version>
</dependency>
<dependency>
  <groupId>org.springframework</groupId>
  <artifactId>spring-context</artifactId>
  <version>4.3.23.RELEASE</version>
</dependency>
<dependency>
  <groupId>org.springframework</groupId>
  <artifactId>spring-aop</artifactId>
  <version>4.3.23.RELEASE</version>
</dependency>
<dependency>
  <groupId>org.springframework</groupId>
  <artifactId>spring-orm</artifactId>
  <version>4.3.23.RELEASE</version>
</dependency>
<dependency>
  <groupId>org.aspectj</groupId>
  <artifactId>aspectjrt</artifactId>
  <version>1.6.1</version>
</dependency>
<dependency>
  <groupId>aspectj</groupId>
  <artifactId>aspectjweaver</artifactId>
  <version>1.5.3</version>
</dependency>
<dependency>
  <groupId>cglib</groupId>
  <artifactId>cglib</artifactId>
  <version>2.1_2</version>
</dependency>
创建application.xml配置文件
<?xml version="1.0" encoding="UTF-8"?>
<beans xmlns="http://www.springframework.org/schema/beans"
       xmlns:xsi="http://www.w3.org/2001/XMLSchema-instance" xmlns:p="http://www.springframework.org/schema/p"
       xmlns:context="http://www.springframework.org/schema/context"
       xmlns:tx="http://www.springframework.org/schema/tx"
       xmlns:aop="http://www.springframework.org/schema/aop"
       xsi:schemaLocation="http://www.springframework.org/schema/aop http://www.springframework.org/schema/aop/spring-aop-4.0.xsd
      http://www.springframework.org/schema/beans http://www.springframework.org/schema/beans/spring-beans.xsd
      http://www.springframework.org/schema/tx http://www.springframework.org/schema/tx/spring-tx-4.0.xsd
      http://www.springframework.org/schema/context http://www.springframework.org/schema/context/spring-context-4.0.xsd">

    <!-- 配置自动扫描的包 -->
    <context:component-scan base-package="com.yx.test.spring"></context:component-scan>

    <1--配置生产者-->
    <bean id="jmsFactory" class="org.apache.activemq.pool.PooledConnectionFactory" destroy-method="stop">
        <property name="connectionFactory">
            <bean class="org.apache.activemq.ActiveMQConnectionFactory">
                <property name="brokerURL" value="tcp://192.168.215.129:61616"/>
            </bean>
        </property>
        <property name="maxConnections" value="100"></property>
    </bean>

    <!--这个是队列目的地,点对点的-->
    <bean id="destinationQueue" class="org.apache.activemq.command.ActiveMQQueue">
        <constructor-arg index="0" value="spring-active-queue"></constructor-arg>
    </bean>

    <!--Spring提供的JMS工具类,它可以进行消息的发送接收等-->
    <bean id="jmsTemplate" class="org.springframework.jms.core.JmsTemplate">
        <property name="connectionFactory" ref="jmsFactory"></property>
        <property name="defaultDestination" ref="destinationQueue"></property>
        <property name="messageConverter">
            <bean class="org.springframework.jms.support.converter.SimpleMessageConverter"></bean>
        </property>
    </bean>
</beans>
创建生产者类SpringMQ_Produce
import org.apache.xbean.spring.context.ClassPathXmlApplicationContext;
import org.springframework.beans.factory.annotation.Autowired;
import org.springframework.context.ApplicationContext;
import org.springframework.jms.core.JmsTemplate;
import org.springframework.jms.core.MessageCreator;
import org.springframework.stereotype.Service;

import javax.jms.JMSException;
import javax.jms.Message;
import javax.jms.Session;
import javax.jms.TextMessage;

@Service
public class SpringMQ_Produce {

    @Autowired
    private JmsTemplate jmsTemplate;

    public  static void  main(String [] args){
        ApplicationContext ctx = new ClassPathXmlApplicationContext("application.xml");
        System.out.println(ctx.getBeanDefinitionNames()[0]);
        SpringMQ_Produce produce = (SpringMQ_Produce)ctx.getBean("springMQ_Produce");
        produce.jmsTemplate.send(new MessageCreator() {
            @Override
            public Message createMessage(Session session) throws JMSException {
                TextMessage textMessage = session.createTextMessage("*********Spring和ActiveMQ的整合case********");
                return textMessage;
            }
        });
        System.out.println("发送完毕");
    }
}import org.apache.xbean.spring.context.ClassPathXmlApplicationContext;
import org.springframework.beans.factory.annotation.Autowired;
import org.springframework.context.ApplicationContext;
import org.springframework.jms.core.JmsTemplate;
import org.springframework.stereotype.Service;
@Service
public class SpringMQ_Consumer {
@Autowired
private JmsTemplate jmsTemplate;
public static void main(String[] args) {
ApplicationContext ctx = new ClassPathXmlApplicationContext("application.xml");
System.out.println(ctx.getBeanDefinitionNames()[0]);
SpringMQ_Consumer consumer = (SpringMQ_Consumer)ctx.getBean("springMQ_Consumer");
String retValue = (String) consumer.jmsTemplate.receiveAndConvert();
System.out.println("*********消费者收到的消息:"+retValue+"***********");
}
}Spring整合activeMQ之Topic
修改application.xml文件,添加topic的bean,并引入到jmstemplate中即可,代码不需修改。
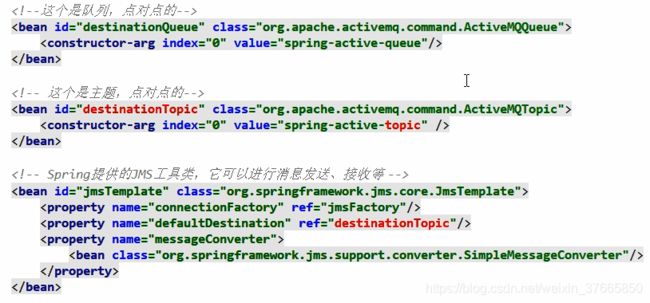
通过spring实现消费者不启动,直接通过配置监听完成,即服务启动就开始监听,生产者一发送消息,就获取到
1)在application.xml中添加监听配置
<?xml version="1.0" encoding="UTF-8"?>
<beans xmlns="http://www.springframework.org/schema/beans"
       xmlns:xsi="http://www.w3.org/2001/XMLSchema-instance" xmlns:p="http://www.springframework.org/schema/p"
       xmlns:context="http://www.springframework.org/schema/context"
       xmlns:tx="http://www.springframework.org/schema/tx"
       xmlns:aop="http://www.springframework.org/schema/aop"
       xsi:schemaLocation="http://www.springframework.org/schema/aop http://www.springframework.org/schema/aop/spring-aop-4.0.xsd
      http://www.springframework.org/schema/beans http://www.springframework.org/schema/beans/spring-beans.xsd
      http://www.springframework.org/schema/tx http://www.springframework.org/schema/tx/spring-tx-4.0.xsd
      http://www.springframework.org/schema/context http://www.springframework.org/schema/context/spring-context-4.0.xsd">

    <!-- 配置自动扫描的包 -->
    <context:component-scan base-package="com.yx.test.spring"></context:component-scan>
    <!--配置生产者-->
    <bean id="jmsFactory" class="org.apache.activemq.pool.PooledConnectionFactory" destroy-method="stop">
        <property name="connectionFactory">
            <bean class="org.apache.activemq.ActiveMQConnectionFactory">
                <property name="brokerURL" value="tcp://192.168.215.129:61616"/>
            </bean>
        </property>
        <property name="maxConnections" value="100"></property>
    </bean>

    <!--这个是队列目的地,点对点的-->
    <bean id="destinationQueue" class="org.apache.activemq.command.ActiveMQQueue">
        <constructor-arg index="0" value="spring-active-queue"></constructor-arg>
    </bean>

    <!--这个是topic目的地-->
    <bean id="destinationTopic" class="org.apache.activemq.command.ActiveMQTopic">
        <constructor-arg index="0" value="spring-active-topic"></constructor-arg>
    </bean>

    <!--Spring提供的JMS工具类,它可以进行消息的发送接收等-->
    <bean id="jmsTemplate" class="org.springframework.jms.core.JmsTemplate">
        <property name="connectionFactory" ref="jmsFactory"></property>
       <!-- <property name="defaultDestination" ref="destinationQueue"></property>-->
        <property name="defaultDestination" ref="destinationTopic"></property>
        <property name="messageConverter">
            <bean class="org.springframework.jms.support.converter.SimpleMessageConverter"></bean>
        </property>
    </bean>

    <!--配置监听程序-->
    <bean id="jmsContainer" class="org.springframework.jms.listener.DefaultMessageListenerContainer">
        <property name="connectionFactory" ref="jmsFactory"></property>
        <property name="destination" ref="destinationTopic"></property>
        <property name="messageListener" ref="myMessageListener"></property>
    </bean>
</beans>
创建实现类MyMessageListener
import org.springframework.stereotype.Component;

import javax.jms.JMSException;
import javax.jms.Message;
import javax.jms.MessageListener;
import javax.jms.TextMessage;

@Component
public class MyMessageListener implements MessageListener {

    @Override
    public void onMessage(Message message) {
        if(null !=message && message instanceof TextMessage)
        {
            TextMessage textMessage = (TextMessage) message;
            try {
                System.out.println("**************listener"+textMessage.getText());
            } catch (JMSException e) {
                e.printStackTrace();
            }
        }
    }
}
只启动生产者main方法,测试可接受到消息。
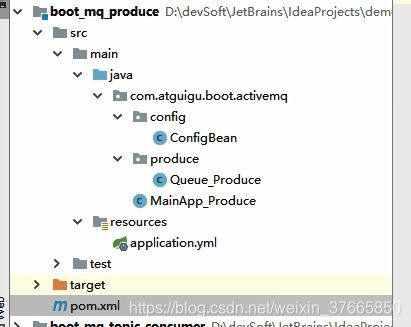
springboot整合activeMQ之队列生产者
POM.XML内容如下:
<?xml version="1.0" encoding="UTF-8"?>

<project xmlns="http://maven.apache.org/POM/4.0.0" xmlns:xsi="http://www.w3.org/2001/XMLSchema-instance"
  xsi:schemaLocation="http://maven.apache.org/POM/4.0.0 http://maven.apache.org/xsd/maven-4.0.0.xsd">
  <modelVersion>4.0.0</modelVersion>

  <parent>
    <groupId>org.springframework.boot</groupId>
    <artifactId>spring-boot-starter-parent</artifactId>
    <version>2.1.5.RELEASE</version>
  </parent>
  <groupId>com.yx.boot</groupId>
  <artifactId>boot_mq_produce</artifactId>
  <version>1.0-SNAPSHOT</version>

  <properties>
    <project.build.sourceEncoding>UTF-8</project.build.sourceEncoding>
    <maven.compiler.source>1.7</maven.compiler.source>
    <maven.compiler.target>1.7</maven.compiler.target>
  </properties>

  <dependencies>
    <dependency>
      <groupId>org.springframework.boot</groupId>
      <artifactId>spring-boot-starter</artifactId>
    </dependency>
    <dependency>
      <groupId>org.springframework.boot</groupId>
      <artifactId>spring-boot-starter-web</artifactId>
    </dependency>
    <dependency>
      <groupId>org.springframework.boot</groupId>
      <artifactId>spring-boot-test</artifactId>
      <scope>test</scope>
    </dependency>
    <dependency>
      <groupId>org.springframework.boot</groupId>
      <artifactId>spring-boot-starter-activemq</artifactId>
      <version>2.1.5.RELEASE</version>
    </dependency>
    <dependency>
      <groupId>junit</groupId>
      <artifactId>junit</artifactId>
      <version>4.12</version>
    </dependency>
    <dependency>
      <groupId>org.springframework</groupId>
      <artifactId>spring-test</artifactId>
      <version>4.3.23.RELEASE</version>
    </dependency>
  </dependencies>

   <build>
     <plugins>
       <plugin>
         <groupId>org.springframework.boot</groupId>
         <artifactId>spring-boot-maven-plugin</artifactId>
       </plugin>
     </plugins>
   </build>
</project>
application.yml内容:
server:
  port: 7777

spring:
  activemq:
    broker-url: tcp://192.168.215.129:61616/
    user: admin
    password: admin
  jms:
    pub-sub-domain: false    # false表示队列 true表示topic 默认false

#自己定义队列名称
myqueue: boot-activemq-queue
配置类ConfigBean内容
import org.apache.activemq.command.ActiveMQQueue;
import org.springframework.beans.factory.annotation.Value;
import org.springframework.context.annotation.Bean;
import org.springframework.jms.annotation.EnableJms;
import org.springframework.stereotype.Component;

import javax.jms.Queue;


@Component
@EnableJms
public class ConfigBean {
    @Value("${myqueue}")
    private String myQueue;

    @Bean
    public Queue queue(){
        return new ActiveMQQueue(myQueue);
    }
}
创建Queue_Produce
import org.springframework.beans.factory.annotation.Autowired;
import org.springframework.jms.core.JmsMessagingTemplate;
import org.springframework.stereotype.Component;

import javax.jms.Queue;
import java.util.UUID;

@Component
public class Queue_Produce {

    @Autowired
    private JmsMessagingTemplate jmsMessagingTemplate;
    @Autowired
    private Queue queue;

    public void produceMsg(){
        jmsMessagingTemplate.convertAndSend(queue,"******:"+ UUID.randomUUID().toString().substring(0,6));
    }
}
创建主启动类
import org.springframework.boot.SpringApplication;
import org.springframework.boot.autoconfigure.SpringBootApplication;

/**
 * Hello world!
 *
 */
@SpringBootApplication
public class MainApp_Produce
{
    public static void main( String[] args )
    {
        SpringApplication.run(MainApp_Produce.class,args);
    }
}
创建测试类Apptest
@SpringBootTest(classes = com.yx.boot.MainApp_Produce.class)
@RunWith(SpringJUnit4ClassRunner.class)
@WebAppConfiguration
public class AppTest
{

    @Resource
    private Queue_Produce queue_Produce;

    @Test
    public void testSend() throws Exception
    {
        queue_Produce.produceMsg();
    }
}
运行测试类,可成功发送消息,结果如下:
定时发送消息
eg:每隔3秒钟向MQ推送消息

修改Queue_Produce
@Component
public class Queue_Produce {

    @Autowired
    private JmsMessagingTemplate jmsMessagingTemplate;
    @Autowired
    private Queue queue;

    public void produceMsg(){
        jmsMessagingTemplate.convertAndSend(queue,"******:"+ UUID.randomUUID().toString().substring(0,6));
    }

    //间隔3秒钟定投
    @Scheduled(fixedDelay = 3000)
    public  void produceMsgScheduled(){
        jmsMessagingTemplate.convertAndSend(queue,"**scheduled****:"+ UUID.randomUUID().toString().substring(0,6));
    }
}
修改主启动类
@SpringBootApplication
@EnableScheduling
public class MainApp_Produce
{
    public static void main( String[] args )
    {
        SpringApplication.run(MainApp_Produce.class,args);
    }
}
启动主启动类,可见消息按时发送
springboot整合activeMQ之队列消费者

POM文件与生产者POM文件相同
application.yml文件如下:
server:
  port: 8888

spring:
  activemq:
    broker-url: tcp://192.168.215.129:61616/
    user: admin
    password: admin
  jms:
    pub-sub-domain: false    # false表示队列 true表示topic 默认false

#自己定义队列名称
myqueue: boot-activemq-queue
创建消费者类Queue_Consumer
@Component
public class Queue_Consumer {

    @JmsListener(destination = "${myqueue}")
    public void receive(TextMessage textMessage) throws JMSException {
        System.out.println("*********消费者收到的消息"+textMessage.getText());
    }

}
创建主启动类App
@SpringBootApplication
public class App
{
    public static void main( String[] args )
    {
        SpringApplication.run(App.class,args);
    }
}
启动主启动类,可见消息接收
springBoot整合ActiveMQ之Topic生产者
server:
  port: 6666

spring:
  activemq:
    broker-url: tcp://192.168.215.129:61616/
    user: admin
    password: admin
  jms:
    pub-sub-domain: true    # false表示队列 true表示topic 默认false

#自己定义队列名称
mytopic: boot-activemq-topic
创建configBean如下:
@Component
public class ConfigBean {

    @Value("${mytopic}")
    private String topicName;
    @Bean
    public Topic topic(){
        return  new ActiveMQTopic(topicName);
    }
}
创建生产者类Topic_Produce
@Component
public class Topic_Produce {
    @Autowired
    private JmsMessagingTemplate jmsMessagingTemplate;
    @Autowired
    private Topic topic;

    @Scheduled(fixedDelay = 3000)
    public void produceTopic(){
        jmsMessagingTemplate.convertAndSend(topic,"Topic生产消息"+ UUID.randomUUID().toString().substring(0,6));
    }
}
主启动类如下:
@SpringBootApplication
@EnableScheduling
public class App
{
    public static void main( String[] args )
    {
     SpringApplication.run(App.class,args);
    }
}
Topic消费者
POM文件同上
application.yml文件内容如下:
server:
  port: 5566

spring:
  activemq:
    broker-url: tcp://192.168.215.129:61616/
    user: admin
    password: admin
  jms:
    pub-sub-domain: true    # false表示队列 true表示topic 默认false

#自己定义队列名称
mytopic: boot-activemq-topic
创建Topic_Consumer
@Component
public class Topic_Consumer {
    @JmsListener(destination = "${mytopic}")
    public void receive(TextMessage text){
        try {
            System.out.println("消费者收到的Topic消息:"+text.getText());
        } catch (JMSException e) {
            e.printStackTrace();
        }
    }
}
创建主启动类
@SpringBootApplication
public class App
{
    public static void main( String[] args )
    {
        SpringApplication.run(App.class,args);
    }
}
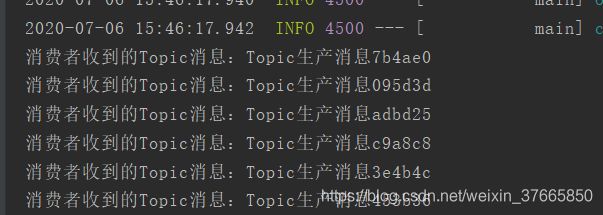
先启动消费者,后启动生产者,测试
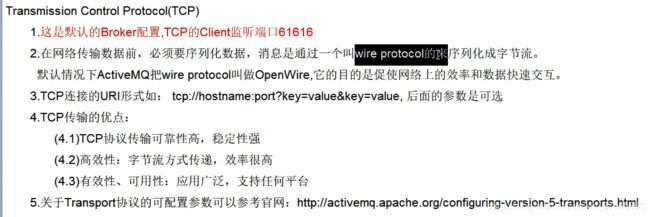
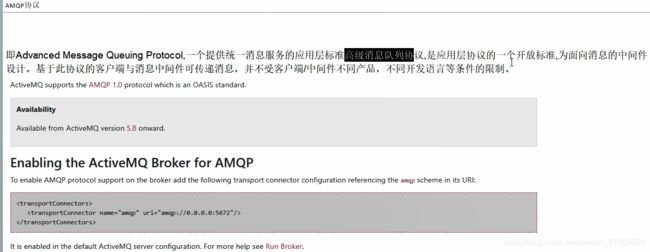
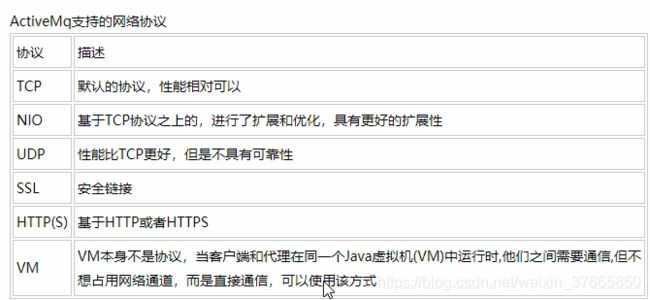
ActiveMQ的传输协议
ActiveMQ传输协议之NIO

修改activemq.xml,注意端口号61618,注释tcp的(也可不注释),添加nio的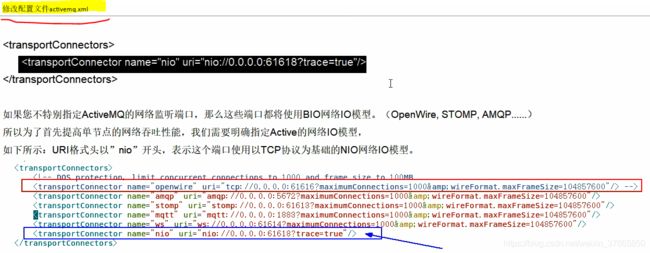
修改生产者消费者连接如下:![]()
完成!

修改activemq.xml注释掉nio,添加如下配置:

修改生产者和消费者的协议端口为61608,即可既支持NIO,又支持多个协议


