RabbitMQ的6种工作模式详解
目录
-
- RabbitMQ几种工作模式
- 1.Work queues
-
- 代码实例
-
- 1.生产者
-
- 1.application.yml
- 2.RabbitMqConfig
- 3.TestSend
- 2.消费者
-
- 1.配置相同,config相同
- 2.RabbitMqListen监听获取消息
- 3.运行
- 2.Publish发布订阅模式
-
- 代码实例
-
- 1.生产者
-
- 1.RabbitMqConfig
- 3.TestSend
- 2.消费者
-
- 1.配置相同,config相同
- 2.RabbitMqListen监听获取消息
- 3.运行
- 3.Routing路由模式
-
- 代码实例
-
- 1.生产者
-
- 1.RabbitMqConfig
- 3.TestSend
- 2.消费者
-
- 1.配置相同,config相同
- 2.RabbitMqListen监听获取消息
- 3.运行
- 4.Topics 统配符模式
-
- 代码实例
-
- 1.生产者
-
- 1.RabbitMqConfig
- 3.TestSend
- 2.消费者
-
- 1.配置相同,config相同
- 2.RabbitMqListen监听获取消息
- 3.运行
- 5.Header模式
- 6.RPC
RabbitMQ几种工作模式
1、Work queues
2、Publish/Subscribe
3、Routing
4、Topics
5、Header
6、RPC
1.Work queues
代码实例
新的依赖
<!--rabbitmq的包 -->
        <dependency>
            <groupId>org.springframework.boot</groupId>
            <artifactId>spring-boot-starter-amqp</artifactId>
        </dependency>
1.生产者
1.application.yml
server:
  port: 666
spring:
  rabbitmq:
    host: 127.0.0.1
    port: 5672
    username: guest
    password: guest
    virtual-host: /
2.RabbitMqConfig
@Configuration
public class RabbitMqConfig {
    //1.工作队列模式
    //声明队列,同时交给spring
    @Bean(name = "work-queue")
    public Queue queue0(){
        return new Queue("work-queue");
    }
  }
3.TestSend
测试发送:
@SpringBootTest
@RunWith(SpringRunner.class)
public class TestSend {
    //rabbitmq跟springboot整合,springboot提供了模板给我们使用。
    //例如:restTemplate redisTemplate thymeleafTemplate
    @Autowired
    RabbitTemplate rabbitTemplate;

    //1.工作模式
    @Test
    public void testSendWork(){
        //使用convertAndSend
        //1.当前队列的名称。2.你要携带的信息内容
        rabbitTemplate.convertAndSend("work-queue","这是qq一条消息!!");
    }
2.消费者
1.配置相同,config相同
2.RabbitMqListen监听获取消息
@Component
public class RabbitMqListen {
    @RabbitListener(queues = "work-queue")
    public void workQueue(String str){
        System.out.println("当前监听到了:"+str);
    }
3.运行
2.Publish发布订阅模式
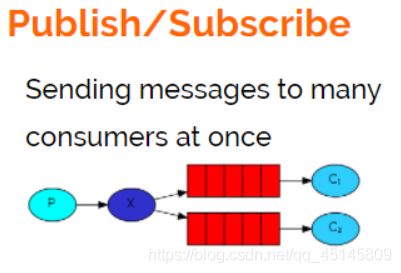
发布订阅模式:
1、每个消费者监听自己的队列。
2、生产者将消息发给broker,由交换机将消息转发到绑定此交换机的每个队列,每个绑定交换机的队列都将接收到消息
代码实例
1.生产者
1.RabbitMqConfig
//2.发布订阅模式
    //声明了队列
    @Bean(name = "queue1")
    public Queue queue(){
        return new Queue("publish-queue1");
    }

    @Bean(name = "queue2")
    public Queue queue2(){
        return new Queue("publish-queue2");
    }
    //广播的交换机
    //声明交换机
    @Bean
    public FanoutExchange fanoutExchange(){
        return new FanoutExchange("publish-exchange");
    }
    //将队列绑定到交换机
    @Bean
    Binding bindQueue1ToFanoutExchange(@Qualifier("queue1")Queue queue, FanoutExchange  fanoutExchange){
        return   BindingBuilder.bind(queue).to(fanoutExchange);
    }
    //将队列绑定到交换机
    @Bean
    Binding bindQueue2ToFanoutExchange(@Qualifier("queue2")Queue queue,FanoutExchange  fanoutExchange){
        return   BindingBuilder.bind(queue).to(fanoutExchange);
    }
3.TestSend
测试发送:
//2.广播订阅模式
    @Test
    public void testSendPublish(){
        Map map=new HashMap<>();
        map.put("name","张三");
        map.put("age",18);
        //1.交换机的名称  2.你的规则,发布订阅模式为空 3.消息的主题
        rabbitTemplate.convertAndSend("publish-exchange","",map);
    }
2.消费者
1.配置相同,config相同
2.RabbitMqListen监听获取消息
@RabbitListener(queues = "publish-queue1")
    public void  publishQueue(Map str){

        System.out.println("publish-queue1当前监听到了:"+str);
    }

    @RabbitListener(queues = "publish-queue2")
    public void  publishQueue2(Map str){

        System.out.println("publish-queue2 当前监听到了:"+str);
    }
3.运行
2个队列同时收到消息
3.Routing路由模式
路由模式:
1、每个消费者监听自己的队列,并且设置routingkey。
2、生产者将消息发给交换机,由交换机根据routingkey来转发消息到指定的队列。
代码实例
1.生产者
1.RabbitMqConfig
    //3.routing模式 -路由模式
    //声明了3个队列
    @Bean(name = "queue1")
    public Queue queue1(){
        return new Queue("routing-queue1");
    }
    @Bean(name = "queue2")
    public Queue queue2(){
        return new Queue("routing-queue2");
    }
    @Bean(name = "queue3")
    public Queue queue3(){
        return new Queue("routing-queue3");
    }
    //声明交换机,路由模式 DirectExchange
    @Bean
    public DirectExchange directExchange(){
        return new DirectExchange("routing-exchange");
    }
    //建立队列与交换机的关系
    @Bean
    public Binding bindQueue1ToDirectExchange(@Qualifier("queue1")Queue queue,DirectExchange directExchange){
        return BindingBuilder.bind(queue).to(directExchange).with("info");
    }
    @Bean
    public Binding bindQueue2ToDirectExchange(@Qualifier("queue2")Queue queue,DirectExchange directExchange){
        return BindingBuilder.bind(queue).to(directExchange).with("waring");
    }
    @Bean
    public Binding bindQueue3ToDirectExchange(@Qualifier("queue3")Queue queue,DirectExchange directExchange){
        return BindingBuilder.bind(queue).to(directExchange).with("error");
    }
3.TestSend
测试发送:
// 3.路由routing模式
    @Test
    public void testRoutingSend(){
        Map map = new HashMap<>();
        map.put("name","张三");
        map.put("age",18);

        rabbitTemplate.convertAndSend("routing-exchange","info",map);
        rabbitTemplate.convertAndSend("routing-exchange","error",map);

    }
2.消费者
1.配置相同,config相同
2.RabbitMqListen监听获取消息
    @RabbitListener(queues = "routing-queue1")
    public void  routingQueue1(Map str){
        System.out.println("监听到了info消息"+str);
    }

    @RabbitListener(queues = "routing-queue2")
    public void  routingQueue2(Map str){

        System.out.println("监听到了warning消息"+str);
    }
    @RabbitListener(queues = "routing-queue3")
    public void  routingQueue3(Map str){

        System.out.println("监听到了error消息"+str);
    }
3.运行
info和error收到
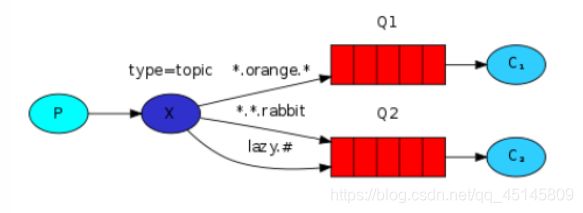
4.Topics 统配符模式
路由模式:
1、每个消费者监听自己的队列,并且设置带统配符的routingkey。
2、生产者将消息发给broker,由交换机根据routingkey来转发消息到指定的队列。
代码实例
1.生产者
1.RabbitMqConfig
    //4.topic 通配符的模式
    //声明队列
    @Bean(name = "topic-queue1")
    public Queue topicQueue1(){
        return new Queue("topic-queue1");
    }
    @Bean(name = "topic-queue2")
    public Queue topicQueue2(){
        return new Queue("topic-queue2");
    }
    @Bean(name = "topic-queue3")
    public Queue topicQueue3(){
        return new Queue("topic-queue3");
    }
    //声明交换机
    //通配符模式下的交换机
    @Bean
    public TopicExchange topicExchange(){
        return new TopicExchange("topic-exchange");
    }

    @Bean
    public Binding bindQueue1ToTopicExchange(@Qualifier("topic-queue1")Queue queue,TopicExchange topicExchange){
        //* 代表一个词
        //# 代表零个或者多个词
        return BindingBuilder.bind(queue).to(topicExchange).with("ex.123.123");
    }
    @Bean
    public Binding bindQueue2ToTopicExchange(@Qualifier("topic-queue2")Queue queue,TopicExchange topicExchange){
        return BindingBuilder.bind(queue).to(topicExchange).with("ex.*");
    }
    @Bean
    public Binding bindQueue3ToTopicExchange(@Qualifier("topic-queue3")Queue queue,TopicExchange topicExchange){
        return BindingBuilder.bind(queue).to(topicExchange).with("ex.#");
    }
3.TestSend
测试发送:
 //4.topic 通配符的模式
    @Test
    public void testTopicSend(){
        Map map = new HashMap<>();
        map.put("name","张三");
        map.put("age",20);

        rabbitTemplate.convertAndSend("topic-exchange","ex.123.123",map);
    }
2.消费者
1.配置相同,config相同
2.RabbitMqListen监听获取消息
    @RabbitListener(queues = "topic-queue1")
    public void  topicQueue1(Map str){

        System.out.println("监听到了info消息"+str);
    }
    @RabbitListener(queues = "topic-queue2")
    public void  topicQueue2(Map str){

        System.out.println("监听到了警告消息"+str);
    }
    @RabbitListener(queues = "topic-queue3")
    public void  topicQueue3(Map str){

        System.out.println("监听到了错误消息"+str);
    }
3.运行
只有队列三可以收到
5.Header模式
header模式与routing不同的地方在于,header模式取消routingkey,使用header中的key/value(键值对)匹配队列。
案例:
根据用户的通知设置去通知用户,设置接收Email的用户只接收Email,设置接收sms的用户只接收sms,设置两种通知类型都接收的则两种通知都有效。
6.RPC

RPC即客户端远程调用服务端的方法 ,使用MQ可以实现RPC的异步调用,基于Direct交换机实现,流程如下:
1、客户端即是生产者就是消费者,向RPC请求队列发送RPC调用消息,同时监听RPC响应队列。
2、服务端监听RPC请求队列的消息,收到消息后执行服务端的方法,得到方法返回的结果
3、服务端将RPC方法 的结果发送到RPC响应队列
4、客户端(RPC调用方)监听RPC响应队列,接收到RPC调用结果。


