Spring Boot 简介及功能案例 全
一、简介
二、Spring boot 应用零配置开发
三、Spring MVC 零配置创建与部署
四、Spring Boot 核心配置
五、日志配置
六、Freemarker & Thymeleaf 视图集成
七、SpringBoot 静态资源访问
八、SpringBoot 应用打包与部署
九、API 文档构建工具 - Swagger2
10、SpringBoot 应用热部署
11、分布式缓存 Ehcache 整合
12、全局异常与事务控制
13、SpringBoot 数据校验 - Validation
一、简介
Spring1.x版本:主要通过在xml文件种写bean,很繁琐。
Spring2.x版本:可以使用注解对Bean进行声明和注入,大大的减少了 xml配置文件,同时也大大简化了项目的开发。
Spring3.x、Spring4.x、Spring5.x版本:从 Spring3.x 开始提供了Java 配置方式,使用 Java 配置方式可以更好的理解你配置的 Bean,现在我们就处于这个时代,并且 Spring4.x、Spring5.x 和 Spring Boot 都推荐使用 java 配置的方式。
二、Spring boot 应用零配置开发
注解
@Component: 组件 没有明确规定其角色,作用在类级别上声明当前类为一个业务组件,被Spring Ioc 容
器维护
@Service: 在业务逻辑层(Service 层)类级别进行声明
@Repository: 在数据访问层(dao 层) 类级别声明
@Controller: 在展现层(MVC) 使用 标注当前类为一个控制器

@AutoWired: Spring 官方提供注解
@Inject: JSR-330 提供注解(标准制定方)
@Resource: JSR-250 提供注解

@Configuration: 作用与类上,将当前类声明为一个配置类,相当于一个xml 配置文件
@ComponentScan: 自动扫描指定包下标注有@Repository,@Service,@Controller
@Component: 注解的类并由Ioc 容器进行实例化和维护
@Bean: 作用于方法上,相当于xml 文件中<bean> 声明当前方法返回值为一个bean
@Value: 获取properties 文件指定key value值
三、Spring MVC 零配置创建与部署
1、创建 Maven 的 web 项目
2、pom.xml 添加坐标相关配置
<dependency>
	<groupId>org.springframeworkgroupId>
	<artifactId>spring-webartifactId>
	<version>5.2.4.RELEASEversion>
dependency>

<dependency>
	<groupId>org.springframeworkgroupId>
	<artifactId>spring-webmvcartifactId>
	<version>5.2.4.RELEASEversion>
dependency>

<dependency>
	<groupId>javax.servletgroupId>
	<artifactId>javax.servlet-apiartifactId>
	<version>3.0.1version>
	<scope>providedscope>
dependency>
<build>
	<finalName>springmvcfinalName>
	<plugins>

		<plugin>
			<groupId>org.apache.maven.pluginsgroupId>
			<artifactId>maven-compiler-pluginartifactId>
			<version>2.3.2version>
			<configuration>
				<source>11source>
				<target>11target>
				<encoding>utf-8encoding>
			configuration>
		plugin>
	plugins>
build>
3、controller层
@Controller
public class HelloController {
	@RequestMapping("/index")
	public String index(){
		return "index";
	}
}
4、在 WEB-INF/views 目录下创建 index.jsp(这里以jsp为模板)
Hello mvc!
5、入口代码实现
/**
* 实现 WebApplicationinitializer 接口的类都可以在web应用程序启动时被加载
*/
public class WebInitializer implements WebApplicationInitializer {
	@Override
	public void onStartup(ServletContext servletContext) throws ServletException{
		// 基于Java的配置类加载Spring的应用上下文
		AnnotationConfigWebApplicationContext ctx = new
		AnnotationConfigWebApplicationContext();
		// 注册 Mvc 配置信息
		ctx.register(MvcConfig.class);
		// 设置 ServletContext 上下文信息
		ctx.setServletContext(servletContext);
		// 配置转发器 Dispatcher
		ServletRegistration.Dynamic servlet =
		servletContext.addServlet("dispatcher",new DispatcherServlet(ctx));
		// 设置映射路径
		servlet.addMapping("/");
		// 启动时即实例化 Bean
		servlet.setLoadOnStartup(1);
	}
}
5、通过 Tomcat 启动项目并访问
四、Spring Boot 核心配置
1、设置 Banner 图标的自定义
Spring Boot 项目启动时默认加载 src/main/resources 目录下的 banner.txt 图标文件,如果该目录
文件未提供,则使用 Spring Boot 默认。在 main 目录下新建 resources 资源目录,并在该目录下新建
banner.txt 文本文件,可以设置自定义图标。
打开网址: http://patorjk.com/software/taag/#p=display&f=Graffiti&t=Type%20Something
在线生成图标对应文本并将文本内容copy 到 banner.txt 中
上面是官方的,这里给大家分享一个好玩的,来自别人,直接复制进banner.txt 中,就可以
${AnsiColor.BRIGHT_YELLOW}

//                          _ooOoo_                               //
//                         o8888888o                              //
//                         88" . "88                              //
//                         (| ^_^ |)                              //
//                         O\  =  /O                              //
//                      ____/`---'\____                           //
//                    .'  \\|     |//  `.                         //
//                   /  \\|||  :  |||//  \                        //
//                  /  _||||| -:- |||||-  \                       //
//                  |   | \\\  -  /// |   |                       //
//                  | \_|  ''\---/''  |   |                       //
//                  \  .-\__  `-`  ___/-. /                       //
//                ___`. .'  /--.--\  `. . ___                     //
//              ."" '<  `.___\_<|>_/___.'  >'"".                  //
//            | | :  `- \`.;`\ _ /`;.`/ - ` : | |                 //
//            \  \ `-.   \_ __\ /__ _/   .-` /  /                 //
//      ========`-.____`-.___\_____/___.-`____.-'========         //
//                           `=---='                              //
//      ^^^^^^^^^^^^^^^^^^^^^^^^^^^^^^^^^^^^^^^^^^^^^^^^^^        //
//            佛祖保佑       永不宕机     永无BUG                     //

${AnsiColor.BRIGHT_RED}
Application Version: ${application.version}${application.formatted-version}
Spring Boot Version: ${spring-boot.version}${spring-boot.formatted-version}
五、日志配置
在开发企业项目时,日志的输出对于系统 bug 定位无疑是一种比较有效的方式,也是项目后续进入生产环境后快速发现错误解决错误的一种有效手段,所以日志的使用对于项目也是比较重要的一块功能。
Spring Boot 默认使用 LogBack 日志系统,如果不需要更改为其他日志系统如 Log4j2 等,则无需多余的配置,LogBack 默认将日志打印到控制台上。如果要使用 LogBack,原则上是需要添加dependency 依赖的。
1、添加依赖
因为新建的 Spring Boot 项目一般都会引用 spring-boot-starter 或者 spring-boot-starter-web ,
而这两个起步依赖中都已经包含了对于 spring-boot-starter-logging 的依赖,所以,无需额外添加依
赖。
<dependency>
<groupId>org.springframework.bootgroupId>
<artifactId>spring-boot-starter-loggingartifactId>
dependency>
2、配置日志输出格式
注意:yml文件对格式要求较严格 一个空格都不能乱
logging:
	pattern:
		console: "%d{yyyy-MM-dd HH:mm:ss} [%thread] %-5level %logger- %msg%n"
		level: debug
	file:
		path: "."
		name: "springboot.log"
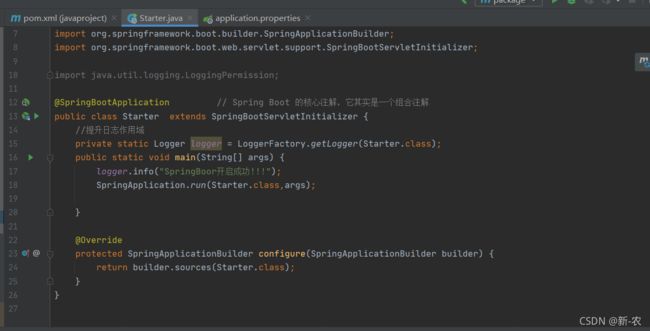
3、测试
@SpringBootApplication
public class Starter {
	private static Logger logger = LoggerFactory.getLogger(Starter.class);
	public static void main(String[] args) {
		logger.info("SpringBoot 应用开始启动...");
		SpringApplication.run(Starter.class);
	}
}
六、Freemarker & Thymeleaf 视图集成
Freemarker :
1、添加依赖
<dependency>
	<groupId>org.springframework.bootgroupId>
	<artifactId>spring-boot-starter-freemarkerartifactId>
dependency>
2、添加配置信息
spring:
#  视图
  freemarker:
#    缓存
    suffix: .ftl
#    响应类型
    content-type: text/html          #响应格式
#    后缀
    charset: utf-8
#    位置
    template-loader-path: classpath:/views/
3、测试
package com.yjxxt.controller;

import org.springframework.stereotype.Controller;
import org.springframework.ui.Model;
import org.springframework.web.bind.annotation.RequestMapping;

@Controller
public class FmController {


    @RequestMapping(value = "/index")
   // @ResponseBody
    public String index(Model model){
        model.addAttribute("msg","Hello,FreeMarker");
        return "index";
    }
}
Thymeleaf:
1、添加依赖
<dependency>
     <groupId>org.springframework.bootgroupId>
     <artifactId>spring-boot-starter-thymeleafartifactId>
 dependency>
2、添加配置信息
  #  thymeleaf视图
spring:
  thymeleaf:
    cache: false
    prefix: classpath:/html/       #不写  默认找  templates 下
3、测试
 @RequestMapping(value = "/temp")
    public String test(Model model){
        model.addAttribute("msg","Hello Thymeleaf!!!");
        return "haha";
    }
@RequestMapping(value = "/temp1")
    public String test01(Model model){
        model.addAttribute("msg","Hello Thymeleaf111!!!");
        return "xixi";
    }
七、SpringBoot 静态资源访问
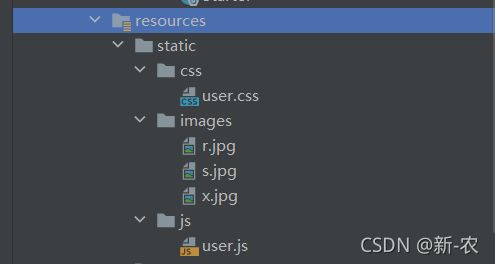
把静态资源统一存储,管理
1、默认静态资源路径
在 resources 目录下创建 static 或者 public 目录,存放 images、js、css 等静态资源文件
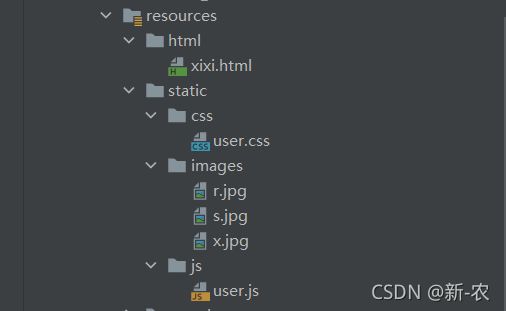
2、自定义静态资源路径
在application.yml添加静态资源加载目录
指定位置创建目录
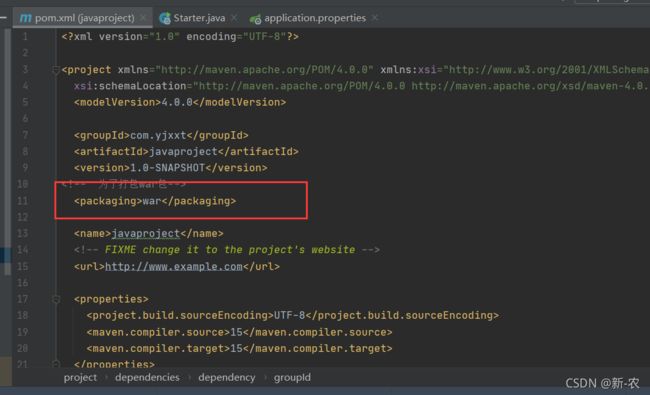
八、SpringBoot 应用打包与部署
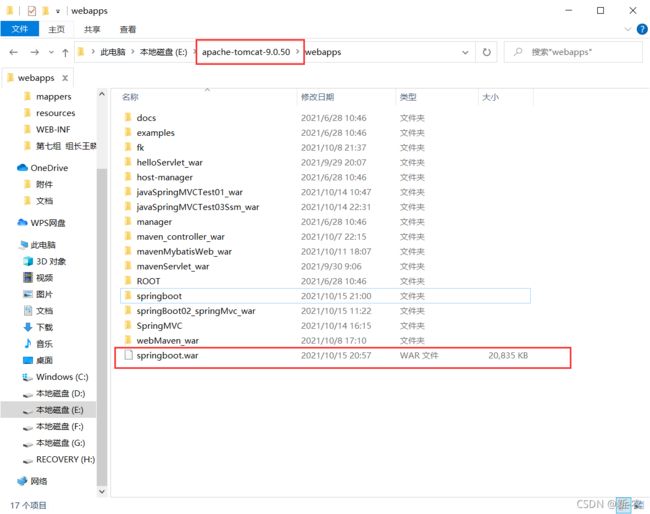
Jar 包部署
idea 下配置 clean compile package -Dmaven.test.skip=true执行打包命令,target 目录得到
待部署的项目文件。
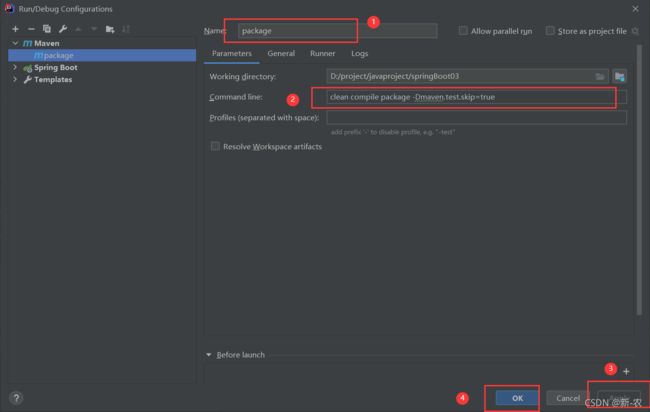
运行得到jar包
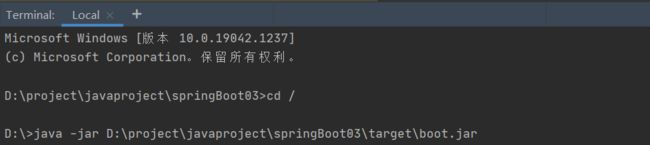
打开本地 dos窗口,执行 java -jar命令 部署已打好的 jar 包文件。
命令如下: java -jar jar包所在目录 就可以运行,访问了。 用完记得ctrl + c 关闭
war 包部署
1、修改pom.xm
2、添加tomact依赖包
构建 SpringBoot 应用时,引入的 spring-boot-starter-web 默认引入 Tomcat 容器,这里忽略掉
内容 Tomcat
<dependency>
<groupId>org.springframework.bootgroupId>
<artifactId>spring-boot-starter-tomcatartifactId>
<scope>providedscope>
dependency>
3、修改Starter
通过继承 SpringBootServletInitializer 类并重写 configure 方法来实现,在部署项目时指定外部 Tomcat 读取项目入口方法。
4、打包操作
- target 目录得到待部署的项目文件。
5、部署并访问
- 外部tomcat部署并访问
- 运行bin下的
startup.bat文件 即可在外部服务器访问
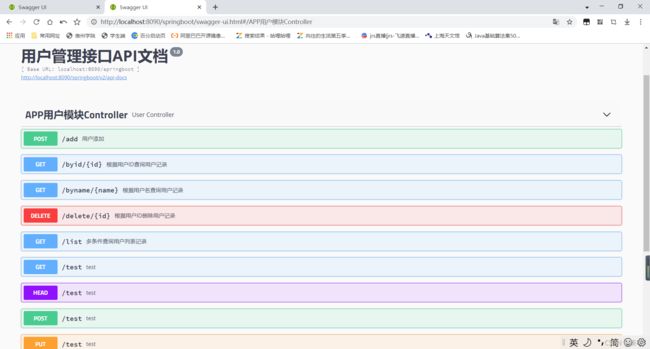
九、API 文档构建工具 - Swagger2
常用注解
@Api
	@Api:用在请求的类上,说明该类的作用
		tags="说明该类的作用"
@ApiOperation
	@ApiOperation:"用在请求的方法上,说明方法的作用"
		value="说明方法的作用"
		notes="方法的备注说明"
@ApiImplicitParams
	@ApiImplicitParams:用在请求的方法上,包含一组参数说明
	@ApiImplicitParam:用在 @ApiImplicitParams 注解中,指定一个请求参数的配置信息
		name:参数名
		value:参数的汉字说明、解释
		required:参数是否必须传
		paramType:参数放在哪个地方
			· header --> 请求参数的获取:@RequestHeader
			· query --> 请求参数的获取:@RequestParam
			· path(用于restful接口)--> 请求参数的获取:@PathVariable
			· body(不常用)
			· form(不常用)
		dataType:参数类型,默认String,其它值dataType="Integer"
		defaultValue:参数的默认值
@ApiResponses
	@ApiResponses:用于请求的方法上,表示一组响应
		@ApiResponse:用在@ApiResponses中,一般用于表达一个错误的响应信息
			code:数字,例如400
			message:信息,例如"请求参数没填好"
			response:抛出异常的类
@ApiModel
	@ApiModel:用于响应类上,表示一个返回响应数据的信息
			(这种一般用在post创建的时候,使用@RequestBody这样的场景,
			请求参数无法使用@ApiImplicitParam注解进行描述的时候)
		@ApiModelProperty:用在属性上,描述响应类的属性
案例使用
1、pom.xml 依赖添加
<dependency>
	<groupId>io.springfoxgroupId>
	<artifactId>springfox-swagger2artifactId>
	<version>2.9.2version>
dependency>
<dependency>
	<groupId>io.springfoxgroupId>
	<artifactId>springfox-swagger-uiartifactId>
	<version>2.9.2version>
dependency>
2、Controller 使用注解
@GetMapping("user/{userName}")
@ApiOperation(value = "根据用户名查询用户记录")
@ApiImplicitParam(name = "userName",value = "查询参数",required = true,paramType =
"path")
public User queryUserByUserName(@PathVariable String userName){
	return userService.queryUserByUserName(userName);
	}

@ApiOperation(value = "根据用户id查询用户记录")
@ApiImplicitParam(name = "userId",value = "查询参数",required = true,paramType =
"path")
@GetMapping("user/id/{userId}")
public User queryUserByUserId(@PathVariable Integer userId, HttpServletRequest
request){
	return userService.queryUserByUserId(userId);
}

@GetMapping("user/list")
@ApiOperation(value = "多条件查询用户列表记录")
public PageInfo<User> list(UserQuery userQuery){
	return userService.queryUserByParams(userQuery);
}

@PutMapping("user")
@ApiOperation(value = "用户添加")
@ApiImplicitParam(name = "user",value = "用户实体类",dataType = "User")
public ResultInfo saveUser(@RequestBody User user){
	ResultInfo resultInfo=new ResultInfo();
	try {
		userService.saveUser(user);
	} catch (ParamsException e) {
		e.printStackTrace();
		resultInfo.setCode(e.getCode());
		resultInfo.setMsg(e.getMsg());
	}catch (Exception e) {
		e.printStackTrace();
		resultInfo.setCode(300);
		resultInfo.setMsg("记录添加失败!");
	}
	return resultInfo;
}

@PostMapping("user")
@ApiOperation(value = "用户更新")
@ApiImplicitParam(name = "user",value = "用户实体类",dataType = "User")
public ResultInfo updateUser(@RequestBody User user){
	ResultInfo resultInfo=new ResultInfo();
	try {
		userService.updateUser(user);
	} catch (ParamsException e) {
		e.printStackTrace();
		resultInfo.setCode(e.getCode());
		resultInfo.setMsg(e.getMsg());
	}catch (Exception e) {
		e.printStackTrace();
		resultInfo.setCode(300);
		resultInfo.setMsg("记录更新失败!");
	}
	return resultInfo;
}

@PutMapping("user/{userId}")
@ApiOperation(value = "根据用户id删除用户记录")
@ApiImplicitParam(name = "userId",value = "查询参数",required = true,paramType =
"path")
public ResultInfo deleteUser(@PathVariable Integer userId){
		ResultInfo resultInfo=new ResultInfo();
		try {
			userService.deleteUser(userId);
		} catch (ParamsException e) {
			e.printStackTrace();
			resultInfo.setCode(e.getCode());
			resultInfo.setMsg(e.getMsg());
		}catch (Exception e) {
			e.printStackTrace();
			resultInfo.setCode(300);
			resultInfo.setMsg("记录删除失败!");
}
		return resultInfo;
}
3、JavaBean 使用注解
@ApiModel(description = "响应结果-用户信息")
public class User {

	@ApiModelProperty(value = "用户id",example = "0")
	private Integer id;

	@ApiModelProperty(value = "用户名")
	private String userName;

	@ApiModelProperty(value = "用户密码")
	private String userPwd;

}
4、UserQuery.java
@ApiModel(description = "用户模块条件查询类")
public class UserQuery {

	@ApiModelProperty(value = "分页页码",example = "1")
	private Integer pageNum = 1;

	@ApiModelProperty(value = "每页大小",example = "10")
	private Integer pageSize = 10;

	@ApiModelProperty(value = "用户名")
	private String userName;

}
5、ResultInfo.java
@ApiModel(description = "响应结果 - Model信息")
	public class ResultInfo {

		@ApiModelProperty(value = "响应状态码",example = "200")
		private Integer code=200;

		@ApiModelProperty(value = "响应消息结果")
		private String msg = "success";

		@ApiModelProperty(value = "响应具体结果信息")
		private Object result;
}
6、启动工程,浏览器访问 :… swagger-ui.html
10、SpringBoot 应用热部署
热部署,就是在应用正在运行的时候升级软件(增加业务/修改bug),却不需要重新启动应用。可自行等待刷新,也可ctrl+f9键重新编译
1、修改 Pom 文件,添加 DevTools 依赖
<dependency>
	<groupId>org.springframework.bootgroupId>
	<artifactId>spring-boot-devtoolsartifactId>

	<optional>trueoptional>
dependency>

<plugin>
	<groupId>org.springframework.bootgroupId>
	<artifactId>spring-boot-maven-pluginartifactId>
	<configuration>
	<fork>truefork>
	configuration>
plugin>
2、 application.yml 配置
spring:
//热部署配置
	devtools:
		restart:
		enabled: true
		//设置重启的目录,添加目录的文件需要restart
		additional-paths: src/main/java
		//解决项目自动重新编译后接口报404的问题
		poll-interval: 3000
		quiet-period: 1000
3、修改IDEA 配置
File -> Settings -> Compiler -> Build Project automatically
4、Registry 属性修改
ctrl + shift + alt + /,选择Registry,勾上 Compiler autoMake allow when app running
11、分布式缓存 Ehcache 整合
1、pom.xml
<!-- Ehcache -->
<dependency>
	<groupId>org.springframework.boot</groupId>
	<artifactId>spring-boot-starter-cache</artifactId>
</dependency>
<dependency>
	<groupId>net.sf.ehcache</groupId>
	<artifactId>ehcache</artifactId>
</dependency>
2、ehcahe.xml 文件添加
src/main/resources 目录下添加 ehcache.xml 文件,内容如下:
<ehcache name="mycache">

<diskStore path="C:\java\cache"/>

		<defaultCache
			maxElementsInMemory="10000"
			eternal="false"
			timeToIdleSeconds="120"
			timeToLiveSeconds="120"
			maxElementsOnDisk="10000000"
			diskExpiryThreadIntervalSeconds="120"
			memoryStoreEvictionPolicy="LRU">
	defaultCache>

	<cache
		name="users"
		eternal="false"
		maxElementsInMemory="100"
		overflowToDisk="false"
		diskPersistent="false"
		timeToIdleSeconds="0"
		timeToLiveSeconds="300"
		memoryStoreEvictionPolicy="LRU"/>
	ehcache>
3、application.yml 缓存配置
## Ehcache缓存配置
cache:
	ehcache:
		config: classpath:ehcache.xml
4、在 Starter 启动入口类中,添加 @EnableCaching 注解,启动缓存
@SpringBootApplication
@EnableCaching
@MapperScan("com.xxxx.springboot.dao")
public class Starter {
	public static void main(String[] args) {
		SpringApplication.run(Starter.class);
	}
}
12、全局异常与事务控制
事务支持
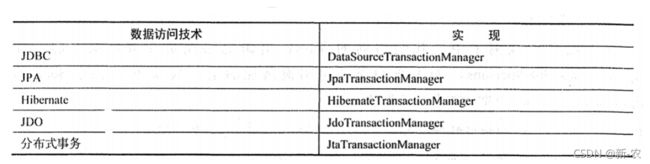
在使用 Jdbc 作为数据库访问技术时,Spring Boot 框架定义了基于 jdbc 的PlatformTransactionManager 接口的实现 DataSourceTransactionManager,并在 Spring Boot 应用启动时自动进行配置。如果使用 jpa 的话 Spring Boot 同样提供了对应实现。
Spring Boot 环境下对事务进行控制,事务实现由 Spring Boot 实现并自动配置,在使用时通过注解方
式标注相关方法加入事务控制即可。加在有事务的方法头上
@Transactional(propagation = Propagation.REQUIRED)
全局异常处理
@ControllerAdvice :全局异常处理
该注解组合了 @Component 注解功能,最常用的就是作为全局异常处理的切面类,同时通过该注解可以指定包扫描的范围。@ControllerAdvice 约定了几种可行的返回值,如果是直接返回 model 类的话,需要使用@ResponseBody 进行 json 转换
@ExceptionHandler :自定义异常处理
该注解在 Spring 3.X 版本引入,在处理异常时标注在方法级别,代表当前方法处理的异常类型有哪些具体应用以 Restful 接口为例,测试保存用户接口。
13、SpringBoot 数据校验 - Validation
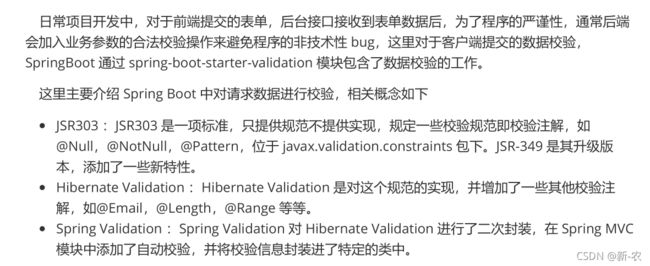
导入依赖
引入 spring-boot-starter-web 依赖时,该模块会自动依赖 spring-boot-starter-validation,所以一般不需要在单独导入依赖。
校验相关注解
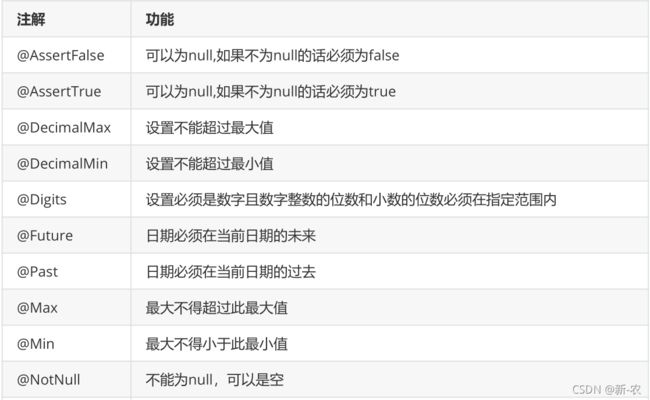
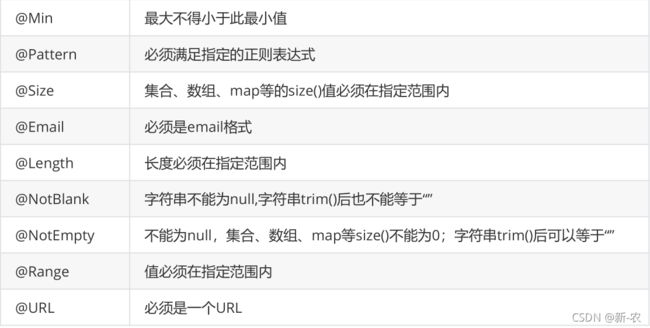
校验注解使用
加在相应的方法或这Java类里就行,这里就不一一演示了。