学习笔记0718----代码管理平台
代码管理平台
- 1. 代码管理平台
- 2. svn介绍
-
- 2.1 svn安装配置
- 2.2 linux上连接svn
- 2.3 windows上连接svn
- 3. git单机操作
- 4. github上建立远程仓库
- 5. 克隆远程仓库
- 6. 本地分支管理
- 7. 远程分支管理
- 8. 标签管理
- 9. git别名
- 10. 搭建git服务器
- 11. 搭建gitlab服务器
- 12. 使用gitlab
- 13. gitlib的备份与恢复
- 14. 扩展
1. 代码管理平台
- 版本控制,记录若干文件内容变化,以便将来查阅特定版本修订情况
- 版本管理工具发展简史,cvs svn git 参考http://luckypoem14.github.io/test/2012/04/24/scm-history/
- svn全称subversion,是一个开源版本控制系统,始于2000年
- git是linux创始人linus发起的,2005年发布,最初目的是更好管理linux内核代码
- git和svn不同在于git不需要依赖服务端就可以工作,即git是分布式的
- 关于git和svn的比较大家参考http://blog.lishiming.net/?p=305
- github是基于git的在线web页面代码托管平台,可以选择付费服务
- gitlab可以认为是一个开源的github,两者没有直接关系
2. svn介绍
2.1 svn安装配置
已经下好了svn的rpm包,使用yum localinstall 安装本地的svn rpm包
[root@linux-001 ~]# mkdir -p /data/svnroot/myproject   //创建版本库
[root@linux-001 ~]# svnadmin create /data/svnroot/myproject   //初始化版本库
[root@linux-001 ~]# ls !$
ls /data/svnroot/myproject
conf  db  format  hooks  locks  README.txt
[root@linux-001 ~]# cd !$/conf
cd /data/svnroot/myproject/conf
[root@linux-001 conf]# ls
authz  passwd  svnserve.conf
[root@linux-001 conf]# vim authz    //authz是权限配置文件
//添加以下内容
[groups]
admins = xihaji,user1   //设置用户组
[/]    //这儿的根指的是/data/svnroot/
@admins = rw  //设置组的权限
*= r   //除了组内用户其他用户的权限

[myproject:/]
user1 = rw


[root@linux-001 conf]# vim passwd  //passwd是用户密码配置文件
//添加以下内容
[users]
xihaji = 123qwe  //指定用户名和密码,左边用户名,右边密码
user1 = 123123

[root@linux-001 conf]# vim svnserve.conf   //svnserve.conf为svn的配置文件
//添加以下内容
[general]
anon-access = none
auth-access = write
password-db = passwd
authz-db = authz
realm = /data/svnroot/myproject

[root@linux-001 conf]# svnserve -d -r /data/svnroot    //-d表示后台启动,-r代表指定启动目录
[root@linux-001 conf]# ps aux |grep svn
root      14772  0.0  0.0 180732   800 ?        Ss   22:50   0:00 svnserve -d -r /data/svnroot
root      14878  0.0  0.1 112724   988 pts/2    S+   22:58   0:00 grep --color=auto svn
[root@linux-001 conf]# netstat -lntp |grep svn
tcp        0      0 0.0.0.0:3690            0.0.0.0:*               LISTEN      14772/svnserve
2.2 linux上连接svn
linux首次连接svn的时候需要使用 svn checkout svn://192.168.48.128/myproject 下载库,使用02机器远程连接01,然后用03下载svn上的文件。
[root@linux-02 ~]# svn checkout svn://192.168.48.128/myproject --username=xihaji
认证领域:  /data/svnroot/myproject
“xihaji”的密码:

-----------------------------------------------------------------------
注意!  你的密码,对于认证域:

    /data/svnroot/myproject

只能明文保存在磁盘上!  如果可能的话,请考虑配置你的系统,让 Subversion
可以保存加密后的密码。请参阅文档以获得详细信息。

你可以通过在“/root/.subversion/servers”中设置选项“store-plaintext-passwords”为“yes”或“no”,
来避免再次出现此警告。
-----------------------------------------------------------------------
保存未加密的密码(yes/no)?yes
取出版本 0。
[root@linux-02 ~]# ls
111              a.txt   grant                                       myproject
111.log          b.txt   mongodb-org-4.0.10-1.el7.x86_64.rpm         runlevel.txt
1.txt            Ctrl-C  mongodb-org-mongos-4.0.10-1.el7.x86_64.rpm  show
2.txt            c.txt   mongodb-org-server-4.0.10-1.el7.x86_64.rpm  subversion-1.7.14-14.el7.x86_64.rpm
3.txt            d.txt   mongodb-org-shell-4.0.10-1.el7.x86_64.rpm   vim-enhanced-7.4.160-5.el7.x86_64.rpm
anaconda-ks.cfg  e.txt   mongodb-org-tools-4.0.10-1.el7.x86_64.rpm
[root@linux-02 ~]# cd myproject/
[root@linux-02 myproject]# ls   //可以查看到没有任何文件
[root@linux-02 myproject]# cp /etc/passwd  .
[root@linux-02 myproject]# svn add passwd
A         passwd
[root@linux-02 myproject]# svn commit -m "add passwd"
正在增加       passwd
传输文件数据.
提交后的版本为 1。
[root@linux-02 myproject]#  vim passwd
[root@linux-02 myproject]# svn add passwd
svn:  警告: W150002: “/root/myproject/passwd”已纳入版本控制
svn: E200009: 因为一些目标已经版本化,所以不能增加全部目标
svn: E200009: 此请求操作的目标非法
[root@linux-02 myproject]# svn commit -m "ch passwd"
正在发送       passwd
传输文件数据.
提交后的版本为 2。
[root@linux-02 myproject]# vim passwd
[root@linux-02 myproject]# svn commit -m "ch passwd"
正在发送       passwd
传输文件数据.
提交后的版本为 3。
[root@linux-02 myproject]# svn delete passwd
D         passwd
[root@linux-02 myproject]# svn commit -m "delete passwd"
正在删除       passwd

提交后的版本为 4。
可以从03上查看文件的变化信息
[root@linux-003 ~]# svn checkout svn://192.168.48.128/myproject --username=xihaji
认证领域:  /data/svnroot/myproject
“xihaji”的密码:
认证领域:  /data/svnroot/myproject
用户名: xihaji
“xihaji”的密码:

-----------------------------------------------------------------------
注意!  你的密码,对于认证域:

    /data/svnroot/myproject

只能明文保存在磁盘上!  如果可能的话,请考虑配置你的系统,让 Subversion
可以保存加密后的密码。请参阅文档以获得详细信息。

你可以通过在“/root/.subversion/servers”中设置选项“store-plaintext-passwords”为“yes”或“no”,
来避免再次出现此警告。
-----------------------------------------------------------------------
保存未加密的密码(yes/no)?yes
A    myproject/passwd
取出版本 2。
[root@linux-003 ~]# cd myproject/
[root@linux-003 myproject]# ls
passwd
[root@linux-003 myproject]# svn up
正在升级 '.':
U    passwd
更新到版本 3。
[root@linux-003 myproject]# svn up
正在升级 '.':
版本 3。
[root@linux-003 myproject]# ls
passwd
[root@linux-003 myproject]# svn up
正在升级 '.':
D    passwd
更新到版本 4。
[root@linux-003 myproject]# ls
[root@linux-003 myproject]# svn log
------------------------------------------------------------------------
r4 | xihaji | 2019-07-18 23:17:37 +0800 (四, 2019-07-18) | 1 行

delete passwd
------------------------------------------------------------------------
r3 | xihaji | 2019-07-18 23:14:44 +0800 (四, 2019-07-18) | 1 行

add passwd
------------------------------------------------------------------------
r2 | xihaji | 2019-07-18 23:11:17 +0800 (四, 2019-07-18) | 1 行

add passwd
------------------------------------------------------------------------
r1 | xihaji | 2019-07-18 23:09:51 +0800 (四, 2019-07-18) | 1 行

add passwd
------------------------------------------------------------------------
[root@linux-003 myproject]#
2.3 windows上连接svn
- 下载svn客户端:https://tortoisesvn.net/index.zh.html
- 在windows上安装svn的客户端,在D盘上创建一个myproject的目录,在目录上右键,点击svn checkout


- svn服务器上刚才设置的文件被删除了,所以我们创建一个文件,传输到svn服务器上
- 鼠标右键刚才创建的文件,TortoiseSVN----add
- 再次鼠标右键创建的文件,会出现svn commit


在linux上我们可以去查看下文件,如下图

3. git单机操作
[root@linux-001 ~]# yum install -y git  //安装git
过程省略
[root@linux-001 ~]# mkdir /data/gitdata/   //创建git仓库
[root@linux-001 ~]# cd !$
cd /data/gitdata/
[root@linux-001 gitdata]# git init   //初始化git仓库
初始化空的 Git 版本库于 /data/gitdata/.git/
[root@linux-001 gitdata]# ls -la     //.git文件夹是git的配置文件路径
总用量 0
drwxr-xr-x 3 root root  18 7月  19 18:09 .
drwxr-xr-x 7 root root  99 7月  19 18:08 ..
drwxr-xr-x 7 root root 119 7月  19 18:09 .git
[root@linux-001 gitdata]# ls .git/
branches  config  description  HEAD  hooks  info  objects  refs
[root@linux-001 gitdata]# vim 1.txt  //创建一个文件
111

[root@linux-001 gitdata]# git add 1.txt   //给文件添加一个标记,和svn差不多
[root@linux-001 gitdata]# git commit -m 'add 1.txt'   //把文件推送到git仓库

*** Please tell me who you are.

Run

  git config --global user.email "[email protected]"
  git config --global user.name "Your Name"

to set your account's default identity.
Omit --global to set the identity only in this repository.

fatal: unable to auto-detect email address (got 'root@linux-001.(none)')
[root@linux-001 gitdata]# git config --global user.email "[email protected]"    //如上的报错,需要我们添加一个邮箱和用户
[root@linux-001 gitdata]# git config --global user.name "admin"
[root@linux-001 gitdata]# git commit -m 'add 1.txt'
[master(根提交) 965ceff] add 1.txt
 1 file changed, 778 insertions(+)
 create mode 100644 1.txt

[root@linux-001 gitdata]# vim 1.txt
## 随便修改1.txt内容##


[root@linux-001 gitdata]# git status   //可以查看到未提交文件的状态
# 位于分支 master
# 尚未暂存以备提交的变更:
#   (使用 "git add ..." 更新要提交的内容)
#   (使用 "git checkout -- ..." 丢弃工作区的改动)
#
#	修改:      1.txt
#
修改尚未加入提交(使用 "git add" 和/或 "git commit -a")
[root@linux-001 gitdata]# git diff 1.txt    //可以查看到文件和仓库文件的不同
diff --git a/1.txt b/1.txt
index f536dae..cf6664e 100644
--- a/1.txt
+++ b/1.txt
@@ -747,16 +747,4 @@
 1
 1
 1
-111
-12
-1
-1
-1
-1
-1
-111
-12
-1
-1
-1
-ooooo
+oooooooooo
[root@linux-001 gitdata]# vim 1.txt
## 随便修改1.txt内容##


[root@linux-001 gitdata]# git add 1.txt
[root@linux-001 gitdata]# git commit -m 'ch 1.txt'
[master 3a5d9a0] ch 1.txt
 1 file changed, 1 insertion(+), 17 deletions(-)
[root@linux-001 gitdata]# git status
# 位于分支 master
无文件要提交,干净的工作区
[root@linux-001 gitdata]# git diff 1.txt    //文件已经发送到git仓库,所以看不到文件有何不同

[root@linux-001 gitdata]# git log    //查看git所有提交记录
commit 4358e0b4bdfe25b08442455b8e2aec2e32e3ea51
Author: admin
Date:   Fri Jul 19 18:21:45 2019 +0800

    ch 1.txt

commit 3a5d9a06913d94523c8393e46b604f3a88f86891
Author: admin
Date:   Fri Jul 19 18:12:45 2019 +0800

    ch 1.txt

commit 965ceff648054c1d0ac328c7eb1b6911198e1615
Author: admin
Date:   Fri Jul 19 18:11:47 2019 +0800

    add 1.txt

[root@linux-001 gitdata]# git log --pretty=oneline   //一行显示git的提交记录
4358e0b4bdfe25b08442455b8e2aec2e32e3ea51 ch 1.txt
3a5d9a06913d94523c8393e46b604f3a88f86891 ch 1.txt
965ceff648054c1d0ac328c7eb1b6911198e1615 add 1.txt


## 如果不小心删除了文件,如何恢复文件?##
[root@linux-001 gitdata]# rm -rf 1.txt
[root@linux-001 gitdata]# ls
[root@linux-001 gitdata]# git checkout 1.txt   //可以使用git checkout 文件把文件从仓库中拉取下来
[root@linux-001 gitdata]# ls
1.txt

## 如果把仓库中的文件也删除,如何恢复操作? ##

[root@linux-001 gitdata]# git rm 1.txt
rm '1.txt'
[root@linux-001 gitdata]# git commit -m 'rm 1.txt'
[分离头指针 0a0dbbd] rm 1.txt
 1 file changed, 750 deletions(-)
 delete mode 100644 1.txt

[root@linux-001 gitdata]# git reflog   //查看所有历史版本,如果想回退到哪个版本,可以使用此命令查看
0a0dbbd HEAD@{0}: commit: rm 1.txt
4358e0b HEAD@{1}: checkout: moving from master to 4358e0b
067d072 HEAD@{2}: commit: rm 1.txt
4358e0b HEAD@{3}: commit: ch 1.txt
3a5d9a0 HEAD@{4}: commit: ch 1.txt
965ceff HEAD@{5}: commit (initial): add 1.txt
[root@linux-001 gitdata]# git reset --hard 4358e0b   //可以回退到某个版本
HEAD 现在位于 4358e0b ch 1.txt
[root@linux-001 gitdata]# git checkout 1.txt
[root@linux-001 gitdata]# ls
1.txt
4. github上建立远程仓库
-
在github上注册一个账号:https://github.com/
-
在github上创建一个仓库
-
在个人中心可以设置ssh,在linux服务器上生成一个公钥,把公钥复制进去 https://github.com/settings/keys 可以使服务器和github上的仓库进行通信。
-
点击近仓库的页面可以看到提示命令创建仓库,我们可以在linux上创建仓库,并且与github上的仓库通信。
服务器上创建仓库命令:
echo“#ceshi”>> README.md
git init
git add README.md
git commit -m“first commit”
git remote add origin https://github.com/Vantone/ceshi.git
git push -u origin master
[root@linux-001 tmp]# mkdir linux
[root@linux-001 tmp]# cd linux/
[root@linux-001 linux]# echo "# linux" >> README.md
[root@linux-001 linux]# git init
初始化空的 Git 版本库于 /tmp/linux/.git/
[root@linux-001 linux]# git add README.md
[root@linux-001 linux]# git commit -m "first commit"
[master(根提交) a43a7ca] first commit
 1 file changed, 1 insertion(+)
 create mode 100644 README.md
[root@linux-001 linux]# git remote add origin https://github.com/Vantone/linux.git
[root@linux-001 linux]# git push -u origin master
Username for 'https://github.com': Vantone
Password for 'https://[email protected]':
Counting objects: 3, done.
Writing objects: 100% (3/3), 211 bytes | 0 bytes/s, done.
Total 3 (delta 0), reused 0 (delta 0)
To https://github.com/Vantone/linux.git
 * [new branch]      master -> master
分支 master 设置为跟踪来自 origin 的远程分支 master

## 新添加一个rpm包推送到github仓库 ##
[root@linux-001 linux]# cp /root/git-1.8.3.1-20.el7.x86_64.rpm   .
[root@linux-001 linux]# ls
git-1.8.3.1-20.el7.x86_64.rpm  README.md
[root@linux-001 linux]# git add git-1.8.3.1-20.el7.x86_64.rpm
[root@linux-001 linux]# git commit -m 'software----git'
[master b56fcee] software----git
 1 file changed, 0 insertions(+), 0 deletions(-)
 create mode 100644 git-1.8.3.1-20.el7.x86_64.rpm
[root@linux-001 linux]# git remote add origin https://github.com/Vantone/linux.git
fatal: 远程 origin 已经存在。
[root@linux-001 linux]# git push -u origin master
Username for 'https://github.com': Vantone
Password for 'https://[email protected]':
Counting objects: 4, done.
Compressing objects: 100% (3/3), done.
Writing objects: 100% (3/3), 4.26 MiB | 382.00 KiB/s, done.
Total 3 (delta 0), reused 0 (delta 0)
To https://github.com/Vantone/linux.git
   a43a7ca..b56fcee  master -> master
分支 master 设置为跟踪来自 origin 的远程分支 master。
[root@linux-001 linux]#
5. 克隆远程仓库
[root@linux-001 git]# git clone https://github.com/Vantone/linux.git   //把远程仓库得文件拉取到本地
正克隆到 'linux'...
remote: Enumerating objects: 6, done.
remote: Counting objects: 100% (6/6), done.
remote: Compressing objects: 100% (4/4), done.
Unpacking objects:  66% (4/6)
remote: Total 6 (delta 0), reused 6 (delta 0), pack-reused 0
Unpacking objects: 100% (6/6), done.

[root@linux-001 git]# ls
linux
[root@linux-001 git]# cd linux/
[root@linux-001 linux]# ls
git-1.8.3.1-20.el7.x86_64.rpm  README.md
[root@linux-001 linux]#
6. 本地分支管理
[root@linux-001 gitdata]# git branch    //查看处于哪个分支
* master
[root@linux-001 gitdata]# git branch xihaji  //创建一个xihaji的分支
[root@linux-001 gitdata]# git  checkout xihaji   //切换到xihaji分支
切换到分支 'xihaji'
[root@linux-001 gitdata]# ls
1.txt
[root@linux-001 gitdata]# git branch
  master
* xihaji

[root@linux-001 gitdata]# echo '123dfasfjasdfj' > 2.txt  //增加一个文件
[root@linux-001 gitdata]# ls
1.txt  2.txt
[root@linux-001 gitdata]# git add .  //把文件同步到仓库
[root@linux-001 gitdata]# git commit -m "new file"
[xihaji f444ea0] new file
 1 file changed, 1 insertion(+)
 create mode 100644 2.txt
[root@linux-001 gitdata]# git checkout master
切换到分支 'master'
[root@linux-001 gitdata]# git merge xihaji   //合并分支
Merge made by the 'recursive' strategy.
 2.txt | 1 +
 1 file changed, 1 insertion(+)
 create mode 100644 2.txt
[root@linux-001 gitdata]# git branch
* master
  xihaji
如果master分支和xihaji分支都对2.txt进行了编辑,当合并时会提示冲突,需要先解决冲突才可以继续合并。
解决冲突的方法是在master分支下,编辑2.txt,改为xihaji分支里面2.txt的内容。 然后提交2.txt,再合并xihaji分支。
但是这样有一个问题,万一master分支更改的内容是我们想要的呢? 可以编辑2.txt内容,改为想要的,然后提交。切换到xihaji分支,然后合并master分支到xihaji分支即可(倒着合并)。合并分支有一个原则,那就是要把最新的分支合并到旧的分支。也就是说merge后面跟的分支名字一定是最新的分支。
git branch -d xihaji //删除分支
如果分支没有合并,删除之前会提示,那就不合并,强制删除
git branch -D xihaji
分支使用原则
对于分支的应用,建议大家以这样的原则来:
master分支是非常重要的,线上发布代码用这个分支,平时我们开发代码不要在这个分支上。
创建一个dev分支,专门用作开发,只有当发布到线上之前,才会把dev分支合并到master
开发人员应该在dev的基础上再分支成个人分支,个人分支(在自己pc上)里面开发代码,然后合并到dev分支
dev分支合并bob分支的命令是:
git checkout dev //先切换到dev分支,然后
git merge bob
7. 远程分支管理
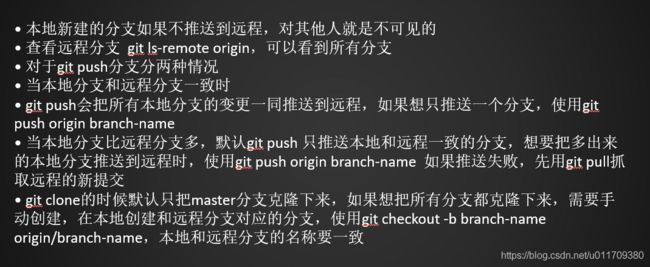
[root@linux-001 gitdata]# git ls-remote origin   //查看远程仓库的分支
2f497bd85fb22f2ab09e9590cd2d2dd1e1b23a6a	HEAD
2f497bd85fb22f2ab09e9590cd2d2dd1e1b23a6a	refs/heads/master
[root@linux-001 gitdata]# git branch xihaji    //创建xihaji的分支
[root@linux-001 gitdata]# git branch     //查看当前所在分支
* master
  xihaji
[root@linux-001 gitdata]# git checkout xihaji
切换到分支 'xihaji'
[root@linux-001 gitdata]# ls
1.txt  ceshi.md
[root@linux-001 gitdata]# cp /etc/passwd  .
[root@linux-001 gitdata]# git add passwd
[root@linux-001 gitdata]# git commit -m 'add passwd'
[xihaji d2c3dd8] add passwd
 1 file changed, 44 insertions(+)
 create mode 100644 passwd
[root@linux-001 gitdata]# git push origin xihaji   //把本地xihaji的分支发送到远程仓库
Username for 'https://github.com': Vantone
Password for 'https://[email protected]':
Counting objects: 4, done.
Compressing objects: 100% (3/3), done.
Writing objects: 100% (3/3), 1.03 KiB | 0 bytes/s, done.
Total 3 (delta 0), reused 0 (delta 0)
remote:
remote: Create a pull request for 'xihaji' on GitHub by visiting:
remote:      https://github.com/Vantone/ceshi/pull/new/xihaji
remote:
To https://github.com/Vantone/ceshi.git
 * [new branch]      xihaji -> xihaji
[root@linux-001 gitdata]#
8. 标签管理
[root@linux-001 gitdata]# git checkout master   //设置tag是需要在master分支上的
切换到分支 'master'
[root@linux-001 gitdata]# ls
1.txt  ceshi.md
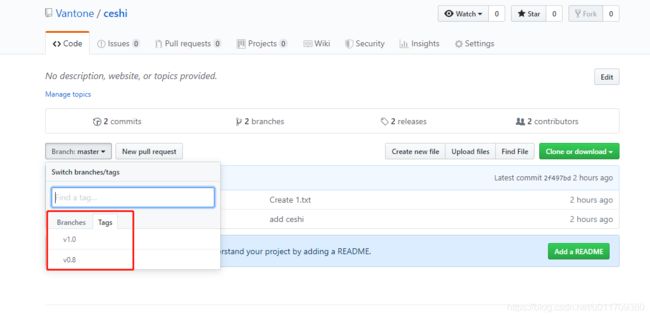
[root@linux-001 gitdata]# git tag v1.0   //给目前的文件添加标签
[root@linux-001 gitdata]# git tag     //查看所有标签
v1.0
[root@linux-001 gitdata]# git show v1.0    查看标签中的信息
commit 2f497bd85fb22f2ab09e9590cd2d2dd1e1b23a6a
Author: Vantone <[email protected]>
Date:   Sat Jul 20 14:59:16 2019 +0800

    Create 1.txt

diff --git a/1.txt b/1.txt
new file mode 100644
index 0000000..c35ed90
--- /dev/null
+++ b/1.txt
@@ -0,0 +1,5 @@
+git init
+git add README.md
+git commit -m“first commit”
+git remote add origin https://github.com/Vantone/ceshi.git
+git push -u origin master
[root@linux-001 gitdata]# git log --pretty=oneline     //查看历史所以变更
2f497bd85fb22f2ab09e9590cd2d2dd1e1b23a6a Create 1.txt
988039d63670f855f22f8684494e6368fe70e599 add ceshi
[root@linux-001 gitdata]# git tag v0.8  988039d6   //历史变更中添加标签
[root@linux-001 gitdata]# git tag
v0.8
v1.0
[root@linux-001 gitdata]# git tag -d v0.8    //删除标签
已删除 tag 'v0.8'(曾为 988039d)
[root@linux-001 gitdata]# git push origin v1.0   //把标签推送到远程仓库
Username for 'https://github.com': Vantone
Password for 'https://[email protected]':
Total 0 (delta 0), reused 0 (delta 0)
To https://github.com/Vantone/ceshi.git
 * [new tag]         v1.0 -> v1.0
[root@linux-001 gitdata]# git tag
v1.0
[root@linux-001 gitdata]#  git tag v0.8  988039d6
[root@linux-001 gitdata]# git push --tag origin   //把所有标签推送到远程仓库
Username for 'https://github.com': Vantone
Password for 'https://[email protected]':
Total 0 (delta 0), reused 0 (delta 0)
To https://github.com/Vantone/ceshi.git
 * [new tag]         v0.8 -> v0.8
9. git别名
[root@linux-001 .ssh]# git config
用法:git config [选项]

配置文件位置
    --global              使用全局配置文件
    --system              使用系统级配置文件
    --local               使用版本库级配置文件
    -f, --file <文件>     使用指定的配置文件
    --blob       read config from given blob object

操作
    --get                 获取值:name [value-regex]
    --get-all             获得所有的值:key [value-regex]
    --get-regexp          根据正则表达式获得值:name-regex [value-regex]
    --replace-all         替换所有匹配的变量:name value [value_regex]
    --add                 添加一个新的变量:name value
    --unset               删除一个变量:name [value-regex]
    --unset-all           删除所有匹配项:name [value-regex]
    --rename-section      重命名小节:old-name new-name
    --remove-section      删除一个小节:name
    -l, --list            列出所有
    -e, --edit            打开一个编辑器
    --get-color     找到配置的颜色:[默认]
    --get-colorbool
                          找到颜色设置:[stdout-is-tty]

类型
    --bool                值是 "true" 或 "false"
    --int                 值是十进制数
    --bool-or-int         值是 --bool or --int
    --path                值是一个路径(文件或目录名)

其它
    -z, --null            终止值是NUL字节
    --includes            查询时参照 include 指令递归查找

[root@linux-001 .ssh]# git config --list
[email protected]
user.name=admin
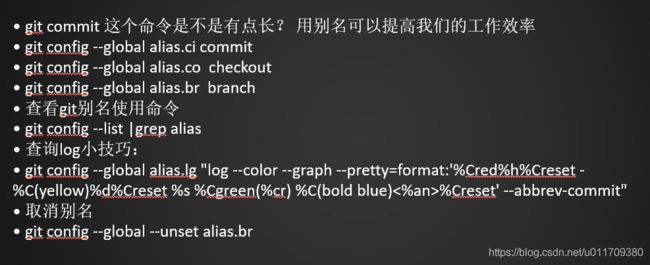
[root@linux-001 .ssh]# git config --global alias.ci commit
[root@linux-001 .ssh]#  git config --global alias.br  branch
[root@linux-001 .ssh]#  git config --global alias.co  checkout
[root@linux-001 .ssh]# git config --list |grep alias
alias.ci=commit
alias.br=branch
alias.co=checkout
[root@linux-001 .ssh]# git config --global alias.lg "log --color --graph --pretty=format:'%Cred%h%Creset -%C(yellow)%d%Creset %s %Cgreen(%cr) %C(bold blue)<%an>%Creset' --abbrev-commit"
[root@linux-001 .ssh]# cd /data/gitdata/
[root@linux-001 gitdata]# ls
1.txt  ceshi.md
[root@linux-001 gitdata]# git lg
* 2f497bd - (HEAD, tag: v1.0, origin/master, master) Create 1.txt (2 小时之前)
* 988039d - (tag: v0.8) add ceshi (2 小时之前)
[root@linux-001 gitdata]#
10. 搭建git服务器
服务器02设置为git服务器,设置如下:
[root@linux-02 ~]# yum install -y git
已加载插件:fastestmirror
Repository base is listed more than once in the configuration
Repository updates is listed more than once in the configuration
Repository extras is listed more than once in the configuration
Repository centosplus is listed more than once in the configuration
Repository contrib is listed more than once in the configuration
Loading mirror speeds from cached hostfile
epel/x86_64/metalink                                                                                                       | 5.4 kB  00:00:00
 * base: mirrors.aliyun.com
 * epel: download.nus.edu.sg
 * extras: mirrors.aliyun.com
 * updates: mirrors.aliyun.com
base                                                                                                                       | 3.6 kB  00:00:00
epel                                                                                                                       | 5.3 kB  00:00:00
extras                                                                                                                     | 3.4 kB  00:00:00
mariadb-main                                                                                                               | 2.9 kB  00:00:00
mariadb-maxscale                                                                                                           | 2.4 kB  00:00:00
mariadb-tools                                                                                                              | 2.9 kB  00:00:00
mongodb-org-4.0                                                                                                            | 2.5 kB  00:00:00
updates                                                                                                                    | 3.4 kB  00:00:00
zabbix                                                                                                                     | 2.9 kB  00:00:00
zabbix-non-supported                                                                                                       |  951 B  00:00:00
(1/2): epel/x86_64/updateinfo                                                                                              | 994 kB  00:00:44
(2/2): epel/x86_64/primary_db                                                                                              | 6.8 MB  00:05:27
正在解决依赖关系
--> 正在检查事务
---> 软件包 git.x86_64.0.1.8.3.1-20.el7 将被 安装
--> 正在处理依赖关系 perl-Git = 1.8.3.1-20.el7,它被软件包 git-1.8.3.1-20.el7.x86_64 需要
--> 正在处理依赖关系 perl(Term::ReadKey),它被软件包 git-1.8.3.1-20.el7.x86_64 需要
--> 正在处理依赖关系 perl(Git),它被软件包 git-1.8.3.1-20.el7.x86_64 需要
--> 正在处理依赖关系 perl(Error),它被软件包 git-1.8.3.1-20.el7.x86_64 需要
--> 正在检查事务
---> 软件包 perl-Error.noarch.1.0.17020-2.el7 将被 安装
---> 软件包 perl-Git.noarch.0.1.8.3.1-20.el7 将被 安装
---> 软件包 perl-TermReadKey.x86_64.0.2.30-20.el7 将被 安装
--> 解决依赖关系完成

依赖关系解决

==================================================================================================================================================
 Package                                架构                         版本                                     源                             大小
==================================================================================================================================================
正在安装:
 git                                    x86_64                       1.8.3.1-20.el7                           updates                       4.4 M
为依赖而安装:
 perl-Error                             noarch                       1:0.17020-2.el7                          base                           32 k
 perl-Git                               noarch                       1.8.3.1-20.el7                           updates                        55 k
 perl-TermReadKey                       x86_64                       2.30-20.el7                              base                           31 k

事务概要
==================================================================================================================================================
安装  1 软件包 (+3 依赖软件包)

总下载量:4.5 M
安装大小:22 M
Downloading packages:
(1/4): perl-Error-0.17020-2.el7.noarch.rpm                                                                                 |  32 kB  00:00:00
(2/4): perl-TermReadKey-2.30-20.el7.x86_64.rpm                                                                             |  31 kB  00:00:03
(3/4): perl-Git-1.8.3.1-20.el7.noarch.rpm                                                                                  |  55 kB  00:00:03
(4/4): git-1.8.3.1-20.el7.x86_64.rpm                                                                                       | 4.4 MB  00:00:04
--------------------------------------------------------------------------------------------------------------------------------------------------
总计                                                                                                              936 kB/s | 4.5 MB  00:00:04
Running transaction check
Running transaction test
Transaction test succeeded
Running transaction
  正在安装    : 1:perl-Error-0.17020-2.el7.noarch                                                                                             1/4
  正在安装    : perl-TermReadKey-2.30-20.el7.x86_64                                                                                           2/4
  正在安装    : git-1.8.3.1-20.el7.x86_64                                                                                                     3/4
  正在安装    : perl-Git-1.8.3.1-20.el7.noarch                                                                                                4/4
  验证中      : perl-Git-1.8.3.1-20.el7.noarch                                                                                                1/4
  验证中      : 1:perl-Error-0.17020-2.el7.noarch                                                                                             2/4
  验证中      : git-1.8.3.1-20.el7.x86_64                                                                                                     3/4
  验证中      : perl-TermReadKey-2.30-20.el7.x86_64                                                                                           4/4

已安装:
  git.x86_64 0:1.8.3.1-20.el7

作为依赖被安装:
  perl-Error.noarch 1:0.17020-2.el7              perl-Git.noarch 0:1.8.3.1-20.el7              perl-TermReadKey.x86_64 0:2.30-20.el7

完毕!

[root@linux-02 ~]# useradd  -s /usr/bin/git-shell git   //创建一个git的用户,但是不能使用ssh登录服务器
[root@linux-02 ~]# cd /home/git/
[root@linux-02 git]# mkdir .ssh
[root@linux-02 git]# cp /root/.ssh/authorized_keys  /home/git/.ssh/   //把服务器1的公钥放置到此目录
[root@linux-02 git]# ll !$
ll /home/git/.ssh/
总用量 4
-rw-r--r-- 1 root root 830 7月  20 17:33 authorized_keys     //注意此文件的权限是600

[root@linux-02 git]# chown -R git:git /home/git/.ssh    //设置git下目录的用户组和用户

[root@linux-02 git]# mkdir -p /data/gitdir     //创建一个git的仓库目录
[root@linux-02 git]# cd !$
cd /data/gitdir

[root@linux-02 gitdir]# git init --bare sample.git    //创建一个空仓库,因为是服务器,所以不需要写文件
初始化空的 Git 版本库于 /data/gitdir/sample.git/
[root@linux-02 gitdir]# ls
sample.git
[root@linux-02 gitdir]# ls sample.git/
branches  config  description  HEAD  hooks  info  objects  refs
[root@linux-02 gitdir]# chown -R  git:git sample.git/
服务器001设置为客户端,我们使用客户端连接服务器,具体操作如下:
[root@linux-001 git]# ssh [email protected]    //出现以下的报错信息说明git用户是不可以通过ssh登录服务器
fatal: Interactive git shell is not enabled.
hint: ~/git-shell-commands should exist and have read and execute access.
Connection to 192.168.48.130 closed.
[root@linux-001 git]# git clone [email protected]:/data/gitdir/sample.git  //克隆远程的仓库到本地
正克隆到 'sample'...
warning: 您似乎克隆了一个空版本库。
[root@linux-001 git]# ls
sample
[root@linux-001 git]# cd sample/
[root@linux-001 sample]# ls
[root@linux-001 sample]# echo 'git'>>1.txt
[root@linux-001 sample]# git add 1.txt
[root@linux-001 sample]# git commit -m "add 1.txt"
[master(根提交) 2e70f48] add 1.txt
 1 file changed, 1 insertion(+)
 create mode 100644 1.txt
[root@linux-001 sample]# git push
warning: push.default 未设置,它的默认值将会在 Git 2.0 由 'matching'
修改为 'simple'。若要不再显示本信息并在其默认值改变后维持当前使用习惯,
进行如下设置:

  git config --global push.default matching

若要不再显示本信息并从现在开始采用新的使用习惯,设置:

  git config --global push.default simple

参见 'git help config' 并查找 'push.default' 以获取更多信息。
('simple' 模式由 Git 1.7.11 版本引入。如果您有时要使用老版本的 Git,
为保持兼容,请用 'current' 代替 'simple' 模式)

No refs in common and none specified; doing nothing.
Perhaps you should specify a branch such as 'master'.
fatal: The remote end hung up unexpectedly
error: 无法推送一些引用到 '[email protected]:/data/gitdir/sample.git'


[root@linux-001 sample]# git push  origin master
Counting objects: 3, done.
Writing objects: 100% (3/3), 198 bytes | 0 bytes/s, done.
Total 3 (delta 0), reused 0 (delta 0)
remote: error: insufficient permission for adding an object to repository database ./objects
remote: fatal: failed to write object
error: unpack failed: unpack-objects abnormal exit    //出现这个报错信息,说明我们服务器git仓库的属组属主是设置错误的
To [email protected]:/data/gitdir/sample.git
 ! [remote rejected] master -> master (unpacker error)
error: 无法推送一些引用到 '[email protected]:/data/gitdir/sample.git'

[root@linux-001 sample]# git config --global push.default simple

[root@linux-001 sample]# git push  origin master
Counting objects: 3, done.
Writing objects: 100% (3/3), 198 bytes | 0 bytes/s, done.
Total 3 (delta 0), reused 0 (delta 0)
To [email protected]:/data/gitdir/sample.git
 * [new branch]      master -> master
[root@linux-001 sample]#
11. 搭建gitlab服务器
[root@linux-001 ~]# vim /etc/yum.repos.d/gitlab-ce.repo

[gitlab-ce]
name=Gitlab CE Repository
baseurl=https://mirrors.tuna.tsinghua.edu.cn/gitlab-ce/yum/el$releasever/
gpgcheck=0
enabled=1


[root@linux-001 ~]# yum install -y gitlab-ce
已加载插件:fastestmirror
Loading mirror speeds from cached hostfile
 * base: mirrors.aliyun.com
 * epel: mirrors.aliyun.com
 * extras: mirrors.163.com
 * updates: mirrors.tuna.tsinghua.edu.cn
gitlab-ce                                                                                                                  | 2.9 kB  00:00:00
gitlab-ce/7/primary_db                                                                                                     | 2.9 MB  00:00:01
正在解决依赖关系
--> 正在检查事务
---> 软件包 gitlab-ce.x86_64.0.12.0.3-ce.0.el7 将被 安装
--> 正在处理依赖关系 policycoreutils-python,它被软件包 gitlab-ce-12.0.3-ce.0.el7.x86_64 需要
--> 正在检查事务
---> 软件包 policycoreutils-python.x86_64.0.2.5-29.el7_6.1 将被 安装
--> 正在处理依赖关系 policycoreutils = 2.5-29.el7_6.1,它被软件包 policycoreutils-python-2.5-29.el7_6.1.x86_64 需要
--> 正在处理依赖关系 setools-libs >= 3.3.8-4,它被软件包 policycoreutils-python-2.5-29.el7_6.1.x86_64 需要
--> 正在处理依赖关系 libsemanage-python >= 2.5-14,它被软件包 policycoreutils-python-2.5-29.el7_6.1.x86_64 需要
--> 正在处理依赖关系 audit-libs-python >= 2.1.3-4,它被软件包 policycoreutils-python-2.5-29.el7_6.1.x86_64 需要
--> 正在处理依赖关系 python-IPy,它被软件包 policycoreutils-python-2.5-29.el7_6.1.x86_64 需要
--> 正在处理依赖关系 libqpol.so.1(VERS_1.4)(64bit),它被软件包 policycoreutils-python-2.5-29.el7_6.1.x86_64 需要
--> 正在处理依赖关系 libqpol.so.1(VERS_1.2)(64bit),它被软件包 policycoreutils-python-2.5-29.el7_6.1.x86_64 需要
--> 正在处理依赖关系 libcgroup,它被软件包 policycoreutils-python-2.5-29.el7_6.1.x86_64 需要
--> 正在处理依赖关系 libapol.so.4(VERS_4.0)(64bit),它被软件包 policycoreutils-python-2.5-29.el7_6.1.x86_64 需要
--> 正在处理依赖关系 checkpolicy,它被软件包 policycoreutils-python-2.5-29.el7_6.1.x86_64 需要
--> 正在处理依赖关系 libqpol.so.1()(64bit),它被软件包 policycoreutils-python-2.5-29.el7_6.1.x86_64 需要
--> 正在处理依赖关系 libapol.so.4()(64bit),它被软件包 policycoreutils-python-2.5-29.el7_6.1.x86_64 需要
--> 正在检查事务
---> 软件包 audit-libs-python.x86_64.0.2.8.4-4.el7 将被 安装
---> 软件包 checkpolicy.x86_64.0.2.5-8.el7 将被 安装
---> 软件包 libcgroup.x86_64.0.0.41-20.el7 将被 安装
---> 软件包 libsemanage-python.x86_64.0.2.5-14.el7 将被 安装
---> 软件包 policycoreutils.x86_64.0.2.5-29.el7 将被 升级
---> 软件包 policycoreutils.x86_64.0.2.5-29.el7_6.1 将被 更新
---> 软件包 python-IPy.noarch.0.0.75-6.el7 将被 安装
---> 软件包 setools-libs.x86_64.0.3.3.8-4.el7 将被 安装
--> 解决依赖关系完成

依赖关系解决

==================================================================================================================================================
 Package                                    架构                       版本                                   源                             大小
==================================================================================================================================================
正在安装:
 gitlab-ce                                  x86_64                     12.0.3-ce.0.el7                        gitlab-ce                     611 M
为依赖而安装:
 audit-libs-python                          x86_64                     2.8.4-4.el7                            base                           76 k
 checkpolicy                                x86_64                     2.5-8.el7                              base                          295 k
 libcgroup                                  x86_64                     0.41-20.el7                            base                           66 k
 libsemanage-python                         x86_64                     2.5-14.el7                             base                          113 k
 policycoreutils-python                     x86_64                     2.5-29.el7_6.1                         updates                       456 k
 python-IPy                                 noarch                     0.75-6.el7                             base                           32 k
 setools-libs                               x86_64                     3.3.8-4.el7                            base                          620 k
为依赖而更新:
 policycoreutils                            x86_64                     2.5-29.el7_6.1                         updates                       916 k

事务概要
==================================================================================================================================================
安装  1 软件包 (+7 依赖软件包)
升级           ( 1 依赖软件包)

总下载量:613 M
Downloading packages:
Delta RPMs disabled because /usr/bin/applydeltarpm not installed.
(1/9): audit-libs-python-2.8.4-4.el7.x86_64.rpm                                                                            |  76 kB  00:00:00
(2/9): libcgroup-0.41-20.el7.x86_64.rpm                                                                                    |  66 kB  00:00:00
(3/9): libsemanage-python-2.5-14.el7.x86_64.rpm                                                                            | 113 kB  00:00:00
(4/9): python-IPy-0.75-6.el7.noarch.rpm                                                                                    |  32 kB  00:00:00
(5/9): checkpolicy-2.5-8.el7.x86_64.rpm                                                                                    | 295 kB  00:00:00
(6/9): policycoreutils-python-2.5-29.el7_6.1.x86_64.rpm                                                                    | 456 kB  00:00:01
(7/9): setools-libs-3.3.8-4.el7.x86_64.rpm                                                                                 | 620 kB  00:00:01
(8/9): policycoreutils-2.5-29.el7_6.1.x86_64.rpm                                                                           | 916 kB  00:00:04
(9/9): gitlab-ce-12.0.3-ce.0.el7.x86_64.rpm                                                                                | 611 MB  00:01:50
--------------------------------------------------------------------------------------------------------------------------------------------------
总计                                                                                                              5.6 MB/s | 613 MB  00:01:50
Running transaction check
Running transaction test
Transaction test succeeded
Running transaction
  正在安装    : setools-libs-3.3.8-4.el7.x86_64                                                                                              1/10
  正在更新    : policycoreutils-2.5-29.el7_6.1.x86_64                                                                                        2/10
  正在安装    : checkpolicy-2.5-8.el7.x86_64                                                                                                 3/10
  正在安装    : python-IPy-0.75-6.el7.noarch                                                                                                 4/10
  正在安装    : libcgroup-0.41-20.el7.x86_64                                                                                                 5/10
  正在安装    : libsemanage-python-2.5-14.el7.x86_64                                                                                         6/10
  正在安装    : audit-libs-python-2.8.4-4.el7.x86_64                                                                                         7/10
  正在安装    : policycoreutils-python-2.5-29.el7_6.1.x86_64                                                                                 8/10
  正在安装    : gitlab-ce-12.0.3-ce.0.el7.x86_64                                                                                             9/10
  清理        : policycoreutils-2.5-29.el7.x86_64                                                                                           10/10
It looks like GitLab has not been configured yet; skipping the upgrade script.

       *.                  *.
      ***                 ***
     *****               *****
    .******             *******
    ********            ********
   ,,,,,,,,,***********,,,,,,,,,
  ,,,,,,,,,,,*********,,,,,,,,,,,
  .,,,,,,,,,,,*******,,,,,,,,,,,,
      ,,,,,,,,,*****,,,,,,,,,.
         ,,,,,,,****,,,,,,
            .,,,***,,,,
                ,*,.


     _______ __  __          __
    / ____(_) /_/ /   ____ _/ /_
   / / __/ / __/ /   / __ `/ __ \
  / /_/ / / /_/ /___/ /_/ / /_/ /
  \____/_/\__/_____/\__,_/_.___/


Thank you for installing GitLab!
GitLab was unable to detect a valid hostname for your instance.
Please configure a URL for your GitLab instance by setting `external_url`
configuration in /etc/gitlab/gitlab.rb file.
Then, you can start your GitLab instance by running the following command:
  sudo gitlab-ctl reconfigure

For a comprehensive list of configuration options please see the Omnibus GitLab readme
https://gitlab.com/gitlab-org/omnibus-gitlab/blob/master/README.md

  验证中      : audit-libs-python-2.8.4-4.el7.x86_64                                                                                         1/10
  验证中      : policycoreutils-python-2.5-29.el7_6.1.x86_64                                                                                 2/10
  验证中      : libsemanage-python-2.5-14.el7.x86_64                                                                                         3/10
  验证中      : libcgroup-0.41-20.el7.x86_64                                                                                                 4/10
  验证中      : gitlab-ce-12.0.3-ce.0.el7.x86_64                                                                                             5/10
  验证中      : python-IPy-0.75-6.el7.noarch                                                                                                 6/10
  验证中      : checkpolicy-2.5-8.el7.x86_64                                                                                                 7/10
  验证中      : policycoreutils-2.5-29.el7_6.1.x86_64                                                                                        8/10
  验证中      : setools-libs-3.3.8-4.el7.x86_64                                                                                              9/10
  验证中      : policycoreutils-2.5-29.el7.x86_64                                                                                           10/10

已安装:
  gitlab-ce.x86_64 0:12.0.3-ce.0.el7

作为依赖被安装:
  audit-libs-python.x86_64 0:2.8.4-4.el7          checkpolicy.x86_64 0:2.5-8.el7                          libcgroup.x86_64 0:0.41-20.el7
  libsemanage-python.x86_64 0:2.5-14.el7          policycoreutils-python.x86_64 0:2.5-29.el7_6.1          python-IPy.noarch 0:0.75-6.el7
  setools-libs.x86_64 0:3.3.8-4.el7

作为依赖被升级:
  policycoreutils.x86_64 0:2.5-29.el7_6.1

完毕!

[root@linux-001 ~]# gitlab-ctl reconfigure   //安装gitlib
省略

[root@linux-001 ~]# gitlab-ctl  start
ok: run: alertmanager: (pid 25597) 1s
ok: run: gitaly: (pid 25610) 0s
ok: run: gitlab-monitor: (pid 25627) 0s
ok: run: gitlab-workhorse: (pid 25629) 1s
ok: run: grafana: (pid 25641) 0s
ok: run: logrotate: (pid 25649) 1s
ok: run: nginx: (pid 25661) 0s
ok: run: node-exporter: (pid 25666) 1s
ok: run: postgres-exporter: (pid 25670) 0s
ok: run: postgresql: (pid 25675) 1s
ok: run: prometheus: (pid 25684) 0s
ok: run: redis: (pid 25692) 0s
ok: run: redis-exporter: (pid 25696) 1s
ok: run: sidekiq: (pid 25702) 0s
ok: run: unicorn: (pid 25708) 1s
[root@linux-001 ~]#
输入服务器的IP地址,打开发现502,由于gitlab需要服务器有最少4g的空闲内存,所以我们设置下虚拟机的内存大小,然后执行命令:chmod -R 755 /var/log/gitlab

12. 使用gitlab
[root@linux-001 ~]# netstat -lntp
Active Internet connections (only servers)
Proto Recv-Q Send-Q Local Address           Foreign Address         State       PID/Program name
tcp        0      0 0.0.0.0:40231           0.0.0.0:*               LISTEN      -
tcp        0      0 192.168.48.128:27017    0.0.0.0:*               LISTEN      9599/mongod
tcp        0      0 127.0.0.1:27017         0.0.0.0:*               LISTEN      9599/mongod
tcp        0      0 127.0.0.1:9100          0.0.0.0:*               LISTEN      10188/node_exporter
tcp        0      0 127.0.0.1:9229          0.0.0.0:*               LISTEN      10154/gitlab-workho
tcp        0      0 0.0.0.0:111             0.0.0.0:*               LISTEN      1/systemd
tcp        0      0 127.0.0.1:8080          0.0.0.0:*               LISTEN      10279/unicorn maste
tcp        0      0 127.0.0.1:9168          0.0.0.0:*               LISTEN      10187/puma 3.12.0 (
tcp        0      0 0.0.0.0:80              0.0.0.0:*               LISTEN      10155/nginx: master
tcp        0      0 0.0.0.0:20048           0.0.0.0:*               LISTEN      9376/rpc.mountd
tcp        0      0 127.0.0.1:8082          0.0.0.0:*               LISTEN      10149/sidekiq 5.2.7
tcp        0      0 127.0.0.1:9236          0.0.0.0:*               LISTEN      10239/gitaly
tcp        0      0 0.0.0.0:22              0.0.0.0:*               LISTEN      9317/sshd
tcp        0      0 127.0.0.1:3000          0.0.0.0:*               LISTEN      10178/grafana-serve
tcp        0      0 127.0.0.1:25            0.0.0.0:*               LISTEN      9799/master
tcp        0      0 0.0.0.0:53081           0.0.0.0:*               LISTEN      9332/rpc.statd
tcp        0      0 0.0.0.0:8060            0.0.0.0:*               LISTEN      10155/nginx: master
tcp        0      0 127.0.0.1:9121          0.0.0.0:*               LISTEN      10180/redis_exporte
tcp        0      0 0.0.0.0:2049            0.0.0.0:*               LISTEN      -
tcp        0      0 127.0.0.1:9090          0.0.0.0:*               LISTEN      10176/prometheus
tcp        0      0 127.0.0.1:9187          0.0.0.0:*               LISTEN      10182/postgres_expo
tcp        0      0 127.0.0.1:9093          0.0.0.0:*               LISTEN      10184/alertmanager
tcp6       0      0 :::3306                 :::*                    LISTEN      9698/mysqld
tcp6       0      0 :::111                  :::*                    LISTEN      1/systemd
tcp6       0      0 ::1:9168                :::*                    LISTEN      10187/puma 3.12.0 (
tcp6       0      0 :::20048                :::*                    LISTEN      9376/rpc.mountd
tcp6       0      0 :::42260                :::*                    LISTEN      -
tcp6       0      0 :::22                   :::*                    LISTEN      9317/sshd
tcp6       0      0 ::1:25                  :::*                    LISTEN      9799/master
tcp6       0      0 :::2049                 :::*                    LISTEN      -
tcp6       0      0 :::33508                :::*                    LISTEN      9332/rpc.statd
tcp6       0      0 :::9094                 :::*                    LISTEN      10184/alertmanager


[root@linux-001 ~]# ps aux |grep nginx
root      10147  0.0  0.0   4228   352 ?        Ss   02:32   0:00 runsv nginx
root      10152  0.0  0.0   4372   352 ?        S    02:32   0:00 svlogd -tt /var/log/gitlab/nginx
root      10155  0.0  0.0  39380  3404 ?        Ss   02:32   0:00 nginx: master process /opt/gitlab/embedded/sbin/nginx -p /var/opt/gitlab/nginx
gitlab-+  10199  0.0  0.1  43944  6612 ?        S    02:32   0:00 nginx: worker process
gitlab-+  10200  0.0  0.0  39540  1656 ?        S    02:32   0:00 nginx: cache manager process
root      11211  0.0  0.0 112724   988 pts/0    R+   02:39   0:00 grep --color=auto nginx

[root@linux-001 ~]# ls /var/opt/gitlab/nginx/conf/
gitlab-http.conf  nginx.conf  nginx-status.conf
13. gitlib的备份与恢复
14. 扩展
扩展内容
同学分享的svn文档  http://note.youdao.com/noteshare?id=1bb87a28a2973ae5722bf765882c2d8f
svn 多仓库管理  http://elim.iteye.com/blog/1171108
svn+ssh  http://www.linuxfly.org/post/450/
svn清除保存的用户名和密码  http://holy2010.blog.51cto.com/1086044/645944
svn命令详解  http://blog.sina.com.cn/s/blog_963453200101eiuq.html
svn的钩子  http://coolnull.com/1716.html
gitlab修改端口  http://blog.csdn.net/arybd/article/details/54635295
修改主机名 http://www.mamicode.com/info-detail-1316828.html
第三方邮件 http://blog.csdn.net/liuruiqun/article/details/50000213
server ssh 端口并不是22   http://www.cnblogs.com/limx/p/5709101.html   http://www.linuxidc.com/Linux/2017-02/141043.htm
应该修改  /opt/gitlab/embedded/service/gitlab-rails/config/gitlab.yml
“# If you use non-standard ssh port you need to specify it”
ssh_port: xxxxx
gitlab的钩子相关配置 http://fighter.blog.51cto.com/1318618/1670667


