转:Windows Azure Platform体验(3):Azure AppFabric
Windows Azure Platform有Windows Azure、SQL Azure、Azure AppFabric三部分。
使用AppFabric,可以轻松将内部部署应用程序与云连接。通过在内部部署的IT应用程序和基于云的服务之间启用安全连接和消息传送,AppFabric提供标识管理和防火墙友好的消息传送,从而保护您的资产。
这节我们体验Azure AppFabric,必备软件:
- Microsoft Visual Studio 2010
- Windows Azure AppFabric SDK
- Windows Azure Platform账户
这次体验有下面几个步骤,分别是:
创建AppFabric项目
AppFabirc由Service Bus和Access Control Service组成,为了使用这些功能和特性,我们必须创建一个Service Project。
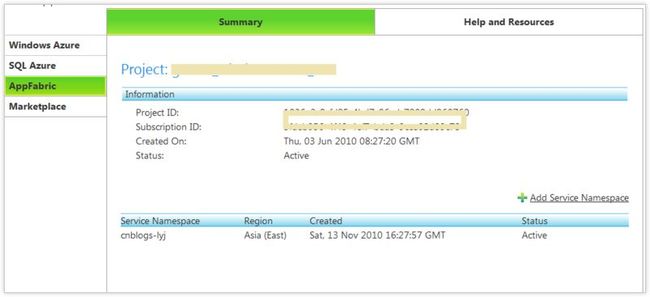
首先我们使用账号登录Azure AppFabric门户,网址为http://appfabric.azure.com,你可以看到下面页面,当前没有创建任何服务空间,我们需要添加一个服务空间。服务空间为暴露于Service Bus的应用程序定义了应用程序边界,以及用来为应用程序构建Service Bus端点。我们点击“Add Service Namespace”:
进入创建服务空间页面,输入服务空间名称、选择区域,选择服务总线连接包,可选0、5、25、100、500连接数。然后点击“Create”按钮:
激活服务时请耐心等待,可能需要数分钟时间。一旦命名空间被激活,便出现在可用服务空间列表上。
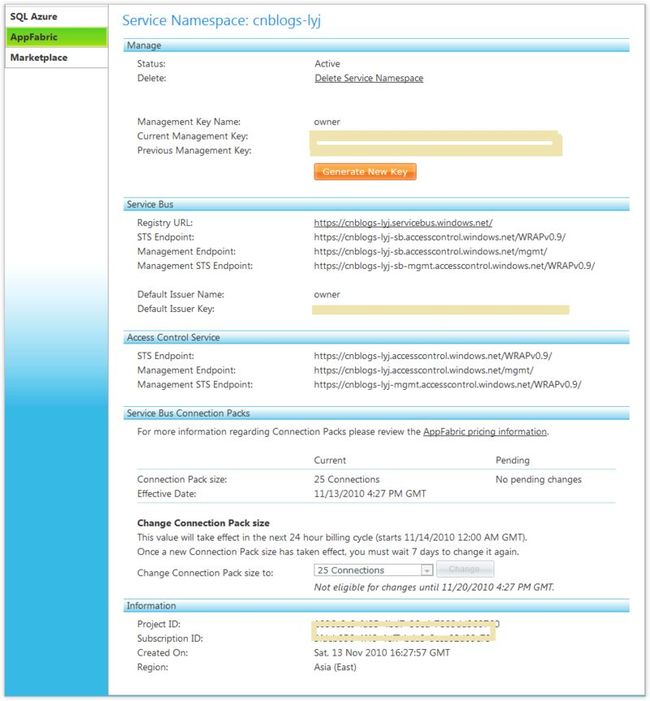
我们可以在可用服务空间列表上点击刚刚创建的服务空间,显示服务空间信息页面:在服务命名空间信息页面,我们需要记录下Default Issuer Name和Default Issuer Key。接下来会使用到它们。
体验AppFabric Service Bus
这个示例演示了Client向Service发送消息,Service以相同的消息进行回应。展示了Service Bus如何在不同网络环境中的不同程序进行通信。
原理
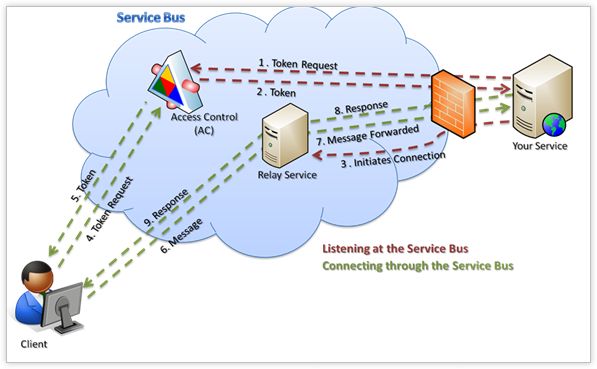
我们首先了解这个程序的运作原理:
步骤1,2,4,5是利用AppFabric中的Access Control服务用来确保安全性。
步骤3是服务器程序与云端建立连接的过程。步骤6,7,8,9是客户端调用服务的过程。
Service Bus通过为服务提供了一套通用的命名规范简化了许多通信难题,在独立于网络拓扑和配置的节点之间提供直接或间接的通信。Service Bus允许WCF应用程序监听公共网络地址,即使其位于NAT或网络防火墙后方。该功能使得应用程序的通信可以无关于其网络结构。使用Service Bus便无需编写与维护复杂的逻辑和代码来跨越不同的网络通信。
代码
我们创建一个WCF服务和一个客户端,两者通过云端的Service Bus交互。解决方案项目结构如下:
注意,都需要引用System.ServiceModel.dll和Microsoft.ServiceBus.dll程序集。前者为WCF的核心 程序集之一。后者在%ProgramFiles%\Windows Azure AppFabric SDK\V1.0\Assemblies\NET4.0中。
服务器端:
//WCF的服务契约
[ServiceContract]
public interface IAppFabricServiceBusContract
{
    //定义了Hello操作契约,指明该方法为服务契约的一部分
    [OperationContract]
    string Hello(string text);
}
//实现WCF的服务契约
[ServiceBehavior]
public class AppFabricServiceBusService : IAppFabricServiceBusContract
{
    public string Hello(string text)
    {
        Console.WriteLine("客户端请求: {0}", text);
        return text;
    }
}
配置WCF服务
<?xml version="1.0" encoding="utf-8" ?>
<configuration>
 <system.serviceModel>
 <services>
 <service name="HelloAppFabricServiceBus.Service.AppFabricServiceBusService">
 <endpoint binding="netTcpRelayBinding"
             contract="HelloAppFabricServiceBus.Service.IAppFabricServiceBusContract" />
 </service>
 </services>
 </system.serviceModel>
</configuration>
主方法
//通过AppFabric Service Bus来托管服务
static void Main()
{
    //基于服务命名空间来创建服务URI
    var address = ServiceBusEnvironment.CreateServiceUri("sb", "[Service Namespace]",
 "AppFabricServiceBusService");
    //为端点(endpoint)创建凭据对象(credential object)
    var sharedSecretServiceBusCredential = new TransportClientEndpointBehavior
 {
                  CredentialType = TransportClientCredentialType.SharedSecret
                };
    sharedSecretServiceBusCredential.Credentials.SharedSecret.IssuerName = "[Issuer Name]";
    sharedSecretServiceBusCredential.Credentials.SharedSecret.IssuerSecret = "[Issuer Key]";
    //创建会读取配置文件的服务宿主(service host)
 var host = new ServiceHost(typeof(AppFabricServiceBusService), address);
    //为端点创建ServiceRegistrySettings行为
 var serviceRegistrySettings = new ServiceRegistrySettings(DiscoveryType.Public);
    //为配置文件中所有端点加入Service Bus凭据
 foreach (var endpoint in host.Description.Endpoints)
    {
        endpoint.Behaviors.Add(serviceRegistrySettings);
        endpoint.Behaviors.Add(sharedSecretServiceBusCredential);
    }
    //打开服务
    host.Open();
    Console.WriteLine("服务地址: " + address);
    Console.WriteLine("按[Enter]键关闭宿主服务");
    Console.ReadLine();
    //关闭服务
    host.Close();
}
客户端:
//WCF的服务契约
[ServiceContract]
public interface IAppFabricServiceBusContract
{
    [OperationContract]
    string Hello(string text);
}
配置
<?xml version="1.0"?>
<configuration>
 <system.serviceModel>
 <client>
 <endpoint name="RelayEndpoint"
           contract="HelloAppFabricServiceBus.Client.IAppFabricServiceBusContract"
            binding="netTcpRelayBinding"/>
 </client>
 </system.serviceModel>
</configuration>
主方法
//使用通过AppFabric Service Bus托管的WCF服务
static void Main()
{
    //基于服务命名空间来创建服务URI
    var serviceUri = ServiceBusEnvironment.CreateServiceUri("sb", "[Service Namespace]",
                                  "AppFabricServiceBusService");
    //为端点(endpoint)创建凭据对象(credential object)
    var sharedSecretServiceBusCredential = new TransportClientEndpointBehavior
 {
                CredentialType = TransportClientCredentialType.SharedSecret
            };
    sharedSecretServiceBusCredential.Credentials.SharedSecret.IssuerName = "[Issuer Name]";
    sharedSecretServiceBusCredential.Credentials.SharedSecret.IssuerSecret = "[Issuer Key]";
    //创建读取配置文件的信道工厂(channel factory)
    var channelFactory = new ChannelFactory<IAppFabricServiceBusContract>("RelayEndpoint",
                             new EndpointAddress(serviceUri));
    //应用Service Bus凭证
    channelFactory.Endpoint.Behaviors.Add(sharedSecretServiceBusCredential);
    //创建并打开客户端信道
    var channel = channelFactory.CreateChannel();
    ((ICommunicationObject)channel).Open();
    Console.WriteLine("输入文字(或者按[Enter]键关闭连接):");
    var input = Console.ReadLine();
    while (input != String.Empty)
    {
        try
 {
            Console.WriteLine("服务器返回: {0}", channel.Hello(input));
        }
        catch (Exception e)
        {
            Console.WriteLine("错误: " + e.Message);
        }
        input = Console.ReadLine();
    }
    ((ICommunicationObject)channel).Close();
    channelFactory.Close();
}
测试
注意你需要将Service Namespace,Issuer Name和Issuer Key替换你的,这些都是基于Azure付费账户。
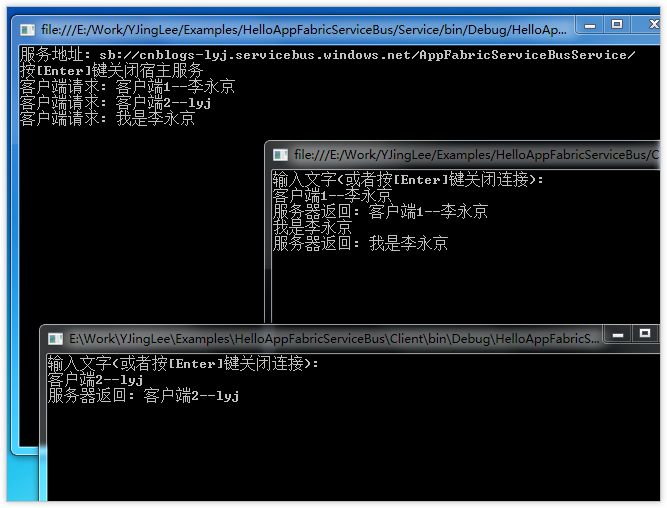
先启动Service,在启动两个Client,测试,我们可以看到它们之间的交互了。


