察看原文,请参阅:http://learn.iis.net/page.aspx/170/developing-a-module-using-net/
前言:
相对于IIS6,在IIS7中,最为显著的变化之一就是功能模块的组件化,也就是说可以根据自己的需要,加载或者拆卸组件,从而最大限度减轻server的负担。同时对于一些组件,也提供了相应的接口,用户可以自己重写这些组件,从而提供更加个性化的功能。本文介绍了如何自定义一个进行basic authentication的模块,并进行加载,从而实现第3方的basic authentication验证模式。
正文:
准备工作:
1 将anonymous authentication mode disable 掉(被修改对象:applicationhost.config)。by default, it's enabled.
2 允许相应的authentication mode 能够被overriden(被修改对象:applicationhost.config)。by defaut, it's denied!
<
sectionGroup name
=
"
authentication
"
>
<
section name
=
"
anonymousAuthentication
"
overrideModeDefault
=
"
Deny
"
/>
<
section name
=
"
basicAuthentication
"
overrideModeDefault
=
"
Deny
"
/>
<
section name
=
"
clientCertificateMappingAuthentication
"
overrideModeDefault
=
"
Deny
"
/>
<
section name
=
"
digestAuthentication
"
overrideModeDefault
=
"
Deny
"
/>
<
section name
=
"
iisClientCertificateMappingAuthentication
"
overrideModeDefault
=
"
Deny
"
/>
<
section name
=
"
windowsAuthentication
"
overrideModeDefault
=
"
Deny
"
/>
</
sectionGroup
>
应将其改为:
<
sectionGroup name
=
"
authentication
"
>
<
section name
=
"
anonymousAuthentication
"
overrideModeDefault
=
"
Allow
"
/>
<
section name
=
"
basicAuthentication
"
overrideModeDefault
=
"
Deny
"
/>
<
section name
=
"
clientCertificateMappingAuthentication
"
overrideModeDefault
=
"
Deny
"
/>
<
section name
=
"
digestAuthentication
"
overrideModeDefault
=
"
Deny
"
/>
<
section name
=
"
iisClientCertificateMappingAuthentication
"
overrideModeDefault
=
"
Deny
"
/>
<
section name
=
"
windowsAuthentication
"
overrideModeDefault
=
"
Deny
"
/>
</
sectionGroup
>
说明:overridenModeDefault的Allow和Deny的区别:
1 overrideModeDefault=Deny (by default)
在此情况下,对于website所做的有关authentication的设置的修改,都被保存至applicationhost.config的<location> section中,如下所示:
<
configuration
>
 ..
..
 ..
..
<
location path
=
"
CustAuth
"
>
<
system.webServer
>
<
security
>
<
authentication
>
<
digestAuthentication enabled
=
"
true
"
/>
<
windowsAuthentication enabled
=
"
false
"
/>
<
anonymousAuthentication enabled
=
"
true
"
/>
</
authentication
>
</
security
>
</
system.webServer
>
</
location
>
</
configuration
>
2 overrideModeDefault=Allow
在此情况下,对于website所做的有关authentication的设置的修改,都被保存至web.config中,如下所示:
<?
xml version
=
"
1.0
"
encoding
=
"
UTF-8
"
?>
<
configuration
>
<
appSettings
/>
<
connectionStrings
/>
<
system.web
>
</
system.web
>
<
system.webServer
>
<
security
>
<
authentication
>
<
anonymousAuthentication enabled
=
"
false
"
/>
</
authentication
>
</
security
>
</
system.webServer
>
</
configuration
>
可以看出,因为我们已经将anonymouAuthentication的orverrideModeDefault设置为了Allow,所在在website中的对于anonymouse authentication的修改都被记录在了 web.config中。
正式工作:
1.编写自定义的basic authentication module,将以下保存为 某个cs文件至 App_Code中。
这部分对于IIS验证及.net framework认识有较高要求。源代码如下:

 Code
Code
#region Using directives
using System;
using System.Collections;
using System.Text;
using System.Web;
using System.Web.Security;
using System.Security.Principal;
using System.IO;
#endregion
namespace IIS7Demos
{
///
/// This module performs basic authentication.
/// For details on basic authentication see RFC 2617.
///
/// The basic operational flow is:
///
/// On AuthenticateRequest:
/// extract the basic authentication credentials
/// verify the credentials
/// if succesfull, create the user principal with these credentials
///
/// On SendResponseHeaders:
/// if the request is being rejected with an unauthorized status code (401),
/// add the basic authentication challenge to trigger basic authentication.
///
///
public class BasicAuthenticationModule : IHttpModule
{
#region member declarations
public const String HttpAuthorizationHeader = "Authorization"; // HTTP1.1 Authorization header
public const String HttpBasicSchemeName = "Basic"; // HTTP1.1 Basic Challenge Scheme Name
public const Char HttpCredentialSeparator = ':'; // HTTP1.1 Credential username and password separator
public const int HttpNotAuthorizedStatusCode = 401; // HTTP1.1 Not authorized response status code
public const String HttpWWWAuthenticateHeader = "WWW-Authenticate"; // HTTP1.1 Basic Challenge Scheme Name
public const String Realm = "Custom Basic Authentication Demo of IIS7"; // HTTP.1.1 Basic Challenge Realm
#endregion
#region Main Event Processing Callbacks
public void AuthenticateUser(Object source, EventArgs e)
{
HttpApplication application = (HttpApplication)source;
HttpContext context = application.Context;
String userName = null;
String password = null;
String realm = null;
String authorizationHeader = context.Request.Headers[HttpAuthorizationHeader];
//
// Extract the basic authentication credentials from the request
//
if (!ExtractBasicCredentials(authorizationHeader, ref userName, ref password))
return;
//
// Validate the user credentials
//
if (!ValidateCredentials(userName, password, realm))
return;
//
// Create the user principal and associate it with the request
//
context.User = new GenericPrincipal(new GenericIdentity(userName), null);
}
public void IssueAuthenticationChallenge(Object source, EventArgs e)
{
HttpApplication application = (HttpApplication)source;
HttpContext context = application.Context;
//
// Issue a basic challenge if necessary
//
if (context.Response.StatusCode == HttpNotAuthorizedStatusCode)
{
context.Response.AddHeader(HttpWWWAuthenticateHeader, "Basic realm =\"" + Realm + "\"");
}
}
#endregion
#region Utility Methods
protected virtual bool ValidateCredentials(String userName, String password, String realm)
{
//
// Validate the credentials using Membership (refault provider)
//
// return Membership.ValidateUser(userName, password);
if (userName.Equals("herengang") && password.Equals("herengang"))
{
return true;
}
else
{
return false;
}
}
protected virtual bool ExtractBasicCredentials(String authorizationHeader, ref String username, ref String password)
{
if ((authorizationHeader == null) || (authorizationHeader.Equals(String.Empty)))
return false;
String verifiedAuthorizationHeader = authorizationHeader.Trim();
if (verifiedAuthorizationHeader.IndexOf(HttpBasicSchemeName) != 0)
return false;
// get the credential payload
verifiedAuthorizationHeader = verifiedAuthorizationHeader.Substring(HttpBasicSchemeName.Length, verifiedAuthorizationHeader.Length - HttpBasicSchemeName.Length).Trim();
// decode the base 64 encodeded credential payload
byte[] credentialBase64DecodedArray = Convert.FromBase64String(verifiedAuthorizationHeader);
UTF8Encoding encoding = new UTF8Encoding();
String decodedAuthorizationHeader = encoding.GetString(credentialBase64DecodedArray, 0, credentialBase64DecodedArray.Length);
// get the username, password, and realm
int separatorPosition = decodedAuthorizationHeader.IndexOf(HttpCredentialSeparator);
if (separatorPosition <= 0)
return false;
username = decodedAuthorizationHeader.Substring(0, separatorPosition).Trim();
password = decodedAuthorizationHeader.Substring(separatorPosition + 1, (decodedAuthorizationHeader.Length - separatorPosition - 1)).Trim();
if (username.Equals(String.Empty) || password.Equals(String.Empty))
return false;
return true;
}
#endregion
#region IHttpModule Members
public void Init(HttpApplication context)
{
//
// Subscribe to the authenticate event to perform the
// authentication.
//
context.AuthenticateRequest += new
EventHandler(this.AuthenticateUser);
//
// Subscribe to the EndRequest event to issue the
// challenge if necessary.
//
context.EndRequest += new
EventHandler(this.IssueAuthenticationChallenge);
}
public void Dispose()
{
//
// Do nothing here
//
}
#endregion
}
}
2 再添加一个简单的测试页面如default.aspx。然后发布website
3 将anonymous authentication disabled掉。
因为前面我们已经将其overrideModeDefault设置为Allow.因此此设置将会写入website下的web.config中
4 添加自定义的basic authentication module (修改对象:web.config)
修改后的web.config如下:

 Code
Code
<?xml version="1.0" encoding="UTF-8"?>
<configuration>
<appSettings />
<connectionStrings />
<system.web>


</system.web>
<system.webServer>
<modules>
<add name="MyBasicAuthenticationModule" type="IIS7Demos.BasicAuthenticationModule" />
</modules>
<security>
<authentication>
<anonymousAuthentication enabled="false" />
</authentication>
</security>
</system.webServer>
</configuration>
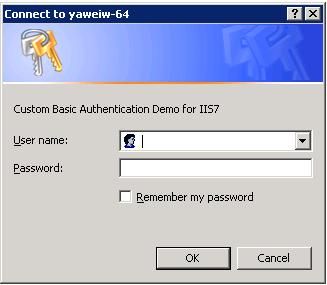
5 请求website下的resource,如default.aspx,basic authentication window prompt for username&password,然后自定义的basic authentication module将会被调用验证该credential.

 ..
.. ..
..