Creating a Windows Service
NOTE: Ok, I am being lazy here. The project name in this sample code is mcWebService which is a spell mistake. I meant to put mcWinService. And now I don't want to change all the screen shots and code all over again. I hope it won't confuse you :).
Ok, its time for one more tutorial. This times pick is Windows Services. Creating Windows Services is not a big deal using Visual C#. Just follow few simple steps and you are all set to run and test your first Windows Service.
Windows Services is new name for NT Services you used to develop in previous versions of Visual Studio. This tutorial walks you through how to create and use your Windows Services. This Service writes some text to a text file when stop and start the service. The base idea is taken from MSDN but its more elaborated. You can modify it according to your needs.
Step 1. Create Skeleton of the Service
To create a new Window Service, pick Windows Service option from your Visual C# Projects, give your service a name, and click OK.
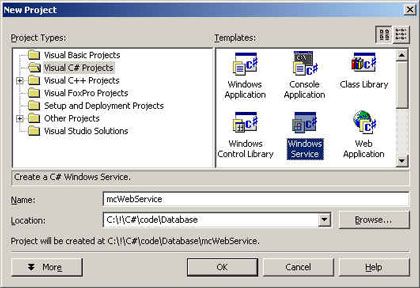
The result look like this. The Wizard adds WebService1.cs class to your project.
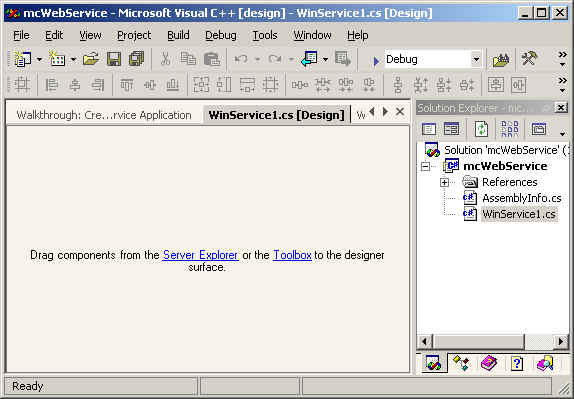
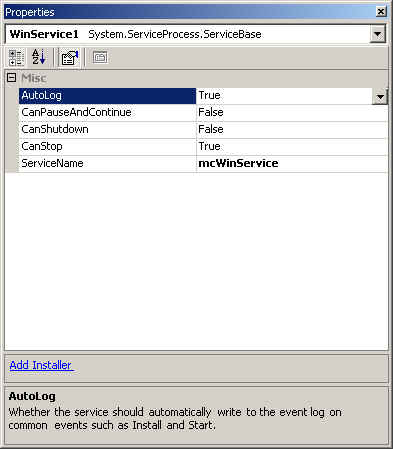
Set your ServiceName to your own name so it would be easier to recognize your service during testing OR you can set this property programmatically using this line this.ServiceName = "mcWinService";
This is the name you will be looking for later :).
The default code of WebService1.cs added by the Wizard looks like here
 namespace
mcWebService

 {
{  using System;
  using System.Collections;
  using System.Core;
  using System.ComponentModel;
  using System.Configuration;
  using System.Data;
  using System.Web.Services;
  using System.Diagnostics;
  using System.ServiceProcess;
  public class WinService1 : System.ServiceProcess.ServiceBase

 {
{ 
 /**//// <summary>
  /// Required designer variable.
  /// </summary>
  private System.ComponentModel.Container components;
  public WinService1()

 {
{  // This call is required by the WinForms Component Designer. InitializeComponent();
  // TODO: Add any initialization after the InitComponent call
  }
}  // The main entry point for the process
  static void Main()

 {
{  System.ServiceProcess.ServiceBase[] ServicesToRun;
  // More than one user Service may run within the same process. To add
  // another service to this process, change the following line to
  / create a second service object. For example,
  //
//  // ServicesToRun = New System.ServiceProcess.ServiceBase[] {new WinService1(), new
  ySecondUserService()};
  //
// 
 ServicesToRun = new System.ServiceProcess.ServiceBase[]
  { new WinService1() };
  System.ServiceProcess.ServiceBase.Run(ServicesToRun);
  }
} 
 /**//// <summary>
  /// Required method for Designer support - do not modify
  /// the contents of this method with the code editor.
  /// </summary>
  private void InitializeComponent()

 {
{  components = new System.ComponentModel.Container();
  this.ServiceName = "WinService1";
  }
} 
 /**//// <summary>
  /// Set things in motion so your service can do its work.
  /// </summary>
  protected override void OnStart(string[] args)

 {
{  // TODO: Add code here to start your service.
  }
} 
 /**//// <summary>
  /// Stop this service.
  /// </summary>
  protected override void OnStop()

 {
{  // TODO: Add code here to perform any tear-down necessary to stop your service.
  }
}  }
}
 }
} 
Step 2. Add functionality to your service
As you saw WebService1.cs, there are two overridden functions OnStart and OnStop. The OnStart function executes when you start your service and the OnStop function gets execute when you stop a service. I write some text to a text file when you start and stop the service.
 protected
override
void
OnStart(
string
[] args)

 {
{  FileStream fs = new FileStream(@"c:\temp\mcWindowsService.txt" ,
  FileMode.OpenOrCreate, FileAccess.Write);
  StreamWriter m_streamWriter = new StreamWriter(fs);
  m_streamWriter.BaseStream.Seek(0, SeekOrigin.End);
  m_streamWriter.WriteLine(" mcWindowsService: Service Started \n");
  m_streamWriter.Flush();
 m_streamWriter.Close();
  }
}

 /**/
/// <summary>
  /// Stop this service.
  /// </summary>
 protected
override
void
OnStop()

 {
{  FileStream fs = new FileStream(@"c:\temp\mcWindowsService.txt" ,
  FileMode.OpenOrCreate, FileAccess.Write);
  StreamWriter m_streamWriter = new StreamWriter(fs);
  m_streamWriter.BaseStream.Seek(0, SeekOrigin.End);
  m_streamWriter.WriteLine(" mcWindowsService: Service Stopped \n"); m_streamWriter.Flush();
 m_streamWriter.Close();
  }
}

Step 3: Install and Run the Service
Build of this application makes one exe, mcWinService.exe. You need to call installutil to
egister this service from command line.
installutil C:\mcWebService\bin\Debug\mcWebService.exe
You use /u option to uninstall the service.
installutil /u C:\mcWebService\bin\Debug\mcWebService.exe
Run the application
Step 4: Start and Stop the Service
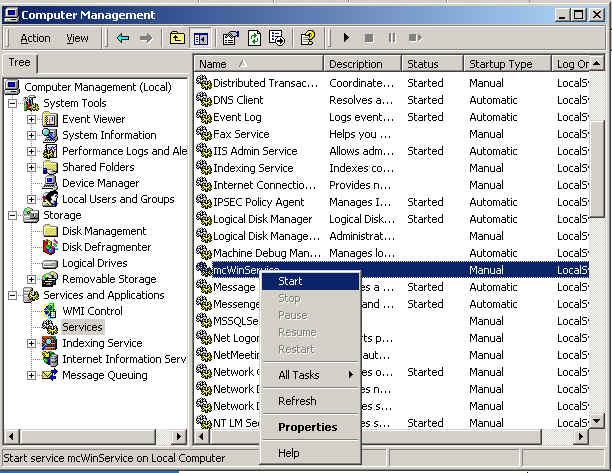
You need to go to the Computer Management to Start to start and stop the service. You can use Manage menu item by right clicking on My Computer.
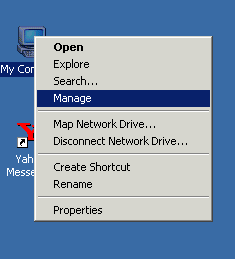
Under Services and Applications, you will see the service mcWinService. Start and Stop menu item starts and stops the service.
Step 5: Test the Service
Go to your temp directory and see if text file is there with contents or not.
That's it.