SSM框架的搭建与测试运行
关于动态Web环境下的SSM框架环境搭建与测试
SSM(Spring+SpringMVC+MyBatis)框架集由Spring、MyBatis两个开源框架整合而成(SpringMVC是Spring中的部分内容)。常作为数据源较简单的web项目的框架。
-
Spring就像是整个项目中装配bean的大工厂,在配置文件中可以指定使用特定的参数去用实体类的构造方法来实例化对象。
-
SpringMVC在项目中拦截用户请求,它的核心Servlet即DispatcherServlet承担中介或是前台这样的职责,将用户请求通过HandlerMapping去匹配Controller,Controller就是具体对应请求所执行的操作(等同于SSH框架中的strus)
-
mybatis(ibatis)是对jdbc的封装,它让数据库底层操作变的透明。mybatis的操作都是围绕一个sqlSessionFactory实例展开的。mybatis通过配置文件关联到各实体类的Mapper文件,Mapper文件中配置了每个类对数据库所需进行的sql语句映射。在每次与数据库交互时,通过sqlSessionFactory拿到一个sqlSession,再执行sql命令
.
进入正题,准备搭建ssm框架(注:该项目未基于Maven结构下的环境搭建,如果想查看Maven结构下搭建ssm框架之后更新或参照其他博客) -
检查开发环境:Eclipse、JDK1.7以上、tomcat8.0、mysql数据库、MyBatis 3.3.0、Spring 4.2.0 、Spring MVC 4.2.0
-
ssm框架所需要的jar包:jar包下载地址 提取码:o9ua
创建数据库表结构并插入测试语句

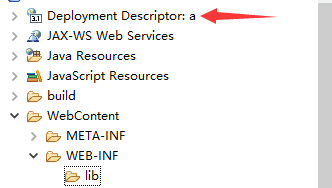
首先进入Eclipse创建一个动态web项目File–>new–>Dynamic web Project,并动态生成web.xml文件(方式1:创建web项目过程中一直下一步并勾选Generate web.xml deployment descriptor然后finsh。方式2:忘记勾选的情况下右击项目,右击项目中地球标识选择开头有个奶瓶标识 [Generate Deployment Descriptor Stub]即可,以下为附图)

第二步:在Java Resources目录下的src创建包,命名方式为:com+单位/学校/个人名称+项目名(亦可根据自己喜好而定,正式工作时这些会被严格规定)包括bean包、mapper(Dao)包、service包、controller(anction)包
在bean包中创建实体类Product (也可通过逆向工程生成实体类mapper等映射文件)
如果想方便看测试结果的话可在最底下重写toString()方法
package com.ybz.bean;

public class Product {
    private Integer pid;

    private String pname;

    private Double price;

    private Integer pnum;

    private String pdiscribe;

    public Integer getPid() {
        return pid;
    }

    public void setPid(Integer pid) {
        this.pid = pid;
    }

    public String getPname() {
        return pname;
    }

    public void setPname(String pname) {
        this.pname = pname == null ? null : pname.trim();
    }

    public Double getPrice() {
        return price;
    }

    public void setPrice(Double price) {
        this.price = price;
    }

    public Integer getPnum() {
        return pnum;
    }

    public void setPnum(Integer pnum) {
        this.pnum = pnum;
    }

    public String getPdiscribe() {
        return pdiscribe;
    }

    public void setPdiscribe(String pdiscribe) {
        this.pdiscribe = pdiscribe == null ? null : pdiscribe.trim();
    }
}
逆向工程下载地址:逆向工程 提取码: g28u
mapper层:
在mapper包目录下新建ProductMapper.java接口和ProductMapper.xml文件
mapper接口代码如下:
package com.ybz.mapper;

import com.ybz.bean.Product;
import com.ybz.bean.ProductExample;
import java.util.List;
import org.apache.ibatis.annotations.Param;
public interface ProductMapper {
    int countByExample(ProductExample example);

    int deleteByExample(ProductExample example);

    int deleteByPrimaryKey(Integer pid);

    int insert(Product record);

    int insertSelective(Product record);
    //查询所有商品信息
    List selectByExample(ProductExample example);
    //根据主键查询单个
    Product selectByPrimaryKey(Integer pid);

    int updateByExampleSelective(@Param("record") Product record, @Param("example") ProductExample example);

    int updateByExample(@Param("record") Product record, @Param("example") ProductExample example);

    int updateByPrimaryKeySelective(Product record);

    int updateByPrimaryKey(Product record);
}
如果这段代码中的@Param出现报错即你在创建项目的时候忘记导入jar包
ProductMapper.xml代码如下:(手动写xml更简洁)
and ${criterion.condition}
and ${criterion.condition} #{criterion.value}
and ${criterion.condition} #{criterion.value} and #{criterion.secondValue}
and ${criterion.condition}
#{listItem}
and ${criterion.condition}
and ${criterion.condition} #{criterion.value}
and ${criterion.condition} #{criterion.value} and #{criterion.secondValue}
and ${criterion.condition}
#{listItem}
pid, pname, price, pnum, pdiscribe
delete from product
where pid = #{pid,jdbcType=INTEGER}
delete from product
insert into product (pid, pname, price,
pnum, pdiscribe)
values (#{pid,jdbcType=INTEGER}, #{pname,jdbcType=VARCHAR}, #{price,jdbcType=DOUBLE},
#{pnum,jdbcType=INTEGER}, #{pdiscribe,jdbcType=VARCHAR})
insert into product
pid,
pname,
price,
pnum,
pdiscribe,
#{pid,jdbcType=INTEGER},
#{pname,jdbcType=VARCHAR},
#{price,jdbcType=DOUBLE},
#{pnum,jdbcType=INTEGER},
#{pdiscribe,jdbcType=VARCHAR},
update product
pid = #{record.pid,jdbcType=INTEGER},
pname = #{record.pname,jdbcType=VARCHAR},
price = #{record.price,jdbcType=DOUBLE},
pnum = #{record.pnum,jdbcType=INTEGER},
pdiscribe = #{record.pdiscribe,jdbcType=VARCHAR},
update product
set pid = #{record.pid,jdbcType=INTEGER},
pname = #{record.pname,jdbcType=VARCHAR},
price = #{record.price,jdbcType=DOUBLE},
pnum = #{record.pnum,jdbcType=INTEGER},
pdiscribe = #{record.pdiscribe,jdbcType=VARCHAR}
update product
pname = #{pname,jdbcType=VARCHAR},
price = #{price,jdbcType=DOUBLE},
pnum = #{pnum,jdbcType=INTEGER},
pdiscribe = #{pdiscribe,jdbcType=VARCHAR},
where pid = #{pid,jdbcType=INTEGER}
update product
set pname = #{pname,jdbcType=VARCHAR},
price = #{price,jdbcType=DOUBLE},
pnum = #{pnum,jdbcType=INTEGER},
pdiscribe = #{pdiscribe,jdbcType=VARCHAR}
where pid = #{pid,jdbcType=INTEGER}
到这里为止dao层代码结束
接下来为service层:(我只写了一个方法为例,需要什么方法可往里添加)
package com.ybz.service;

import java.util.List;
import com.ybz.bean.Product;


public interface ProductService {

	/**
	 * 查询所有商品信息
	 */
	List selectAll();
}
在service包的基础上再新建一个impl包,并创建一个实现类取名ProductServiceImpl.java
package com.ybz.service.impl;

import java.util.List;

import org.springframework.beans.factory.annotation.Autowired;
import org.springframework.stereotype.Service;

import com.ybz.bean.Product;
import com.ybz.bean.ProductExample;
import com.ybz.mapper.ProductMapper;
import com.ybz.service.ProductService;


 /*
  * 将当前类注释为一个spring的bean
  */

@Service
public class ProductServiceImpl implements ProductService {

	//自动注入值
	@Autowired
	private ProductMapper productMapper;

	/**
	 * 查询所有商品信息
	 */
	@Override
	public List selectAll() {
		ProductExample example = new ProductExample();
		return productMapper.selectByExample(example);
	}

}
接下来最重要的便是编写配置文件,在src目录下新建mybatis-config.xml、applicationContext.xml文件,当然也可以将这些配置文件单独放入一个包中(推荐使用)注:配置文件书写方式或风格并不唯一,看到其他写法也不要以为是错误的,原则是项目能跑通的情况下,哈哈…
mybatis-config.xml:
然后就是通过applicationContext.xml将spring和mybatis整合,包括了自动扫描,自动注入,数据库配置等等。
在编写xml文件时系统不会提示,要想有提示需要下载相关dtd文件并在eclipse中进行配置,具体方法可百度 “xml提示”方法
applicationContext.xml:
以上配置中数据库方面可以使用阿里巴巴的durid配置速度会更快 “com.alibaba.druid.pool.DruidDataSource”,也可以不将数据源信息写死在xml文件中,可新建并保持在properties文件中然后直接引入便ok了
整合完spring和mybatis后,需要继续完成springMvc的整合
在controller包下新建ProductController.java,代码如下:
package com.ybz.controller;

import java.util.List;

import org.springframework.beans.factory.annotation.Autowired;
import org.springframework.stereotype.Controller;
import org.springframework.ui.Model;
import org.springframework.web.bind.annotation.RequestMapping;

import com.ybz.bean.Product;
import com.ybz.service.ProductService;

/**
 * 处理请求
 * @author ybz-
 *
 */
@Controller
@RequestMapping("/product")
public class ProductController {
	/**
	 * 自动注入值
	 */
	@Autowired
	private ProductService productService;

	//查询所有商品信息
	@RequestMapping("/allProduct")
	public String findAll(Model model) {
		//调用service中的方法
		List productList = productService.selectAll();
		model.addAttribute("list", productList);
		//返回页面
		return "index.jsp";
	}
}
在WebContent目录的子目录:WEB-INF中创建JSP页面 index.jsp为例:
<%@ page language="java" contentType="text/html; charset=UTF-8"
    pageEncoding="UTF-8"%>
<%@ taglib uri="http://java.sun.com/jsp/jstl/core" prefix="c" %>


SSM框架测试


			商品名
			价格
			商品数量
			商品描述


				${l.pname}
				${l.price}
				${l.pnum}
				${l.pdiscribe}
由于在controller方法中我们将所查询到的信息存在model中并返回给前端页面,前端页面要想取到值则需要jstl表达式,格式为${},通过c:forEach循环将值取出

接下来则对spring-mvc.xml文件进行配置:
注意的地方来了,很多人在这个地方会防出现一个错误,注解驱动那里会报错并且
![]()
这里出错的意思是说mvc:注解驱动未进行绑定
解决办法:
在开头的配置中加入xmlns:mvc=“http://www.springframework.org/schema/mvc” xsi:schemaLocation="http://www.springframework.org/schema/mvc
http://www.springframework.org/schema/mvc/spring-mvc-3.0.xsd ”
更改后代码如下:
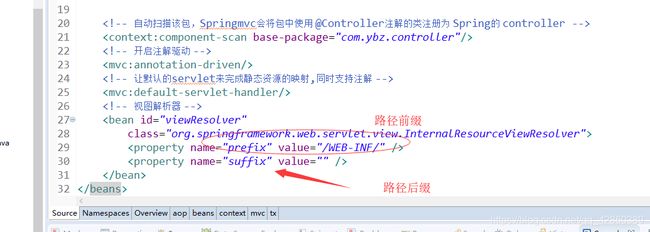
其中视图解析器对项目路径配置,根据你在controller方法中返回页面格式自定义。如果你前端页面使用的其他页面或者使用了thymeleaf进行渲染的话也是在这里进行配置。

以为配置文件到这里就完了吗?还没有呢~ 一下子接受不了吧,哈哈哈

配置web.xml:
  ssm


    org.springframework.web.context.ContextLoaderListener


    contextConfigLocation
    classpath:applicationContext.xml


    springDispatcherServlet
    org.springframework.web.servlet.DispatcherServlet

      contextConfigLocation
      classpath:spring-mvc.xml

    1


    springDispatcherServlet
    /


    encodingFilter
    org.springframework.web.filter.CharacterEncodingFilter

      encoding
      UTF-8


      forceEncoding
      true


    encodingFilter
    /*
当你看到这里意味着万事俱备,只差运行了,打开tomcat将项目添加到tomcat上启动运行结果如下:

