Spring Boot 补充版本
文章目录
- `Tomcat` 容器操作
-
-
-
- 基本配置
- ⛄️ 日志配置
- `HTTPS` 证书配置
-
-
- 配置文件
-
-
-
- 位置以及名称
- 配置文件中引用 Maven 配置
-
-
- 日志
- `Spring Security `
-
-
-
- 简介:
- 架构简介
- 基本认证
- 登录成功之后源码简析
- 登录失败处理逻辑
- 注销登录配置
- 登录用户获取
- 体验:
- 自定义登录表单
-
-
Tomcat 容器操作
基本配置
spring boot 启动时候会确定启动容器的类型:
# 启动时容器的类型
spring.main.web-application-type=servlet
# 系统会生成随机端口
server.port=0
# 系统不会生成端口,访问不到
server.port=-1
当系统生成的是随机端口的时候,如需获取端口则需要自定义一个监听器。
@Component
public class MyApplicationListener implements ApplicationListener<WebServerInitializedEvent> {
    /**
     * Handle an application event.
     *
     * @param event the event to respond to
     */
    @Override
    public void onApplicationEvent(WebServerInitializedEvent event) {
        System.out.println(event.getWebServer().getPort());
    }
}
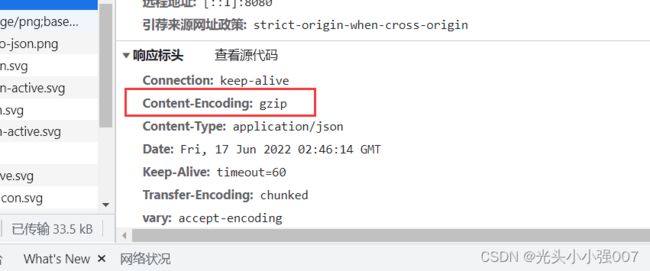
数据压缩配置:
 # 开启数据压缩
server.compression.enabled=true
# 如果系统定义的类型仍然无法满足我们的话,我们可以自己去定义类型
#server.compression.mime-types=
# 超过多少 kb 的数据去压缩,没有则不压缩
#server.compression.min-response-size=
⛄️ 日志配置
# 生成的访问日志将在该目录下
server.tomcat.basedir=my-tomcat
# 开启访问日志,默认的日志位置在项目运行的临时目录中, 默认生成的日志格式:access_log.2022-06-17.log
server.tomcat.accesslog.enabled=true
# 生成日志文件名的前缀,默认是 access_log
server.tomcat.accesslog.prefix=java_log
# 生成日志文件名的后缀
server.tomcat.accesslog.suffix=.log
# 日志文件名中日期的格式
server.tomcat.accesslog.file-date-format=.yyyyMMdd

# 生成的日志文件内容格式也是可以调整的
# %h 请求的客户端 ip
# %l 用户的身份, 没有使用 - 代替
# %u 用户名,没有则使用 - 代替
# %t 请求时间
# %r 请求地址
# %s 响应的状态码
# %b 响应的大小
server.tomcat.accesslog.pattern=%h %l %u %t \"%r\" %s %b

# 服务器内部日志
logging.level.org.apache.tomcat=debug
logging.level.org.apache.catalina=debug
HTTPS 证书配置
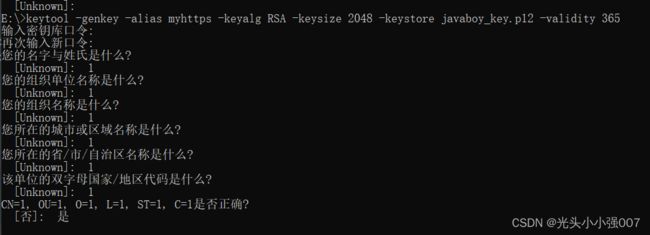
生成 https 证书命令:keytool
  1. -alias 别名
  2. -keyalg 算法 RSA
  3. -keysize 秘钥大小
  4. -keystore 存储的地点
  5. -validity 有效时间

 keytool -genkey -alias myhttps -keyalg RSA -keysize 2048 -keystore javaboy_key.p12 -validity 365
生成好的文件放在项目的 resources 目录下:
http 请求转发到 https 请求:
@Configuration
public class TomcatConfig {
    @Bean
    TomcatServletWebServerFactory tomcatServletWebServerFactory(){
        TomcatServletWebServerFactory factory = new TomcatServletWebServerFactory(){
            @Override
            protected void postProcessContext(Context context) {
                SecurityConstraint constraint = new SecurityConstraint();
                constraint.setUserConstraint("CONFIDENTIAL");
                SecurityCollection collection = new SecurityCollection();
                collection.addPattern("/*");
                constraint.addCollection(collection);
                context.addConstraint(constraint);
            }
        };
        factory.addAdditionalTomcatConnectors(myConnectors());
        return factory;
    }

    private Connector myConnectors() {
        Connector connector = new Connector("org.apache.coyote.http11.Http11NioProtocol");
        connector.setScheme("http");
        connector.setPort(8081);
        connector.setSecure(false);
        // 转发到 8080 这里来
        connector.setRedirectPort(8080);
        return connector;
    }
}
配置文件
位置以及名称
配置文件有四个位置:
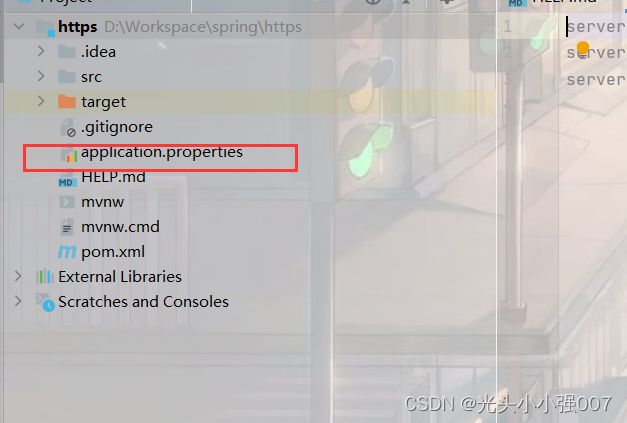
- 根目录下
config/application.properties
四个配置在同一项目出现时,优先级会依次降低
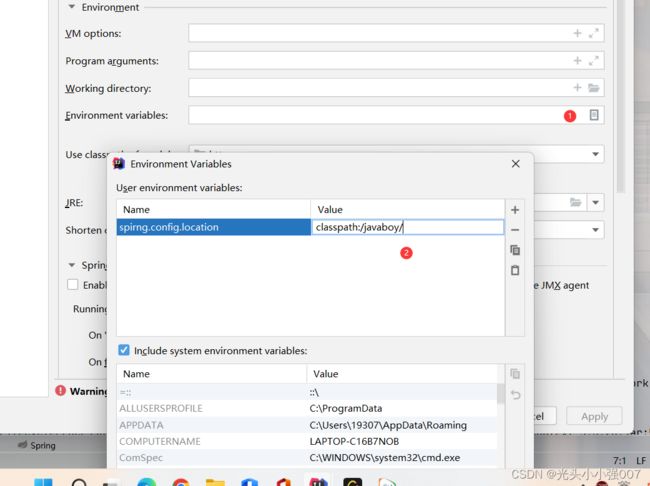
我们也可以自定义文件夹目录,和自定义文件名称。
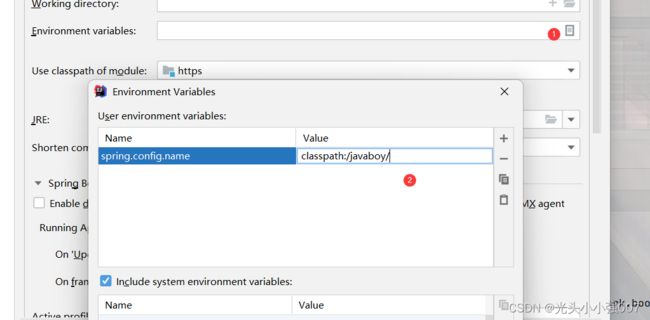
启动的时候配置环境参数:
文件夹:
java -jar xxx.jar --spring.config.location=classpath:/javaboy/
文件名称:
配置文件中引用 Maven 配置
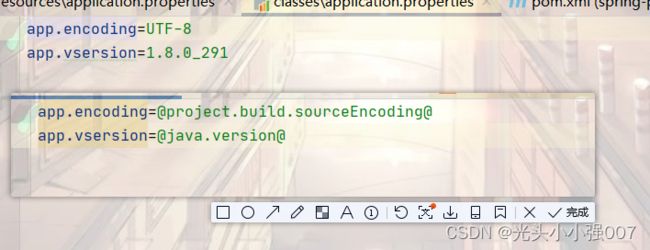
spring boot 中,默认使用 @ 符号,引用 maven 中的配置:
我们启动 jar 包项目时候,可以指定端口:
java -jar xxx.jar --server.port=8080
--server.port=8080 觉得太长了,我们可以定义称如下:
java -jar xxx.jar --port=8080
需要在配置文件进行如下配置:
# 如果没有传入参数,则默认端口是 8080
server.port=${port:8080}
日志
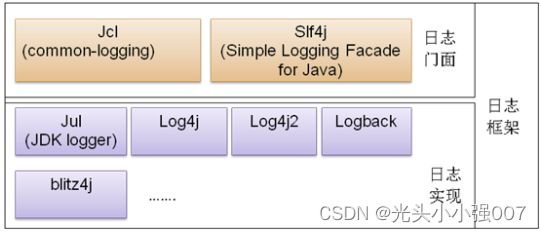
java 中的日志框架主要分为两大类:日志门面和日志实现
日志门面:日志门面定义了一组日志的接口规范,它并不提供底层具体的实现逻辑。Apache Commons Logging 和 Slf4j 就属于这一类。
日志实现:日志实现则是日志具体的实现,包括日志级别控制、日志打印格式、日志输出形式(输出到数据库、输出到文件、输出到控制台等)。
Spring Boot 日志配置:
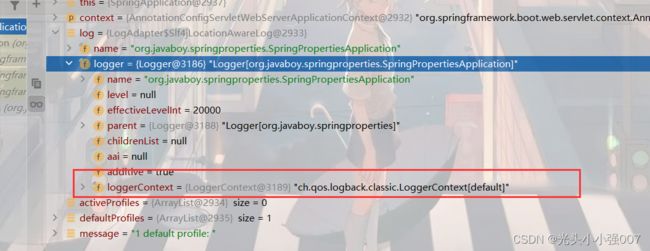
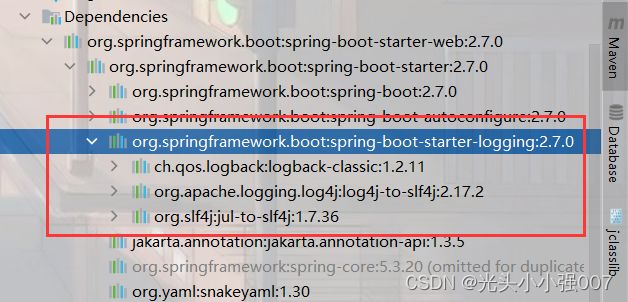
Spring Boot 的日志系统会自动根据 classpath 下的内容选择合适的日志配置,在这个过程中首选 Logback。
日志文件的一些配置信息:
# 打印日志级别
logging.level.org.springframework.web=debug
# 日志文件名称
#logging.file.name=javaboy.log
# 配置日志文件路径,默认文件名称是 spring.log
logging.file.path=/user/log/
# 日志文件达到 1M 即可压缩
logging.logback.rollingpolicy.max-file-size=1MB
如果想禁止控制台的日志输出,转而将日志内容输出到一个文件,我们可以自定义一个 logback-spring.xml 文件,并引入前面所说的 file-appender.xml 文件。
<configuration>
    <include resource="org/springframework/boot/logging/logback/defaults.xml" />
    <property name="LOG_FILE" value="{LOG_FILE:-{LOG_PATH:-{LOG_TEMP:-{java.io.tmpdir:-/tmp}}/}spring.log}"/>
    <include resource="org/springframework/boot/logging/logback/file-appender.xml" />
    <root level="INFO">
        <appender-ref ref="FILE" />
    root>
configuration>
Log4j 配置:
如果 classpath 下存在 Log4j2 的依赖,Spring Boot 会自动进行配置。
默认情况下 classpath 下当然不存在 Log4j2 的依赖,如果想使用 Log4j2,可以排除已有的 Logback,然后再引入 Log4j2,如下:
     <dependency>
            <groupId>org.springframework.bootgroupId>
            <artifactId>spring-boot-starter-webartifactId>
            <exclusions>
                <exclusion>
                    <groupId>org.springframework.bootgroupId>
                    <artifactId>spring-boot-starter-loggingartifactId>
                exclusion>
            exclusions>
        dependency>

        <dependency>
            <groupId>org.springframework.bootgroupId>
            <artifactId>spring-boot-starter-log4j2artifactId>
        dependency>
Log4j2 的配置就比较容易了,在 reources 目录下新建 log4j2.xml 文件,内容如下:
<configuration status="warn">
    <properties>

        <Property name="app_name">loggingProperty>

        <Property name="log_path">logs/${app_name}Property>
    properties>
    <appenders>
        <console name="Console" target="SYSTEM_OUT">
            <PatternLayout pattern="[%d][%t][%p][%l] %m%n" />
        console>
        <RollingFile name="RollingFileInfo" fileName="${log_path}/info.log"
                     filePattern="${log_path}/$${date:yyyy-MM}/info-%d{yyyy-MM-dd}-%i.log.gz">
            <Filters>
                <ThresholdFilter level="INFO" />
                <ThresholdFilter level="WARN" onMatch="DENY"
                                 onMismatch="NEUTRAL" />
            Filters>
            <PatternLayout pattern="[%d][%t][%p][%c:%L] %m%n" />
            <Policies>
                <TimeBasedTriggeringPolicy interval="1" modulate="true" />
                <SizeBasedTriggeringPolicy size="2 MB" />
            Policies>
            <DefaultRolloverStrategy compressionLevel="0" max="10"/>
        RollingFile>
        <RollingFile name="RollingFileWarn" fileName="${log_path}/warn.log"
                     filePattern="${log_path}/$${date:yyyy-MM}/warn-%d{yyyy-MM-dd}-%i.log.gz">
            <Filters>
                <ThresholdFilter level="WARN" />
                <ThresholdFilter level="ERROR" onMatch="DENY"
                                 onMismatch="NEUTRAL" />
            Filters>
            <PatternLayout pattern="[%d][%t][%p][%c:%L] %m%n" />
            <Policies>
                <TimeBasedTriggeringPolicy interval="1" modulate="true" />
                <SizeBasedTriggeringPolicy size="2 MB" />
            Policies>
            <DefaultRolloverStrategy compressionLevel="0" max="10"/>
        RollingFile>

        <RollingFile name="RollingFileError" fileName="${log_path}/error.log"
                     filePattern="${log_path}/$${date:yyyy-MM}/error-%d{yyyy-MM-dd}-%i.log.gz">
            <ThresholdFilter level="ERROR" />
            <PatternLayout pattern="[%d][%t][%p][%c:%L] %m%n" />
            <Policies>
                <TimeBasedTriggeringPolicy interval="1" modulate="true" />
                <SizeBasedTriggeringPolicy size="2 MB" />
            Policies>
            <DefaultRolloverStrategy compressionLevel="0" max="10"/>
        RollingFile>
    appenders>
    <loggers>
        <root level="info">
            <appender-ref ref="Console" />
            <appender-ref ref="RollingFileInfo" />
            <appender-ref ref="RollingFileWarn" />
            <appender-ref ref="RollingFileError" />
        root>
    loggers>
configuration>
Spring Security
简介:
认证
- 表单认证
OAuth2.0认证SAML2.0认证CAS认证RememberMe认证JAAS认证OpenId去中心化认证X509认证Http Basic认证Http Digest认证
授权
url请求授权- 方法访授权
SpEl访问控制ACLRBAC
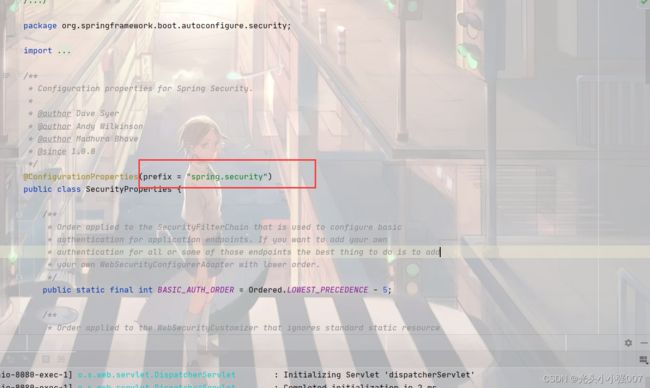
当我们在配置文件中配置自己的用户名密码,默认密码(uuid 生成的)就不在打印了
架构简介
Authentication 接口下的一些方法规范:
getAuthorities获取用户权限getCredentials获取用户的登陆凭证!getDetails获取用户携带的一些详细信息,一般来说就是当前请求的对象。getPrincipal获取当前用户对象isAuthenticated当前用户是否认证成功
AuthenticationManager 接口:
authenticate,用来做认证的方法,构造一个authentication实例,如果该方法正常执行并返回authentication对象,表示认证成功。抛出异常的话表示认证无效。
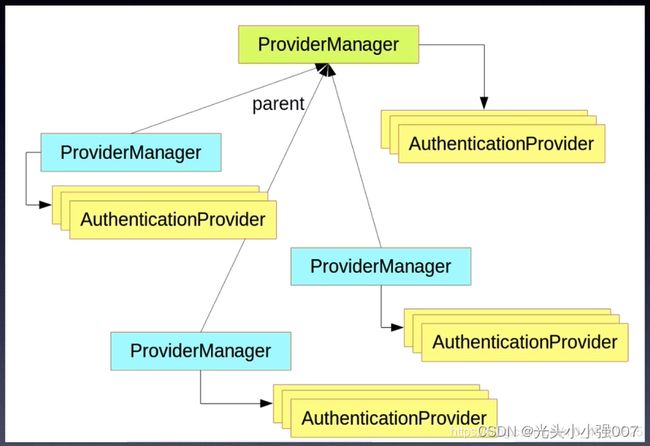
我们登录的用户信息,会封装到 Authentication 中,实现类会交给 AuthenticationManager 去处理,而它的具体处理从工作会交给 ProviderManager,进而交给 AuthenticationProvider 去工作处理。
web 安全
32个过滤器- 两个流程图
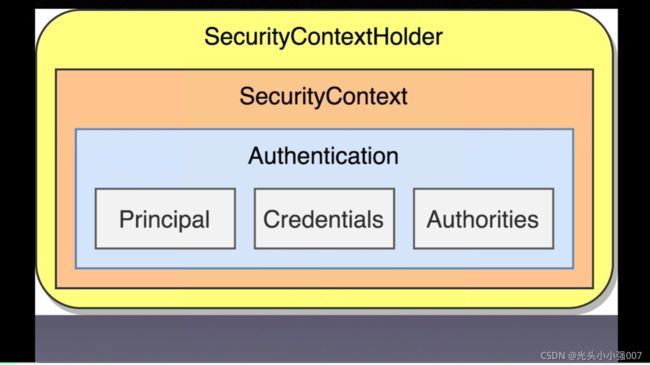
登录数据的保存 SecurityContextHolder
基本认证
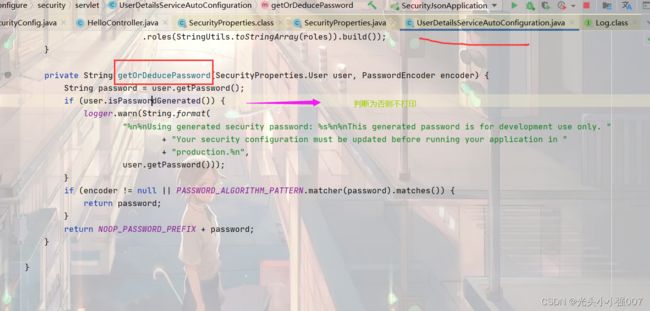
默认密码哪里来的?
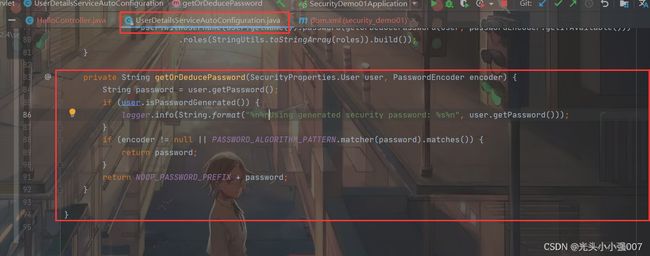
下载源码,全局搜索 Using generated security password:
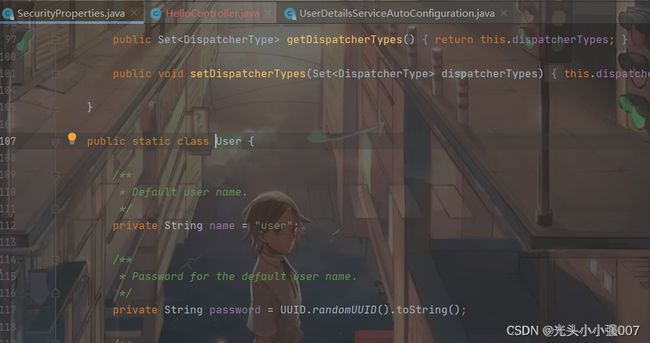
根据 user 对象来判断,密码是否是生成的。
		public void setPassword(String password) {
			if (!StringUtils.hasLength(password)) {
				return;
			}
			this.passwordGenerated = false;
			this.password = password;
		}
当我们设置新的密码的时候 passwordGenerated 会为 false,则不会自动生成密码,可以通过配置文件来重新定义登录名和密码。
登录(注销)页面哪里来的?
DefaultLoginPageGeneratingFilter 默认登录页面生成的过滤器,DefaultLogoutPageGeneratingFilter 登出页面生成过滤器。
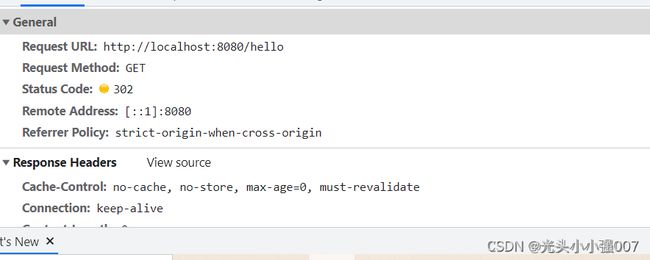
当我们第一次访问 hello 接口的时候,就已经结果登录页面生成的过滤器了,但是这个过滤器并不会拦截这个请求。这个请求会继续传递,当到最后一个过滤器的时候,会发现我们还没有登录,这个时候它会抛出一个异常,会重定向到登录页面。
认证流程分析:
用户配置相关问题
UserDetails 是 spring security 中,提供的一个用户类的接口,并提供如下方法:
getAuthorities获取权限getPassword获取密码getUsername获取用户名isAccountNonExpired判断当前账户是否没有过期isAccountNonLocked判断账户是否没有被锁定isCredentialsNonExpired判断密码是否没有过期isEnabled账户是否可用
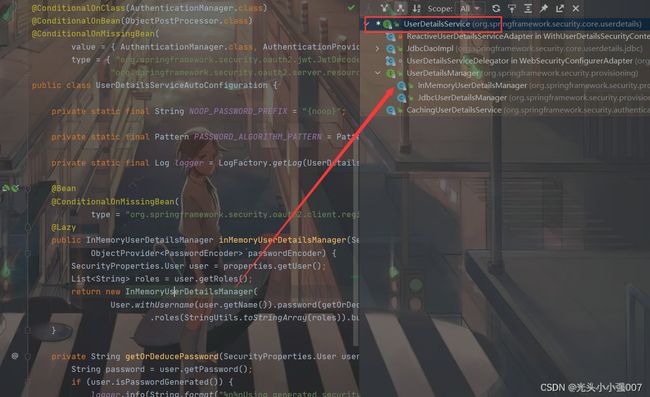
UserDetailsService 用于用户查询。spring security 自动化配置的类 UserDetailsServiceAutoConfiguration
sping security 默认是用户名和密码是以 map 集合存储在内存中的
当用户登录的时候会从 map 集合中读取数据,进而去进行登录判断。
登录成功之后源码简析
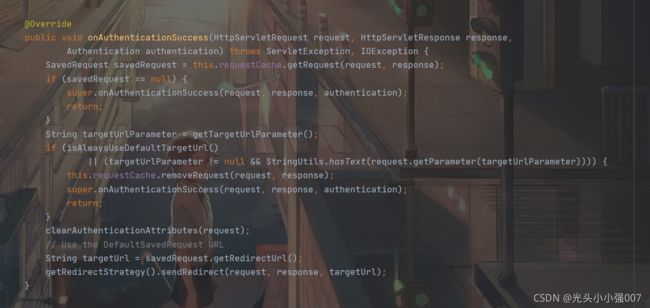
登录成功的跳转有两种方法,defaultSuccessUrl() 是客户端的重定向推荐使用这种,successForwardUrl() 属于服务端的跳转,无论登录之前访问的是什么页面都会跳转到在方法中配置好的页面。但是每次刷新页面之后都会重新提交表单登录。
AuthenticationSuccessHandler 这个接口就是用来处理登录成功之后的请求的,有如下的三个实现类:
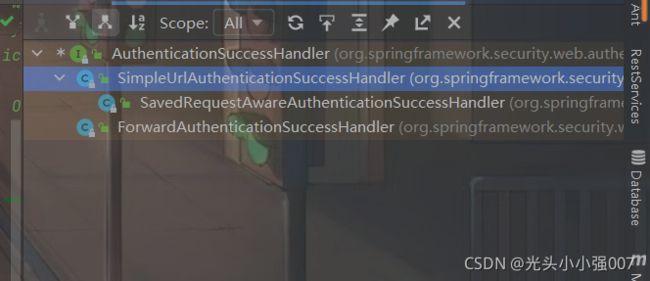
SimpleUrlAuthenticationSuccessHandler 这个类用来处理重定向的:

SavedRequestAwareAuthenticationSuccessHandler 这个类将之前的方法缓存起来了。
我们也可以自定义登录成功之后的方法处理,successHandler() 传入 AuthenticationSuccessHandler 对象
    @Bean
    SavedRequestAwareAuthenticationSuccessHandler savedRequestAwareAuthenticationSuccessHandler(){
        SavedRequestAwareAuthenticationSuccessHandler handler = new SavedRequestAwareAuthenticationSuccessHandler();
        handler.setDefaultTargetUrl("/index");
        handler.setTargetUrlParameter("target");
        return handler;
    }
添加一个 hello2 的接口,然后再请求的地址上添加要跳转的路径,如下:

在前后端分离项目中,我们不必关注页面的跳转,只是在登陆成功之后返回对应的登录信息。
                .successHandler((request, response, authentication) -> {
                    PrintWriter writer = response.getWriter();
                    ObjectMapper objectMapper = new ObjectMapper();
                    response.setContentType("application/json;charset=gbk");
                    Map<String, String> code = new HashMap<>();
                    code.put("code", "001");code.put( "msg", "登录成功");
                    writer.write(objectMapper.writeValueAsString(code));

                })
登录失败处理逻辑
failureUrl() 这个方法是登录失败的跳转, 注意这种跳转方式是客户端跳转(重定向),failureForwardUrl() 配置登录失败的跳转页面,注意,这个是服务端的跳转,服务端跳转可以携带失败的信息。
AuthenticationFailureHandler 这个接口中的 onAuthenticationFailure 是用来处理异常信息的,AuthenticationFailureHandler 接口有如下的实现类:
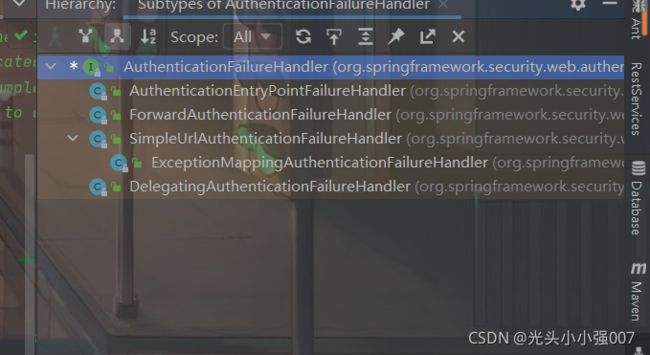
AuthenticationEntryPointFailureHandler是5.2版本引入的类,通过AuthenticationEntryPoint来进行处理异常。ForwardAuthenticationFailureHandler通过服务端跳转回到登录页面。我们配置的failureForwardUrl()的方法底层逻辑实现就是ForwardAuthenticationFailureHandler。SimpleUrlAuthenticationFailureHandler客户端的重定向ExceptionMappingAuthenticationFailureHandler根据不同的异常类型去跳转到不同的登录页面。DelegatingAuthenticationFailureHandler为登录的不同类型的失败做一个回调
自定义回调的 handler
    SimpleUrlAuthenticationFailureHandler simpleUrlAuthenticationFailureHandler() {
        SimpleUrlAuthenticationFailureHandler handler = new SimpleUrlAuthenticationFailureHandler();
        // 登录失败跳转的 url, 客户端重定向
        handler.setDefaultFailureUrl("/myLogin.html");
        // 设置客户端的重定向编程服务端的跳转
        handler.setUseForward(true);
        return handler;
    }
                // 登录失败的跳转, 注意这种跳转方式是客户端跳转(重定向)
//                .failureUrl("/myLogin.html")
                // 配置登录失败的跳转页面,注意,这个是服务端的跳转,服务端跳转可以携带失败的信息
//                .failureForwardUrl("/myLogin.html")
    .failureHandler(simpleUrlAuthenticationFailureHandler())
前后端分离的情况下我们自定义处理失败的 handler
       .failureHandler((request, response, exception) -> {
                    response.setContentType("application/json;charset=utf-8");
                    HashMap<String, Object> map = new HashMap<>();
                    map.put("status", 500);
                    map.put("msg", exception.getMessage());
                    response.getWriter().write(new ObjectMapper().writeValueAsString(map));
                })
注销登录配置
  // 注销登录的 url 地址,这是一个 get 请求
  .logoutUrl("/logout")
  // 注销登录时, 是 httpSession 失效,默认为 true
  .invalidateHttpSession(true)
 // 注销登录时,清除认证信息默认为 true
 .clearAuthentication(true)
  // 注销成功之后跳转的地址
.logoutSuccessUrl("/myLogin.html")
我们也可以配置多个登出的 url 地址,如下:
                // 注销登录的请求的配置,可以配置多个注销登录的请求地址
                .logoutRequestMatcher(new OrRequestMatcher(
                        new AntPathRequestMatcher("/logout","GET"),
                        new AntPathRequestMatcher("/logout2","POST")
                        ))
在前后端分离项目中我们也可以返回 json 格式:
                // 注销成功之后的回调
        .logoutSuccessHandler((request, response, authentication) -> {
        response.setContentType("application/json;charset=utf-8");
        HashMap<String, Object> map = new HashMap<>();
           map.put("status", 500);
                  map.put("msg", "注销成功!");
                    response.getWriter().write(new ObjectMapper().writeValueAsString(map));
                })
也可以根据不同的回调地址,响应不同的信息:
             .defaultLogoutSuccessHandlerFor((request, response, authentication) -> {
                    response.setContentType("application/json;charset=utf-8");
                    HashMap<String, Object> map = new HashMap<>();
                    map.put("status", 500);
                    map.put("msg", "使用 logout/GET 注销成功!");
                    response.getWriter().write(new ObjectMapper().writeValueAsString(map));
                }, new AntPathRequestMatcher("/logout","GET"))
                .defaultLogoutSuccessHandlerFor((request, response, authentication) -> {
                    response.setContentType("application/json;charset=utf-8");
                    HashMap<String, Object> map = new HashMap<>();
                    map.put("status", 500);
                    map.put("msg", "使用 logout2/POST 注销成功!");
                    response.getWriter().write(new ObjectMapper().writeValueAsString(map));
                }, new AntPathRequestMatcher("/logout2","POST"))
登录用户获取
SecurityContextHolder:
我们可以从 SecurityContextHolder 中的 getContext().getAuthentication() 中获取 Authentication ,继而获取登录信息
public interface Authentication extends Principal, Serializable {

    // 当前的登录用户的角色
	Collection<? extends GrantedAuthority> getAuthorities();

    // 获取凭证
	Object getCredentials();

	// 当前登录用户额外的信息
	Object getDetails();

   // 定义认证的用户
	Object getPrincipal();

    // 当前用户是否被认证
	boolean isAuthenticated();

    // 设置上面的值
	void setAuthenticated(boolean isAuthenticated) throws IllegalArgumentException;
Authentication 继承了 Principal 接口,这个接口是 java 自带的接口,里面有一些基本的方法。
他的实现类有如下:
AbstractAuthenticationToken 实现 Authentication 的同时还实现了 CredentialsContainer 接口,eraseCredentials() 该方法擦除登录凭证。
RememberMeAuthenticationToken记住我,是服务端的操作TestingAuthenticationToken测试用的tokenAnonymousAuthenticationToken匿名登录时封装的用户名和对象RunAsUserToken替换封装时的用户名和对象UsernamePasswordAuthenticationToken用户名和密码登录JaasAuthenticationTokenjas登录时PreAuthenticatedAuthenticationTokePreAuthenticatedAuthentication登录时调用的对象
** 从当前请求中获取**
SecurityContextHolder 下包含 SecurityContext ,SecurityContext 包含 Authentication
我们看一下 SecurityContextHolder 这个类,定义了三种不同的存储策略:

MODE_THREADLOCAL在那个线程里存的,在那个线程里取MODE_INHERITABLETHREADLOCAL在父线程里面存的,可以再子线程里取到信息。MODE_GLOBAL将当前信息存储到一个静态变量中。
  // 使用那种策略的配置,自定以策略
	public static final String SYSTEM_PROPERTY = "spring.security.strategy";
	private static String strategyName = System.getProperty(SYSTEM_PROPERTY);
    // 策略
	private static SecurityContextHolderStrategy strategy;
我们也可以定义从子线程中获取用户数据,如下:
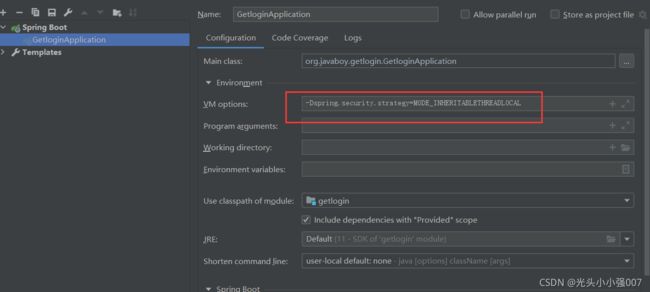
在 SecurityContextHolder 的初始化方法中判断,如果没设置则使用默认策略 MODE_THREADLOCAL 否则使用定义测策略:
	private static void initialize() {
		if (!StringUtils.hasText(strategyName)) {
			// Set default
			strategyName = MODE_THREADLOCAL;
		}
		if (strategyName.equals(MODE_THREADLOCAL)) {
			strategy = new ThreadLocalSecurityContextHolderStrategy();
		}
		else if (strategyName.equals(MODE_INHERITABLETHREADLOCAL)) {
			strategy = new InheritableThreadLocalSecurityContextHolderStrategy();
		}
		else if (strategyName.equals(MODE_GLOBAL)) {
			strategy = new GlobalSecurityContextHolderStrategy();
		}
		else {
			// Try to load a custom strategy
			try {
				Class<?> clazz = Class.forName(strategyName);
				Constructor<?> customStrategy = clazz.getConstructor();
				strategy = (SecurityContextHolderStrategy) customStrategy.newInstance();
			}
			catch (Exception ex) {
				ReflectionUtils.handleReflectionException(ex);
			}
		}
		initializeCount++;
	}
体验:
最近使用 spring boot 2.7.0 版本,结果发现 WebSecurityConfigurerAdapter 这个类过期了。
使用 {@link org.springframework.security.web.SecurityFilterChain} Bean 来配置 {@link HttpSecurity}
或 {@link WebSecurityCustomizer} Bean 来配置 {@link WebSecurity}
以前我们在内存中配置用户信息是在 configure(AuthenticationManagerBuilder auth) 该方法中去做的,UserDetailsService 接口的实现类并注入 Spring 容器即可
   @Bean
    UserDetailsService userDetailsService(){
        InMemoryUserDetailsManager user = new InMemoryUserDetailsManager();
        user.createUser(User.withUsername("zhangsan").password("{noop}123").roles("admin").build());
        return user;
    }
configure(HttpSecurity http) 使用 SecurityFilterChain 来配置过滤器链:
//@Bean
//    SecurityFilterChain  securityFilterChain(){
//        List filters = new ArrayList<>();
//        return  new DefaultSecurityFilterChain(new AntPathRequestMatcher("/**"), filters);
//    }

    @Bean
    SecurityFilterChain securityFilterChain(HttpSecurity http) throws Exception {
        // 开启配置
        http.authorizeRequests()
                .antMatchers("/admin/**").hasRole("admin")
                .antMatchers("/user/**").hasAnyRole("admin", "user")
                .anyRequest().authenticated() // 剩余的其他路径需求认证即可进入
                .and()
                .formLogin()
                .loginProcessingUrl("/doLogin")
                .permitAll() // 这些接口直接能访问
                .and()
                .csrf().disable();
        return http.build();
    }
configure(WebSecurity) 方法,使用 WebSecurityCustomizer 进行配置:
 @Bean
    WebSecurityCustomizer webSecurityCustomizer() {
        return new WebSecurityCustomizer() {
            @Override
            public void customize(WebSecurity web) {
                web.ignoring().antMatchers("/hello");
            }
        };
    }
自定义登录表单
定义两个接口
@RestController
public class HelloController {

    @GetMapping("hello")
    public String hello(){
        return "hello";
    }

    @RequestMapping("/index")
    public String index(){
        return "index";
    }
}
创建一个用户
spring.security.user.name=javaboy
spring.security.user.password=123
自定义表单页面,创建 security 的配置类:
package org.javaboy.formlogin.config;

import org.springframework.context.annotation.Configuration;
import org.springframework.security.config.annotation.web.builders.HttpSecurity;
import org.springframework.security.config.annotation.web.configuration.WebSecurityConfigurerAdapter;

/**
 * @author: yueLQ
 * @date: 2021-09-20 21:59
 *
 *  spring security 的配置类
 */
@Configuration
public class SecurityConfig  extends WebSecurityConfigurerAdapter {


    @Override
    protected void configure(HttpSecurity http) throws Exception {
        http
                // 开启权限的配置
        .authorizeRequests()
                // 拦截所有请求,所有请求必须认证才能访问
        .anyRequest().authenticated()
                .and()
                .formLogin()
                // 配置登录页面
                .loginPage("/login.html")
                // 配置登录接口,默认的登录接口是 /login
                .loginProcessingUrl("/doLogin")
                // 默认登录成功的跳转,如果第二个参数是 true 登录之后不跳转 hello
                .defaultSuccessUrl("/index")
                // 登录失败的跳转
                .failureUrl("/login.html")
                // 登录时用户名的 key
                .usernameParameter("uanem")
                // 登录时密码的 key
                .passwordParameter("passwd")
                //登录相关的接口可以直接通行
                .permitAll()
                 .and()
                .logout()
                // 登出地址,默认是 get 请求,我们可以改为 post 请求
                .logoutRequestMatcher(new AntPathRequestMatcher("/logout","POST"))
                                // 登出成功之后的默认地址
                .logoutSuccessUrl("/logout.html")
                // 退出之后清除 session 默认为true
                .invalidateHttpSession(true)
                // 清除认证信息默认为 true
                .clearAuthentication(true)
                .and()
                // 关闭 csrf 的防御策略
                .csrf().disable()
                    // 未认证的情况下返回 json 数据
                .exceptionHandling()
                 .authenticationEntryPoint((request, response, authException) -> {
                     response.setContentType("application/json;charset=utf-8");
                     PrintWriter writer = response.getWriter();
                     writer.write(new ObjectMapper().writeValueAsString("尚未登录请登录!"));
                     writer.flush();
                     writer.close();
                 });
    }
}


