【Vue】Vue学习笔记——UI组件库和常用插件
文章目录
- 6. UI组件库和常用插件
-
- 6.1 Element-ui
- 6.2 Vue-router
-
- 6.2.1 基本用法
- 6.2.2 跳转
- 6.2.3 路由嵌套
- 6.2.4 路由参数传递
- 6.3 Axios
-
- 6.3.1 基本使用
- 6.3.2 json-server的安装及使用
- 6.3.3 跨域处理
- 6.3.4 Vue中Axios的封装
6. UI组件库和常用插件
6.1 Element-ui
vue的核心思想是组件和数据驱动,但是每一个组件都需要自己编写模板、样式、添加事件、数据等,这些工作是比较繁琐的,所以推出了Element-ui,提供丰富的PC端组件。
Element-ui的两种引入方式:
-
cdn:通过在线方式直接在页面上引入Element-ui的JS和CSS文件即可开始使用:
<link rel="stylesheet" href="https://unpkg.com/element-ui/lib/theme-chalk/index.css"> <script src="https://unpkg.com/element-ui/lib/index.js">script> -
npm安装
推荐使用npm的方式安装,它能更好地和webpack打包工具配合使用
npm install element-ui -S
Vue项目中集成Element-ui的步骤如下:
-
在控制台输入命令进行安装;
-
查看配置文件package.json,是否有Element-ui组件的版本号;
-
在main.js文件中完整引入Element-ui组件库;
-
从Element官网复制示例代码到HelloWorld.vue,体验Element-ui组件;
在HelloWorld.vue中引入常用的操作按钮、下拉列表、Table表格等组件:
<template> <div id="app"> <h1>{{msg}}h1> <el-button type="primary">主要按钮el-button> <el-button plain type="warning">警告按钮el-button> <el-dropdown split-button size="small" trigger="click"> 个人中心 <el-dropdown-menu> <el-dropdown-item >退出系统el-dropdown-item> <el-dropdown-item divided>修改密码el-dropdown-item> <el-dropdown-item divided>联系管理员el-dropdown-item> el-dropdown-menu> el-dropdown> <br> <el-table :data="tableData" stripe> <el-table-column prop="date" label="日期">el-table-column> <el-table-column prop="name" label="姓名">el-table-column> <el-table-column prop="address" label="地址">el-table-column> <el-table-column label="操作" align="center"> <template slot-scope="scope"> <el-button type="primary" size="mini" @click="handleUpdate(scope.row)">编辑el-button> <el-button type="danger" size="mini" @click="handleDelete(scope.row)">删除el-button> template> el-table-column> el-table> div> template> <script> export default { name: 'HelloWorld', //在Vue组件中data只能为函数,这是Vue的特性。必须有return返回数据,否则页面模板接收不到值。 data () { return { tableData: [{ date: '2016-05-02', name: '王小虎', address: '上海市普陀区金沙江路 1518 弄' }, { date: '2016-05-04', name: '王小虎', address: '上海市普陀区金沙江路 1517 弄' }, { date: '2016-05-01', name: '王小虎', address: '上海市普陀区金沙江路 1519 弄' }] } }, methods:{ handleUpdate(row){ alert(row.date); }, handleDelete(row){ alert(row.date); } } } script> <style scoped> style> 效果如下:
6.2 Vue-router
Vue-router就是Web App的链接路径管理系统。
Vue-router是Vue官方的路由插件,它和Vue.js是深度集成的,适用于构建单页面应用。Vue的单页面应用是基于路由和组件的,路由用于设定访问路径,并将路径和组件映射起来。传统的页面应用使用一些超链接实现页面的切换和跳转。在Vue-router单页面应用中,通过路径之间的切换,也就是组件的切换实现页面的切换和跳转。路由模块的本质就是建立起URL和页面之间的映射关系。这样有助于前后端分离,前端不依赖后端逻辑,只需后端提供数据接口。
不用a标签是因为用Vue做的应用都是单页应用(当项目准备打包时,运行命令npm run build就会生成dist文件夹,这里面只有一个静态资源和一个index.html页面),所以我们写的< a >< /a >标签不起作用,必须使用Vue-router进行管理。
6.2.1 基本用法
npm install --save vue-router //通过npm命令安装vue-router
-
在src目录下建立router/index.js文件,此文件专门用于管理路由核心文件,使用Vue.use()加载路由插件,如下:
//引入vue框架 import Vue from 'vue' //引入vue-router路由依赖 import Router from 'vue-router' //引入页面组件,命名为HelloWorld。@代表绝对路径 import HelloWorld from '@/components/HelloWorld' //Vue全局使用Router Vue.use(Router) //定义路由配置,注意export导出,只要导出了别的文件才能import导入 export default new Router({ routes: [ { path: '/', name: 'HelloWorld', component: HelloWorld } ] }) -
在系统入口文件main.js中导入router,如下:
// The Vue build version to load with the `import` command // (runtime-only or standalone) has been set in webpack.base.conf with an alias. import Vue from 'vue' import App from './App' import router from './router' import ElementUI from 'element-ui' import 'element-ui/lib/theme-chalk/index.css' Vue.use(ElementUI) Vue.config.productionTip = false /* eslint-disable no-new */ new Vue({ el: '#app', router, components: { App }, template: '' }) -
用router-view占位符定义路由出口,路由匹配到的组件内容将渲染到这里,具体在App.vue组件中的用法代码如下:
<template>
  <div id="app">

    <router-view>router-view>
  div>
template>

<script>
export default {
  name: 'App'
}
script>

<style>
#app {
  font-family: 'Avenir', Helvetica, Arial, sans-serif;
  -webkit-font-smoothing: antialiased;
  -moz-osx-font-smoothing: grayscale;
  text-align: center;
  color: #2c3e50;
  margin-top: 60px;
}
style>
Vue提供了一个属性mode:‘history’,可以去掉地址栏中的#。
设置mode为history会开启HTML5和History路由模式,通过"/“设置路径。如果不设置mode,就会使用”#"设置路径。
每个页面对应一个组件,也就是对应一个.vue文件。在components目录下创建Hi.vue文件,代码如下:
<template>
	<div id="hi">
        <h1>
            Hi.vue组件
    h1>
    div>
template>
<script>
	export default{
        name:"Hi"
    }
script>
再回到index.js文件中完成路由的配置,完整代码如下:
import Hi from '../components/Hi.vue'

	{
      path:'/hi',
      name:'Hi',
      component:Hi
    }
启动服务,在浏览器中访问http://localhost:8080/hi和http://localhost:8080/就可以分别访问Hi.vue和HelloWorld.vue组件页面了。
ES6语法提示:
ES6新增了let和const命令声明变量,代替了var。它们的用法类似于var,但是所声明的变量只有在代码块内有效:代码如下:
{
	let a=123;
	var b=234;
}
console.log(a);	//报错,a is not defined
console.log(b);	//234
let和const的主要区别是,const声明的是一个只读常量,一旦声明,常量的值就不能改变。
6.2.2 跳转
在components目录下创建Home.vue(首页)和News.vue(新闻页)两个文件,代码如下:
Home.vue:
<template>
    <div id="Home">
      <h1>我是首页:h1>
      <ul>

        <span><router-link :to="{name: 'One', params:{username:'beixi'}}">子页面1router-link>span>
        <span><router-link to="/home/two/666/贝西奇谈" >子页面2router-link>span>
        <button @click="toThreePage">页面3button>
      ul>

      <router-view/>
    div>
template>

<script>
    export default {
        name: "Home",
      methods: {
        toThreePage() {
          this.$router.push({name: 'three', params: {id: 1, name: 'beixi'}})
        }
      }
    }
script>
<style scoped>
  .router-link-active{
    color: red;
  }
style>
News.vue:
<template>
    <div id="News">
      <h3>{{title}}h3>
      <ul class="ulnews">
        <li v-for="(data,index) in newslist" :key="index">{{data}}li>
      ul>
    div>
template>

<script>
    export default {
        name: "News",
        data(){
          return{
            title:'新闻栏目',
            newslist:[
              '新闻1',
              '新闻2',
              '新闻3'
            ]
          }
        }
    }
script>

<style scoped>
  .ulnews li{
    display: block;
  }
style>
接着在index.js中完成路由配置:
import Vue from 'vue'
import Router from 'vue-router'
import HelloWorld from '@/components/HelloWorld'
import Hi from '../components/Hi.vue'
import Home from '@/components/Home'
import News from '@/components/News'

Vue.use(Router)

export default new Router({
  mode:'history',
  routes: [
    {
      path: '/',
      name: 'HelloWorld',
      component: HelloWorld
    },
    {
      path:'/hi',
      name:'Hi',
      component:Hi
    },
    {
      path: '/home',
      name: 'Home',
      component: Home
    },
    {
      path: '/news',
      name: 'News',
      component: News
    }
  ]
})
这样就可以在地址栏输入不同的路径访问对应的页面,但页面上一般需要有导航链接,我们只要单击此链接就可以实现页面内容的变化。在components目录创建Nav.vue导航页面,代码如下:
<template>
  <div id="box">
    <ul>
      <li><router-link to="/home" active-class="router-link-active">首页router-link>li>


      <li><router-link to="/news" >新闻router-link>li>
    ul>
  div>
template>

<script>
    export default {
        name: "nav",
        data(){
            return {
              home:'/home'
            }
        },
      methods: {
        goHome(){
          this.$router.push('/home');
        }
      }
    }
script>

<style scoped>
  .router-link-active{
    color: red;
  }
  *{
    padding: 0;
    margin: 0;
  }
  ul{
    list-style: none;
    overflow: hidden;
  }
  #box{
    width: 600px;
    margin: 100px auto;

  }
  #box ul{
    padding: 0 100px;
    background-color: #2dc3e8;
  }
  #box ul li {
    display: block;
    width: 100px;
    height: 50px;
    background-color: #2dc3e8;
    color: #fff;
    float: left;
    line-height:50px;
    text-align: center;
  }
  #box ul li:hover{
    background-color: #00b3ee;
  }
style>
导航页面构建完成后,在实例App.vue组件中导入,这样我们在访问http://localhost:8080/路径时就会显示导航栏:
<template>
  <div id="app">
    <Nav>Nav>
    <router-view>router-view>
  div>
template>

<script>
import Nav from './components/Nav.vue'
export default {
  name: 'App',
  components:{
    Nav
  }
}
script>

<style>
#app {
  font-family: 'Avenir', Helvetica, Arial, sans-serif;
  -webkit-font-smoothing: antialiased;
  -moz-osx-font-smoothing: grayscale;
  text-align: center;
  color: #2c3e50;
  margin-top: 60px;
}
style>
下面介绍Vue.js通过路由跳转页面方式:
-
router-link标签跳转
使用内置的< router-link >标签跳转,它会被渲染成< a >标签,使用方式如下:
<template>
  <div id="box">
    <ul>
      <li><router-link to="/home" active-class="router-link-active">首页router-link>li>
      <li><router-link to="/news" >新闻router-link>li>
    ul>
  div>
template>
< router-link >标签中属性介绍如下:
-
to
表示目标路由的链接。当被单击后,内部会立刻把to的值传到router.push(),所以这个值可以是一个字符串,也可以是描述目标位置的对象。也可以用v-bind动态设置连接路径:
<li><router-link to="/home" active-class="router-link-active">首页router-link>li> <li><router-link v-bind:to="home">首页router-link>li> <li><router-link :to="{ path: 'home' }">首页router-link>li> -
replace
使用replace属性导航后不会留下history记录,所以导航后不能用后退键返回上一个页面,如< router-link to="/home" replace >
-
tag
有时需要时< router-link >渲染成某种标签,例如< li >。我们可以使用tag属性指定标签,同时它可以监听单击,从而触发导航:
<router-link to="/foo" tag="li">foorouter-link>渲染结果为< li >foo< /li >
-
active-class
当< router-link >对应的路由匹配成功时,会自动给当前元素设置一个名为router-link-active的class值。设置router-link-active的CSS样式,在单击导航栏时可以 使用该功能高亮显示当前页面对应的导航菜单项。
当我们访问http://localhost:8080/路径时,希望在页面上显示首页的内容,而不是HelloWorld.vue组件的内容。这时我们可以使用路由的重定向redirect属性。在路由配置文件中设置redirect参数即可:
{ path: '/', redirect:'/home', name: 'HelloWorld', component: HelloWorld } -
-
JS代码内部跳转
在实际项目中,很多时候通过在JS代码内部进行导航的跳转,使用方式如下:
this.$router.push('/xxx')具体用法及步骤如下:
-
在页面中添加单击事件:
<button @click="getHome"> 首页 button> -
在 < script > 模块加入getHome方法,并用this.$router.push(’/’)导航到首页:
export default{
    name:"app",
    methods:{
        getHome(){
            this.$router.push('/home');
        }
    }
}
其他常用方法:
//后退一步记录,等同于history.back() this.$router.go(-1) //在浏览器记录前进一步,等同于history.forward() this.$router.go(1) -
6.2.3 路由嵌套
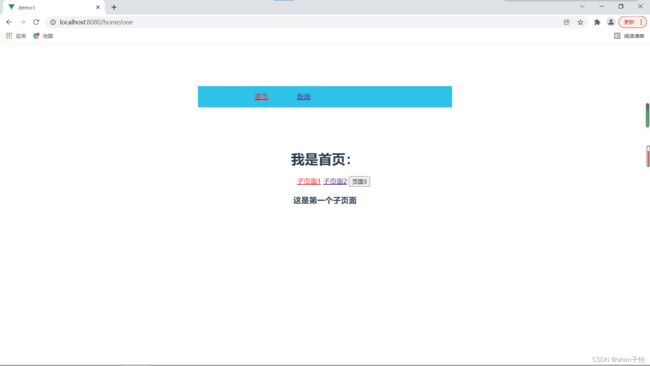
子路由也叫路由嵌套,一般应用会出现二级导航这种情况,这时就得使用路由嵌套这种写法,采用在children后跟路由数组来实现,数组的配置和其他配置路由基本相同,需要配置path和component,然后在相应部分添加< router-view/ >展现子页面信息,相当于嵌入iframe。
-
Home.vue代码如下:
<template> <div id="Home"> <h1>我是首页:h1> <ul> <span><router-link to="/home/one">子页面1router-link>span> <span><router-link to="/home/two" >子页面2router-link>span> <button @click="toThreePage">页面3button> ul> <router-view/> div> template> <script> export default { name: "Home", methods: { toThreePage() { this.$router.push({name: 'three', params: {id: 1, name: 'beixi'}}) } } } script> <style scoped> .router-link-active{ color: red; } style> -
One.vue代码如下:
<template> <div id="one"> <h3>{{msg}}h3> div> template> <script> export default { name: "One", data(){ return { msg:'这是第一个子页面' } } } script> <style scoped> style> -
Two.vue代码如下:
<template> <div id="two"><h3>{{msg}}h3> div> template> <script> export default { name: "Two", data(){ return { msg:'这是第二个子页面' } } } script> <style scoped> style> -
index.js代码如下:
import Vue from 'vue'
import Router from 'vue-router'
import HelloWorld from '@/components/HelloWorld'
import Hi from '../components/Hi.vue'
import Home from '@/components/Home'
import News from '@/components/News'
import One from '../pages/One.vue'
import Two from '../pages/Two.vue'

Vue.use(Router)

export default new Router({
  mode:'history',
  routes: [
    {
      path: '/',
      name: 'HelloWorld',
      component: HelloWorld
    },
    {
      path:'/hi',
      name:'Hi',
      component:Hi
    },
    {
      path: '/home',
      name: 'Home',
      component: Home,
      children:[ // 嵌套子路由
        {
          path:'one', // 子页面1
          name:'One',
          component:One
        },
        {
          path:'two', // 子页面2
          component:Two
        }
      ]
    },
    {
      path: '/news',
      name: 'News',
      component: News
    }
  ]
})
6.2.4 路由参数传递
路由传递参数有三种方式:
-
通过< router-link >的to传参
基本语法:
<router-link :to="{name,xxx,params:{key:value}}">valuestringrouter-link>在上面代码中to带冒号,值为对象形式的字符串。
- name:对应的是路由配置文件中所使用的name值,叫做路由名称。
- params:要传的参数,此参数以对象形式出现,在对象里可以传递多个值。
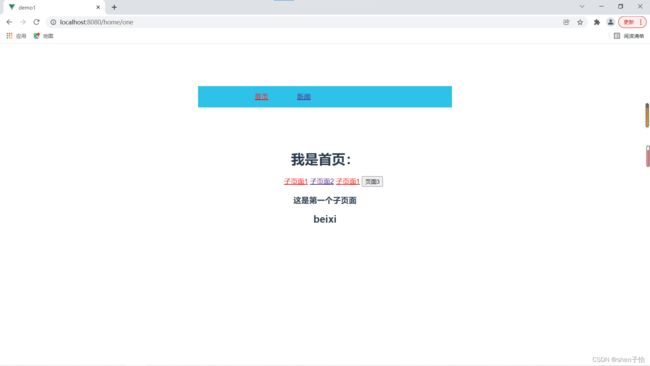
具体实例如下:
-
在src/components/Home.vue里面的导航中添加如下代码:
<router-link :to="{name:'One',params:{username:'beixi'}}">子页面1router-link> -
在src/router/index.js中添加如下代码:
{ path:'one', //子页面1 name:'One', //name属性不能少 component:One } -
在src/pages/One.vue里面接收参数,代码如下:
<h2>
    {{$route.params.username}}
h2>
-
在URL中传递参数
-
在路由中以冒号的形式传递,在src/router/index.js中添加如下代码:
{ path:'two/:id/:name', //子页面2 component:Two } -
接收参数,在src/pages/Two.vue中添加如下代码:
<p> ID:{{$route.params.id}} p> <p> 名称:{{$route.params.name}} p> -
路由跳转,在src/components/Home.vue中添加如下代码:
<router-link to="/home/two/666/沈子怡">子页面2router-link>
-
-
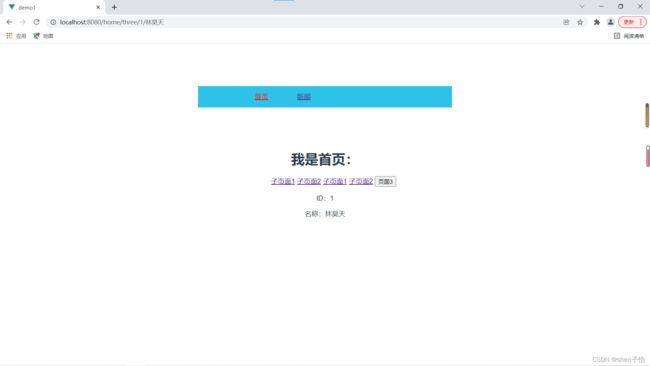
编程式导航params传递参数
-
在src/router/index.js中添加如下代码:
{ path:'three/:id/:name', //子页面3 name:'three', component:Three } -
在src/pages/Three.vue页面添加如下代码:
<p> ID:{{$route.params.id}} p> <p> 名称:{{$route.params.name}} p> -
在src/components/Home.vue中添加如下代码:
<button @click="toThreePage">页面3button> methods: { toThreePage() { this.$router.push({name: 'three', params: {id: 1, name: '林昊天'}}) } -
动态路由使用params传递参数,在this.$route.push()方法中path不能和params一起使用,否则params将无效。需要用name来指定页面。
路由中router和route的区别如下:
-
router是Vuerouter的一个对象,通过Vue.use(VueRouter)和VueRouter构造函数得到一个router的实例对象,这个对象是一个全局的对象,它包含了所有的路由并且也包含了许多关键的对象和属性,代码如下:
$router.push({path:'home'}); //切换路由,有history记录 $router.replace({path:'home'}); //替换路由,无history记录 -
route是一个跳转的路由对象,每一个路由都会有一个route对象,它是一个局部的对象,可以获取对应的name、path、params、query等。
$ route.path,$ route.params,$ route.name,$ route.query这几个属性很容易理解,主要用于接收路由传递的参数。
-
6.3 Axios
Axios是一个基于Promise的HTTP库,它是一个简洁、易用且高效的代码封装库,通俗地讲,它是当前比较流行的一种Ajax框架,可以使用它发起HTTP请求接口功能,它是基于Promise的,相比较Ajax的回调函数能更好地管理异步操作。
Axios的特点:
- 从浏览器中创建XMLHttpRequests
- 从Node.js创建HTTP请求
- 支持PromiseAPI
- 拦截请求和响应
- 转换请求数据和响应数据
- 取消请求
- 自动转换JSON数据
- 客户端支持防御XSRF
6.3.1 基本使用
使用npm安装Axios依赖:
npm install axios
如果要全局使用Axios就需要在main.js中设置,然后在组件中通过this调用,代码如下:
import axios from 'axios'
Vue.prototype.$axios=axios;		//加载到原型上
Axios提供了很多请求方式,例如在组件中直接发起GET或POST请求:
//为给定ID的user创建get请求
this.$axios.get('/user?ID=12345').then(res=>{console.log('数据是:',res);})
//也可以把参数提取出来
this.$axios.get('/user',{
    params:{
        ID:12345
    }
}).then(res=>{//响应数据
    console.log('数据是',res);
}).catch((e)=>{//请求失败
    console.log('获取数据失败');
});

//post请求
this.$axios.post('/user',{
    firstName:'lin',
    lastName:'haotian'
}).then(function(res){
    console.log(res);
}).catch(function(err){
    console.log(err);
});
分别写两个请求函数,利用Axios的all方法接收一个由每个请求函数组成的数组,可与一次性发出多个请求,如果全部请求成功,在axios.spread方法中接收一个回调函数,该函数的参数就是每个请求返回的结果,代码如下:
function getUserAccount(){
    return axios.get('/user/12345');
}
function getUserPerssions(){
    return axios.get('/user/12345/perssions');
}
this.$axios.all([getUserAccount(),getUserPerssions()])
.then(axios.spread(function(res1,res2){
    //当这两个请求都完成的时候会触发这个函数,两个参数分别代表返回的结果
}))
以上通过Axios直接发起对应请求其实是Axios为了方便起见给不同的请求提供别名方法,我们完全可以通过调用Axios的API,传递一个配置对象来发起请求。
发生POST请求,参数写在data属性中,代码如下:
axios({
    url:'http://rap2api.taobao.org/app/mock/121145/post',
    method:'post',
    data:{
        name:'沈子怡'
    }}).then(res=>{
    console.log('请求结果:',res);
});
发生GET请求,默认就是GET请求,直接在第一个参数处写路径,在第二个参数处写配置对象,参数通过params属性设置,代码如下:
axios('http://rap2api.taobao.org/app/mock/121145/get',{
    params:{
        name:'沈子怡'
    }}).then(res=>{
    console.log('请求结果:',res);
});
Axios为所有的请求提供了别名:
axios.request(config)
axios.get(url,[config])
axios.delete(url,[config])
axios.head(url,[config])
axios.options(url,[config])
axios.post(url,data,[config])
axios.put(url,data,[config])
axios.patch(url,data,[config])
在使用别名方法时,url,method,data这些属性都不必在配置中指定
6.3.2 json-server的安装及使用
json-server是一个Node模块,运行Express服务器,我们可以指定一个JSON文件作为API的数据源。简单理解为在本地创建数据接口,使用Axios访问数据,使用步骤如下:
- 在根目录下全局安装json-server:
npm install -g json-server
- 在任意盘符创建一个文件夹用于存放JSON数据文件,终端切换到该文件目录下,执行初始化命令(一直按回车键即可):
npm init
- 在初始化的项目中安装json-server,执行如下命令:
npm install json-server --save
-
此时我们在项目文件夹下就可看到一个package.json文件,然后在当前目录下新建一个db.json文件,在本文件下编写自己的JSON数据:
{ "users":[ { "name":"beixi", "phone":"15536812236", "email":"[email protected]", "id":"1", "age":"18", "companyId":1 } ], "cpmpanies":[ { "id":1, "name":"Alibaba", "description":"Alibaba is good" } ] } -
修改package.json数据,设置快捷启动json-server命令如下:
"scripts": { "json:server":"json-server --watch db.json" }, -
运行json-server,命令如下:
npm run json:server
-
接着利用Axios访问json-server服务器中的数据,对数据列表进行增删改查操作:
 <template>
  <div id="jsonDemo" v-cloak>
    <div class="add">
     用户信息:
      <input type="text" v-model="name" >
      <input type="button" value="添加" @click=addItem()>
    div>
    <div>
      <table class="tb">
        <tr>
          <th>编号th>
          <th>用户名称th>
          <th>操作th>
        tr>
        <tr v-for="(v,i) in list" :key="i">
          <td>{{i+1}}td>
          <td>{{v.name}}td>
          <td>
            <a href="#" @click.prevent="deleItem2(v.id)">删除a>
          td>
        tr>

        <tr v-if="list.length===0">
          <td colspan="4">没有数据td>
        tr>
      table>
    div>
  div>
template>

<script>
    export default {
        name: "jsonDemo",
      data(){
        return{
          name:'',
          list: []
        }
      },
      created(){
        this.$axios.get("http://localhost:3000/users").then(res => {
            this.list = res.data
            console.log(res)
          })
          .catch(error => {
            console.log(error);
          })
      },
      methods:{
        // 获取数据
        getData() {
          this.$axios.get('http://localhost:3000/users')
            .then((res) => {
              const { status, data } = res;
              if (status === 200) {
                this.list = data;
              }
            })
            .catch((err) => {
            })
        },
        // 删除
        deleItem2(ID) {
          console.log(ID)
           if (confirm("确定要删除吗?")) {
             // this.list.splice(index, 1);
             this.$axios.delete('http://localhost:3000/users/' + ID)
               .then((res) => {
                 console.log(res);
                 this.getData()
               })
           }
        },
        // 增加
        addItem() {
          this.$axios.post('http://localhost:3000/users', {
              name: this.name
            })
            .then((res) => {
              const { status } = res;
              if (status === 201) {
                this.getData()
              }
            })
          this.list.unshift({
            name: this.name,
          });
          this.name = "";
        }
      }
    }
script>

<style scoped>
  #app {
    width: 600px;
    margin: 10px auto;
  }

  .tb {
    border-collapse: collapse;
    width: 100%;
  }

  .tb th {
    background-color: #0094ff;
    color: white;
  }

  .tb td,
  .tb th {
    padding: 5px;
    border: 1px solid black;
    text-align: center;
  }

  .add {
    padding: 5px;
    border: 1px solid black;
    margin-bottom: 10px;
  }
style>
6.3.3 跨域处理
跨域是指浏览器不能执行其他网站的脚本.它是由浏览器的同源策略造成的,是浏览器对JavaScript实施的安全限制.
同源策略:是指协议\域名\端口都要相同,其中有一个不同便会产生跨域.
如我们调用百度音乐的接口,以此获取音乐数据列表,这必然会出现跨域的问题.百度音乐的接口完整地址:http://tingapi.ting.baidu.com/v1/restserver/ting? method=baidu.ting.billboard.billList&type=1&size=10&offset=0
在vue中使用本地代理的方式进行跨域处理.首先在配置文件config/index.js中设置代理,在proxyTable中添加如下代码:
    proxyTable: {
      '/api': {
        target: 'http://tingapi.ting.baidu.com', //目标路径,别忘了加http和端口号
        changeOrigin: true, //是否跨域
        pathRewrite: {
          '^SymbolYCp/api': '' //重写路径
        }
      }
    },
在main.js中,配置访问的URL前缀,这样每次发出请求时都会在URL前自动添加/api的路径,代码如下:
axios.defaults.baseURL = '/api'
在src/compones/baidu.vue建立组件页面,发生URL请求,代码如下:
<template lang="html">
  <div class="">
    <h3>百度音乐h3>
    <ul>
      <li v-for="(item,index) in music.song_list">{{ item.album_title}}li>
    ul>
  div>
template>

<script>
export default {
  name:"baidu",
  data(){
    return{
      music:{
        song_list:[]
      },
    }
  },
  created(){
    // 网络请求
    var url =  "/v1/restserver/ting?method=baidu.ting.billboard.billList&type=1&size=10&offset=0";
    this.$axios.get(url)
    .then(res => {
      this.music = res.data
      console.log(res)
    })
    .catch(error => {
      console.log(error);
    })
  },
}
script>
<style >
style>
在src/router/index.js中配置路由,代码如下:
    {
      path: '/baidu',
      name: 'baidu',
      component: baidu
    }
*emmmmmmm…报500了,也不知道什么原因。所以下一章的实战项目也一样是500. *
6.3.4 Vue中Axios的封装
-
Axios的封装
在项目中新建api/index.js文件,用以封装配置Axios,代码如下:
let http=axios.create({
    baseURL='http://localhost:8080/',
    withCredentials:true,
    headers:{
    	'Content-Type':'application/x-www-form-urlencoded;charset=utf-8'
	},
    transformRequest:[function(data){
    	let newData='';
    	for(let k in data){
            if(data.hasOwnProperty(k)===true){
                newData+=encodeURIComponent(k)+'='+encodeURIComponent(data[k])+'&';
            }
        }
        return newData;
	}]
});
function apiAxios(method,url,params,response){
    http({
        method:method,
        url:url,
        data:method==='POST'||method==='PUT'?params:null,
        params:method==='GET'||method==='DELETE'?params:null,
    }).then(function(res){
        response(res);
    }).catch(function(err){
        response(err);
    })
}
export default{
    get:function(url,params,response){
        return apiAxios('GET',url,params,response)
    },
    post:function(url,params,response){
        return apiAxios('POST',url,params,response)
    },
    put:function(url,params,response){
        return apiAxios('PUT',url,params,response)
    },
    delete:function(url,params,response){
        return apiAxios('DELETE',url,params,response)
    }
}
这里配置了PIST,PUT,GET,DELETE方法,并且自动将JSON格式数据转为URL拼接的方式。同时配置了跨域,如果不需要则将withCredentials设置为false。设置默认前缀地址为http://localhost:8080/,这样调用的时候只需写目标后缀路径。
注:PUT请求默认会发送两次请求,第一次预检查请求不含参数,所以后端不能对PUT请求地址做参数限制。
-
使用
首先在main.js中引入方法:
//main.js
import Api from './api/index.js';
Vue.protoType.$api=Api;
然后在需要的地方调用即可:
this.$api.post('user/login.do(地址)',{"参数名":"参数值"},response=>{
	if(response.status>=200&&response.status<300){
		console.log(response.data);		//请求成功,response为成功信息参数
	}else{
		console.log(response.message);		//请求失败,response为失败信息
	}})


