| 源码(码云):https://gitee.com/yin_zhipeng/implement_mybatis_of_myself.git |
文章目录
- 一、手写Mybatis
- 二、Mybatis高级应用
-
- 1. 基本概念
- 2. 环境说明
- 3. 基本crud操作
- 4. 核心配置文件常用配置
- 5. 动态sql
- 6. 复杂映射
-
- 7. Mybatis注解开发
-
- 7.1 基本CRUD
- 7.2 复杂映射,一对一
- 7.3 复制映射,一对多
- 8. Mybatis一级缓存和源码
- 9. Mybatis二级缓存
-
- 9.1 使用redis自定义二级缓存
- 9.2 mybatis-redis源码分析
- 10. Mybatis插件
-
- 10.1 自定义插件练手
- 10.2 源码分析
- 10.3 pageHelper分页插件
- 10.4 通用mapper
- 三、Mybatis源码
一、手写Mybatis
| 篇幅限制,我将其放在这篇文章中:https://blog.csdn.net/grd_java/article/details/122894621 |
二、Mybatis高级应用
1. 基本概念
| ORM(Object/Relation Mapping,对象/关系数据库映射) |
- 完成面向对象的编程语言到关系数据库的映射。当ORM框架完成映射后,程序员就可以利用面向对象的简单易用性和关系型数据库的技术优势完成对数据库的操作
- ORM把关系型数据库包装成面向对象的模型。是面向对象语言和关系型数据库的中间解决方案
- 使用ORM框架,应用程序不再直接访问底层数据库,而是以面向对象的方式操作持久化对象,ORM框架将面向对象操作转换成底层SQL操作
- 效果:把持久化对象的保存、修改、删除等操作,装换为对数据库的操作
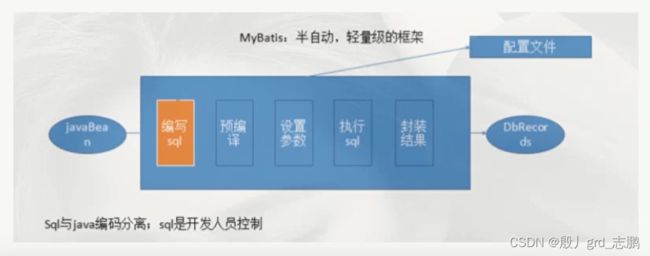
- 优秀的半自动化轻量级ORM框架,持久层框架,支持定制化SQL、存储过程以及高级映射
- 避免了几乎所有JDBC代码和手动设置参数以及获取结果集。Mybatis可以使用XML或注解来配置和映射原生类型、接口和Java的POJO(Plain Old Java Objects 普通老式Java对象)为数据库中记录
- 原是Apache的开源项目iBatis。2010nian6月由Apache Software Foundation迁移到了Google Code,随着开发团队转投Google Code旗下,iBatis3.x正式更名为MyBatis,代码与2013年11月迁移到Github
- 半自动化持久层框架。对开发人员而言,核心Sql需要自己优化,sql和java编码解耦合,分开编写,功能边界清晰,一个专注业务,一个专注数据
2. 环境说明
- 复制上面使用手写mybatis的模块,用真正的mybatis改造
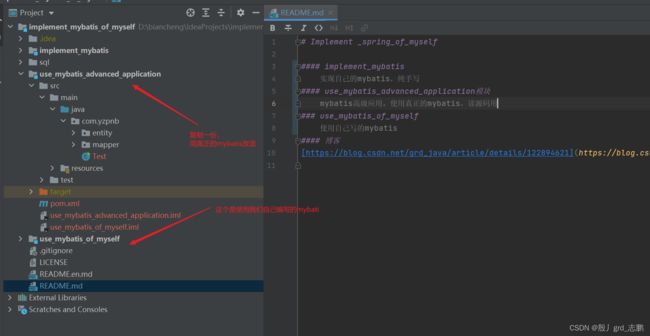
- 依赖

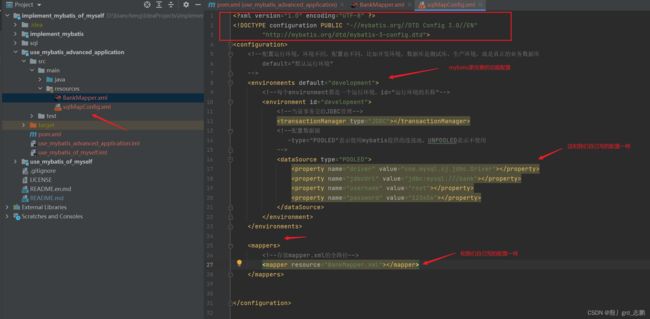
- xml配置文件,xml映射基本一样,核心配置文件有些不同,它更完善,它可以针对不同环境,采用不同的配置,并用一个< mappers>标签来当所有配置映射mapper.xml文件路径的父标签
- mapper.xml

DOCTYPE mapper PUBLIC "-//mybatis.org//DTD Mapper 3.0//EN"
        "http://mybatis.org/dtd/mybatis-3-mapper.dtd">
<mapper namespace="com.yzpnb.mapper.AccountMapper">

    <select id="selectList" resultType="com.yzpnb.entity.Account">
        select * from account
    select>
    <select id="selectOne" resultType="com.yzpnb.entity.Account" parameterType="com.yzpnb.entity.Account">
        select * from account where id = #{id}
    select>
mapper>
- 核心配置文件(下图有一错误:jdbcUrl不是mybatis指定,需要换成url)
DOCTYPE configuration PUBLIC "-//mybatis.org//DTD Config 3.0//EN"
        "http://mybatis.org/dtd/mybatis-3-config.dtd">
<configuration>

    <environments default="development">

        <environment id="development">

            <transactionManager type="JDBC">transactionManager>

            <dataSource type="POOLED">
                <property name="driver" value="com.mysql.cj.jdbc.Driver">property>
                <property name="url" value="jdbc:mysql:///bank">property>
                <property name="username" value="root">property>
                <property name="password" value="123456">property>
            dataSource>
        environment>
    environments>

    <mappers>

        <mapper resource="BankMapper.xml">mapper>
    mappers>


configuration>
- 测试(代码基本不变)

3. 基本crud操作


4. 核心配置文件常用配置
| Properties,可以引入外部资源文件,常用于mybatis配置文件和数据库配置解耦合 |
- 将数据库配置抽离成一个单独文件
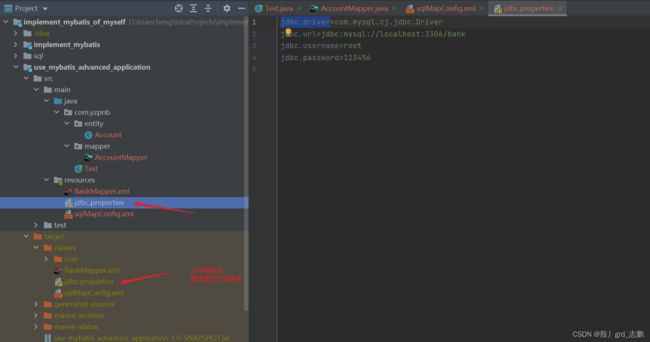
- mybatis核心配置文件,引用

<properties resource="jdbc.properties">properties>
| typeAliases,为Java类型设置一个短的名字,比如我们com.yzpnb.entity.Account,可以配置为account,这样写起来更简单 |
- Mybatis为我们设置了一些常用的别名
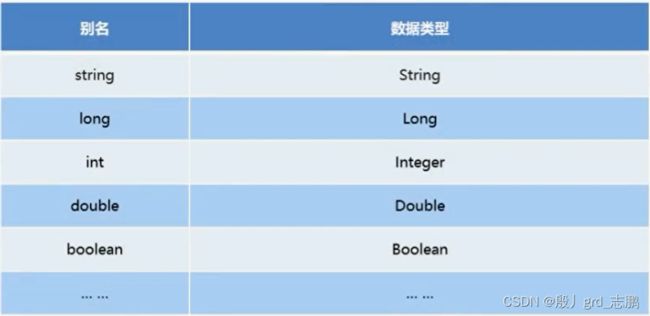
- 我们自己配置一下,将com.yzpnb.entity.Account,配置为account

    <typeAliases>

        <typeAlias type="com.yzpnb.entity.Account" alias="account">typeAlias>

        <package name="com.yzpnb.entity"/>
    typeAliases>
- mapper映射文件就可以使用了

5. 动态sql
| mybatis提供了很多处理动态sql的手段,可以动态拼接条件,循环等等,如下,讲解在代码后面 |
DOCTYPE mapper PUBLIC "-//mybatis.org//DTD Mapper 3.0//EN"
"http://mybatis.org/dtd/mybatis-3-mapper.dtd">
<mapper namespace="cn.edu.imau.zy.online_education.mapper.OeUserMapper">

    <resultMap type="OeUser" id="OeUserResult">
        <result property="id"    column="id"    />
        <result property="jobNumber"    column="job_number"    />
        <result property="studentNumber"    column="student_number"    />
        <result property="userName"    column="user_name"    />
        <result property="phoneNum"    column="phone_num"    />
        <result property="level"    column="level"    />
        <result property="description"    column="description"    />
        <result property="avatar"    column="avatar"    />
        <result property="gmtCreate"    column="gmt_create"    />
        <result property="gmtModified"    column="gmt_modified"    />
    resultMap>

    <sql id="selectOeUserVo">
        select id, job_number, student_number, user_name, phone_num, level, description, avatar, gmt_create, gmt_modified from oe_user
    sql>

    <select id="selectOeUserList" parameterType="OeUser" resultMap="OeUserResult">
        <include refid="selectOeUserVo"/>/*引入公共头*/
        <where>
            <trim>
                <if test="jobNumber != null  and jobNumber != ''">and job_number = #{jobNumber}if>
                <if test="studentNumber != null  and studentNumber != ''">student_number = #{studentNumber}if>
                <if test="userName != null  and userName != ''"> and user_name like concat('%', #{userName}, '%')if>
                <if test="phoneNum != null  and phoneNum != ''">phone_num = #{phoneNum}if>
                <if test="level != null  and level != ''">level = #{level}if>
                <if test="description != null  and description != ''">description = #{descrition}if>
            trim>
        where>
    select>

    <select id="selectOeUserById" parameterType="Long" resultMap="OeUserResult">
        <include refid="selectOeUserVo"/>
        where id = #{id}
    select>

    <select id="selectOurSchoolStudent" resultMap="OeUserResult">
        <include refid="selectOeUserVo"/>
        where student_number is not null
    select>

    <select id="selectOurSchoolTeacher" resultMap="OeUserResult">
        <include refid="selectOeUserVo"/>
        where job_number is not null
    select>

    <select id="selectCommonUser" resultMap="OeUserResult">
        <include refid="selectOeUserVo"/>
        where job_number is null and student_number is null
    select>
    <insert id="insertOeUser" parameterType="OeUser">
        insert into oe_user
        <trim prefix="(" suffix=")" suffixOverrides=",">
            <if test="id != null ">id,if>
            <if test="jobNumber != null  and jobNumber != ''">job_number,if>
            <if test="studentNumber != null  and studentNumber != ''">student_number,if>
            <if test="userName != null  and userName != ''">user_name,if>
            <if test="phoneNum != null  and phoneNum != ''">phone_num,if>
            <if test="level != null  and level != ''">level,if>
            <if test="description != null  and description != ''">description,if>
            <if test="avatar != null  and avatar != ''">avatar,if>
            <if test="gmtCreate != null ">gmt_create,if>
            <if test="gmtModified != null ">gmt_modified,if>
         trim>
        <trim prefix="values (" suffix=")" suffixOverrides=",">
            <if test="id != null ">#{id},if>
            <if test="jobNumber != null  and jobNumber != ''">#{jobNumber},if>
            <if test="studentNumber != null  and studentNumber != ''">#{studentNumber},if>
            <if test="userName != null  and userName != ''">#{userName},if>
            <if test="phoneNum != null  and phoneNum != ''">#{phoneNum},if>
            <if test="level != null  and level != ''">#{level},if>
            <if test="description != null  and description != ''">#{description},if>
            <if test="avatar != null  and avatar != ''">#{avatar},if>
            <if test="gmtCreate != null ">#{gmtCreate},if>
            <if test="gmtModified != null ">#{gmtModified},if>
         trim>
    insert>

    <update id="updateOeUser" parameterType="OeUser">
        update oe_user
        <trim prefix="SET" suffixOverrides=",">
            <if test="jobNumber != null  and jobNumber != ''">job_number = #{jobNumber},if>
            <if test="studentNumber != null  and studentNumber != ''">student_number = #{studentNumber},if>
            <if test="userName != null  and userName != ''">user_name = #{userName},if>
            <if test="phoneNum != null  and phoneNum != ''">phone_num = #{phoneNum},if>
            <if test="level != null  and level != ''">level = #{level},if>
            <if test="description != null  and description != ''">description = #{description},if>
            <if test="avatar != null  and avatar != ''">avatar = #{avatar},if>
            <if test="gmtCreate != null ">gmt_create = #{gmtCreate},if>
            <if test="gmtModified != null ">gmt_modified = #{gmtModified},if>
        trim>
        where id = #{id}
    update>

    <delete id="deleteOeUserById" parameterType="Long">
        delete from oe_user where id = #{id}
    delete>

    <delete id="deleteOeUserByIds" parameterType="String">
        delete from oe_user where id in
        <foreach item="id" collection="array" open="(" separator="," close=")">
            #{id}
        foreach>
    delete>

mapper>
- if标签根据条件是否成立来拼接sql,但是很可能出现and开头,and结尾等语法错误的情况。例如select * from account where
and username=“101001”,where后面里面跟了and,这是错误的
- where标签,可以让我们省略where关键字,并去掉开头和末尾的and
- trim可以指定去掉某些内容,比如逗号,也可以指定拼接前缀,后缀
| foreach 标签,可以遍历拼接sql,可以指定遍历的属性,还有类似循环变量的功能 |
- item=“循环变量”,相当于循环变量,每次遍历的值都会渲染到它所在的位置
- collection=“容器类型”,如果传过来参数是数组就array,list就写list
- open,指定循环的前缀,就是循环开始前,先把这个字符拼接到sql
- separator,指定每个参数的分隔符
- close,指定循环结束的后缀,循环结束后,把这个字符拼接到sql
| sql 和 include标签,相当于全局变量。sql可以定义一段sql为共用的(重复的sql),include可以在需要的地方引入 |
6. 复杂映射


6.1 一对一
| 一对一关系映射(不是站在数据库设计角度,而是java对象角度) |
- 大致关系如下(一个订单,只能属于一个用户)

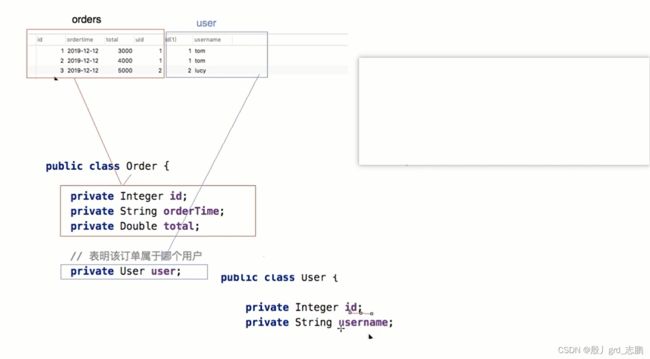
- 新建一个实体类,并封装对应关系

- mapper层接口
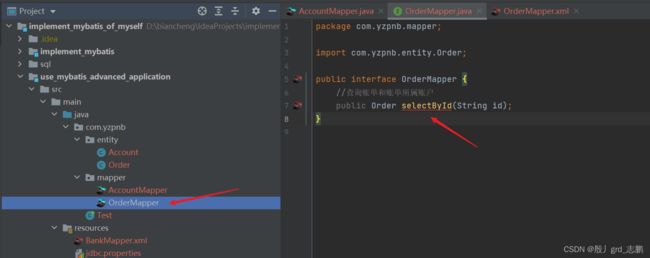
| 现在的问题是,我们如何让mybatis返回时,正常的返回Order,正常的将Account对象封装进Order的属性中,方式就是使用mybatis的结果集封装标签 |
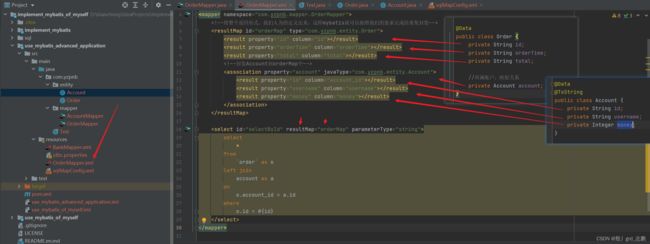
DOCTYPE mapper PUBLIC "-//mybatis.org//DTD Mapper 3.0//EN"
        "http://mybatis.org/dtd/mybatis-3-mapper.dtd">
<mapper namespace="com.yzpnb.mapper.OrderMapper">

    <resultMap id="orderMap" type="com.yzpnb.entity.Order">
        <result property="id" column="id">result>
        <result property="orderTime" column="orderTime">result>
        <result property="total" column="total">result>

        <association property="account" javaType="com.yzpnb.entity.Account">
            <result property="id" column="account_id">result>
            <result property="username" column="username">result>
            <result property="money" column="money">result>
        association>
    resultMap>

    <select id="selectById" resultMap="orderMap" parameterType="string">
        select
            *
        from
            `order` as o
        left join
            account as a
        on
            o.account_id = a.id
        where
            o.id = #{id}
    select>
mapper>

6.2 一对多
| 一对多(不是站在数据库设计角度,而是java对象角度),刚刚是一个订单属于一个用户,现在我们查一个用户的所有订单 |
- 大致关系

- 实体类封装对应关系,用集合封装

- mapper.xml改造
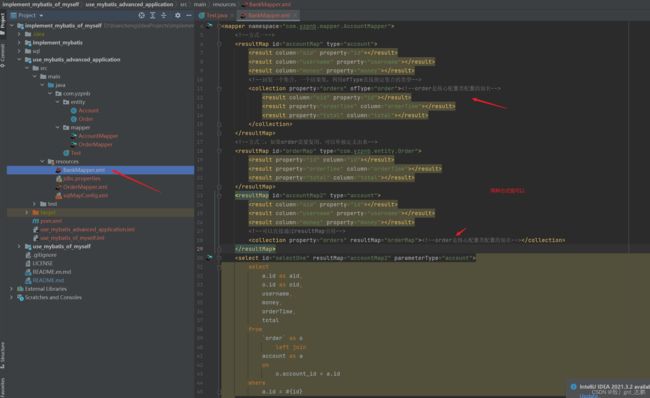
    <resultMap id="accountMap" type="account">
        <result column="aid" property="id">result>
        <result column="username" property="username">result>
        <result column="money" property="money">result>

        <collection property="orders" ofType="order">
            <result column="oid" property="id">result>
            <result property="orderTime" column="orderTime">result>
            <result property="total" column="total">result>
        collection>
    resultMap>

    <resultMap id="orderMap" type="com.yzpnb.entity.Order">
        <result property="id" column="id">result>
        <result property="orderTime" column="orderTime">result>
        <result property="total" column="total">result>
    resultMap>
    <resultMap id="accountMap2" type="account">
        <result column="aid" property="id">result>
        <result column="username" property="username">result>
        <result column="money" property="money">result>

        <collection property="orders" resultMap="orderMap">collection>
    resultMap>
    <select id="selectOne" resultMap="accountMap2" parameterType="account">
        select
            a.id as aid,
            o.id as oid,
            username,
            money,
            orderTime,
            total
        from
            `order` as o
                left join
            account as a
            on
                o.account_id = a.id
        where
            a.id = #{id}
    select>
- 测试

7. Mybatis注解开发
| 描述(:不常用/:常用) |
注解 |
| 新增 |
@Insert |
| 更新 |
@Update |
| 删除 |
@Delete |
| 查询 |
@Select |
| 结果集封装 |
@Result |
| 可与@Result一起使用,封装多个结果集 |
@Results |
| 一对一结果集封装 |
@One |
| 一对多结果集封装 |
@Many |
7.1 基本CRUD

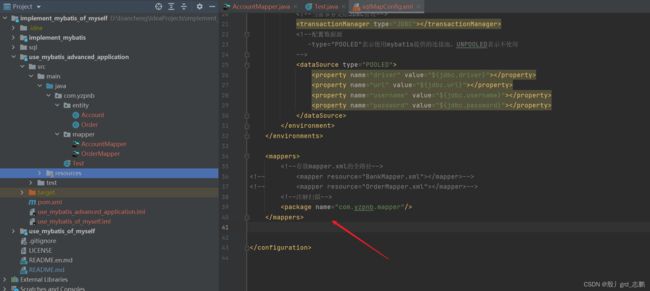
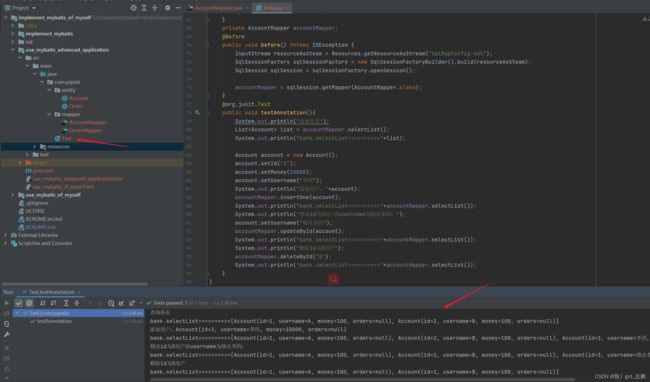
7.2 复杂映射,一对一
| 基于注解的复杂映射,其实就是执行多个sql,组合在一起 |
- 假设查询订单,以及这个订单属于谁
- 先根据id查询出订单,这时会查询出account_id,属于哪个account
- 然后再根据account_id查询账户
- 首先我们要拥有根据id查询出账户account的接口

- 然后我们就可以编辑一对一映射了

@Results({
@Result(column = "id",property = "id"),
@Result(column = "orderTime",property = "orderTime"),
@Result(column = "total",property = "total"),
@Result(column = "account_id",property = "account",
javaType = Account.class,
one = @One(select = "com.yzpnb.mapper.AccountMapper.selectOne"))
})
@Select("select * from `order` where id = #{id}")
public Order selectById(String id);
- 测试
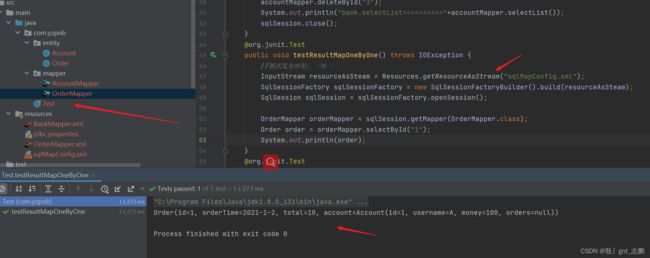
7.3 复制映射,一对多
| 一样的,根据账户,查询订单,我们需要先提供一个根据账户id查询订单的接口 |

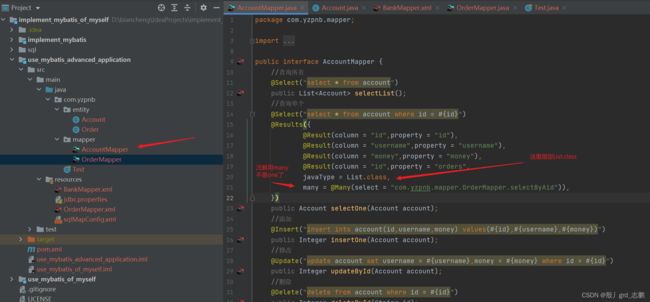
@Select("select * from account where id = #{id}")
@Results({
@Result(column = "id",property = "id"),
@Result(column = "username",property = "username"),
@Result(column = "money",property = "money"),
@Result(column = "id",property = "orders",
javaType = List.class,
many = @Many(select = "com.yzpnb.mapper.OrderMapper.selectByAid")),
})
public Account selectOne(Account account);
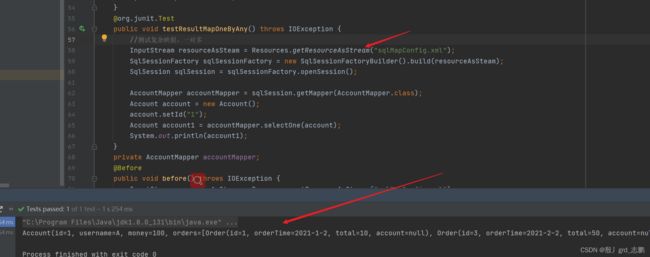
8. Mybatis一级缓存和源码
| 缓存就是把一些频繁访问的数据,放在内存中,这样用户想要查询数据,就不用频繁和数据库进行交换IO,而是直接从内存中获取数据。提高访问速度。 |
- mybatis提供了对缓存的支持,分为一级和二级缓存
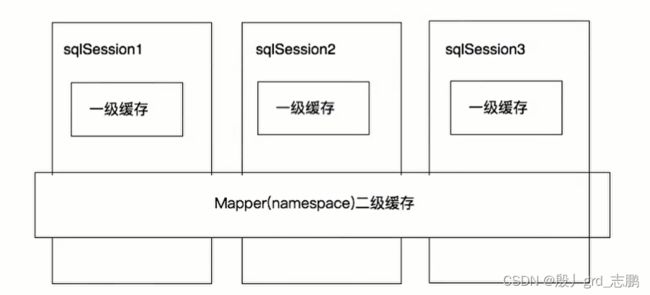
- 一级缓存,是SqlSession级别的缓存,操作数据库时需要构造sqlSession对象。而对象中有一个缓存(HashMap,数据结构)用于存储缓存数据。不同sqlSession之间的缓存数据区域(HashMap)互不影响
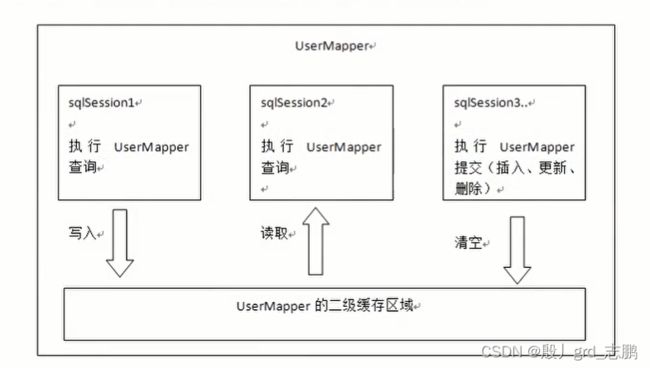
- 二级缓存,mapper级别的缓存。多个sqlSession操作同一个Mapper的sql语句,多个sqlSession共用二级缓存,是跨sqlSession的。
| 一级缓存,除了一些增删改会刷新缓存外,还可以调用sqlSession.clearCache()手动刷新 |


- 查询时,会先去缓存找是否有相应查询信息,没有就从数据库查,然后存到一级缓存
- 如果中间sqlSession执行commit操作(增删改),或调用clearCache(),当前sqlSession会清空自己的一级缓存,避免脏读。
- 再次查询时,依然先去缓存找,如果有,就直接缓存取出,否则还是去数据库,然后存入一级缓存
- 以sqlSession接口clearCache方法为入口,点击进入实现类DefaultSqlSession。你会发现,此方法是调用executor执行器的clearLocalCache()方法完成的

- 进入executor,它有两个实现类,我们观察BaseExecutor实现类的clearLocalCache方法,发现它清空了两个容器。这两个容器都是PerpetualCache类实例
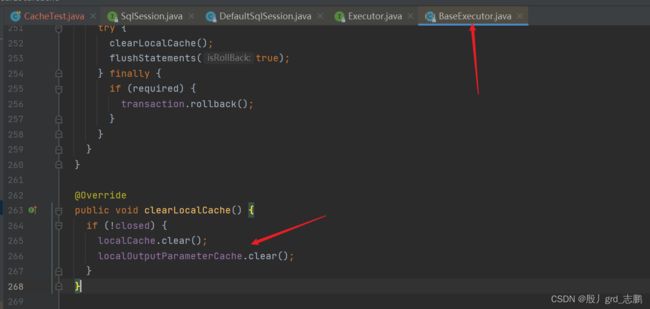
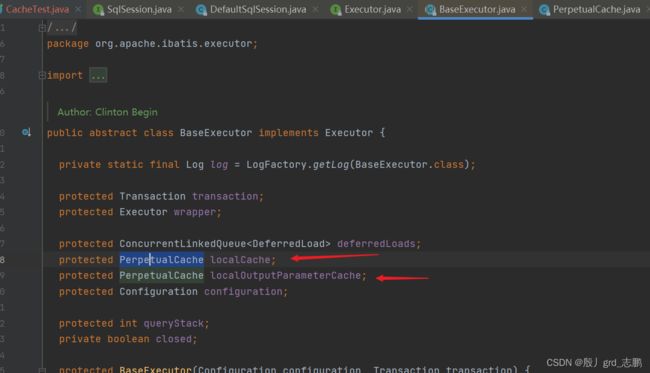
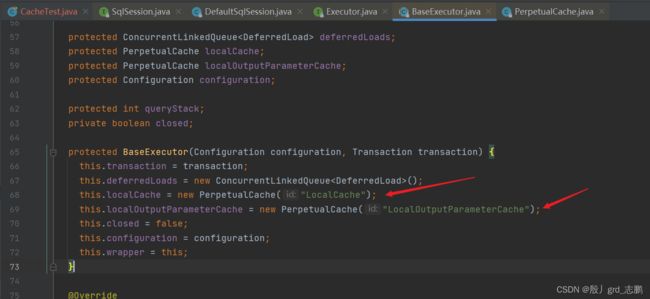
- 我们点击进入PerpetualCache,我们发现,缓存就是一个HashMap,而一级缓存就是PerpetualCache对象

- 那么既然executor会操作一级缓存,那么我们看看缓存什么时候创建,原来是构造方法,也就是执行器一创建,缓存就会创建
- 我们先看看负责查询的query方法,发现它调用了createCacheKey(MappedStatement, parameter, rowBounds, boundSql)
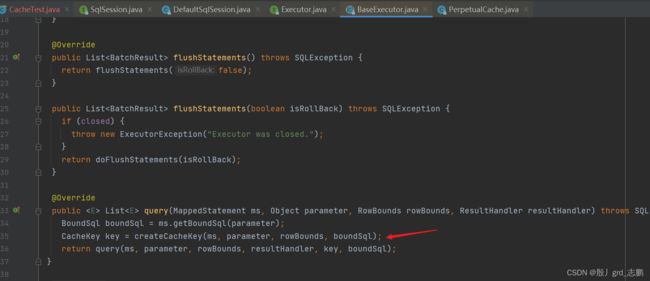
- 进入此方法,发现它就是负责创建CacheKey对象,这个对象就是一个根据MappedStatement(sql映射,mapper.xml或注解),查询参数(用户传过来的条件),RowBounds(分页参数),BoundSql(解析后的sql),configuration.getEnvironment().getId()//核心配置文件,当前环境的id值;生成key值的对象

- 回到query,发现它拿着生成好的key,调用了query重载方法
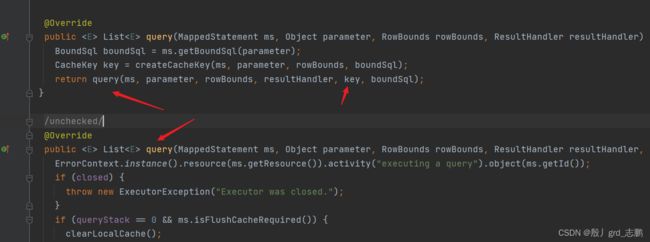
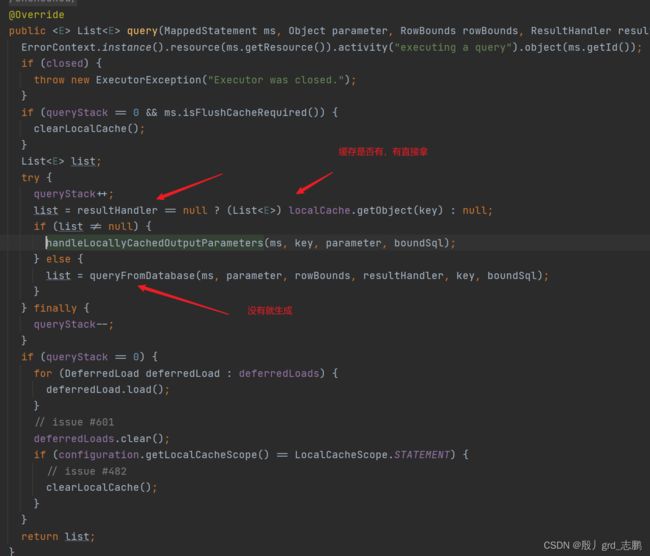
- 这个重载,先是判断是否有缓存(通过getObject(key)查看是否能获取到),没有才调用queryFromDatabase创建添加,
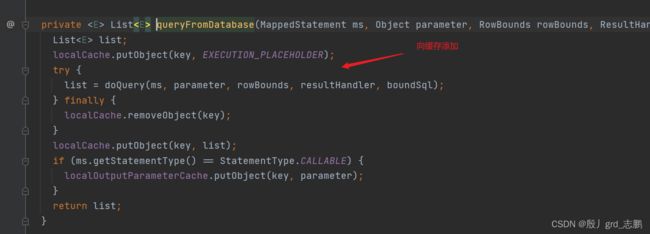
- queryFromDatabase方法,负责添加缓存
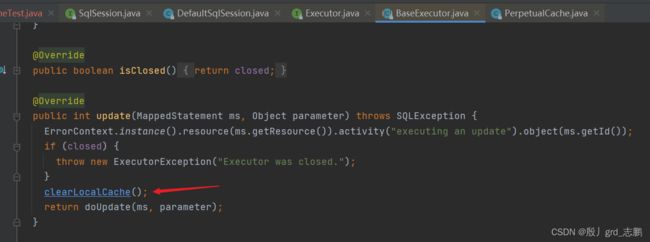
- 修改操作,会直接清空缓存

9. Mybatis二级缓存
| 前面介绍一级缓存时,发现缓存就是PerpetualCache对象,而这也是mybatis的默认二级缓存,如果我们配置时,不指定参数,那么就默认使用PerpetualCache来作为一个二级缓存 |
- 但是底层,它并
不是,将一个对象存入二级缓存中,而是将数据存储到二级缓存中。因为二级缓存涉及多个sqlSession,难免发生并发同步问题
| 开启二级缓存前,需要将对应实体类,继承序列化接口,因为二级缓存的存储介质不同,可能不止将数据存储到内存,可能会持久化到磁盘,可能需要反序列化操作 |

- 和一级缓存原理一样,第一次查询判断缓存是否有,没有就查数据库。
- 不同点在于,一级缓存基于sqlSession。二级缓存基于mapper文件的namespace。也就是一个mapper的相关业务的缓存,很多个sqlSession共享这片区域
- 如果两个mapper的namespace相同,即使有两个mapper,那么这两个mapper中执行sql查询到的数据也将存在相同二级缓存中
| 开启二级缓存的方法,一级缓存默认开启,但是二级缓存需要手动开启 |
- 全局配置文件,通过< settings >标签开启功能

    <settings>

        <setting name="cacheEnabled" value="true"/>
    settings>
- 到需要二级缓存的mapper.xml开启缓存,可以直接空标签,使用默认二级缓存PerpetualCache,也可以自己指定

<cache>cache>
- 使用注解@CacheNamespace开启缓存,可以指定缓存
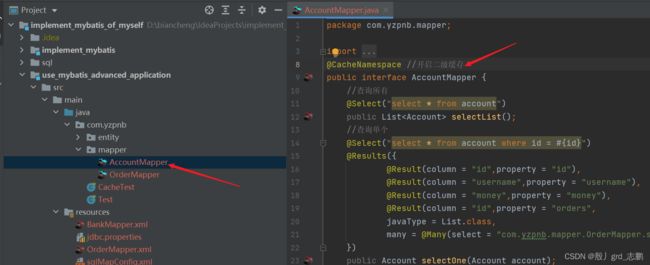

@CacheNamespace(implementation = PerpetualCache.class)
| 两个用在子标签的配置(select、insert等子标签),useCache是否使用缓存和flushCache是否刷新缓存 |
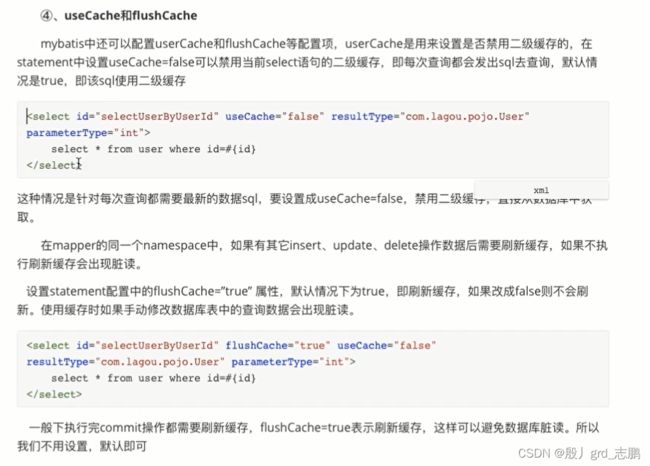
- 对应注解
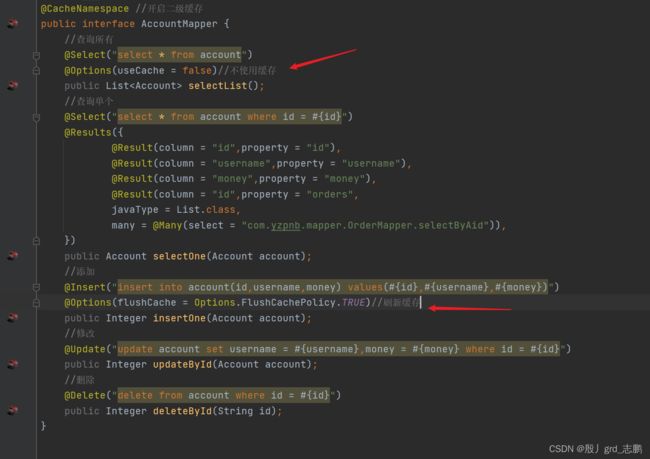
@Options(useCache = false)
@Options(flushCache = Options.FlushCachePolicy.TRUE)
9.1 使用redis自定义二级缓存
| 前面我们说过mybatis默认是PerpetualCache为二级缓存,既然是默认,那么也就表示,我们可以自定义缓存,接下来介绍如何通过reids自定义二级缓存。只需要继承Cache接口重写方法即可 |
| 为什么不使用默认的,默认的使用HashMap作为缓存 |
- 如果是单服务器,HashMap有很大缺点,就是无法实现分布式缓存
- A和B两个服务器的缓存无法立刻同步
- 所以,分布式架构下,最好找一个分布式缓存,专门存储缓存数据,这样不同服务器要用缓存,都从这个分布式缓存中操作
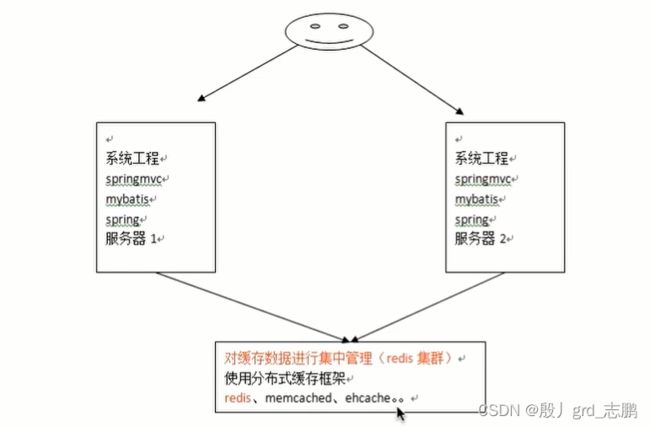
- 当然是因为懒了,mybatis不仅提供cache,让我们自己实现缓存逻辑,还自己提供了一个基于cache接口的redis实现类。该类在mybatis-redis包中
- 引入依赖即可使用

        <!--mybatis-redis-->
        <dependency>
            <groupId>org.mybatis.caches</groupId>
            <artifactId>mybatis-redis</artifactId>
            <version>1.0.0-beta2</version>
        </dependency>
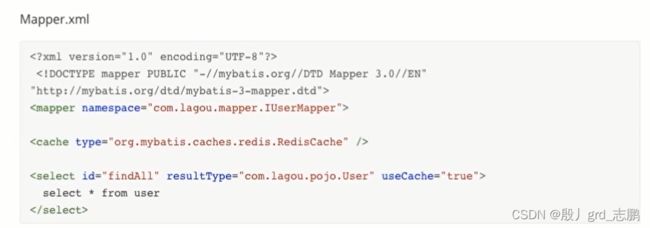
- 注解指定实现类,xml同理,两种方式根据自己喜好选择

- 配置redis,配置文件必须叫redis.properties,放在resources目录下(classpath:)

redis.host = localhost
redis.port = 6379
redis.connectionTimeout = 5000
redis.database = 0
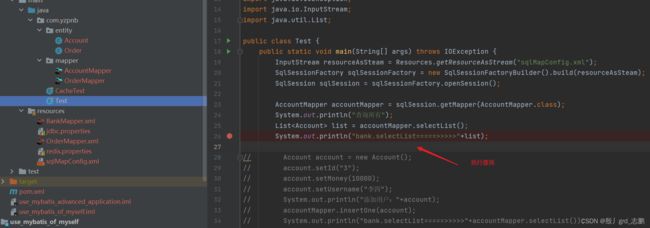
| 使用,然后查询redis缓存,依然要保证,查询的任何实体类都要实现序列化,否则不会添加到缓存 |

9.2 mybatis-redis源码分析
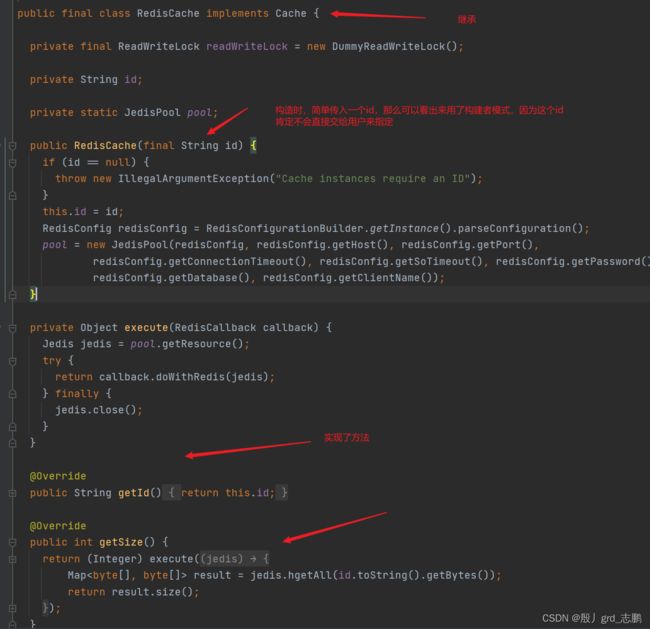
| 1. 想要实现二级缓存,必须继承Cache接口.可以发现RedisCache这个类,继承了Cache接口,并实现了相关方法。而我们发现构造方法,传入一个id,也就是外界进行了构建,猜测是构建者设计模式 |
- 我们还发现这里面封装redisConfig对象,这个就是redis的配置,自己看就好,没什么好说的
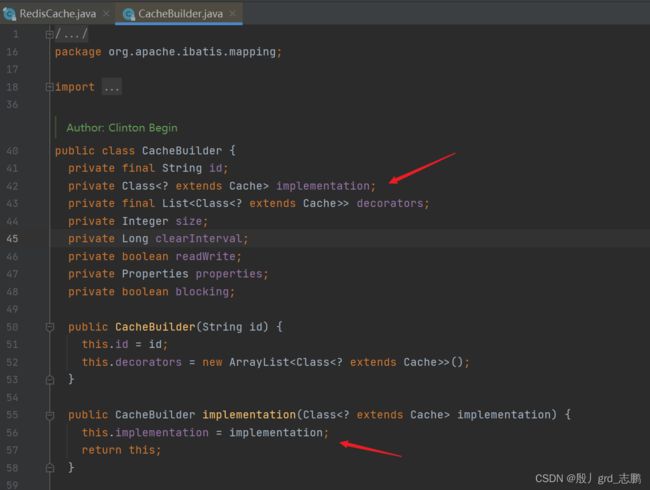
- 构建的本质,构建指定的对象,我们知道,我们配置时,配置的@CacheNamespace(implementation = PerpetualCache.class),所以implementation就是构建对象
- build方法

10. Mybatis插件
- 开源框架一般都会提供插件或其它拓展点,供开发者自行拓展。
- 增加框架灵活性,方便开发者对框架拓展
- 我们可以基于Mybatis插件机制,实现分页,分表,监控等功能
- 插件和业务无关,业务无法感知插件存在,可以无感插入插件,无形中增强功能
- Mybatis在四大组件(Executor、StatementHandler、ParameterHandler、ResultSetHandler)处提供了简单易用的插件扩展机制

- MyBatis对持久层操作就是借助这4大核心对象,而MyBatis支持用插件对这四大核心对象拦截,对mybatis来说,插件就是拦截器
- 本质上还是借助底层动态代理实现。Mybatis四大对象都是代理对象
- Executor执行器:update、query、commit、rollback等
- StatementHandler,SQL语法构建器:prepare、parameterize、batch、update、query
- ParameterHandler参数处理器:getParameterObject、setParameters
- ResultSetHandler:handleResultSets、handleOutputParameters等
- 每个创建出来的对象不直接返回,而是interceptorChain.pluginAll(parameterHandler);
- 获取到所有Interceptor(拦截器)(插件需要实现的接口);调用interceptor.plugin(target);返回target包装后对象
- 插件机制,我们可以使用插件为目标对象创建一个代理对象;可以拦截到四大对象的每一个执行

- interceptorChain保存了所有拦截器(interceptor),在mybatis初始化时创建,调用拦截链中的拦截器依次对目标进行拦截或增强
- interceptor.plugin(target)中target可以理解为mybatis中四大对象,返回target是被重重代理的对象
- 如果我们要拦截Exector的query方法,可以像这样来定义插件

- 这样Mybatis启动时就可以加载插件,保存插件实例到相关对象(InterceptorChain,拦截链中)
- 准备工作完成后,Mybatis处于就绪状态,执行sql时,需要先通过DefaultSqlSessionFactory创建SqlSession
- Exector实例会在创建SqlSession过程中被创建,Executor实例创建完成后,MyBatis会通过JDK动态代理为实例生成代理类
- 此时,插件逻辑可以在Executor相关方法被调用前执行。
10.1 自定义插件练手
| 假设,我们要对下面这个四大对象之一StatementHandler的prepare(Connection connection, Integer transactionTimeout)方法进行拦截 |

- 插件
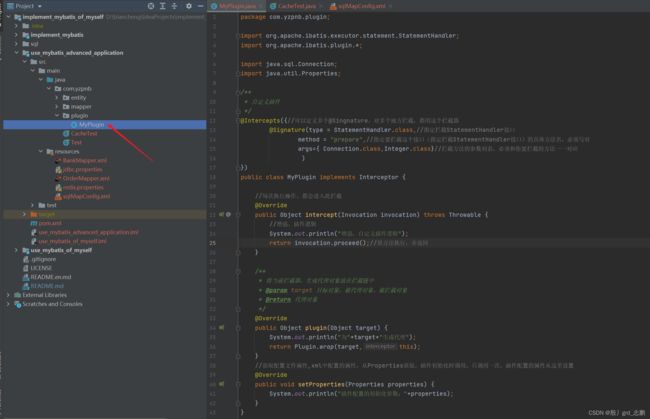
import org.apache.ibatis.executor.statement.StatementHandler;
import org.apache.ibatis.plugin.*;
import java.sql.Connection;
import java.util.Properties;
@Intercepts({
@Signature(type = StatementHandler.class,
method = "prepare",
args={ Connection.class,Integer.class}
)
})
public class MyPlugin implements Interceptor {
@Override
public Object intercept(Invocation invocation) throws Throwable {
System.out.println("增强,自定义插件逻辑");
return invocation.proceed();
}
@Override
public Object plugin(Object target) {
System.out.println("为"+target+"生成代理");
return Plugin.wrap(target,this);
}
@Override
public void setProperties(Properties properties) {
System.out.println("插件配置的初始化参数:"+properties);
}
}
- xml配置
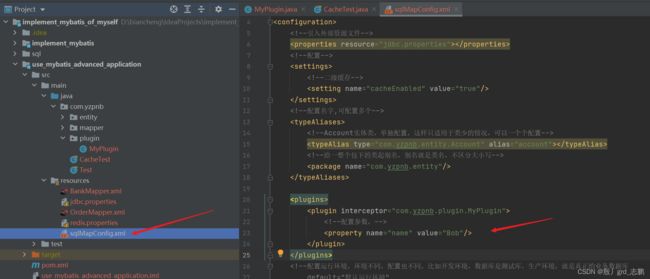
    <plugins>
        <plugin interceptor="com.yzpnb.plugin.MyPlugin">

            <property name="name" value="Bob"/>
        plugin>
    plugins>
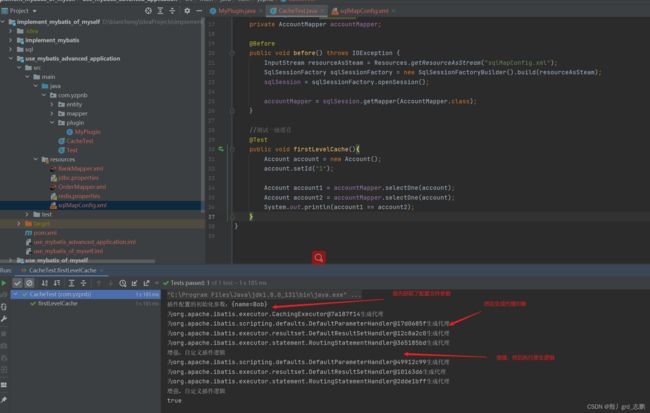
10.2 源码分析
| 上面我们已经知道,插件的核心原理就是动态代理,所以看源码关键就是,如何动态代理 |
- 自定义插件时, 我们使用Plugin.wrap(target,this)生成代理对象。所以我们以Plugin类为看源码的入口。我们发现,Plugin就是一个代理类,我们通过Plugin对target进行代理。
- 但是厉害的是,它通过静态方法wrap,让用户传入代理对象和自定义拦截器
- 然后根据用户传入的,生成Plugin对象,也就是最终代理对象,就是Plugin。然后他把拦截器保存到成员变量interceptor中
- 所以,Plugin这个代理类,可以随时使用自定义拦截器

- 既然Plugin是代理类,那么核心逻辑就在invoke()方法中,它会拦截所有方法。可以发现它会检测当前拦截的方法是否是我们插件要拦截的,如果是,执行插件逻辑,否则继续执行被拦截的方法

- 而执行插件逻辑,就是我们自己实现的intercept方法
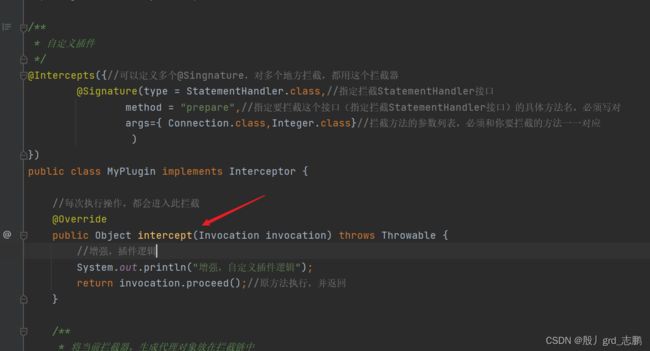
- 这个intercept方法的参数Invocation,也很简单,就是保存目标对象,方法,和参数列表

10.3 pageHelper分页插件
| 介绍了自定义插件的方法,接下来看看,Mybatis常用的第三方插件 |
- PageHelper就是一个插件,将分页操作进行封装,让我们可以方便的进行分页操作
- 导入maven依赖
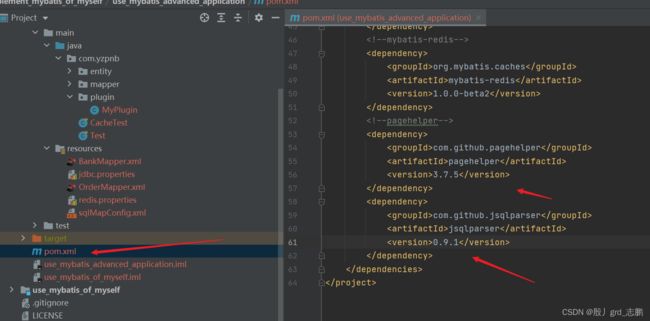
        <!--pagehelper-->
        <dependency>
            <groupId>com.github.pagehelper</groupId>
            <artifactId>pagehelper</artifactId>
            <version>3.7.5</version>
        </dependency>
        <dependency>
            <groupId>com.github.jsqlparser</groupId>
            <artifactId>jsqlparser</artifactId>
            <version>0.9.1</version>
        </dependency>
- 核心配置文件xml中配置
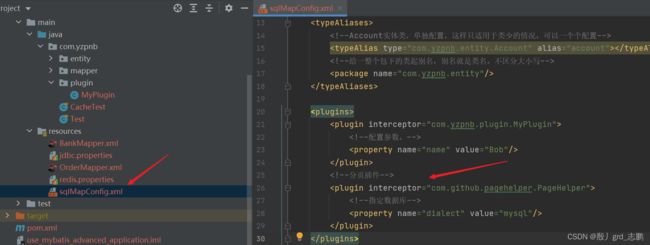
    <plugins>

        <plugin interceptor="com.github.pagehelper.PageHelper">

            <property name="dialect" value="mysql"/>
        plugin>
    plugins>

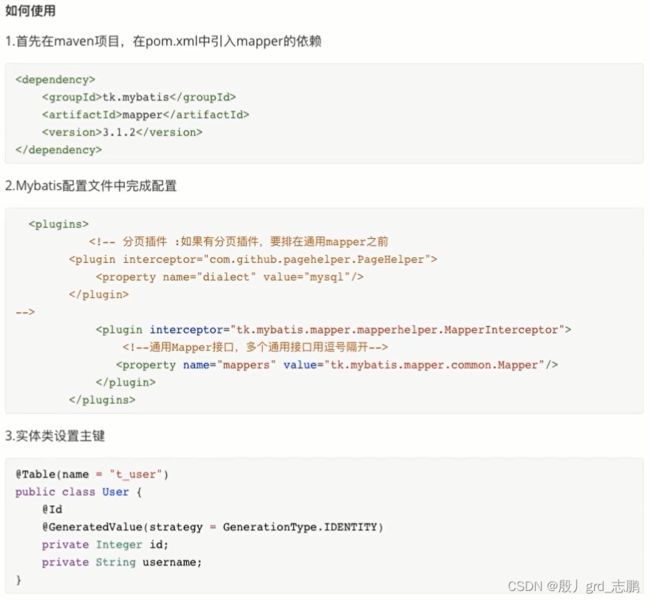
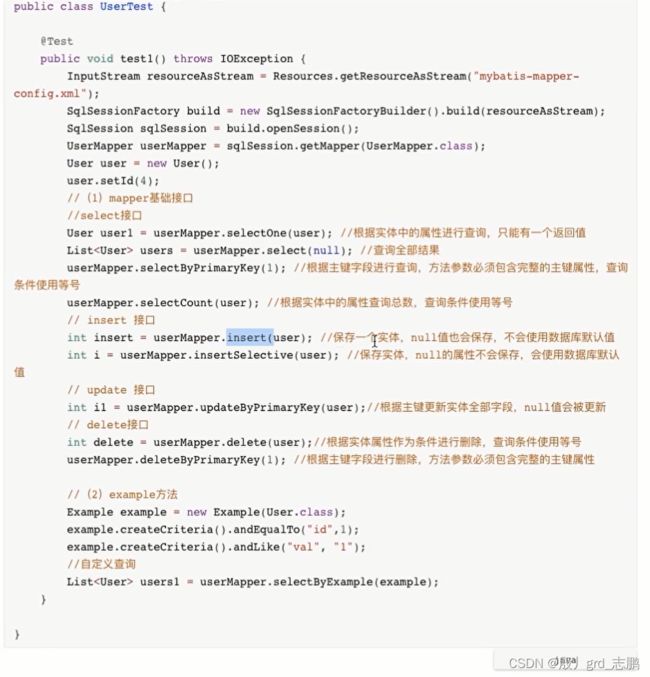
10.4 通用mapper

三、Mybatis源码
| 篇幅原因,我将其放在这篇文章https://blog.csdn.net/grd_java/article/details/122927311 |


