机器学习入门篇(一)
目录
- 一、什么是机器学习?
-
- 1.1 机器学习算法分类
- 1.2 机器学习开发流程
- 1.3 可用数据集
-
- 1.3.1 sklearn 数据集的使用
- 1.3.2 数据集的划分
- 二、特征工程
-
- 2.1 特征抽取
-
- 2.1.1 字典特征工程
- 2.1.2 文本特征工程
- 2.2 特征预处理
-
- 2.2.1 归一化
- 2.2.2 标准化
- 2.3 特征降维
-
- 2.3.1 特征选择
-
- 2.3.1.1 方差选择法
- 2.3.1.2 相关系数
- 2.3.2 主成分分析
一、什么是机器学习?
机器学习是从数据中自动分析获得模型,并利用模型对未知数据进行预测。
数据集:特征值 + 目标值
1.1 机器学习算法分类
-
监督学习:
目标值:类别 – 分类问题
目标值:连续性的数据 – 回归问题 -
无监督学习:
目标值:无 -
监督学习(supervised learning)
定义:输入数据是由输入特征值和目标值所组成。函数的输出可以是一个连续的值(称为回归),或是输出是有限个离散值(称作分类)
分类:k-近邻算法、贝叶斯分类、决策树与随机森林、逻辑回归
回归:线性回归、岭回归 -
无监督学习(unsupervised learning)
定义:输入数据是由输入特征值所组成。
聚类k-means
1.2 机器学习开发流程
- 获取数据
- 数据处理
- 特征工程
- 机器学习算法训练 - 模型
- 模型评估
1.3 可用数据集
kaggle
uci
sklearn
1.3.1 sklearn 数据集的使用
- 安装sklearn库
安装scikit-learn需要Numpy,Scipy等库
conda install numpy scipy
pip install sklearn
- scikit-learn 数据集 API 介绍
sklearn.datasets:
获取小规模数据集,数据保存在datasets里。用法:datasets.load_ *() 注:(* 代表数据集名称)
- 鸢尾花数据集
from sklearn.datasets import load_iris


def datasets_demo():
    iris = load_iris()
    print("数据集的键:", list(iris.keys()))
    print("数据集:", iris['data'])
    print("数据集描述:", iris['DESCR'])
    print("数据集特征值的名字:", (iris['feature_names']))
    print("数据值大小:", iris['data'].shape)
    print("目标值", iris['target_names'])


if __name__ == '__main__':
    datasets_demo()
数据集的键: ['data', 'target', 'frame', 'target_names', 'DESCR', 'feature_names', 'filename', 'data_module']
数据集: [[5.1 3.5 1.4 0.2]
 [4.9 3.  1.4 0.2]
 [4.7 3.2 1.3 0.2]
 [4.6 3.1 1.5 0.2]
 [5.  3.6 1.4 0.2]
 [5.4 3.9 1.7 0.4]
 [4.6 3.4 1.4 0.3]
 [5.  3.4 1.5 0.2]
 [4.4 2.9 1.4 0.2]
 [4.9 3.1 1.5 0.1]
 [5.4 3.7 1.5 0.2]
 [4.8 3.4 1.6 0.2]
 [4.8 3.  1.4 0.1]
 [4.3 3.  1.1 0.1]
 [5.8 4.  1.2 0.2]
 [5.7 4.4 1.5 0.4]
 [5.4 3.9 1.3 0.4]
 [5.1 3.5 1.4 0.3]
 [5.7 3.8 1.7 0.3]
 [5.1 3.8 1.5 0.3]
 [5.4 3.4 1.7 0.2]
 [5.1 3.7 1.5 0.4]
 [4.6 3.6 1.  0.2]
 [5.1 3.3 1.7 0.5]
 [4.8 3.4 1.9 0.2]
 [5.  3.  1.6 0.2]
 [5.  3.4 1.6 0.4]
 [5.2 3.5 1.5 0.2]
 [5.2 3.4 1.4 0.2]
 [4.7 3.2 1.6 0.2]
 [4.8 3.1 1.6 0.2]
 [5.4 3.4 1.5 0.4]
 [5.2 4.1 1.5 0.1]
 [5.5 4.2 1.4 0.2]
 [4.9 3.1 1.5 0.2]
 [5.  3.2 1.2 0.2]
 [5.5 3.5 1.3 0.2]
 [4.9 3.6 1.4 0.1]
 [4.4 3.  1.3 0.2]
 [5.1 3.4 1.5 0.2]
 [5.  3.5 1.3 0.3]
 [4.5 2.3 1.3 0.3]
 [4.4 3.2 1.3 0.2]
 [5.  3.5 1.6 0.6]
 [5.1 3.8 1.9 0.4]
 [4.8 3.  1.4 0.3]
 [5.1 3.8 1.6 0.2]
 [4.6 3.2 1.4 0.2]
 [5.3 3.7 1.5 0.2]
 [5.  3.3 1.4 0.2]
 [7.  3.2 4.7 1.4]
 [6.4 3.2 4.5 1.5]
 [6.9 3.1 4.9 1.5]
 [5.5 2.3 4.  1.3]
 [6.5 2.8 4.6 1.5]
 [5.7 2.8 4.5 1.3]
 [6.3 3.3 4.7 1.6]
 [4.9 2.4 3.3 1. ]
 [6.6 2.9 4.6 1.3]
 [5.2 2.7 3.9 1.4]
 [5.  2.  3.5 1. ]
 [5.9 3.  4.2 1.5]
 [6.  2.2 4.  1. ]
 [6.1 2.9 4.7 1.4]
 [5.6 2.9 3.6 1.3]
 [6.7 3.1 4.4 1.4]
 [5.6 3.  4.5 1.5]
 [5.8 2.7 4.1 1. ]
 [6.2 2.2 4.5 1.5]
 [5.6 2.5 3.9 1.1]
 [5.9 3.2 4.8 1.8]
 [6.1 2.8 4.  1.3]
 [6.3 2.5 4.9 1.5]
 [6.1 2.8 4.7 1.2]
 [6.4 2.9 4.3 1.3]
 [6.6 3.  4.4 1.4]
 [6.8 2.8 4.8 1.4]
 [6.7 3.  5.  1.7]
 [6.  2.9 4.5 1.5]
 [5.7 2.6 3.5 1. ]
 [5.5 2.4 3.8 1.1]
 [5.5 2.4 3.7 1. ]
 [5.8 2.7 3.9 1.2]
 [6.  2.7 5.1 1.6]
 [5.4 3.  4.5 1.5]
 [6.  3.4 4.5 1.6]
 [6.7 3.1 4.7 1.5]
 [6.3 2.3 4.4 1.3]
 [5.6 3.  4.1 1.3]
 [5.5 2.5 4.  1.3]
 [5.5 2.6 4.4 1.2]
 [6.1 3.  4.6 1.4]
 [5.8 2.6 4.  1.2]
 [5.  2.3 3.3 1. ]
 [5.6 2.7 4.2 1.3]
 [5.7 3.  4.2 1.2]
 [5.7 2.9 4.2 1.3]
 [6.2 2.9 4.3 1.3]
 [5.1 2.5 3.  1.1]
 [5.7 2.8 4.1 1.3]
 [6.3 3.3 6.  2.5]
 [5.8 2.7 5.1 1.9]
 [7.1 3.  5.9 2.1]
 [6.3 2.9 5.6 1.8]
 [6.5 3.  5.8 2.2]
 [7.6 3.  6.6 2.1]
 [4.9 2.5 4.5 1.7]
 [7.3 2.9 6.3 1.8]
 [6.7 2.5 5.8 1.8]
 [7.2 3.6 6.1 2.5]
 [6.5 3.2 5.1 2. ]
 [6.4 2.7 5.3 1.9]
 [6.8 3.  5.5 2.1]
 [5.7 2.5 5.  2. ]
 [5.8 2.8 5.1 2.4]
 [6.4 3.2 5.3 2.3]
 [6.5 3.  5.5 1.8]
 [7.7 3.8 6.7 2.2]
 [7.7 2.6 6.9 2.3]
 [6.  2.2 5.  1.5]
 [6.9 3.2 5.7 2.3]
 [5.6 2.8 4.9 2. ]
 [7.7 2.8 6.7 2. ]
 [6.3 2.7 4.9 1.8]
 [6.7 3.3 5.7 2.1]
 [7.2 3.2 6.  1.8]
 [6.2 2.8 4.8 1.8]
 [6.1 3.  4.9 1.8]
 [6.4 2.8 5.6 2.1]
 [7.2 3.  5.8 1.6]
 [7.4 2.8 6.1 1.9]
 [7.9 3.8 6.4 2. ]
 [6.4 2.8 5.6 2.2]
 [6.3 2.8 5.1 1.5]
 [6.1 2.6 5.6 1.4]
 [7.7 3.  6.1 2.3]
 [6.3 3.4 5.6 2.4]
 [6.4 3.1 5.5 1.8]
 [6.  3.  4.8 1.8]
 [6.9 3.1 5.4 2.1]
 [6.7 3.1 5.6 2.4]
 [6.9 3.1 5.1 2.3]
 [5.8 2.7 5.1 1.9]
 [6.8 3.2 5.9 2.3]
 [6.7 3.3 5.7 2.5]
 [6.7 3.  5.2 2.3]
 [6.3 2.5 5.  1.9]
 [6.5 3.  5.2 2. ]
 [6.2 3.4 5.4 2.3]
 [5.9 3.  5.1 1.8]]
数据集描述:_iris_dataset:

Iris plants dataset
--------------------

**Data Set Characteristics:**

    :Number of Instances: 150 (50 in each of three classes)
    :Number of Attributes: 4 numeric, predictive attributes and the class
    :Attribute Information:
        - sepal length in cm
        - sepal width in cm
        - petal length in cm
        - petal width in cm
        - class:
                - Iris-Setosa
                - Iris-Versicolour
                - Iris-Virginica

    :Summary Statistics:

    ============== ==== ==== ======= ===== ====================
                    Min  Max   Mean    SD   Class Correlation
    ============== ==== ==== ======= ===== ====================
    sepal length:   4.3  7.9   5.84   0.83    0.7826
    sepal width:    2.0  4.4   3.05   0.43   -0.4194
    petal length:   1.0  6.9   3.76   1.76    0.9490  (high!)
    petal width:    0.1  2.5   1.20   0.76    0.9565  (high!)
    ============== ==== ==== ======= ===== ====================

    :Missing Attribute Values: None
    :Class Distribution: 33.3% for each of 3 classes.
    :Creator: R.A. Fisher
    :Donor: Michael Marshall (MARSHALL%PLU@io.arc.nasa.gov)
    :Date: July, 1988

The famous Iris database, first used by Sir R.A. Fisher. The dataset is taken
from Fisher's paper. Note that it's the same as in R, but not as in the UCI
Machine Learning Repository, which has two wrong data points.

This is perhaps the best known database to be found in the
pattern recognition literature.  Fisher's paper is a classic in the field and
is referenced frequently to this day.  (See Duda & Hart, for example.)  The
data set contains 3 classes of 50 instances each, where each class refers to a
type of iris plant.  One class is linearly separable from the other 2; the
latter are NOT linearly separable from each other.

.. topic:: References

   - Fisher, R.A. "The use of multiple measurements in taxonomic problems"
     Annual Eugenics, 7, Part II, 179-188 (1936); also in "Contributions to
     Mathematical Statistics" (John Wiley, NY, 1950).
   - Duda, R.O., & Hart, P.E. (1973) Pattern Classification and Scene Analysis.
     (Q327.D83) John Wiley & Sons.  ISBN 0-471-22361-1.  See page 218.
   - Dasarathy, B.V. (1980) "Nosing Around the Neighborhood: A New System
     Structure and Classification Rule for Recognition in Partially Exposed
     Environments".  IEEE Transactions on Pattern Analysis and Machine
     Intelligence, Vol. PAMI-2, No. 1, 67-71.
   - Gates, G.W. (1972) "The Reduced Nearest Neighbor Rule".  IEEE Transactions
     on Information Theory, May 1972, 431-433.
   - See also: 1988 MLC Proceedings, 54-64.  Cheeseman et al"s AUTOCLASS II
     conceptual clustering system finds 3 classes in the data.
   - Many, many more ...
数据集特征值的名字: ['sepal length (cm)', 'sepal width (cm)', 'petal length (cm)', 'petal width (cm)']
数据值大小: (150, 4)
目标值 ['setosa' 'versicolor' 'virginica']
1.3.2 数据集的划分
- 训练数据:用于训练,构建模型
- 测试数据:在模型检验时使用,用于评估模型是否有效
划分比例:
- 训练集:70% 80% 75%
- 测试集:30% 20% 30%
from sklearn.model_selection import train_test_split
def split_datasets():
    iris = load_iris()
    # 返回值:训练集特征值,测试集特征值,训练集目标值,测试集目标值
    x_train, x_test, y_train, y_test = train_test_split(iris['data'], iris['target'], test_size=0.2)
    print("训练集的特征值:", x_train, x_train.shape)  # (120, 4)


if __name__ == '__main__':
    split_datasets()
二、特征工程
业界广泛流传:数据和特征决定了机器学习的上限,而模型和算法只是逼近这个上限而已。
特征工程是使用专业背景知识和技巧处理数据,使得特征能在机器学习更好的作用的过程。
将任意数据(如文本或图像)转换为可用于机器学习的数字特征。
2.1 特征抽取
2.1.1 字典特征工程
from sklearn.feature_extraction import DictVectorizer
def dict_extraction():
    data = [{'city': '北京', 'temperature': 36}, {'city': '上海', 'temperature': 37}, {'city': '深圳', 'temperature': 35}]
    # 实例化一个转换器 sparse 为稀疏矩阵
    # transfer = DictVectorizer(sparse=True)
    transfer = DictVectorizer(sparse=False)
    data_new = transfer.fit_transform(data)
    print(data_new)


if __name__ == '__main__':
	dict_extraction()
稀疏矩阵:将非零值按位置表示出来。
  (0, 1)	1.0
  (0, 3)	36.0
  (1, 0)	1.0
  (1, 3)	37.0
  (2, 2)	1.0
  (2, 3)	35.0
[[ 0.  1.  0. 36.]
 [ 1.  0.  0. 37.]
 [ 0.  0.  1. 35.]]
对于特征当中存在类别信息的都处理成 one-hot 编码。
2.1.2 文本特征工程
- 英文文本特征抽取
from sklearn.feature_extraction.text import CountVectorizer
def text_extraction():
    data = ["life is too short,i like python", "python is very efficient for machine learning "]
    transfer = CountVectorizer()
    data_new = transfer.fit_transform(data)
    name = transfer.get_feature_names_out()
    print(name)
    # 将稀疏矩阵转换为二位列表
    print(data_new.toarray())


if __name__ == '__main__':
    text_extraction()
['efficient' 'for' 'is' 'learning' 'life' 'like' 'machine' 'python'
 'short' 'too' 'very']
[[0 0 1 0 1 1 0 1 1 1 0]
 [1 1 1 1 0 0 1 1 0 0 1]]
统计每个样本特征词出现的个数。
- 中文文本特征抽取
中文如果不做处理,特征词将会以短句的形式进行特征抽取。因为英文语句默认是以空格来分隔开的,所以以单个单词作为特征名称。
pip install jieba
from sklearn.feature_extraction.text import CountVectorizer
import jieba
def chinese_text_extraction():
    datas = ["生活苦短", "我爱爬虫"]
    # 将列表转换为字符串,并用空格隔开。
    new_datas = [" ".join(list(jieba.cut(data))) for data in datas]
    transfer = CountVectorizer()
    data_final = transfer.fit_transform(new_datas)
    print(transfer.get_feature_names_out())
    print(data_final.toarray())
if __name__ == '__main__':
    chinese_text_extraction()
['爬虫' '生活' '苦短']
[[0 1 1]
 [1 0 0]]
- tf-idf 文本特征提取
问题描述:该如何处理某个词或短语在多篇文章中出现的次数高这种情况?
TF-IDF的主要思想是:如果某个词或短语在一篇文章中出现的概率高,并且在其他文章中很少出现,则认为此词或者短语具有很好的类别区分能力,适合用来分类。
TF-IDF作用:用以评估一字词对于一个文件集或一个语料库中的其中一份文件的重要程度。
- 词频(term frequency,tf)指的是某一个给定的词语在该文件中出现的频率
- 逆向文档频率(inverse document frequency,idf)是一个词语普遍重要性的度量。某一特定词语的idf,是总文件数目除以包含该词语文件的数目,再将得到的商取以10为底的对数得到。

from sklearn.feature_extraction.text import CountVectorizer, TfidfVectorizer
import jieba
def tfidf_text():
    datas = ["中国的“动力电池白名单”政策被认为是推动中国新能源车及动力电池产业高速发展的重要政策手段", "中国“白名单”政策从2015年5月实施,到2019年6月废止,共执行四年时间"]
    # 将列表转换为字符串,并用空格隔开。
    new_datas = [" ".join(list(jieba.cut(data))) for data in datas]
    transfer = TfidfVectorizer(stop_words=['认为', '重要'])
    data_final = transfer.fit_transform(new_datas)
    print(transfer.get_feature_names_out())
    print(data_final.toarray())

if __name__ == '__main__':
    tfidf_text()
['2015' '2019' '中国' '产业' '动力电池' '发展' '四年' '实施' '废止' '手段' '执行' '推动' '政策'
 '新能源' '时间' '白名单' '车及' '高速']
[[0.         0.         0.3607931  0.25354106 0.50708212 0.25354106
  0.         0.         0.         0.25354106 0.         0.25354106
  0.3607931  0.25354106 0.         0.18039655 0.25354106 0.25354106]
 [0.34261985 0.34261985 0.24377685 0.         0.         0.
  0.34261985 0.34261985 0.34261985 0.         0.34261985 0.
  0.24377685 0.         0.34261985 0.24377685 0.         0.        ]]
2.2 特征预处理
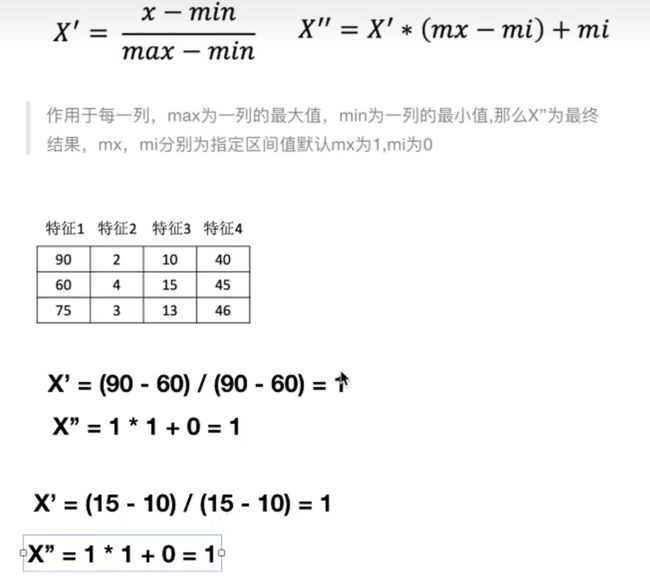
通过一些转换函数将特征数据转换成更加适合算法模型的特征数据过程。
数值型数据的无量纲化:
- 归一化
- 标准化
为什么我们要进行归一化/标准化?
- 特征的单位或者大小相差较大,或者某特征的方差相比其他的特征要大出几个数量级,容易影响(支配)目标结果,使得一些算法无法学习到其它的特征。
2.2.1 归一化
from sklearn.preprocessing import MinMaxScaler
import pandas as pd
def normalization():
    # 1.获取数据
    filepath = 'dating.txt'
    datas = pd.read_csv(filepath)
    # 划分:所有行 0到3列 包括3
    datas = datas.iloc[:, 0:3]
    # 2.实例化一个转换器对象 feature_range默认(0,1)
    transfer = MinMaxScaler()
    # 3.调用fit_transform
    data_new = transfer.fit_transform(datas)
    print(data_new)
[[0.44832535 0.39805139 0.56233353]
 [0.15873259 0.34195467 0.98724416]
 [0.28542943 0.06892523 0.47449629]
 ...
 [0.29115949 0.50910294 0.51079493]
 [0.52711097 0.43665451 0.4290048 ]
 [0.47940793 0.3768091  0.78571804]]
2.2.2 标准化
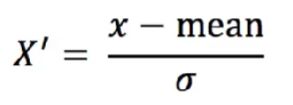
通过对原始数据进行变换把数据变换到均值为0,标准差为1。
作用于每一列,mean为平均数,σ为标准差。
from sklearn.preprocessing import StandardScaler
import pandas as pd
def standardization():
    # 1.获取数据
    filepath = 'dating.txt'
    datas = pd.read_csv(filepath)
    # 划分:所有行 0到3列 包括3
    datas = datas.iloc[:, 0:3]
    # 2.实例化一个转换器对象 feature_range默认(0,1)
    transfer = StandardScaler()
    # 3.调用fit_transform
    data_new = transfer.fit_transform(datas)
    print(data_new)
[[ 0.33193158  0.41660188  0.24523407]
 [-0.87247784  0.13992897  1.69385734]
 [-0.34554872 -1.20667094 -0.05422437]
 ...
 [-0.32171752  0.96431572  0.06952649]
 [ 0.65959911  0.60699509 -0.20931587]
 [ 0.46120328  0.31183342  1.00680598]]
2.3 特征降维
降维是指在某些限定条件下,降低随机变量(特征)个数,得到一组“不相关”主变量的过程(特征与特征不相关)。
- 特征相关
相对湿度与降雨量之间的相关
正是因为在进行训练的时候,我们都是使用特征进行学习。如果特征本身存在问题或者特征之间相关性较强,对于算法学习预测会影响较大。
2.3.1 特征选择
Filter(过滤式):主要探究特征本身特点、特征与特征和目标值之间关联。
- 方差选择法:低方差特征过滤
- 相关系数
2.3.1.1 方差选择法
方差是衡量一组数据的波动情况,数据与平均数之差平方和的平均数。
- 特征方差小:某个特征大多样本的值比较相近
- 特征方差大:某个特征很多样本的值都有差别
from sklearn.feature_selection import VarianceThreshold
import pandas as pd
def low_variance():
    # 1.获取factor_return.csv数据
    filepath = 'factor_returns.csv'
    datas = pd.read_csv(filepath)
    datas = datas.iloc[:, 1:-2]
    print(datas.shape)
    # 2.实例化一个转换器对象 默认方差为0,即threshold为零。一列数据元素相等
    transform = VarianceThreshold(threshold=5)
    # 3.调用fit_transform
    data_new = transform.fit_transform(datas)
    print(data_new.shape)
(2318, 9)
(2318, 8)
2.3.1.2 相关系数
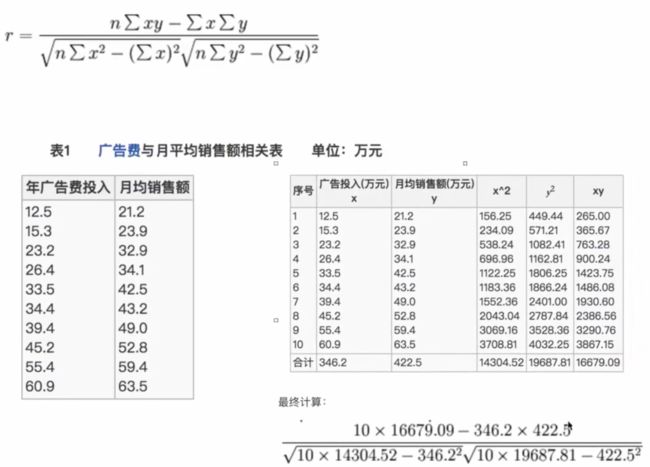
皮尔逊相关系数(Pearson Correlation Coefficient)反映变量之间相关关系密切程度的统计指标。
特点:
相关系数的值介于 -1 与 +1 之间,即 -1 ≤ r ≤ 1。其性质如下:
- 当 r > 0 时,表示两变量正相关,r < 0时,两变量为负相关
- 当 |r| = 1 时,表示两变量为完全相关,当 r = 0 时,表示两变量间无相关关系
- 当 0 < |r| < 1 时,表示两变量存在一定程度的相关。且 Irl 越接近1,两变量间线性关系越密切;** Irl越接近于0**,表示两变量的线性相关越弱
- 一般可按三级划分:Irl < 0.4为低度相关;0.4 < Irl < 0.7为显著性相关;0.7 < |r| < 1为高度线性相关
安装conda
conda install scipy
from scipy.stats import pearsonr
import pandas as pd
def correlation():
    filepath = 'factor_returns.csv'
    datas = pd.read_csv(filepath)
    datas = datas.iloc[:, 1:-2]
    print(datas)
    # 计算 pe_ratio 和 pb_ratio 之间的相关系数
    corr = pearsonr(datas['pe_ratio'], datas['pb_ratio'])
    print(corr)
      pe_ratio  pb_ratio  ...       revenue  total_expense
0       5.9572    1.1818  ...  2.070140e+10   1.088254e+10
1       7.0289    1.5880  ...  2.930837e+10   2.378348e+10
2    -262.7461    7.0003  ...  1.167983e+07   1.203008e+07
3      16.4760    3.7146  ...  9.189387e+09   7.935543e+09
4      12.5878    2.5616  ...  8.951453e+09   7.091398e+09
...        ...       ...  ...           ...            ...
2313   25.0848    4.2323  ...  1.148170e+10   1.041419e+10
2314   59.4849    1.6392  ...  1.731713e+09   1.089783e+09
2315   39.5523    4.0052  ...  1.789082e+10   1.749295e+10
2316   52.5408    2.4646  ...  6.465392e+09   6.009007e+09
2317   14.2203    1.4103  ...  4.509872e+10   4.132842e+10

[2318 rows x 9 columns]
(-0.004389322779936285, 0.8327205496564927)
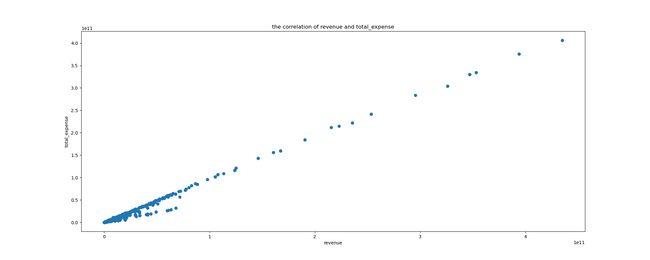
散点图可以直观地看出特征 revenue 和 total_expense 之间的相关程度
def scatter_diagram():
    filepath = 'factor_returns.csv'
    datas = pd.read_csv(filepath)
    datas = datas.iloc[:, 1:-2]
    print(datas)
    plt.figure(figsize=(20, 8), dpi=100)
    plt.title('the correlation of revenue and total_expense')
    plt.xlabel('revenue')
    plt.ylabel('total_expense')
    plt.scatter(x=datas['revenue'], y=datas['total_expense'])
    plt.show()
corr2 = pearsonr(datas['revenue'], datas['total_expense'])
# (0.99584504131361, 0.0)
这两者之间的相关系数很大,可以作进一步的处理,比如合成。
2.3.2 主成分分析
- PCA(Principal Components Analysis)即主成分分析技术
- 定义:高维数据转化为低维数据的过程,在此过程中可能会舍弃原有数据、创造新的变量
- 作用:是数据维数压缩,尽可能降低原数据的维数(复杂度),损失少量信息。
from sklearn.decomposition import PCA
import pandas as pd
def pca():
    datas = np.array([[1, 3, 8, 9], [5, 7, 4, 9], [5, 6, 9, 2]])
    # 降到维度为3
    transfer = PCA(n_components=3)
    data_new = transfer.fit_transform(datas)
    print(data_new)
[[-2.64575131e+00 -3.46410162e+00  1.79236038e-16]
 [-2.64575131e+00  3.46410162e+00  1.79236038e-16]
 [ 5.29150262e+00  1.63168795e-15  1.79236038e-16]]


