zabbix监控nginx和tomcat
实验思路
两台机器一台做监控服务端,另一台做监控端。是新鲜过程一台机器安装zabbix-server监控,另一台安装zabbix-agent、nginx、tomcat。启动nginx和tomcat状态模块,在对其监控。
实验环境
selinux:关闭状态
firewalld:关闭状态
yum:有网络状态
实验部署
| IP | 软件 |
|---|---|
| 192.168.1.50 | zabbix-server 、mariadb 、 httpd |
| 192.168.1.51 | zabbix-agent 、nginx 、 tomcat |
实验过程
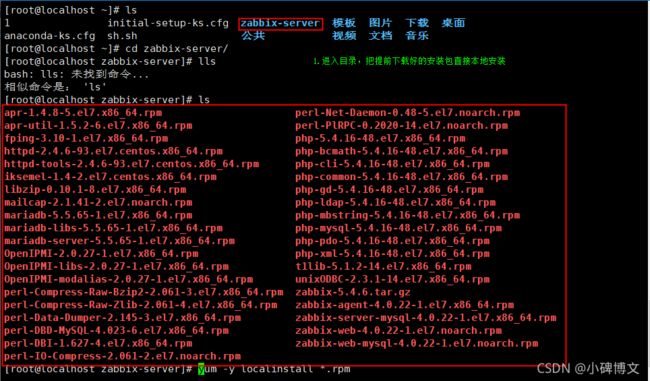
[root@localhost ~]# ls
[root@localhost zabbix-server]# ls
# 本地安装rpm包
[root@localhost zabbix-server]# yum -y localinstall *.rpm
# 启动mysql数据库
[root@localhost zabbix-server]# systemctl start mariadb
# 创建数据库和用户
[root@localhost zabbix-server]# mysql -uroot -e 'create database zabbix character set utf8 collate utf8_bin;'
[root@localhost zabbix-server]# mysql -uroot -e "grant all on zabbix.* to zabbix@localhost identified by'zabbix';"
# 导入zabbix初始数据到zabbix中
[root@localhost zabbix-server]# zcat /usr/share/doc/zabbix-server-mysql*/create.sql.gz | mysql -uzabbix -pzabbix zabbix
# 解决中文乱码问题
[root@localhost zabbix-server]# yum -y install wqy-microhei-fonts
[root@localhost zabbix-server]# cp /usr/share/fonts/wqy-microhei/wqy-microhei.ttc /usr/share/zabbix/assets/fonts/graphfont.ttf
# 修改配置文件
[root@localhost zabbix-server]# sed -i 's/# DBPassword=/DBPassword=zabbix/' /etc/zabbix/zabbix_server.conf
[root@localhost zabbix-server]# sed -i 's/ # php_value date.timezone Europe\/Riga/php_value date.timezone Asia\/Shanghai/' /etc/httpd/conf.d/zabbix.conf
# 启动服务zabbix-server和httpd
[root@localhost zabbix-server]# systemctl start httpd zabbix-server
# 把服务添加到开机自启
[root@localhost zabbix-server]# systemctl enable httpd zabbix-server mariadb
# 安装epel源后安装nginx
[root@bogon zabbix-server]# yum -y install epel-release.noarch
# 修改nginx的配置文件
[root@bogon zabbix-server]# vim /etc/nginx/nginx.conf
        location /nginx_status {
        stub_status on;
		}
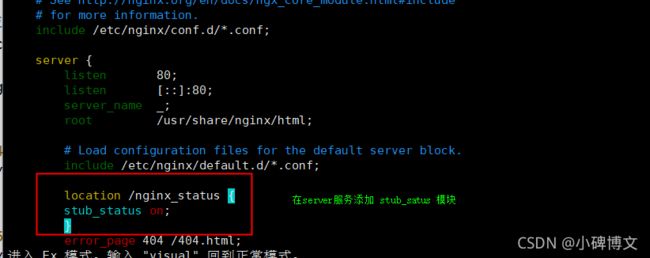
进入/etc/zabbix/zabbix_agentd.d写配置文件
[root@localhost zabbix_agentd.d]# vim userparameter_nginx.conf
UserParameter=nginx.status[*],/etc/zabbix/nginx_status.sh $1
				监控的键值【*代表所有值】,调用这nignx_status.sh脚本的第一个键值
脚本内容
#!/bin/bash
# 设置俩变量
NGINX_PORT=80
NGINX_COMMAND=$1
# 设置函数调用
# 建立链接数量
nginx_active () {
        /usr/bin/curl -s 'http://127.0.0.1:'$NGINX_PORT'/nginx_status' | awk '/Active/ {print $NF}'
}
# 读的
nginx_reading () {
        /usr/bin/curl -s 'http://127.0.0.1:'$NGINX_PORT'/nginx_status' | awk '/Reading/ {print $2}'
}
# 写的
nginx_writing () {
        /usr/bin/curl -s 'http://127.0.0.1:'$NGINX_PORT'/nginx_status' | awk '/Writing/ {print $4}'
}
# 等待的
nginx_waiting () {
        /usr/bin/curl -s 'http://127.0.0.1:'$NGINX_PORT'/nginx_status' | awk '/waiting/ {print $6}'
}
# 接受已处理的求救
nginx_accepts () {
        /usr/bin/curl -s 'http://127.0.0.1:'$NGINX_PORT'/nginx_status' | awk 'NR==3 {print $1}'
}
# 判断调用函数
case $NGINX_COMMAND in
active)
nginx_active;;
reading)
nginx_reading;;
writing)
nginx_writing;;
waiting)
nginx_waiting;;
accepts)
nginx_accepts;;
*)
# 没有输出结果时的提醒
echo $"USAGE:$0 {active|reading|writing|waiting|accepts}";;
esac
# 给文件授权
[root@bogon zabbix]# chmod +x nginx_status.sh
# 修改配置文件,叫agent端,把数据传输给server端
[root@bogon zabbix-server]# sed -i 's/Server=127.0.0.1/Server=127.0.0.1,192.168.1.50/' /etc/zabbix/zabbix_agentd.conf

# 启动zabbix-agent和nginx,并添加到开机自启
[root@bogon zabbix-server]# systemctl start zabbix-agent nginx
[root@bogon zabbix-server]# systemctl enable zabbix-agent nginx
开始页面安装zabbix监控
1.安装开始

2.第二步
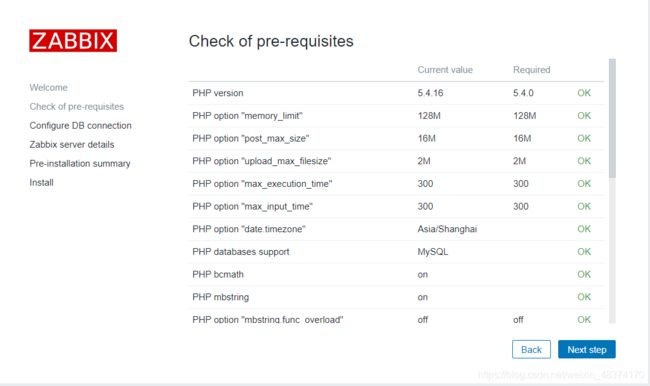
3.输入MySQL数据库的密码
4.自定义用户的名称
5.安装完成


6.输入登入用户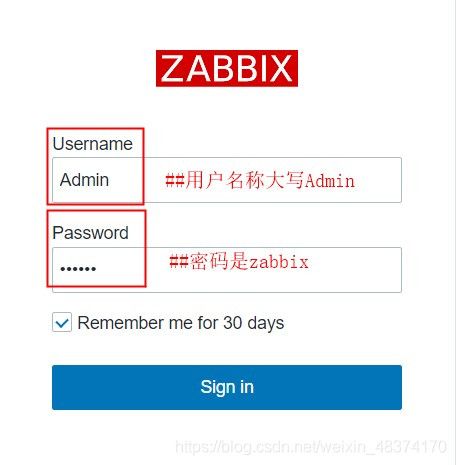
7.修改为中文界面

8.创建主机
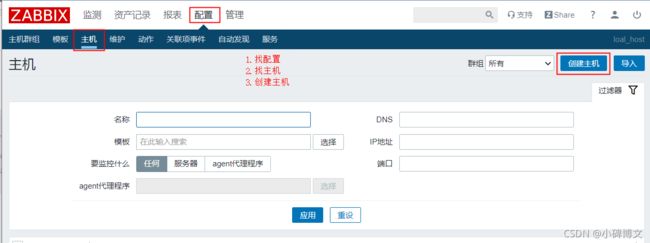


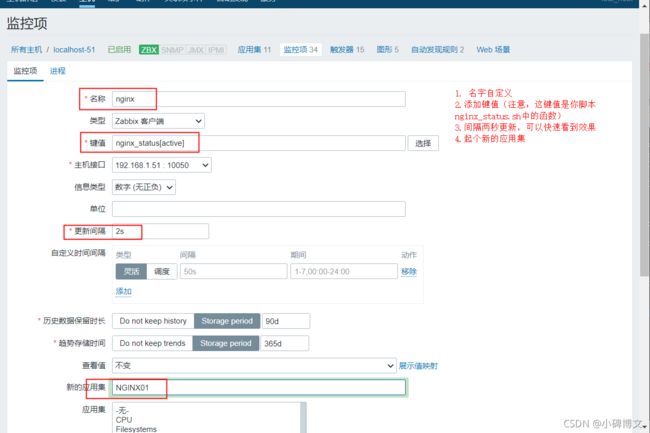
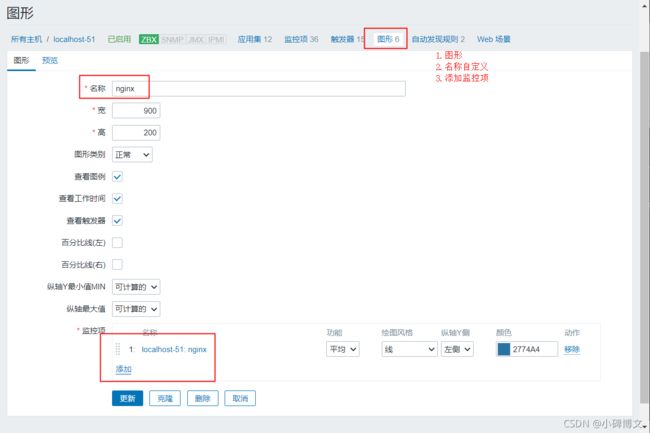
9.添加监控项
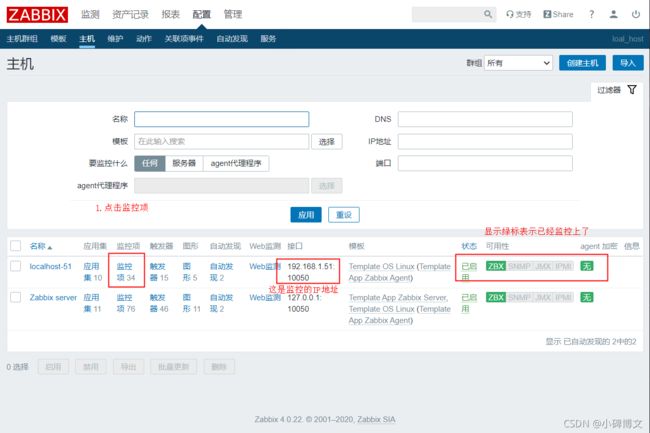
10. 添加键值队(想要监控其他值可以重复此动作)
监控tomcat
部署环境
selinux、firewalld关闭状态
有网络环境
架构部署规划
| 主机IP | 应用软件 |
|---|---|
| 192.168.1.50 | zabbix-server |
| 192.168.1.51 | zabbix-agent、zabbix-java-gateway、tomcat |
安装流程
安装zabbix-server
## 配置zabbix官方源
[root@localhost ~]# rpm -Uvh https://repo.zabbix.com/zabbix/4.0/rhel/7/x86_64/zabbix-release-4.0-2.el7.noarch.rpm
## 清除缓存
[root@localhost ~]# yum clean all
## 下载组件
[root@localhost ~]# yum -y install zabbix-web-mysql zabbix-server-mysql mariadb-server
## 启动数据库
[root@localhost ~]# systemctl start mariadb
## 进入数据库创库和新建用户
[root@localhost ~]# mysql
## 创建数据库名字为zabbix选择字符级别为utf8,并进行验证是否是utf8的级别。
MariaDB [(none)]> create database zabbix character set utf8 collate utf8_bin;
Query OK, 1 row affected (0.00 sec)
## 授权与zabbix用户所有权限并在本机上登入,密码为123456.
MariaDB [(none)]> grant all on zabbix.* to zabbix@localhost identified by '123456';
Query OK, 0 rows affected (0.00 sec)
## 推出数据库
MariaDB [(none)]> exit
Bye
## 导入数据zabbix初始数据
[root@localhost ~]#  zcat /usr/share/doc/zabbix-server-mysql*/create.sql.gz | mysql zabbix
## 修改配置文件
[root@localhost ~]# vim /etc/zabbix/zabbix_server.conf
125行 DBPassword=zabbix       		 ## 登入Admin用户的密码
289行 JavaGateway=192.168.1.55		## 数据库的IP地址,此时的数据库IP地址和zabbix-server在同一台机器上
297行 JavaGatewayPort=10052			## 默认监听的10052端口
305行 StartJavaPollers=5				## 启动多少进程去轮询java-gateway,要和java-gateway的配置一直
## 启动服务,并添加开机自启
[root@localhost ~]# systemctl start zabbix-server zabbix-agent httpd
[root@localhost ~]# systemctl enable zabbix-server zabbix-agent httpd
安装tomcat
## 安装java环境
[root@localhost bin]# yum -y install java
## 安装tomcat,安装包从官网直接下载
[root@localhost ~]# tar -xf apache-tomcat-8.5.64.tar.gz
[root@localhost ~]# mv apache-tomcat-8.5.64/ /usr/local/tomcat
## 修改配置文件
[root@localhost ~]# cd /usr/local/tomcat/bin/
[root@localhost bin]# vim catalina.sh
127行 CATALINA_OPTS="-Dcom.sun.management.jmxremote -Dcom.sun.management.jmxremote.port=12345 -Dcom.sun.management.jmxremote.authenticate=false -Dcom.sun.management.jmxremote.ssl=false -Djava.rmi.server.hostname=192.168.1.55"
【内容详解:
CATALINA_OPTS="$CATALINA_OPTS
-Dcom.sun.management.jmxremote  #启用远程监控JMX
-Dcom.sun.management.jmxremote.port=12345 # 默认启动的JMX端口号,要和zabbix添加主机时候的端口一致即可
-Dcom.sun.management.jmxremote.authenticate=false # 不使用用户名密码
-Dcom.sun.management.jmxremote.ssl=false #不使用ssl认证
-Djava.rmi.server.hostname=192.168.1.55" #tomcat主机自己的IP地址,不要写zabbix服务器的地址
】
## 启动tomcat
[root@localhost bin]# ./startup.sh
## 查看服务
[root@localhost bin]# ps -aux | grep tomcat
root      69705  0.4  3.4 4573064 134568 pts/0  Sl   11:33   0:09 /usr/bin/java -Djava.util.logging.config.file=/usr/local/tomcat/conf/logging.properties -Djava.util.logging.manager=org.apache.juli.ClassLoaderLogManager -Djdk.tls.ephemeralDHKeySize=2048 -Djava.protocol.handler.pkgs=org.apache.catalina.webresources -Dorg.apache.catalina.security.SecurityListener.UMASK=0027 -Dcom.sun.management.jmxremote -Dcom.sun.management.jmxremote.port=12345 -Dcom.sun.management.jmxremote.authenticate=false -Dcom.sun.management.jmxremote.ssl=false -Djava.rmi.server.hostname=192.168.1.55 -Dignore.endorsed.dirs= -classpath /usr/local/tomcat/bin/bootstrap.jar:/usr/local/tomcat/bin/tomcat-juli.jar -Dcatalina.base=/usr/local/tomcat -Dcatalina.home=/usr/local/tomcat -Djava.io.tmpdir=/usr/local/tomcat/temp org.apache.catalina.startup.Bootstrap start
root      70974  0.0  0.0 112720   984 pts/0    S+   12:07   0:00 grep --color=auto tomcat
## 安装zabbix-java-gateway
[root@localhost bin]# yum -y install zabbix-java-gateway
## 修该配置文件
[root@localhost bin]# vim /etc/zabbix/zabbix_java_gateway.conf
 9行 LISTEN_IP="0.0.0.0"		## 默认监控0.0.0.0的IP地址
17行 LISTEN_PORT=10052			## 默认监控10052端口
27行 PID_FILE="/var/run/zabbix/zabbix_java.pid"
35行 START_POLLERS=5			## 启动多少进程轮询Java,要和Java应用保持一定关系
43行 TIMEOUT=30					##超时时间30s,最小时间也就是30s,尽量超时时长该大点,,否则后端服务器还未响应,当大于超时时长才进行响应,此时java-gateway已经显示超时。
## 安装zabbix-agent
[root@localhost bin]# yum -y install zabbix-agent
## 修改配置文件
[root@localhost bin]# vim /etc/zabbix/zabbix_agentd.con
98行 Server=192.168.1.54   		## zabbix-server的IP地址
## 开启服务
[root@localhost bin]# systemctl start zabbix-agent zabbix-java-gateway
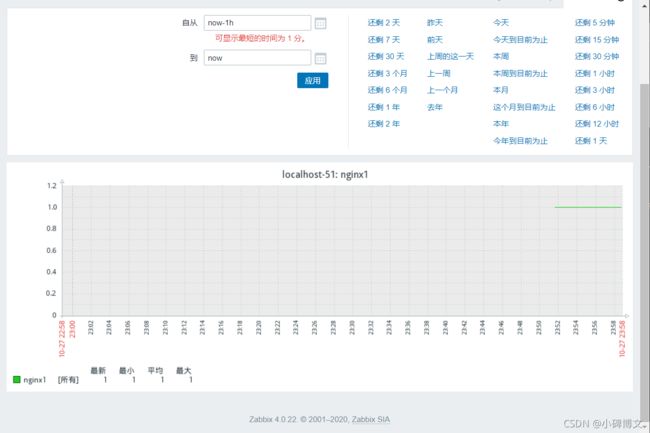
现在可以登入网页查看状态
