创建分辨率自适应的Windows Phone 8应用程序
1. 引言
Windows Phone 7平台只支持WVGA分辨率(480*800)的设备,这对于应用程序的UI设计来说是有利的,因为设计人员不用考虑多分辨率对UI控件布局的影响。但是,Windows Phone 8平台打破了这个局面,支持三种分辨率,分别为WVGA、WXGA(768*1280)和720p(720*1280)。随之而来的问题就是,开发者该如何应对多分辨率对应用程序的影响?这仿佛又把我们带回了Windows Mobile那个多分辨率的时代。那个时候,我们的应对方法就是使用控件的Docking and Anchoring属性,或者利用本地代码创建Orientation-Aware and Resolution-Aware的应用程序。其实,在Windows Phone 8平台上,我们处理的方式和方法也是类似的。
2. 分辨率对比
| 名称 |
分辨率 |
比例 |
Windows Phone 7 |
Windows Phone 8 |
| WVGA |
480 × 800 |
15:9 |
支持 |
支持 |
| WXGA |
768 × 1280 |
15:9 |
不支持 |
支持 |
| 720p |
720 × 1280 |
16:9 |
不支持 |
支持 |
表1:Windows Phone 7与Windows Phone 8分辨率对比
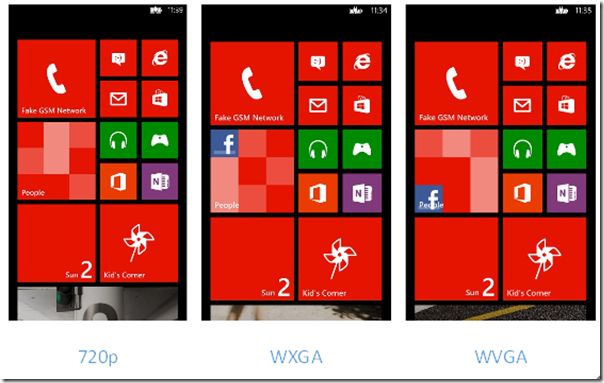
下图1展示了同一个页面在三种不同分辨率设备上的呈现。注意,图1以高度640为基准,将三种分辨率的Start页面进行等比例缩放得到。
图1:三种分辨率设备的Start页面
3. 控件自适应布局
从屏幕的比例上来看,由于Windows Phone 8支持15:9和16:9这两种比例,因此,控件的外观和布局在这两种分辨率下会呈现不同的效果。为了使得控件在不同分辨率的设备下展现合适的外观,开发者设计XAML布局的时候,不要设置固定的高度和宽度值。例如,为了创建一个自适应的控件布局界面,开发者可以使用类似Grid的容器,将其他控件放入该容器,并将其行和列的高度和宽度值设置为“*”和“Auto”。这样,应用程序会根据用户设备的实际分辨率对UI界面元素进行自适应拉伸。相反,若在代码中将控件的宽度和高度设置为固定值,那么界面布局就不会根据设备的实际分辨率进行自适应调整了。
以下的XAML代码就是一个很好的例子:
1: <Grid x:Name="ContentPanel" Grid.Row="1" Margin="12,0,12,0">2: <Grid.RowDefinitions>3: <RowDefinition Height="Auto" />4: <RowDefinition Height="*" />5: <RowDefinition Height="*" />6: <RowDefinition Height="*" />7: <RowDefinition Height="*" />8: <RowDefinition Height="*" />9: </Grid.RowDefinitions>10: <Grid.ColumnDefinitions>11: <ColumnDefinition Width="*" />12: <ColumnDefinition Width="*" />13: <ColumnDefinition Width="*" />14: <ColumnDefinition Width="*" />15: </Grid.ColumnDefinitions>16:17: <Border Grid.Row="0" Grid.Column="0" Grid.ColumnSpan="4"18: BorderThickness="3" BorderBrush="White" Padding="4"19: Margin="12">20: <TextBlock Text="423 + 61 = 484" FontSize="35" Padding="6" Height="69" />21: </Border>22: <Button Grid.Row="1" Grid.Column="0" Content="Clear" />23: <Button Grid.Row="1" Grid.Column="1" Content="/" />24: <Button Grid.Row="1" Grid.Column="2" Content="*" />25: <Button Grid.Row="1" Grid.Column="3" Content="-" />26: <Button Grid.Row="2" Grid.Column="0" Content="7" />27: <Button Grid.Row="2" Grid.Column="1" Content="8" />28: <Button Grid.Row="2" Grid.Column="2" Content="9" />29: <Button Grid.Row="2" Grid.Column="3" Content="+" Grid.RowSpan="2" />30: <Button Grid.Row="3" Grid.Column="0" Content="4" />31: <Button Grid.Row="3" Grid.Column="1" Content="5" />32: <Button Grid.Row="3" Grid.Column="2" Content="6" />33: <Button Grid.Row="4" Grid.Column="0" Content="1" />34: <Button Grid.Row="4" Grid.Column="1" Content="2" />35: <Button Grid.Row="4" Grid.Column="2" Content="3" />36: <Button Grid.Row="4" Grid.Column="3" Content="=" Grid.RowSpan="2" />37: <Button Grid.Row="5" Grid.Column="0" Content="0" Grid.ColumnSpan="2" />38: <Button Grid.Row="5" Grid.Column="2" Content="." />39: </Grid>40:
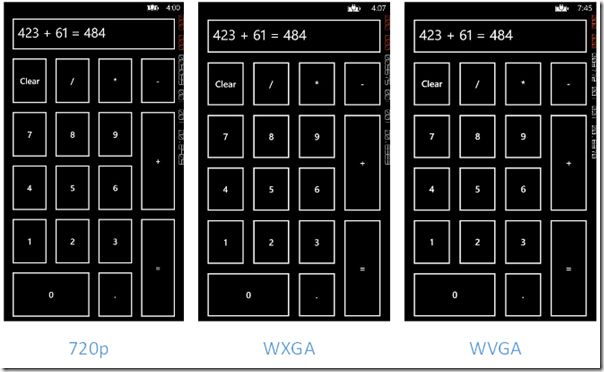
该XAML代码在三种不同分辨率的设备上展现如下图2所示:
图2:三种分辨率设备的应用程序界面
从图中我们可以发现,WXGA和WVGA设备界面中,控件的比例大小一致,而在720p分辨率的界面上,控件的比例做了自适应的调整。另外,开发者可以使用MinHeight 和MaxHeight属性来设置控件的最小高度和最大高度,因为高度小于8mm时,应用程序接收用户的指尖操作就有可能会变得不可靠。
4. 创建与设备分辨率相关的背景与资源
应用程序的资源包含了图片、视频、音频、图标等文件,它们往往占据了应用程序空间的很大比例。如果说在一个应用程序中包含三种不同分辨率的资源,那么其占用的程序空间可想而知。一般情况下,我们推荐开发者在工程中只包含WXGA分辨率的资源文件。因为WXGA分辨率的资源的解析度已经很高,而且能够在WVGA和720p分辨率下进行自动缩放。
当然,对于应用程序的背景图片来说,如果开发者想针对不同的分辨率采用不同的背景图片,那么我们可以采用下面的步骤来进行动态地加载。
(1)在工程中加入三种不同分辨率的图片,如wvga.jpg、wxga. jpg和720p. jpg。
(2)将图片的Copy to Output Directory属性修改为copy always。
(3)为工程添加一个名字为ResolutionHelper.cs的类文件,加入以下代码:
1: public enum Resolutions { WVGA, WXGA, HD720p };2:3: public static class ResolutionHelper4: {5: private static bool IsWvga6: {7: get8: {9: return App.Current.Host.Content.ScaleFactor == 100;10: }11: }12:13: private static bool IsWxga14: {15: get16: {17: return App.Current.Host.Content.ScaleFactor == 160;18: }19: }20:21: private static bool Is720p22: {23: get24: {25: return App.Current.Host.Content.ScaleFactor == 150;26: }27: }28:29: public static Resolutions CurrentResolution30: {31: get32: {33: if (IsWvga) return Resolutions.WVGA;34: else if (IsWxga) return Resolutions.WXGA;35: else if (Is720p) return Resolutions.HD720p;36: else throw new InvalidOperationException("Unknown resolution");37: }38: }39: }40:
该类使用ScaleFactor属性来获取当前设备的分辨率。
(4)添加一个名为MultiResImageChooser.cs的类文件,并加入以下代码。
1: using System.Windows.Media.Imaging;2:3: public class MultiResImageChooserUri4: {5: public Uri BestResolutionImage6: {7: get8: {9: switch (ResolutionHelper.CurrentResolution)10: {11: case Resolutions.HD720p:12: return new Uri("Assets/ 720p.jpg", UriKind.Relative);13: case Resolutions.WXGA:14: return new Uri("Assets/.jpg", UriKind.Relative);15: case Resolutions.WVGA:16: return new Uri("Assets/ wvga.jpg", UriKind.Relative);17: default:18: throw new InvalidOperationException("Unknown resolution type");19: }20: }21: }22:23: }24:
该类使用ResolutionHelper.cs中的方法来获取当前设备的分辨率,然后返回对应的BitmapImage。
(5)在主页面的xaml文件中,加入Image元素,并将其Source属性绑定到MultiResImageChooser.cs类所返回的Uri。代码如下:
1: <!--ContentPanel - place additional content here-->2: <Grid x:Name="ContentPanel" Grid.Row="1" Margin="12,0,12,0">3: <Image Source="{Binding BestResolutionImage, Source={StaticResource MultiResImageChooser}}"/>4: </Grid>5:
(6)在App.xaml文件的<Application>元素中,加入以下xmlns命名空间的映射:
xmlns:h="clr-namespace: MultiResolutionDemo "
(7)在App.xaml文件的< Application.Resources>元素中,加入:
1: <!--Application Resources-->2: <Application.Resources>3: <h:MultiResImageChooser x:Key="MultiResImageChooser"/>4: </Application.Resources>
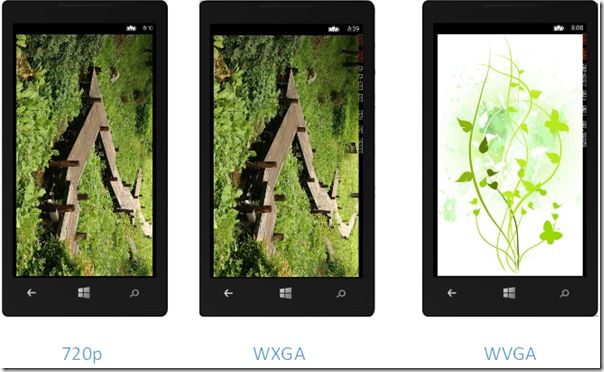
该XAML代码在三种不同分辨率的设备上展现如下图3所示:
图3:三种分辨率设备的应用程序背景
5. 创建与设备分辨率相关的应用程序启动画面
应用程序启动画面(也称为splash screen),是在应用程序启动之后,第一个页面显示完成之前,这一段时间内,应用程序呈现给用户的图片画面。它有两个重要的作用:一个是提示用户应用程序正在启动过程中,另一个是可以展现诸如商标或者Logo等特定的信息。
一般来说,我们可以使用一个WXGA分辨率的图片(768 x 1280)来作为splash screen,因为对于其他两种分辨率的设备(WVGA和720p)来讲,应用程序会自动对图片进行拉伸,使其合适该屏幕。
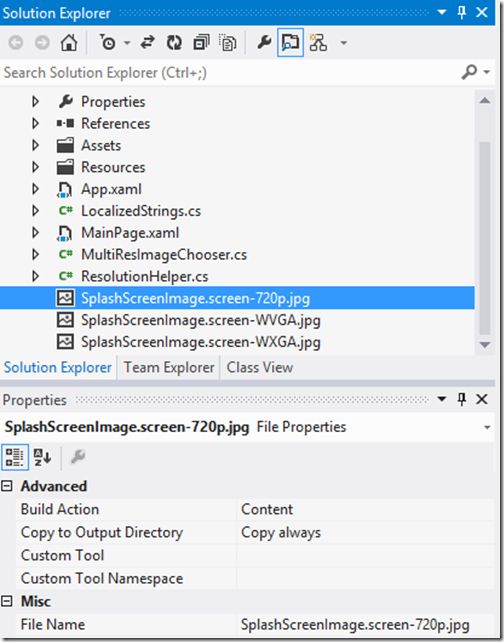
如果我们要针对不同的设备设定不同的启动画面,那么我们可以为应用程序添加三种对应分辨率的jpg图片,注意,需要添加在应用程序的根目录,且文件名分别为:SplashScreenImage.screen-WVGA.jpg、SplashScreenImage.screen-720p.jpg和SplashScreenImage.screen-WXGA.jpg。并且,三个文件的Build Action属性必须设置为Content。如下图4所示。
图4:启动画面文件设置
参考链接:
1. Multi-resolution apps for Windows Phone 8
2. How to create a splash screen for Windows Phone
源代码下载:点此下载。


