keepalived-通过zabbix监控是否发生脑裂
keepalived- 脑裂
- 脑裂
-
- 脑裂产生的原因
- 部署zabbix
-
- 部署LAMP
-
- 下载centos和epel源
- 安装httpd
- 安装php
- 安装mariadb
- 设置httpd服务
- 测试php页面和配置时间
- 浏览器访问
- 安装zabbix
-
- 配置zabbix源
- 安装
- 配置数据库并导入zabbix表数据
- 验证zabbix数据库数据
- 配置zabbix并启动服务
- 配置httpd并启动服务
- 浏览器访问http://192.168.40.99/zabbix
- 第三方QQ邮箱+脚本告警配置
- keepalived部署
脑裂
在高可用(HA)系统中,当联系2个节点的“心跳线”断开时,本来为一整体、动作协调的HA系统,就分裂成为2个独立的个体。由于相互失去了联系,都以为是对方出了故障。两个节点上的HA软件像“裂脑人”一样,争抢“共享资源”、争起“应用服务”,就会发生严重后果——或者共享资源被瓜分、两边“服务”都起不来了;或者两边“服务”都起来了,但同时读写“共享存储”,导致数据损坏(常见如数据库轮询着的联机日志出错)。
1、对付HA系统“裂脑”的对策,目前达成共识的的大概有以下几条:
(1)添加冗余的心跳线,例如:双心跳线(心跳线也HA),尽量减少“裂脑”发生几率;
(2)启用磁盘锁。正在服务一方锁住共享磁盘,“裂脑”发生时,让对方完全“抢不走”共享磁盘资源。但使用锁磁盘也会有一个不小的问题,如果占用共享盘的一方不主动“解锁”,另一方就永远得不到共享磁盘。现实中假如服务节点突然死机或崩溃,就不可能执行解锁命令。后备节点也就接管不了共享资源和应用服务。于是有人在HA中设计了“智能”锁。即:正在服务的一方只在发现心跳线全部断开(察觉不到对端)时才启用磁盘锁。平时就不上锁了
(3)设置仲裁机制。例如设置参考IP(如网关IP),当心跳线完全断开时,2个节点都各自ping一下参考IP,不通则表明断点就出在本端。不仅“心跳”、还兼对外“服务”的本端网络链路断了,即使启动(或继续)应用服务也没有用了,那就主动放弃竞争,让能够ping通参考IP的一端去起服务。更保险一些,ping不通参考IP的一方干脆就自我重启,以彻底释放有可能还占用着的那些共享资源
脑裂产生的原因
一般来说,脑裂的发生,有以下几种原因:
(1)高可用服务器对之间心跳线链路发生故障,导致无法正常通信
(2)因心跳线坏了(包括断了,老化)
(3)因网卡及相关驱动坏了,ip配置及冲突问题(网卡直连)
(4)因心跳线间连接的设备故障(网卡及交换机)
(5)因仲裁的机器出问题(采用仲裁的方案)
(6)高可用服务器上开启了 iptables防火墙阻挡了心跳消息传输
(7)高可用服务器上心跳网卡地址等信息配置不正确,导致发送心跳失败
(8)其他服务配置不当等原因,如心跳方式不同,心跳广插冲突、软件Bug等
对脑裂的监控应在备用服务器上进行,通过添加zabbix自定义监控进行。
监控什么信息呢?监控备上有无VIP地址
备机上出现VIP有两种情况:
(1)发生了脑裂
(2)正常的主备切换
监控只是监控发生脑裂的可能性,不能保证一定是发生了脑裂,因为正常的主备切换VIP也会到备份节点上。
使用zabbix监控脑裂
| 用户 | IP | 服务 |
|---|---|---|
| sever | IP:192.168.40.99–VIP:192.168.40.111 | lamp架构、zabbix-server、zabbix-agentd、keepalived、nginx |
| Agent | 192.168.100.100 | zabbix-agentd keepalived、nginx |
部署zabbix
部署LAMP
下载centos和epel源
[root@localhost ~]# cd /etc/yum.repos.d/
[root@localhost yum.repos.d]# rm -rf *
[root@localhost yum.repos.d]# ls
[root@localhost yum.repos.d]# curl -o /etc/yum.repos.d/CentOS-Base.repo https://mirrors.aliyun.com/repo/Centos-vault-8.5.2111.repo
  % Total    % Received % Xferd  Average Speed   Time    Time     Time  Current
                                 Dload  Upload   Total   Spent    Left  Speed
100  2495  100  2495    0     0  11497      0 --:--:-- --:--:-- --:--:-- 11497
[root@localhost yum.repos.d]# sed -i -e '/mirrors.cloud.aliyuncs.com/d' -e '/mirrors.aliyuncs.com/d' /etc/yum.repos.d/CentOS-Base.repo
[root@localhost yum.repos.d]# yum install -y https://mirrors.aliyun.com/epel/epel-release-latest-8.noarch.rpm
CentOS-8.5.2111 - Base - mirrors.aliyun.com                               556 kB/s | 4.6 MB     00:08
CentOS-8.5.2111 - Extras - mirrors.aliyun.com                             106 kB/s |  10 kB     00:00
CentOS-8.5.2111 - AppStream - mirrors.aliyun.com                          358 kB/s | 8.4 MB     00:24
epel-release-latest-8.noarch.rpm                                          230 kB/s |  24 kB     00:00
依赖关系解决。
==========================================================================================================
 软件包                     架构                 版本                    仓库                        大小
==========================================================================================================
安装:
 epel-release               noarch               8-17.el8                @commandline                24 k

事务概要
==========================================================================================================
安装  1 软件包

总计:24 k
安装大小:34 k
下载软件包:
运行事务检查
事务检查成功。
运行事务测试
事务测试成功。
运行事务
  准备中  :                                                                                           1/1
  安装    : epel-release-8-17.el8.noarch                                                              1/1
  运行脚本: epel-release-8-17.el8.noarch                                                              1/1
Many EPEL packages require the CodeReady Builder (CRB) repository.
It is recommended that you run /usr/bin/crb enable to enable the CRB repository.

  验证    : epel-release-8-17.el8.noarch                                                              1/1

已安装:
  epel-release-8-17.el8.noarch

完毕!
[root@localhost yum.repos.d]# ls
CentOS-Base.repo  epel-modular.repo  epel.repo  epel-testing-modular.repo  epel-testing.repo
[root@localhost yum.repos.d]#
安装httpd
[root@localhost ~]# dnf -y install httpd
已安装:
  apr-1.6.3-12.el8.x86_64
  apr-util-1.6.1-6.el8.x86_64
  apr-util-bdb-1.6.1-6.el8.x86_64
  apr-util-openssl-1.6.1-6.el8.x86_64
  centos-logos-httpd-85.8-2.el8.noarch
  httpd-2.4.37-43.module_el8.5.0+1022+541f3b1.x86_64
  httpd-filesystem-2.4.37-43.module_el8.5.0+1022+b541f3b1.noarch
  httpd-tools-2.4.37-43.module_el8.5.0+1022+b541f3b1.x86_64
  mod_http2-1.15.7-3.module_el8.4.0+778+c970deab.x86_64

完毕!
安装php
[root@localhost ~]# yum -y install php-xml.x86_64  php-json.x86_64  php-mysqlnd.x86_64  php-common.x86_64  php-fpm.x86_64  php-bcmath.x86_64  php-cli.x86_64  php.x86_64  php-gd.x86_64  php-pdo.x86_64  php-devel.x86_64 --allowerasing --skip-broken
....
已安装:
  nginx-filesystem-1:1.14.1-9.module_el8.0.0+184+e34fea82.noarch
  php-7.2.24-1.module_el8.2.0+313+b04d0a66.x86_64
  php-bcmath-7.2.24-1.module_el8.2.0+313+b04d0a66.x86_64
  php-cli-7.2.24-1.module_el8.2.0+313+b04d0a66.x86_64
  php-common-7.2.24-1.module_el8.2.0+313+b04d0a66.x86_64
  php-fpm-7.2.24-1.module_el8.2.0+313+b04d0a66.x86_64
  php-gd-7.2.24-1.module_el8.2.0+313+b04d0a66.x86_64
  php-json-7.2.24-1.module_el8.2.0+313+b04d0a66.x86_64
  php-mysqlnd-7.2.24-1.module_el8.2.0+313+b04d0a66.x86_64
  php-pdo-7.2.24-1.module_el8.2.0+313+b04d0a66.x86_64
  php-xml-7.2.24-1.module_el8.2.0+313+b04d0a66.x86_64

完毕!
安装mariadb
[root@localhost ~]# dnf -y install mariadb-server mariadb
...
已安装:
  mariadb-3:10.3.28-1.module_el8.3.0+757+d382997d.x86_64
  mariadb-backup-3:10.3.28-1.module_el8.3.0+757+d382997d.x86_64
  mariadb-common-3:10.3.28-1.module_el8.3.0+757+d382997d.x86_64
  mariadb-connector-c-3.1.11-2.el8_3.x86_64
  mariadb-connector-c-config-3.1.11-2.el8_3.noarch
  mariadb-errmsg-3:10.3.28-1.module_el8.3.0+757+d382997d.x86_64
  mariadb-gssapi-server-3:10.3.28-1.module_el8.3.0+757+d382997d.x86_64
  mariadb-server-3:10.3.28-1.module_el8.3.0+757+d382997d.x86_64
  mariadb-server-utils-3:10.3.28-1.module_el8.3.0+757+d382997d.x86_64
  perl-DBD-MySQL-4.046-3.module_el8.3.0+419+c2dec72b.x86_64

完毕!
启动数据库服务,设置数据库密码
[root@localhost ~]# systemctl start mariadb.service
[root@localhost ~]# systemctl enable mariadb.service
Created symlink /etc/systemd/system/mysql.service → /usr/lib/systemd/system/mariadb.service.
Created symlink /etc/systemd/system/mysqld.service → /usr/lib/systemd/system/mariadb.service.
Created symlink /etc/systemd/system/multi-user.target.wants/mariadb.service → /usr/lib/systemd/system/mariadb.service.
[root@localhost ~]# systemctl start httpd.service
[root@localhost ~]# systemctl enable httpd.service
Created symlink /etc/systemd/system/multi-user.target.wants/httpd.service → /usr/lib/systemd/system/httpd.service.
[root@localhost ~]# mysql_secure_installation

NOTE: RUNNING ALL PARTS OF THIS SCRIPT IS RECOMMENDED FOR ALL MariaDB
      SERVERS IN PRODUCTION USE!  PLEASE READ EACH STEP CAREFULLY!

In order to log into MariaDB to secure it, we'll need the current
password for the root user.  If you've just installed MariaDB, and
you haven't set the root password yet, the password will be blank,
so you should just press enter here.

Enter current password for root (enter for none):
OK, successfully used password, moving on...

Setting the root password ensures that nobody can log into the MariaDB
root user without the proper authorisation.

Set root password? [Y/n] y
New password:
Re-enter new password:
Password updated successfully!
Reloading privilege tables..
 ... Success!


By default, a MariaDB installation has an anonymous user, allowing anyone
to log into MariaDB without having to have a user account created for
them.  This is intended only for testing, and to make the installation
go a bit smoother.  You should remove them before moving into a
production environment.

Remove anonymous users? [Y/n] y
 ... Success!

Normally, root should only be allowed to connect from 'localhost'.  This
ensures that someone cannot guess at the root password from the network.

Disallow root login remotely? [Y/n] y
 ... Success!

By default, MariaDB comes with a database named 'test' that anyone can
access.  This is also intended only for testing, and should be removed
before moving into a production environment.

Remove test database and access to it? [Y/n] y
 - Dropping test database...
 ... Success!
 - Removing privileges on test database...
 ... Success!

Reloading the privilege tables will ensure that all changes made so far
will take effect immediately.

Reload privilege tables now? [Y/n] y
 ... Success!

Cleaning up...

All done!  If you've completed all of the above steps, your MariaDB
installation should now be secure.

Thanks for using MariaDB!
MariaDB [(none)]>
[root@localhost ~]# mysql -uroot -p123456
Welcome to the MariaDB monitor.  Commands end with ; or \g.
Your MariaDB connection id is 9
Server version: 10.3.28-MariaDB MariaDB Server

Copyright (c) 2000, 2018, Oracle, MariaDB Corporation Ab and others.

Type 'help;' or '\h' for help. Type '\c' to clear the current input statement.

MariaDB [(none)]>
设置httpd服务
[root@localhost ~]# vim /etc/httpd/conf/httpd.conf

    DirectoryIndex index.html index.php
测试php页面和配置时间
[root@localhost ~]# cd /var/www/html/
[root@localhost html]# ls
[root@localhost html]# vim index.php

[root@localhost html]# ls
index.php
[root@localhost html]#
root@localhost ~]# systemctl restart php-fpm.service
[root@localhost ~]# systemctl enable php-fpm.service
Created symlink /etc/systemd/system/multi-user.target.wants/php-fpm.service → /usr/lib/systemd/system/php-fpm.service.
[root@localhost ~]#
[root@localhost ~]# vim /etc/php.ini
[Date]
; Defines the default timezone used by the date functions
; http://php.net/date.timezone
date.timezone = Asia/Shanghai
浏览器访问
安装zabbix
配置zabbix源
[root@localhost ~]# cd /etc/yum.repos.d/
[root@localhost yum.repos.d]# ls
CentOS-Base.repo  epel-modular.repo  epel.repo  epel-testing-modular.repo  epel-testing.repo
[root@localhost yum.repos.d]# vim zabbix.repo
[Aliyun]
name=haha
baseurl=https://mirrors.aliyun.com/zabbix/zabbix/4.4/rhel/8/x86_64/
enable=1
gpgcheck=0
[qinghua]
name=hehe
#baseurl=http://repo.zabbix.com/zabbix/3.4/rhel/7/$basearch/
baseurl=https://mirrors.tuna.tsinghua.edu.cn/zabbix/zabbix/4.4/rhel/8/$basearch/
enabled=1
gpgcheck=0
gpgkey=file:///etc/pki/rpm-gpg/RPM-GPG-KEY-ZABBIX-A14FE591
安装
[root@localhost ~]# dnf -y install zabbix-server-mysql zabbix-web-mysql zabbix-apache-conf zabbix-agent
haha                                                                      247 kB/s | 115 kB     00:00
hehe                                                                       61 kB/s | 115 kB     00:01
...
...
已安装:
  OpenIPMI-libs-2.0.31-3.el8.x86_64
  fping-4.2-2.el8.x86_64
  php-ldap-7.2.24-1.module_el8.2.0+313+b04d0a66.x86_64
  php-mbstring-7.2.24-1.module_el8.2.0+313+b04d0a66.x86_64
  unixODBC-2.3.7-1.el8.x86_64
  zabbix-agent-4.4.10-1.el8.x86_64
  zabbix-apache-conf-4.4.10-1.el8.noarch
  zabbix-server-mysql-4.4.10-1.el8.x86_64
  zabbix-web-4.4.10-1.el8.noarch
  zabbix-web-mysql-4.4.10-1.el8.noarch

完毕!
配置数据库并导入zabbix表数据
[root@localhost ~]# mysql -uroot -p123456
Welcome to the MariaDB monitor.  Commands end with ; or \g.
Your MariaDB connection id is 10
Server version: 10.3.28-MariaDB MariaDB Server

Copyright (c) 2000, 2018, Oracle, MariaDB Corporation Ab and others.

Type 'help;' or '\h' for help. Type '\c' to clear the current input statement.

MariaDB [(none)]>  create database zabbix character set utf8 collate utf8_bin;
Query OK, 1 row affected (0.001 sec)

MariaDB [(none)]> grant all on zabbix.* to zabbix@'localhost' identified by '123456';
Query OK, 0 rows affected (0.001 sec)

MariaDB [(none)]>  flush privileges;
Query OK, 0 rows affected (0.000 sec)

[root@localhost ~]# zcat /usr/share/doc/zabbix-server-mysql/create.sql.gz | mysql -u zabbix -p123456 zabbix
验证zabbix数据库数据
[root@localhost ~]# mysql -uroot -p123456
Welcome to the MariaDB monitor.  Commands end with ; or \g.
Your MariaDB connection id is 12
Server version: 10.3.28-MariaDB MariaDB Server

Copyright (c) 2000, 2018, Oracle, MariaDB Corporation Ab and others.

Type 'help;' or '\h' for help. Type '\c' to clear the current input statement.

MariaDB [(none)]> show databases;
+--------------------+
| Database           |
+--------------------+
| information_schema |
| mysql              |
| performance_schema |
| zabbix             |
+--------------------+
4 rows in set (0.001 sec)

MariaDB [(none)]> use zabbix;
Reading table information for completion of table and column names
You can turn off this feature to get a quicker startup with -A

Database changed
MariaDB [zabbix]> show tables;
+----------------------------+
| Tables_in_zabbix           |
+----------------------------+
| acknowledges               |
| actions                    |
| alerts                     |
| application_discovery      |
| application_prototype      |
| application_template       |
| applications               |
| auditlog                   |
| auditlog_details           |
| autoreg_host               |
| conditions                 |
| config                     |
| config_autoreg_tls         |
| corr_condition             |
| corr_condition_group       |
| corr_condition_tag         |
| corr_condition_tagpair     |
| corr_condition_tagvalue    |
| corr_operation             |
| correlation                |
| dashboard                  |
| dashboard_user             |
| dashboard_usrgrp           |
| dbversion                  |
| dchecks                    |
| dhosts                     |
| drules                     |
| dservices                  |
| escalations                |
| event_recovery             |
| event_suppress             |
| event_tag                  |
| events                     |
| expressions                |
| functions                  |
| globalmacro                |
| globalvars                 |
| graph_discovery            |
| graph_theme                |
| graphs                     |
| graphs_items               |
| group_discovery            |
| group_prototype            |
| history                    |
| history_log                |
| history_str                |
| history_text               |
| history_uint               |
| host_discovery             |
| host_inventory             |
| host_tag                   |
| hostmacro                  |
| hosts                      |
| hosts_groups               |
| hosts_templates            |
| housekeeper                |
| hstgrp                     |
| httpstep                   |
| httpstep_field             |
| httpstepitem               |
| httptest                   |
| httptest_field             |
| httptestitem               |
| icon_map                   |
| icon_mapping               |
| ids                        |
| images                     |
| interface                  |
| interface_discovery        |
| item_application_prototype |
| item_condition             |
| item_discovery             |
| item_preproc               |
| item_rtdata                |
| items                      |
| items_applications         |
| lld_macro_path             |
| maintenance_tag            |
| maintenances               |
| maintenances_groups        |
| maintenances_hosts         |
| maintenances_windows       |
| mappings                   |
| media                      |
| media_type                 |
| media_type_param           |
| opcommand                  |
| opcommand_grp              |
| opcommand_hst              |
| opconditions               |
| operations                 |
| opgroup                    |
| opinventory                |
| opmessage                  |
| opmessage_grp              |
| opmessage_usr              |
| optemplate                 |
| problem                    |
| problem_tag                |
| profiles                   |
| proxy_autoreg_host         |
| proxy_dhistory             |
| proxy_history              |
| regexps                    |
| rights                     |
| screen_user                |
| screen_usrgrp              |
| screens                    |
| screens_items              |
| scripts                    |
| service_alarms             |
| services                   |
| services_links             |
| services_times             |
| sessions                   |
| slides                     |
| slideshow_user             |
| slideshow_usrgrp           |
| slideshows                 |
| sysmap_element_trigger     |
| sysmap_element_url         |
| sysmap_shape               |
| sysmap_url                 |
| sysmap_user                |
| sysmap_usrgrp              |
| sysmaps                    |
| sysmaps_elements           |
| sysmaps_link_triggers      |
| sysmaps_links              |
| tag_filter                 |
| task                       |
| task_acknowledge           |
| task_check_now             |
| task_close_problem         |
| task_remote_command        |
| task_remote_command_result |
| timeperiods                |
| trends                     |
| trends_uint                |
| trigger_depends            |
| trigger_discovery          |
| trigger_tag                |
| triggers                   |
| users                      |
| users_groups               |
| usrgrp                     |
| valuemaps                  |
| widget                     |
| widget_field               |
+----------------------------+
149 rows in set (0.001 sec)

MariaDB [zabbix]>
配置zabbix并启动服务
[root@server ~]# vim /etc/zabbix/zabbix_server.conf
ListenPort=10051
DBHost=localhost
DBName=zabbix
DBUser=zabbix
DBPassword=123456             #打开注释并修改连接mysql的密码,在124行
DBSocket=/var/lib/mysql/mysql.sock
ListenIP=0.0.0.0
[root@localhost ~]# vim /etc/selinux/config
[root@localhost ~]# vim /etc/zabbix/zabbix_server.conf
[root@localhost ~]# systemctl restart zabbix-server.service
[root@localhost ~]# systemctl enable zabbix-server.service
Created symlink /etc/systemd/system/multi-user.target.wants/zabbix-server.service → /usr/lib/systemd/system/zabbix-server.service.
配置httpd并启动服务
[root@localhost ~]# systemctl restart httpd.service
[root@localhost ~]# systemctl enable httpd.service
Created symlink /etc/systemd/system/multi-user.target.wants/httpd.service → /usr/lib/systemd/system/httpd.service.
[root@localhost ~]#
浏览器访问http://192.168.40.99/zabbix
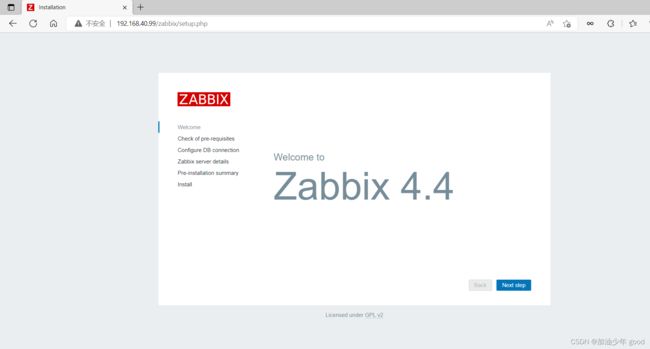


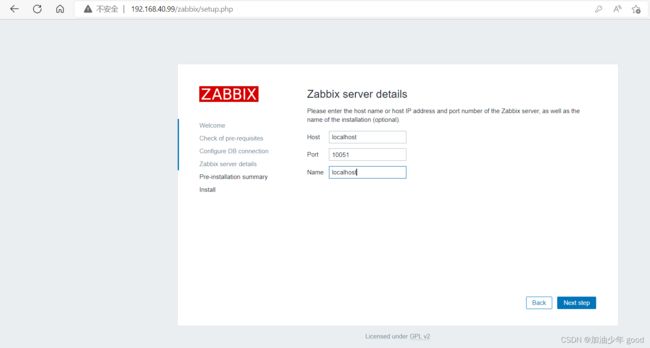

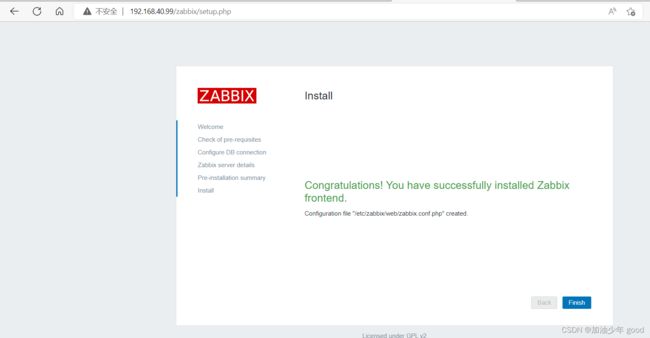

此处说明:用户名hehe=localhost=server haha=haha=agent
1、将zabbix server添加到zabbix web监控平台
[root@hehe zabbix]# vim zabbix_agentd.conf
Server=127.0.0.1 zabbix服务器的IP,agent被动监控(默认模式)
ServerActive=127.0.0.1
Hostname=hehe  //本机主机名
[root@hehe zabbix]# systemctl restart zabbix-agent.service
[root@hehe zabbix]# systemctl enable zabbix-agent.service
Created symlink /etc/systemd/system/multi-user.target.wants/zabbix-agent.service → /usr/lib/systemd/system/zabbix-agent.service.
[root@hehe ~]# cat /etc/hosts
127.0.0.1   localhost localhost.localdomain localhost4 localhost4.localdomain4
::1         localhost localhost.localdomain localhost6 localhost6.localdomain6
192.168.40.99 haha
192.168.40.100 hehe
2、将zabbix agent添加到zabbix web监控平台
[root@haha ~]#  yum -y install zabbix-agent
[root@haha ~]# cd /etc/zabbix/
[root@haha zabbix]# ls
zabbix_agentd.conf  zabbix_agentd.d
[root@haha zabbix]# vim zabbix_agentd.conf
Server=192.168.40.99 修改成zabbix监控服务器的IP,agent被动模式
ServerActive=192.168.40.99 修改成zabbix监控服务器的IP,agent主动模式
Hostname=hehe 修改为被监控端的主机名
安装postfix软件
dnf -y install postfix
修改postfix的主配置文件,并重启服务和设置下次启动生效
vim /etc/postfix/main.cf
在该行后面加上$mydomain
mydestination = $myhostname, localhost.$mydomain, localhost,$mydomain
systemctl restart postfix.service
systemctl enable postfix.service
安装mailx软件包
dnf -y install mailx
第三方QQ邮箱+脚本告警配置
修改mailx配置文件
[root@server zabbix]# vim /etc/mail.rc
set [email protected]
set smtp=smtp.qq.com
set [email protected]
set smtp-auth-password=imcycxhtldvpeajj
set smtp-auth=login
set ssl-verify=ignore
[root@server zabbix]# chown -R zabbix:zabbix /etc/mail.rc
[root@server zabbix]#
在zabbix服务端写邮件发送脚本
[root@server ~]# vim  /usr/lib/zabbix/alertscripts/haha.sh
#!/bin/bash
messages=`echo $3 | tr '\r\n' '\n'`
subject=`echo $2 | tr '\r\n' '\n'`
echo "${messages}" | mailx -s "${subject}" $1
[root@server ~]# cd /usr/lib/zabbix/alertscripts/
[root@server alertscripts]# chmod +x haha.sh
[root@server alertscripts]#  chown zabbix.zabbix haha.sh
[root@server alertscripts]#
keepalived部署
server和agent都安装
[root@server ~]# dnf -y install  gcc gcc-c++
[root@server ~]# dnf -y install keepalived
[root@agent ~]# dnf -y install keepalived
[root@agent ~]# dnf -y install  gcc gcc-c++
[root@server ~]# dnf -y install  nginx
[root@agent ~]# dnf -y install  nginx
在nginx中添加测试网页
[root@server ~]# cd /usr/share/nginx/html/
[root@server html]# ls
404.html  50x.html  index.html  nginx-logo.png  poweredby.png
[root@server html]# echo "hi server" > index.html
[root@server html]#
[root@agent ~]# cd /usr/share/nginx/html/
[root@agent html]# echo "hi agent" > index.html
配置nginx端口为8080
vim /etc/nginx/nginx.conf
 server {
        listen       8080 default_server;
        listen       [::]:8080 default_server;
        server_name  _;
systemctl restart nginx.service
修改内核参数,开启侦听VIP功能
此步可做可不做,该功能可用于仅监听VIP的时候
vim /etc/sysctl.conf
net.ipv4.ip_nonlocal_bind = 1
sysctl -p
[root@server ~]# ip addr add 192.168.40.111/32 dev ens33
[root@server ~]# ip addr show ens33
2: ens33:  mtu 1500 qdisc fq_codel state UP group default qlen 1000
    link/ether 00:0c:29:a3:51:0a brd ff:ff:ff:ff:ff:ff
    inet 192.168.40.99/24 brd 192.168.40.255 scope global noprefixroute ens33
       valid_lft forever preferred_lft forever
    inet 192.168.40.111/32 scope global ens33
       valid_lft forever preferred_lft forever
    inet6 fe80::20c:29ff:fea3:510a/64 scope link noprefixroute
       valid_lft forever preferred_lft forever
让keepalived监控nginx负载均衡
在server和agent上编写脚本
[root@agent ~]# mkdir /scripts
[root@agent ~]# cd /scripts/
[root@agent scripts]# vim  check.sh
[root@agent scripts]# chmod +x check.sh
[root@agent scripts]# vim notify.sh
[root@agent scripts]# chmod +x notify.sh
[root@agent scripts]# cat check.sh
#!/bin/bash
nginx_status=`ps -ef | grep -v "grep" | grep "nginx" | wc -l`
if [ $nginx_status -lt 1 ];then
        systemctl stop keepalived
fi
[root@agent scripts]# cat notify.sh
#!/bin/bash
VIP=$2
sendmail () {
	subject="${VIP}'s server keepalived state is translate"
	content="`date +'%F %T'`: `hostname`'s state change to master"
	echo $content | mail -s "$subject" [email protected]
}
case "$1" in
  master)
	nginx_status=$(ps -ef|grep -Ev "grep|$0"|grep '\bnginx\b'|wc -l)
	if [ $nginx_status -lt 1 ];then
		systemctl start nginx
	fi
	sendmail
   ;;
   backup)
	nginx_status=$(ps -ef|grep -Ev "grep|$0"|grep '\bnginx\b'|wc -l)
	if [ $nginx_status -gt 0 ];then
		systemctl stop nginx
	fi
   ;;
   *)
	echo "Usage:$0 master|backup VIP"
   ;;
esac
[root@server ~]# mkdir /scripts
[root@server ~]# cd /scripts/
[root@server scripts]# scp -r  [email protected]:/scripts/* .
The authenticity of host '192.168.40.100 (192.168.40.100)' can't be established.
ECDSA key fingerprint is SHA256:CpwzTyA+TDEgnsVkB3eHsGG+klmfSTzcJXmbNJpj5pY.
Are you sure you want to continue connecting (yes/no/[fingerprint])? yes
Warning: Permanently added '192.168.40.100' (ECDSA) to the list of known hosts.
[email protected]'s password:
check.sh                                                                   100%  143   171.3KB/s   00:00
notify.sh                                                                  100%  589   396.3KB/s   00:00
[root@server scripts]# ll
总用量 8
-rwxr-xr-x 1 root root 143 10月  9 01:37 check.sh
-rwxr-xr-x 1 root root 589 10月  9 01:37 notify.sh
[root@server scripts]#
server配置
[root@server scripts]# cd /etc/keepalived/
[root@server keepalived]# vim keepalived.conf
[root@server keepalived]# cat keepalived.conf
! Configuration File for keepalived

global_defs {
   router_id haha
}

vrrp_script nginx_check {
    script "/scripts/check.sh"
    interval 10
    weight -20
}

vrrp_instance VI_1 {
    state MASTER
    interface ens33
    virtual_router_id 51
    priority 100
    advert_int 1
    authentication {
        auth_type PASS
        auth_pass 1111
    }
    virtual_ipaddress {
        192.168.40.111
    }
    track_script {
    nginx_check
    }
    notify_master "/scripts/notify.sh master 192.168.40.111"
    notify_backup "/scripts/notify.sh backup 192.168.40.111"
}

virtual_server 192.168.40.111 8080 {
    delay_loop 6
    lb_algo rr
    lb_kind DR
    persistence_timeout 50
    protocol TCP

    real_server 192.168.40.99 8080 {
        weight 1
        TCP_CHECK {
	    connect_port 8080
            connect_timeout 3
	    nb_get_retry 3
            delay_before_retry 3
        }
    }


    real_server 192.168.40.100 8080 {
        weight 1
        TCP_CHECK {
	    connect_port 8080
            connect_timeout 3
            nb_get_retry 3
            delay_before_retry 3
        }
    }
}
[root@server keepalived]# systemctl restart keepalived.service
[root@server keepalived]# systemctl enable keepalived.service
Created symlink /etc/systemd/system/multi-user.target.wants/keepalived.service → /usr/lib/systemd/system/keepalived.service.
agent配置
[root@agent scripts]# cd /etc/keepalived/
[root@agent keepalived]# vim keepalived.conf
[root@agent keepalived]# systemctl restart keepalived.service
[root@agent keepalived]# systemctl enable keepalived.service
Created symlink /etc/systemd/system/multi-user.target.wants/keepalived.service → /usr/lib/systemd/system/keepalived.service.
[root@agent keepalived]# cat keepalived.conf
! Configuration File for keepalived

global_defs {
   router_id hehe
}

vrrp_instance VI_1 {
    state BACKUP
    interface ens33
    virtual_router_id 51
    priority 90
    advert_int 1
    authentication {
        auth_type PASS
        auth_pass 1111
    }
    virtual_ipaddress {
        192.168.40.111
    }
    notify_master "/scripts/notify.sh master 192.168.40.111"
    notify_backup "/scripts/notify.sh backup 192.168.40.111"
}


virtual_server 192.168.40.111 8080 {
    delay_loop 6
    lb_algo rr
    lb_kind DR
    persistence_timeout 50
    protocol TCP

    real_server 192.168.40.99 8080 {
        weight 1
        TCP_CHECK {
	    connect_port 80
            connect_timeout 3
	    nb_get_retry 3
            delay_before_retry 3
        }
    }


    real_server 192.168.40.100 8080 {
        weight 1
        TCP_CHECK {
	    connect_port 8080
            connect_timeout 3
            nb_get_retry 3
            delay_before_retry 3
        }
    }
}
[root@agent keepalived]# systemctl restart keepalived.service
[root@agent ~]# cd /scripts/
[root@agent scripts]# ls
check.sh  notify.sh
[root@agent scripts]# vim check_backupip.sh
[root@agent scripts]# chmod +x check_backupip.sh
[root@agent scripts]# cat check_backupip.sh
#!/bin/bash
a=`ip a show ens33 | grep 192.168.40.111 | wc -l`
if [ $a -eq 0 ];then
        echo "0"
else
        echo "1"
fi
在备份节点添加自定义监控项
[root@agent scripts]# vim /etc/zabbix/zabbix_agentd.conf
//在最末尾加入这两行,自定义监控项
UnsafeUserParameters=1
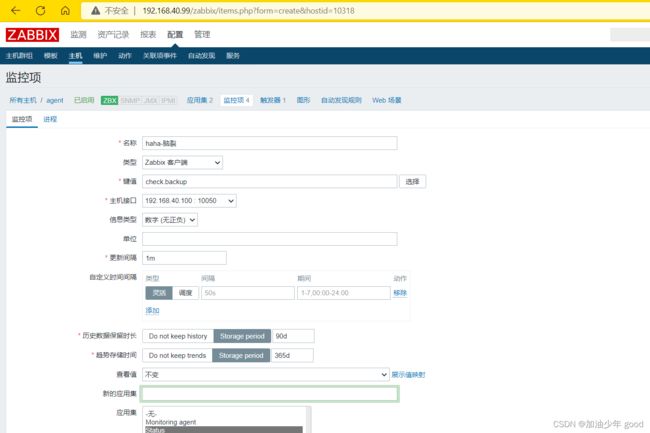
UserParameter=check.backup,/scripts/check_backupip.sh
[root@agent scripts]# systemctl restart zabbix-agent.service
在主节点中测试该监控项
[root@server ~]# yum -y install zabbix-get
[root@server zabbix]# zabbix_get -s 192.168.40.100 -k "check.backup"
0
配置监控项
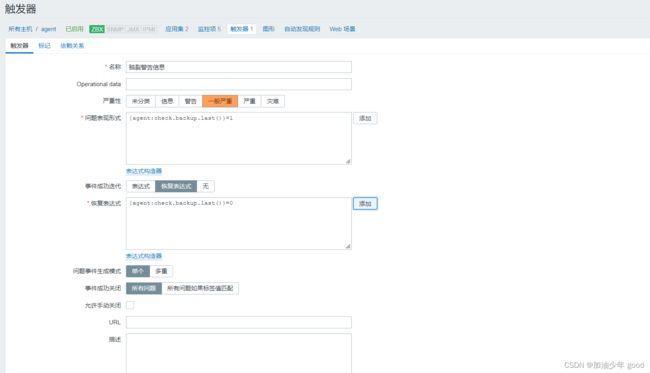
配置触发器
添加媒介

配置动作


模拟脑裂,关闭主节点的nginx服务
[root@server keepalived]# systemctl stop nginx.service
[root@server keepalived]# systemctl restart keepalived.service


