2.CentOS7.8 部署Zabbix 5.4高可用集群
文章目录
-
- 1.准备环境
- 2.各服务下载版本链接地址
- 3.配置epel和aliyun的yum源
- 4.编译安装PHP7.3.33
-
- 4.1 使用yum安装依赖和cmake3.20安装
- 4.2 解压PHP包并编译
- 4.3 拷贝并修改配置文件
- 4.4 配置开机自启动php-fpm
- 5.源码编译部署Zabbix
-
- 5.1 Server服务端安装zabbix server
- 5.2 创建运行用户和日志目录
- 5.3 修改zabbix Server配置文件
- 5.4 创建zabbix数据库
- 5.5 配置Zabbix Server端为系统服务
- 6.安装zabbix agent客户端
-
- 6.1 从yum仓库安装
- 6.2 从源码安装zabbix agent
- 6.3 使用Ansible批量安装Zabbix agent服务
- 7.安装并配置nginx
-
- 7.1 编译nginx
- 7.2 修改nginx配置文件并配置访问zabbix
- 7.3 配置nginx为开机自启动服务
- 7.4 访问Zabbix界面
1.准备环境
服务器要求:
- 建议最小硬件配置:2核CPU、2G内存、30G硬盘
- 服务器最好可以访问外网
软件环境
| 软件 | 版本 |
|---|---|
| 操作系统 | CentOS Linux release 7.8.2003 |
| 容器引擎 | Docker CE 19.03.12 |
| 操作系统内核版本 | 4.18.9-1.el7.elrepo.x86_64 |
| 数据库版本 | mysql 5.7.35 |
| PHP版本 | php 7.3.33 |
| Zabbix版本 | 5.4.7 |
| Tengine(nginx)版本 | 2.3.2 |
| HAproxy版本 | 1.5.18 |
| Keepalived版本 | v1.3.5 |
机器环境和用途
| 角色 | 主机名 | IP地址 | 用途 |
|---|---|---|---|
| Zabbix Server | ldap1.yuan.com | 192.168.2.206 | Zabbix Server和Web主 |
| Zabbix Server | ldap2.yuan.com | 192.168.2.208 | Zabbix Server和Web备 |
| MySQL Server | ldap1.yuan.com | 192.168.2.206 | MYSQL主主同步高可用(互为主从,采用GTID+多线程复制) |
| MySQL Server | ldap2.yuan.com | 192.168.2.208 | MYSQL主主同步高可用(互为主从,采用GTID+多线程复制) |
| 负载均衡器IP | 192.168.2.210 | HAproxy+ keepalived |
关闭防火墙和SELINUX
# systemctl stop firewalld  #关闭防火墙
# systemctl disable firewalld  #开机禁用防火墙
# sed -i 's/SELINUX=enable/SELINUX=disabled/g' /etc/sysconfig/selinux
# setenforce 0   #临时关闭SELinux
2.各服务下载版本链接地址
Zabbix5.4.7下载
PHP7.3.33下载
淘宝nginx2.3.2下载
MySQL5.7.35下载
Cmake和libzip包下载
执行命令:
wget https://cdn.zabbix.com/zabbix/sources/stable/5.4/zabbix-5.4.7.tar.gz
wget  https://downloads.mysql.com/archives/get/p/23/file/mysql-5.7.35-linux-glibc2.12-x86_64.tar.gz
wget  https://www.php.net/distributions/php-7.3.33.tar.gz
wget -c https://github.com/Kitware/CMake/releases/download/v3.20.2/cmake-3.20.2.tar.gz
wget -c https://libzip.org/download/libzip-1.8.0.tar.gz
3.配置epel和aliyun的yum源
epel源
$  sudo cat > /etc/yum.repos.d/epel.repo  <<-EOF
[epel]
name=Extra Packages for Enterprise Linux 7 - $basearch
baseurl=http://mirrors.aliyun.com/epel/7/$basearch
failovermethod=priority
enabled=1
gpgcheck=0
gpgkey=file:///etc/pki/rpm-gpg/RPM-GPG-KEY-EPEL-7

[epel-debuginfo]
name=Extra Packages for Enterprise Linux 7 - $basearch - Debug
baseurl=http://mirrors.aliyun.com/epel/7/$basearch/debug
failovermethod=priority
enabled=0
gpgkey=file:///etc/pki/rpm-gpg/RPM-GPG-KEY-EPEL-7
gpgcheck=0

[epel-source]
name=Extra Packages for Enterprise Linux 7 - $basearch - Source
baseurl=http://mirrors.aliyun.com/epel/7/SRPMS
failovermethod=priority
enabled=0
gpgkey=file:///etc/pki/rpm-gpg/RPM-GPG-KEY-EPEL-7
gpgcheck=0

EOF
阿里云的yum源
$  sudo cat > /etc/yum.repos.d/aliyun.repo  <<-EOF
[base]
name=CentOS-$releasever - Base - mirrors.aliyun.com
failovermethod=priority
baseurl=http://mirrors.aliyun.com/centos/$releasever/os/$basearch/
        http://mirrors.aliyuncs.com/centos/$releasever/os/$basearch/
        http://mirrors.cloud.aliyuncs.com/centos/$releasever/os/$basearch/
gpgcheck=1
gpgkey=http://mirrors.aliyun.com/centos/RPM-GPG-KEY-CentOS-7

#released updates
[updates]
name=CentOS-$releasever - Updates - mirrors.aliyun.com
failovermethod=priority
baseurl=http://mirrors.aliyun.com/centos/$releasever/updates/$basearch/
        http://mirrors.aliyuncs.com/centos/$releasever/updates/$basearch/
        http://mirrors.cloud.aliyuncs.com/centos/$releasever/updates/$basearch/
gpgcheck=1
gpgkey=http://mirrors.aliyun.com/centos/RPM-GPG-KEY-CentOS-7

#additional packages that may be useful
[extras]
name=CentOS-$releasever - Extras - mirrors.aliyun.com
failovermethod=priority
baseurl=http://mirrors.aliyun.com/centos/$releasever/extras/$basearch/
        http://mirrors.aliyuncs.com/centos/$releasever/extras/$basearch/
        http://mirrors.cloud.aliyuncs.com/centos/$releasever/extras/$basearch/
gpgcheck=1
gpgkey=http://mirrors.aliyun.com/centos/RPM-GPG-KEY-CentOS-7

#additional packages that extend functionality of existing packages
[centosplus]
name=CentOS-$releasever - Plus - mirrors.aliyun.com
failovermethod=priority
baseurl=http://mirrors.aliyun.com/centos/$releasever/centosplus/$basearch/
        http://mirrors.aliyuncs.com/centos/$releasever/centosplus/$basearch/
        http://mirrors.cloud.aliyuncs.com/centos/$releasever/centosplus/$basearch/
gpgcheck=1
enabled=0
gpgkey=http://mirrors.aliyun.com/centos/RPM-GPG-KEY-CentOS-7

#contrib - packages by Centos Users
[contrib]
name=CentOS-$releasever - Contrib - mirrors.aliyun.com
failovermethod=priority
baseurl=http://mirrors.aliyun.com/centos/$releasever/contrib/$basearch/
        http://mirrors.aliyuncs.com/centos/$releasever/contrib/$basearch/
        http://mirrors.cloud.aliyuncs.com/centos/$releasever/contrib/$basearch/
gpgcheck=1
enabled=0
gpgkey=http://mirrors.aliyun.com/centos/RPM-GPG-KEY-CentOS-7

EOF
4.编译安装PHP7.3.33
4.1 使用yum安装依赖和cmake3.20安装
$ sudo yum install -y openssl openssl-devel curl curl-devel libjpeg libjpeg-devel libpng libpng-devel \
	freetype freetype-devel pcre pcre-devel libxslt libxslt-devel bzip2 bzip2-devel openldap \
	openldap-devel nss_ldap openldap-clients openldap-servers  gcc gcc-c++  make automake lrzsz

# 卸载旧版本的cmake 2.8.12.2
$ yum remove -y cmake

编译报错:
  configure: error: Please reinstall the libzip distribution
先下载cmake 3.20版本,编译cmake
$ sudo tar -zxvf /data/uploads/cmake-3.20.2.tar.gz -C /data/softinstall/sources/
$ cd /data/softinstall/sources/cmake-3.20.2/
$ sudo ./bootstrap && gmake && gmake install # 使用sudo报权限不够,建议用root用户执行.
# ./bootstrap && gmake && gmake install
# 链接 目的是添加到环境变量中
ln -s /usr/local/bin/cmake /usr/bin/cmake
#  打印版本号
cmake --version

在 https://libzip.org/download/ 下载源码,进行安装
$ sudo tar -zxvf /data/uploads/libzip-1.8.0.tar.gz -C /data/softinstall/sources/
$ cd /data/softinstall/sources/libzip-1.8.0/
# cmake . && make && make install
4.2 解压PHP包并编译
# 创建组和用户
$ sudo useradd -s /sbin/nologin  -M -g zabbix  zabbix
$ sudo useradd -s /sbin/nologin  -M -g nginx nginx
$ sudo tar -zxvf /data/uploads/php-7.3.33.tar.gz -C /data/softinstall/sources/
$ cd /data/softinstall/sources/php-7.3.33
$ sudo ./configure --prefix=/data/softinstall/php73 \
    --with-config-file-path=/data/softinstall/php73/etc \
    --with-curl 				\
	--with-freetype-dir 		\
	--with-gd 					\
	--with-gettext 				\
	--with-iconv-dir 			\
	--with-kerberos 			\
	--with-libdir=lib64 		\
	--with-libxml-dir 			\
	--with-mysqli 				\
	--with-openssl 				\
	--with-pcre-regex 			\
	--with-pdo-mysql 			\
	--with-pear 				\
	--with-png-dir 				\
	--with-jpeg-dir 			\
	--with-xmlrpc 				\
	--with-xsl 					\
	--with-zlib 				\
	--with-bz2 					\
	--with-mhash 				\
	--enable-fpm 				\
	--enable-bcmath 			\
	--enable-libxml 			\
	--enable-inline-optimization \
	--enable-mbregex 			\
	--enable-mbstring 			\
	--enable-opcache 			\
	--enable-pcntl 				\
	--enable-shmop 				\
	--enable-soap 				\
	--enable-sockets 			\
	--enable-sysvsem 			\
	--enable-sysvshm 			\
	--enable-xml 				\
	--enable-zip 				\
	--with-ldap 				\
	--with-ldap-sasl			\
    --with-litespeed


注释:
   --with-ldap 	\	#若要采用LDAP认证,需安装该模块
   --enable-fpm \	 #以php-fpm进程运行

$ sudo make && sudo make install
warning: pear/PEAR dependency package "pear/Archive_Tar" installed version 1.4.14 is not the recommended version 1.4.4
[PEAR] PEAR           - installed: 1.10.13
Wrote PEAR system config file at: /data/softinstall/php73/etc/pear.conf
You may want to add: /data/softinstall/php73/lib/php to your php.ini include_path
/data/softinstall/sources/php-7.3.33/build/shtool install -c ext/phar/phar.phar /data/softinstall/php73/bin
ln -s -f phar.phar /data/softinstall/php73/bin/phar
Installing PDO headers:           /data/softinstall/php73/include/php/ext/pdo/
4.3 拷贝并修改配置文件
$ sudo cp  php.ini-development /data/softinstall/php73/etc/php.ini
$ sudo cp sapi/fpm/php-fpm.conf  /data/softinstall/php73/etc/
$ sudo cp /data/softinstall/php73/etc/php-fpm.d/www.conf.default  /data/softinstall/php73/etc/php-fpm.d/www.conf

$ sudo vim /data/softinstall/php73/etc/php.ini
      short_open_tag = On
      default_charset = "UTF-8"
      date.timezone = Asia/Shanghai
      max_execution_time = 600
      max_input_time = 600
      memory_limit = 256M
      post_max_size = 32M
      file_uploads = On
      upload_max_filesize = 2M
      max_file_uploads = 20

$ sudo mkdir /data/data/logs/php73/
$ sudo vim /data/softinstall/php73/etc/php-fpm.d/www.conf
[nginx]
user = nginx
group = nginx
listen = 192.168.2.206:9095
# zabbix server1配置192.168.2.206:9095
# zabbix server2 配置192.168.2.208:9095
listen.backlog = -1
listen.owner = nginx
listen.group = nginx
pm = dynamic
pm.max_children = 50       #子进程最大数量
pm.start_servers = 20       #在启动时创建的子进程数量
pm.min_spare_servers = 5     # 空闲子进程的最小数量
pm.max_spare_servers = 50     # 空闲子进程的最大数量
pm.process_idle_timeout = 10s;  # 一个空闲进程空闲多少秒后被杀死
pm.max_requests = 1000
pm.status_path = /status
ping.path = /ping
ping.response = pong
access.log = /data/data/logs/php73/phpfpm_access.log
slowlog = /data/data/logs/php73/phpfpm_slow.log
request_slowlog_timeout = 10
request_terminate_timeout = 10
rlimit_files = 1024
rlimit_core = 0
catch_workers_output = yes
php_admin_value[error_log] = /data/data/logs/php73/php73_fpm_error.log

$ cat /data/softinstall/php73/etc/php-fpm.conf |grep -v "^;"
[global]
pid = /data/data/logs/php73/php-fpm.pid
error_log = /data/data/logs/php73/php-fpm.log
log_level = notice
emergency_restart_threshold = 60
emergency_restart_interval = 60s
daemonize = yes
include=/data/softinstall/php73/etc/php-fpm.d/*.conf
4.4 配置开机自启动php-fpm
# vi /etc/profile
export PATH=/data/softinstall/php73/bin:/usr/local/sbin:/usr/local/bin:/sbin:/bin:/usr/sbin:/usr/bin:/root/bin:/data/softinstall/mysql5735/bin
# source /etc/profile

# 开机自启动php-fpm
$ sudo cp sapi/fpm/php-fpm.service /usr/lib/systemd/system/
$ sudo systemctl daemon-reload
$ sudo systemctl enable php-fpm.service
$ sudo systemctl start php-fpm.service

内容如下:
$ cat /usr/lib/systemd/system/php-fpm.service
[Unit]
Description=The PHP FastCGI Process Manager
After=network.target

[Service]
Type=simple
PIDFile=/data/data/logs/php73/php-fpm.pid
ExecStart=/data/softinstall/php73/sbin/php-fpm  --nodaemonize --fpm-config /data/softinstall/php73/etc/php-fpm.conf
ExecReload=/bin/kill -USR2 $MAINPID
PrivateTmp=true

[Install]
WantedBy=multi-user.target
5.源码编译部署Zabbix
5.1 Server服务端安装zabbix server
$ sudo tar -zxvf /data/uploads/zabbix-5.4.7.tar.gz -C /data/softinstall/sources/
$ cd /data/softinstall/sources/zabbix-5.4.7

编译报错:
configure: error: MySQL library not found
$sudo yum -y install mysql-devel

configure: error: Invalid Net-SNMP directory - unable to find net-snmp-config
$sudo yum install -y net-snmp-devel

configure: error: SSH library not found
$sudo yum -y install libssh2-devel  libssh-devel

configure: error: Invalid OPENIPMI directory - unable to find ipmiif.h
$ sudo  yum install -y OpenIPMI-devel

checking for libevent support... configure: error: Unable to use libevent (libevent check failed)
$ sudo yum -y install libevent-devel java-devel   curl-devel

使用yum安装依赖:
$ sudo yum -y install mysql-devel  net-snmp-devel  libssh2-devel  libssh-devel \
    OpenIPMI-devel	libevent-devel java-devel   curl-devel  \
    pcre*  libxml2 libxml2-devel \
 automake libssh2-devel libevent-devel httpd libcurl-devel.x86_64 \
 kernel-devel openssl-devel popt-devel

$ sudo rpm --import https://mirror.go-repo.io/centos/RPM-GPG-KEY-GO-REPO
$ sudo curl -s https://mirror.go-repo.io/centos/go-repo.repo | sudo tee /etc/yum.repos.d/go-repo.repo
$ sudo yum -y install golang
$ go env -w GOPROXY=https://goproxy.cn

$ sudo ./configure --prefix=/data/softinstall/zabbix54 \
    --enable-server --enable-proxy --enable-agent --enable-agent2  \
     --enable-webservice --enable-java --with-mysql=/usr/bin/mysql_config \
      --with-libxml2 --with-net-snmp --with-ssh --with-openipmi \
      --with-zlib --with-libpthread  --with-libevent --with-openssl \
       --with-ldap  --with-libcurl --with-libpcre --with-iconv

$ sudo make install
5.2 创建运行用户和日志目录
创建日志目录和snmp目录:
$ sudo mkdir -p /data/data/logs/zabbix54/{serverlogs,snmptraplogs}
$ sudo chown -R zabbix.zabbix /data/data/logs/zabbix54/{serverlogs,snmptraplogs}
$ sudo chown -R zabbix.zabbix /data/softinstall/zabbix54
5.3 修改zabbix Server配置文件
$ sudo vi /data/softinstall/zabbix54/etc/zabbix_server.conf
SourceIP=192.168.2.210 #zabbix使用VIP必须使用这个参数作为源IP,若只是单server,不必启用这个参数
#日志文件目录
LogFile=/data/data/logs/zabbix54/serverlogs/zabbix_server.log
LogFileSize=1
#Pid 文件目录
PidFile=/data/data/logs/zabbix54/serverlogs/zabbix_server.pid
#Socket 文件目录
SocketDir=/data/data/logs/zabbix54/serverlogs
#开启 snmp trap
StartSNMPTrapper=1
#允许所有地址访问
StatsAllowedIP=0.0.0.0
#snmp trap 目录
SNMPTrapperFile=/data/data/logs/zabbix54/snmptraplogs/zabbix_traps.log
#拉取 snmp 信息的线程数
StartProxyPollers=3

DBHost=192.168.2.210  # MySQL的VIP地址
DBName=zabbix     # 数据库名称
DBUser=zabbix       #数据库用户
DBPassword=zabbix  #数据库密码
DBPort=3307             # 数据库端口
Timeout=5            #超时时长
LogSlowQueries=3000   #只有在DebugLevel=3时,这个配置才有效。慢查询记录到日志
CacheSize=50M     #配置缓存,用于存储host,item,trigger数据,根据实际情况配置
HistoryCacheSize=50M  #历史记录缓存大小,用于存储历史记录
ValueCacheSize=50M   #0表示禁用,history value缓存大小,当缓存超标了,将会每隔5分钟往server日志里面记录
AlertScriptsPath=/data/softinstall/zabbix54/alertscripts #自定义报警脚本的位置
ExternalScripts=/data/softinstall/zabbix54/externalscripts  #自定义监控脚本的位置

# 查看已经配置过的内容
$ sudo cat /data/softinstall/zabbix54/etc/zabbix_server.conf|grep -vE "#|^$"
Zabbix Server 备机配置和主机除了 SourceIP 以外,其余配置一样.
5.4 创建zabbix数据库
mysql> create database if not exists zabbix  DEFAULT CHARACTER SET utf8 COLLATE utf8_bin;
mysql> grant all on zabbix.* to zabbix@'192.168.2.%' identified by 'zabbix';
mysql> flush privileges;
mysql> use zabbix;
mysql> source /data/softinstall/sources/zabbix-5.4.7/database/mysql/schema.sql;
mysql> source /data/softinstall/sources/zabbix-5.4.7/database/mysql/images.sql;
mysql> source /data/softinstall/sources/zabbix-5.4.7/database/mysql/data.sql;
mysql> source /data/softinstall/sources/zabbix-5.4.7/database/mysql/double.sql;
5.5 配置Zabbix Server端为系统服务
$ sudo cat > zabbix-server.service <<-EOF
[Unit]
Description=Zabbix Server
After=network.target

[Service]
User=zabbix
Environment="CONFFILE=/data/softinstall/zabbix54/etc/zabbix_server.conf"
Type=forking
Restart=on-failure
PIDFile=/data/data/logs/zabbix54/serverlogs/zabbix_server.pid
KillMode=control-group
ExecStart=/data/softinstall/zabbix54/sbin/zabbix_server -c $CONFFILE
ExecStop=/bin/kill -SIGTERM $MAINPID
RestartSec=10s
TimeoutSec=0

[Install]
WantedBy=multi-user.target

EOF
启动Zabbix Server,并设置开机自启动
systemctl enable zabbix-server.service
systemctl daemon-reload
systemctl start zabbix-server.service
6.安装zabbix agent客户端
6.1 从yum仓库安装
# rpm -Uvh https://repo.zabbix.com/zabbix/5.4/rhel/7/x86_64/zabbix-release-5.4-1.el7.noarch.rpm
# yum clean all
# yum -y install zabbix-agent
# systemctl restart zabbix-agent
# systemctl enable zabbix-agent
修改配置文件
$ cat /etc/zabbix/zabbix_agentd.conf |grep -vE "#|^$"
PidFile=/var/run/zabbix/zabbix_agentd.pid
LogFile=/var/log/zabbix/zabbix_agentd.log
ListenPort=10050
LogFileSize=1
Server=192.168.2.0/24
ServerActive=192.168.2.208:10051,192.168.2.206:10051,192.168.2.210:10051
Hostname=192.168.2.208   # 客户端的IP地址或者主机名
AllowRoot=1
HostMetadataItem=system.uname
Include=/etc/zabbix/zabbix_agentd.d/*.conf
Zabbix agent开机自启动服务脚本:
$ cat /usr/lib/systemd/system/zabbix-agent.service
[Unit]
Description=Zabbix Agent
After=syslog.target
After=network.target

[Service]
Environment="CONFFILE=/etc/zabbix/zabbix_agentd.conf"
EnvironmentFile=-/etc/sysconfig/zabbix-agent
Type=forking
Restart=on-failure
PIDFile=/run/zabbix/zabbix_agentd.pid
KillMode=control-group
ExecStart=/usr/sbin/zabbix_agentd -c $CONFFILE
ExecStop=/bin/kill -SIGTERM $MAINPID
RestartSec=10s
User=zabbix
Group=zabbix

[Install]
WantedBy=multi-user.target
6.2 从源码安装zabbix agent
$ cat /data/softinstall/zabbix54/etc/zabbix_agentd.conf  |grep -vE "#|^$"
PidFile=/data/data/logs/zabbix54/agentlogs/zabbix_agentd.pid
LogFile=/data/data/logs/zabbix54/agentlogs/zabbix_agentd.log
ListenPort=10050
LogFileSize=1
Server=192.168.2.0/24
ServerActive=192.168.2.208:10051,192.168.2.206:10051,192.168.2.210:10051
Hostname=192.168.2.208
AllowRoot=1
HostMetadataItem=system.uname
Include=/etc/zabbix/zabbix_agentd.d/*.conf
设置开机自启动服务
$ sudo cat >> /etc/systemd/system/zabbix-agentd.service <<-EOF
[Unit]
Description=Zabbix Agentd
After=network.target

[Service]
User=zabbix
Group=zabbix
Environment="CONFFILE=/data/softinstall/zabbix54/etc/zabbix_agentd.conf"
Type=forking
Restart=on-failure
PIDFile=/data/data/logs/zabbix54/agentlogs/zabbix_agentd.pid
KillMode=control-group
ExecStart=/data/softinstall/zabbix54/sbin/zabbix_agentd -c $CONFFILE
ExecStop=/bin/kill -SIGTERM $MAINPID
RestartSec=10s
TimeoutSec=0

[Install]
WantedBy=multi-user.target
EOF
启动服务
$ sudo systemctl enable zabbix-agentd
$ sudo systemctl start zabbix-agentd
6.3 使用Ansible批量安装Zabbix agent服务
$ cat zabbix/hosts
# ops environment
[ops200]
192.168.2.200
[ops201]
192.168.2.201
[ops:children]
ops200
ops201
[ops:vars]
ansible_ssh_user='yuan'
[ops200:vars]
ansible_ssh_user='yuan'
ansible_ssh_port='10020'
zabbix-agent配置
$ cat zabbix/zabbix_agent.yml
- hosts: all
  user: yuan
  vars:
    agent_hostname: '{{ ansible_hostname }}' # 客户端hostname
    agent_ip: '{{ ansible_em1.ipv4.address }}' # 客户端IP 根据实际情况修改自己的网卡名字em1 改成自己服务器
  roles:
    - zabbix_agent
配置角色
$ wget --no-check-certificate  https://repo.zabbix.com/zabbix/5.4/rhel/7/x86_64/zabbix-agent-5.4.7-1.el7.x86_64.rpm  -O  /data/uploads/zabbix-agent-5.4.7-1.el7.x86_64.rpm
$ cat zabbix/roles/zabbix_agent/tasks/main.yml
- name: copy zabbix_agentd
  copy: src=/data/uploads/zabbix-agent-5.4.7-1.el7.x86_64.rpm dest=/data/uploads/zabbix-agent-5.4.7-1.el7.x86_64.rpm
- name: install zabbix-agentd
  shell: rpm -ivh /data/uploads/zabbix-agent-5.4.7-1.el7.x86_64.rpm   # 安装zabbix agentd
- name: upload zabbix-agent file client  # 上传配置文件
  template: src=zabbix_agentd.conf.j2 dest=/etc/zabbix/zabbix_agentd.conf
- name: enabled service zabbix-agent # 打开zabbix-agent 开机启动
  systemd:
    name: zabbix-agent
    daemon_reload: yes
    enabled: yes
    state: started
修改Zabbix Agent配置文件
$ cat zabbix/roles/zabbix_agent/templates/zabbix_agentd.conf.j2
PidFile=/var/run/zabbix/zabbix_agentd.pid
LogFile=/var/log/zabbix/zabbix_agentd.log
ListenPort=10050
LogFileSize=1
Server=192.168.2.0/24
ServerActive=192.168.2.208:10051,192.168.2.206:10051,192.168.2.210:10051
Hostname={{ ansible_em1.ipv4.address }}
AllowRoot=1
HostMetadataItem=system.uname
Include=/etc/zabbix/zabbix_agentd.d/*.conf
执行部署操作
$ cd zabbix
$ ansible-playbook zabbix_agent.yml -i ./hosts
7.安装并配置nginx
7.1 编译nginx
$ sudo groupadd nginx
$ sudo useradd nginx -g nginx -s /sbin/nologin -M
$ sudo  tar -zxvf /data/uploads/tengine-2.3.2.tar.gz -C /data/softinstall/sources/
$ cd /data/softinstall/sources/tengine-2.3.2/
$ sudo yum install gd gd-devel GeoIP-devel -y
$ sudo ./configure --prefix=/data/softinstall/nginx --user=nginx --group=nginx --error-log-path=/data/softinstall/nginx/log/error.log --http-log-path=/data/softinstall/nginx/log/access.log --with-file-aio --with-threads --with-ipv6 --with-http_v2_module --with-http_ssl_module --with-http_realip_module --with-http_addition_module --with-http_xslt_module=dynamic --with-http_image_filter_module=dynamic --with-http_geoip_module --with-http_sub_module --with-http_dav_module --with-http_flv_module --with-http_mp4_module --with-http_gunzip_module --with-http_gzip_static_module --with-http_auth_request_module --with-http_random_index_module --with-http_secure_link_module --with-http_degradation_module --with-http_slice_module --with-http_stub_status_module --with-mail --with-mail_ssl_module --with-stream  --with-stream_ssl_module --with-stream_realip_module --with-stream_geoip_module --with-stream_ssl_preread_module
$ sudo make && sudo make install
$ sudo chown -R nginx.nginx /data/softinstall/nginx
7.2 修改nginx配置文件并配置访问zabbix
nginx.conf
$ cat /data/softinstall/nginx/conf/nginx.conf
user  nginx nginx;
worker_processes 4;
worker_rlimit_nofile 102400;

error_log  log/error.log warn;
pid        log/nginx.pid;


events {
    use epoll;
    worker_connections  102400;
    multi_accept on;
}

http {
    include       mime.types;
    default_type  application/octet-stream;
    server_tokens off;

    log_format  main  '$remote_addr - $remote_user [$time_local] "$request" '
                      '$status $body_bytes_sent "$http_referer" '
                      '"$http_user_agent" "$http_x_forwarded_for"';

    access_log  log/access.log  main;

    sendfile        on;
    tcp_nopush      on;
    #tcp_nodelay     on;

    keepalive_timeout  100;
    keepalive_requests  1000;

    proxy_temp_path /data/softinstall/nginx/temp;
    proxy_cache_path /data/softinstall/nginx/cache levels=1:2 keys_zone=gmz_cache:200m inactive=1d max_size=2g;

    gzip  on;
    gzip_types text/plain application/x-javascript text/css application/xml text/javascript application/javascript application/x-httpd-php;
    gzip_min_length 1k;
    gzip_buffers    4 16k;
    gzip_http_version 1.1;
    gzip_comp_level   9;
    gzip_vary   on;

    client_header_timeout 600s;
    client_body_timeout 600s;
    client_max_body_size 100M;
    client_body_buffer_size 256k;

#    autoindex on; #开启nginx目录浏览功能
#    autoindex_exact_size off; #文件大小从KB开始显示
#    autoindex_localtime on; #显示文件修改时间为服务器本地时间
    limit_conn_zone $binary_remote_addr zone=perip:10m;
    limit_conn_zone $server_name zone=perserver:10m;

    map $http_upgrade $connection_upgrade {
        default upgrade;
        ''      close;
    }
    #fastcgi_cache_path /data/softinstall/nginx/cache levels=1:2 keys_zone=fastcgi_cache_zone:128m inactive=5m max_size=10g;
    fastcgi_buffering on;
    fastcgi_buffer_size 64k;
    fastcgi_buffers 8 32k;
    #fastcgi_temp_path temp 1 2;
    fastcgi_max_temp_file_size 1024m;
    fastcgi_temp_file_write_size 128k;
    fastcgi_request_buffering on;
    fastcgi_connect_timeout 60s;
    fastcgi_read_timeout 300s;
    fastcgi_send_timeout 300s;

    include conf.d/*.conf;
}

stream {
    include sconf.d/*.conf;
}
zabbix.conf配置
sudo chown -R nginx.nginx  /data/softinstall/nginx
$ cat /data/softinstall/nginx/conf/conf.d/zabbix.conf
upstream php_servers {
  server 192.168.2.206:9095 weight=100 max_fails=5 fail_timeout=100s;
  server 192.168.2.208:9095 weight=100 max_fails=5 fail_timeout=100s;
  keepalive 100;
}

server {
    listen 80;
    server_name 192.168.2.208;
    access_log log/php-access.log;
    root /data/data/tengine/zabbix;
    location / {
      #try_files $uri $uri/ /index.php$is_args$args;
      index index.php index.html index.htm;
    }
    location ~* \.php$ {
        try_files $uri =404;
        fastcgi_connect_timeout 300;
        fastcgi_send_timeout 300;
        fastcgi_read_timeout 300;
        fastcgi_pass  php_servers;
        #fastcgi_pass unix:/tmp/php-fpm.sock;
        fastcgi_index index.php;
        fastcgi_param SCRIPT_FILENAME $document_root$fastcgi_script_name;
        include fastcgi_params;
    }
  }
拷贝zabbix界面
$ sudo mkdir /data/data/tengine/zabbix
$ cd /data/softinstall/sources/zabbix-5.4.7
$ sudo cp -rp ui/*  /data/data/tengine/zabbix/
$ sudo chown -R nginx.nginx /data/data/tengine/zabbix/
7.3 配置nginx为开机自启动服务
启动nginx
启动:
$ sudo /data/softinstall/nginx/sbin/nginx
检查语法:
$ sudo /data/softinstall/nginx/sbin/nginx -t
加载配置:
$ sudo /data/softinstall/nginx/sbin/nginx -s reload
配置开机自启动服务
$ sudo cat  >> /usr/lib/systemd/system/nginx.service <<-EOF
[Unit]
Description=nginx
After=network.target

[Service]
Type=forking
PIDFile=/data/softinstall/nginx/log/nginx.pid
ExecStartPre=/data/softinstall/nginx/sbin/nginx -t
ExecStart=/data/softinstall/nginx/sbin/nginx
ExecReload=/data/softinstall/nginx/sbin/nginx -s reload
ExecStop=/bin/kill -s QUIT $MAINPID
PrivateTmp=true
TimeoutStopSec=5
KillMode=mixed
#User=nginx
#Group=nginx

[Install]
WantedBy=multi-user.target

EOF
启动nginx
$ sudo systemctl daemon-reload
$ sudo systemctl enable nginx.service
$ sudo systemctl start nginx.service
$ sudo systemctl status nginx.service
$ sudo systemctl stop nginx.service
$ sudo systemctl reload nginx.service
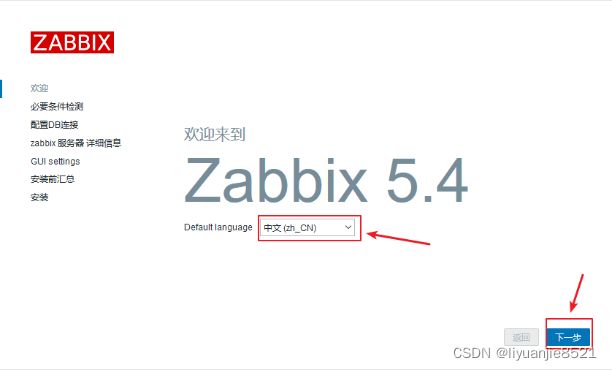
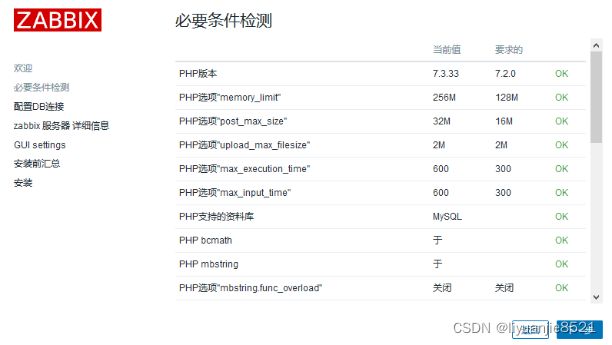
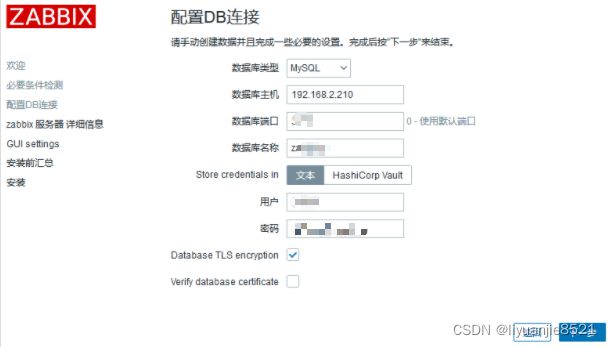
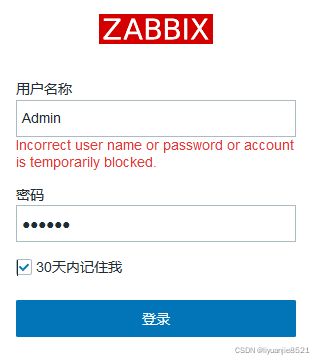
7.4 访问Zabbix界面
访问: http://192.168.2.208/index.php


Zabbix高可用集群已部署完成。


