快速学会JDBC及获取连接的五种方式
快速学会JDBC及获取连接的五种方式
1. JDBC基本介绍
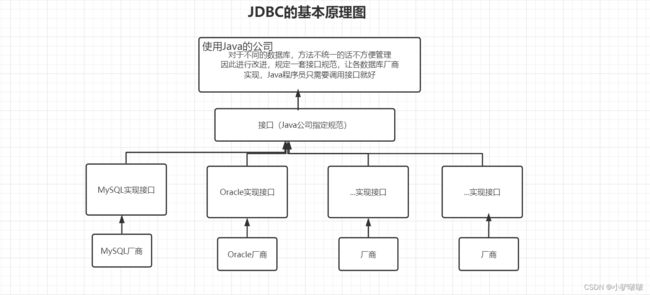
- JDBC为访问不同的数据库提供了统一的接口,为使用者屏蔽了细节问题
- Java程序员使用JDBC,可以连接任何提供了JDBC驱动程序的数据库系统,完成对数据库的各种操作。
- JDBC基本原理图
2. JDBC快速入门
2.1 JDBC程序编写步骤
- 注册驱动-加载Driver类
- 获取连接-得到Connection
- 执行增删改查-发送SQL给MySQL执行
- 释放资源-关闭相关连接
2.2 案例演示
2.2.1 前置工作,在数据库中建立对应表
CREATE TABLE `actor`(
id INT PRIMARY KEY AUTO_INCREMENT,
NAME VARCHAR(32) NOT NULL DEFAULT '',
sex CHAR(1) NOT NULL DEFAULT '女',
borndate DATETIME,
phone VARCHAR(12));
2.2.2 前置工作,导入MySQL数据库的对应jar包
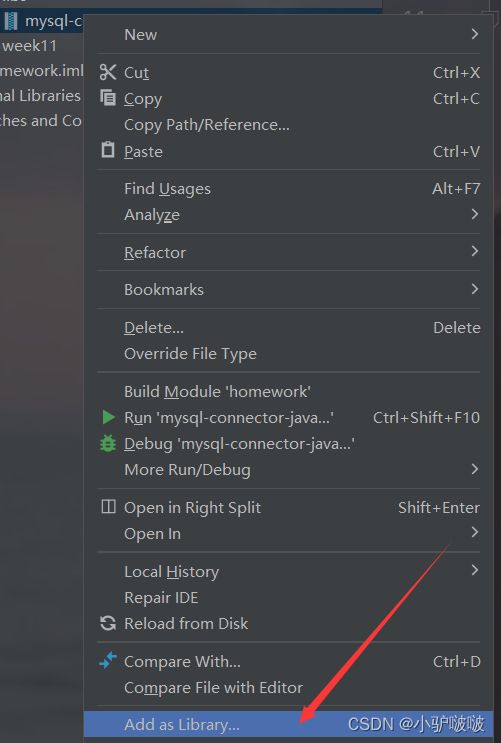
在项目下新建一个文件夹如libs,将对应jar包拷入,并将其加入library中

public static void main(String[] args) throws SQLException {
        //注册驱动
        Driver driver = new Driver();
        String url="jdbc:mysql://localhost:3306/zxy_db01";
        String user="root";
        String psd = "123";
        DriverManager.registerDriver(driver);
        //获得连接
        Connection connection = DriverManager.getConnection(url,user,psd);
        //执行SQL语句
        String sql = "insert into actor values(null, '刘德华', '男', '1970-11-11', '110')";
        //statement 用于执行静态 SQL 语句并返回其生成的结果的对象
        Statement statement = (Statement) connection.createStatement();
        int rows = statement.executeUpdate(sql);
        System.out.println(rows > 0 ? "成功" : "失败");
        //关闭资源
        statement.close();
        connection.close();
    }
然后我们再去查询数据库,就会发现已经成功啦
3. 相关类的介绍
3.1 Statement
相信对于上面的代码中你最好奇的就是Statement这个类,我们就来聊一聊这个。
基本介绍:
-
用于执行静态Sql语句并返回其生成结果
-
在连接建立后,需要对数据库进行访问,执行命名或是SQL语句,可以通过Statement(存在SQL注入问题)PrepardStatement(预处理) CallableStatement(存储过程)
-
Statement对象执行SQL语句,存在SQL注入风险
-
SQL注入是利用某些系统没有对用户输入对数据进行充分对检查,而在用户输入数据中注入非法对SQL语句段或命令,恶意攻击数据库
-
要防范SQL注入,只要用PreparedStatement(从Statement扩展而来),取代Statement就可以了
其实归根究底,这个类就是一个用来调用执行SQL语句的类。
3.2 ResultSet[结果集]
这个是执行查询的SQL时返回的对象,如下面这段代码
String sql = "select id, name , sex, borndate from actor";
ResultSet resultSet = statement.executeQuery(sql);
while (resultSet.next()) { // 让光标向后移动,如果没有更多行,则返回 false
    int id = resultSet.getInt(1); //获取该行的第 1 列
    String name = resultSet.getString(2);//获取该行的第 2 列
    String sex = resultSet.getString(3);
    Date date = resultSet.getDate(4);
    System.out.println(id + "\t" + name + "\t" + sex + "\t" + date);
}
-
表示数据库结果集的数据表,通常通过执行查询数据库的语句生成。
-
ResultSet对象保持一个光标指向其当前的数据行。 最初,光标位于第一行之前。 next方法将光标移动到下一行,并且由于在ResultSet对象中没有更多行时返回false ,因此可在while循环中使用循环来遍历结果集。
3.3 PreparedStatement
这个类其实和上面介绍的Statement效果类似,相当于Statement的改进版,增加了预处理过程避免了sql注入现象(简单来讲就是破获你的数据库中的信息),下面我们就来聊聊它
- PreparedStatement执行的SQL语句中的参数用问号(?)来表示,调用PreparedStatement对象额setXxx()方法来设置这些参数,setXxx()方法有两个参数,第一个参数是要设置的SQL语句中的参数的索引(从1开始),第二个是设置的SQL语句中的参数的值。
- 调用executeQuery(),返回ResultSet对象
- 调用 executeUpdate(),执行增删改等操作。
其优点也是极其明显的
- 不再使用+拼接SQL语句,减少语法错误
- 有效的解决了SQL注入问题
- 大大减少了编译次数,效率提高
话不多说,我们直接上案例
String sql = "select name , pwd from admin where name =? and pwd = ?";
PreparedStatement preparedStatement = connection.prepareStatement(sql);
preparedStatement.setString(1, "刘德华");
preparedStatement.setString(2, "123");
ResultSet resultSet = preparedStatement.executeQuery(sql);
if (resultSet.next()) { //如果查询到一条记录,则说明该管理存在
    System.out.println("恭喜, 登录成功"); }
else {
    System.out.println("对不起,登录失败");
     }
4. 关闭资源
在JDBC编码过程中,我们创建了resultSet,statement,connection等资源,这些资源在使用完毕后一定要进行关闭资源,关闭的过程中遵循从里到外的原则,因为在增删改查中的操作中都要用到这样的关闭操作
resultSet.close();
statement.close();
connection.close();
5. 获取数据库连接的五种方式
方式一
直接通过Driver类获得连接
 public void way1() throws SQLException {
        Driver driver = new Driver();
        String url = "jdbc:mysql://localhost:3306/zxy_db01";
        Properties info = new Properties();
        info.setProperty("user","root");
        info.setProperty("psd","123");
        Connection connect = driver.connect(url, info);
        System.out.println(connect);
    }
方式二
通过反射的方式加载Driver类获得连接
 public void way2() throws SQLException, ClassNotFoundException, InstantiationException, IllegalAccessException {
        Class<?> clzz = Class.forName("com.mysql.jdbc.Driver");
        Driver driver = (Driver) clzz.newInstance();
        String url = "jdbc:mysql://localhost:3306/zxy_db01";
        Properties info = new Properties();
        info.setProperty("user","root");
        info.setProperty("psd","123");
        Connection connect = driver.connect(url, info);
        System.out.println(connect);
    }
方式三
使用DriverManager替换Driver获得连接
 public void way3() throws SQLException, ClassNotFoundException, InstantiationException, IllegalAccessException {
        Class<?> clzz = Class.forName("com.mysql.jdbc.Driver");
        Driver driver = (Driver) clzz.newInstance();
        String url="jdbc:mysql://localhost:3306/zxy_db01";
        String user="root";
        String psw = "123";
        DriverManager.registerDriver(driver);
        Connection connection = DriverManager.getConnection(url,user,password);
        System.out.println(connection);
    }
方式四
使用Class.forName自动完成驱动注册获得链接
public void way4() throws SQLException, ClassNotFoundException {
        Class.forName("com.mysql.jdbc.Driver");
        String url="jdbc:mysql://localhost:3306/zxy_db01";
        String user="root";
        String psd = "123";
        Connection connection = DriverManager.getConnection(url, user, password);
        System.out.println(connection);
    }
方式五
借助配置文件获得来获得连接
user=root
psd=123
url=jdbc:mysql://localhost:3306/zxy_db01
driver=com.mysql.jdbc.Driver
 public void way5() throws SQLException, ClassNotFoundException, IOException {
        Properties properties = new Properties();
        properties.load(new FileInputStream("src\\mysql.properties"));
        String user = properties.getProperty("user");
        String password = properties.getProperty("psd");
        String url = properties.getProperty("url");
        String driver = properties.getProperty("driver");
        Class.forName(driver);
        Connection connection = DriverManager.getConnection(url, user, psd);
        System.out.println(connection);
    }
相信看完本篇你对jdbc已经有了不错的了解了,谢谢观看。


