zookeeper从入门到精通
前期准备
安装 virtualbox (还是vmware好用T_T)
搭建2台 虚拟机,安装 centos8 系统(后面发现NAT无法联通,最多只能验证伪分布式,因此只要搭建一台即可)

由于virtualbox内的多台虚拟机,都是10开头的外网地址,即使关了防火墙,也无法相互ping通,后改用vmware

使用 minimal 的模式,安装命令行模式的系统即可

安装开发工具
JDK
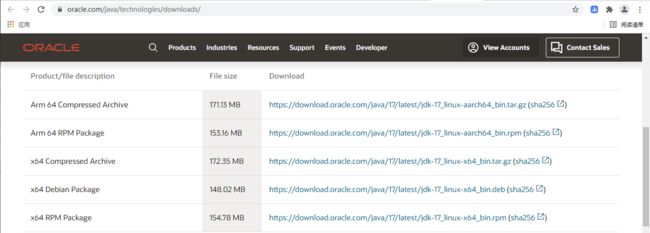
使用 java -version 查看 java 是否安装。若未安装,访问 oracle 官网 https://www.oracle.com/java/technologies/downloads/ ,复制RPM包的链接地址
wget https://download.oracle.com/java/17/latest/jdk-17_linux-x64_bin.rpm
rpm -ivh jdk-17_linux-x64_bin.rpm
其它
- 如果不支持
ifconfig命令查看IP,使用dnf -y install net-tools安装必要的网络工具。 - 使用
yum install wget安装下载器 - 使用
yum install tar安装解压器
分别修改主机名(避免混淆)
//主机1
hostnamectl set-hostname PC1
//主机2
hostnamectl set-hostname PC2
设置好后,用putty重连,即可看到新的主机名了
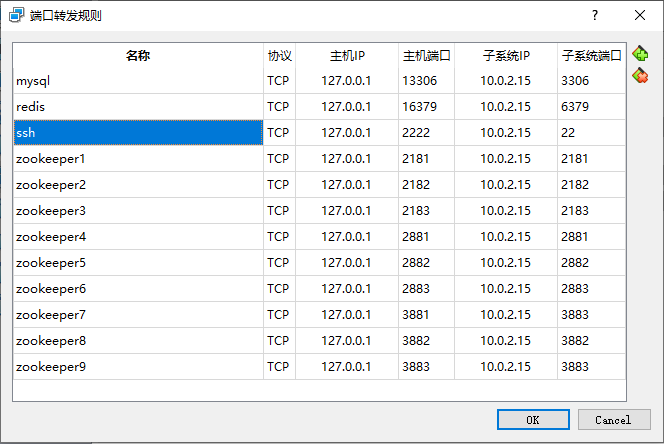
注意:由于虚拟机是NAT网络地址转换,需要 “设置” —> “网络”—>“网卡1”—>“高级”—>“端口转发”

由于是NAT,相当于还是本机,因此地址只要写 127.0.0.1,连接到本机就好了。端口号由22,改为上面的2222
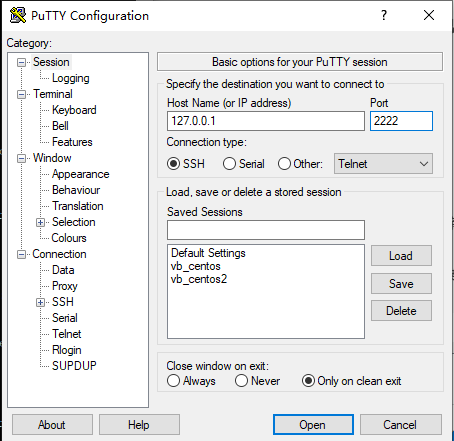
使用putty重连后可以看到,标题栏名字已经发生改变了

下载zookeeper
在 zookeeper官网下载 zookeeper https://zookeeper.apache.org/releases.html
mkdir download
mkdir software
cd download
wget https://archive.apache.org/dist/zookeeper/zookeeper-3.7.0/apache-zookeeper-3.7.0-bin.tar.gz
tar -zvxf apache-zookeeper-3.7.0-bin.tar.gz -C ../software/
cd ../software/apache-zookeeper-3.7.0-bin/
ls
zookeeper的三种模式
单机模式
zookeeper的默认配置文件为 conf/zoo.cfg,需要使用 cp 命令,将 zoo_sample.cfg 复制为 zoo.cfg
[root@centos2 apache-zookeeper-3.7.0-bin]# cat conf/zoo_sample.cfg
# The number of milliseconds of each tick
tickTime=2000
# The number of ticks that the initial
# synchronization phase can take
initLimit=10
# The number of ticks that can pass between
# sending a request and getting an acknowledgement
syncLimit=5
# the directory where the snapshot is stored.
# do not use /tmp for storage, /tmp here is just
# example sakes.
dataDir=/tmp/zookeeper
# the port at which the clients will connect
clientPort=2181
# the maximum number of client connections.
# increase this if you need to handle more clients
#maxClientCnxns=60
#
# Be sure to read the maintenance section of the
# administrator guide before turning on autopurge.
#
# http://zookeeper.apache.org/doc/current/zookeeperAdmin.html#sc_maintenance
#
# The number of snapshots to retain in dataDir
#autopurge.snapRetainCount=3
# Purge task interval in hours
# Set to "0" to disable auto purge feature
#autopurge.purgeInterval=1

## Metrics Providers
#
# https://prometheus.io Metrics Exporter
#metricsProvider.className=org.apache.zookeeper.metrics.prometheus.PrometheusMetricsProvider
#metricsProvider.httpPort=7000
#metricsProvider.exportJvmInfo=true
配置说明
- tickTime:服务器与客户端之间交互的基本时间单元(ms)
- dataDir:保存zookeeper数据路径
- dataLogDir:保存zookeeper日志路径,当此配置不存在时,默认路径与dataDir一致
- clientPort:客户端访问zookeeper时使用的端口号
- 启动服务器
./zkServer.sh start
cd bin
sh zkServer.sh start
# 或者
./zkServer.sh start

2. 查看服务器状态 ./zkServer.sh status

3. 启动客户端 ./zkCli.sh
看到控制台输出Welcome to ZooKeeper说明连接成功

4. 停止服务器 ./zkServer.sh stop

伪集群模式
伪集群模式,主要是在一台设备上模拟集群环境
- 创建3个不同的配置文件
server后面跟的编号,是dataDir目录下myid文件中的值
配置文件中会涉及到3种不同类型的端口
- 2181 对client端提供服务
- 2881 集群内机器间相互通讯使用
- 3881 选举leader使用
zoo_1.cfg
tickTime=2000
initLimit=5
dataDir=/tmp/zookeeper/data1
clientPort=2181
server.1=127.0.0.1:2881:3881
server.2=127.0.0.1:2882:3882
server.3=127.0.0.1:2883:3883
zoo_2.cfg
tickTime=2000
initLimit=5
dataDir=/tmp/zookeeper/data2
clientPort=2182
server.1=127.0.0.1:2881:3881
server.2=127.0.0.1:2882:3882
server.3=127.0.0.1:2883:3883
zoo_3.cfg
tickTime=2000
initLimit=5
dataDir=/tmp/zookeeper/data3
clientPort=2183
server.1=127.0.0.1:2881:3881
server.2=127.0.0.1:2882:3882
server.3=127.0.0.1:2883:3883
- 在存放数据的目录创建 myid 文件,用来标识服务器id
mkdir -p /tmp/zookeeper/data1
mkdir -p /tmp/zookeeper/data2
mkdir -p /tmp/zookeeper/data3
echo "1" > /tmp/zookeeper/data1/myid
echo "2" > /tmp/zookeeper/data1/myid
echo "3" > /tmp/zookeeper/data1/myid
- 分别启动服务(若未指明配置文件,默认使用 conf/zoo.cfg)
ssh bin/zkServer.sh start conf/zoo_1.cfg
ssh bin/zkServer.sh start conf/zoo_2.cfg
ssh bin/zkServer.sh start conf/zoo_3.cfg
- 查看zookeeper状态
ssh bin/zkServer.sh status conf/zoo_1.cfg
ssh bin/zkServer.sh status conf/zoo_2.cfg
ssh bin/zkServer.sh status conf/zoo_3.cfg
可以看到只有1个leader,其它两个都是follower

使用 jps 也可以查看到当前 zookeeper 的进程,只不过名字叫 QuorumPeerMain

5.使用客户端连接服务器
下面的3个命令可以连接任意一个服务器
ssh bin/zkCli.sh -server localhost:2181
ssh bin/zkCli.sh -server localhost:2182
ssh bin/zkCli.sh -server localhost:2183
注意:如果启动失败,很可能是配置文件 “端口” 写错
集群模式
-
为每台主机设置不同的静态IP
https://blog.csdn.net/chy555chy/article/details/121270935
我这里分别设置为192.168.100.101,192.168.100.102,192.168.100.103 -
分别创建数据目录,及服务器id
A机echo "1" > /tmp/zookeeper/myid
B机echo "2" > /tmp/zookeeper/myid
C机echo "3" > /tmp/zookeeper/myid -
创建配置文件(conf/zoo.cfg,每台主机均相同)
tickTime=2000
initLimit=5
dataDir=/tmp/zookeeper/
clientPort=2181
server.1=192.168.100.101:2881:3881
server.2=192.168.100.102:2881:3881
server.3=192.168.100.103:2881:3881
4.启动zookeeper
使用 ./zkServer.sh start 分别启动每个节点,然后使用 ./zkServer.sh status 查看节点状态


操作zookeeper节点
使用 zkClik.sh 随便连接其中一个节点(比如2181),创建mynode节点
创建完毕后,再连接其它节点(比如2182、2183),可以发现已经同步了我们刚刚新添加的 mynode 节点了
zookeeper定义
zookeeper 在分布式应用中一般做主从协调、服务器节点动态上下线、同意配置管理、分布式共享锁、统一名称服务等
zookeeper 对外提供了一个类似于文件系统的层次化的数据存储服务,为了保证整个zookeeper集群的容错性和高性能,每个zookeeper集群都是由多台服务器节点组成,这些节点通过复制保证了各个服务器节点之间的数据一致性。只要当这些服务器节点中的过半数可用,那么整个zookeeper集群就可用
角色
zookeeper集群中,会有三种角色:leader、follower、observer,分别对应着总统、议员、观察员。
- leader:是zookeeper集群工作的核心,也是事务性请求(写操作)的唯一调度和处理者,它保证集群事务处理的顺序性,同时负责进行投票的发起和决议,以及更新系统状态
- follower:负责处理客户端的非事务(读操作)请求,如果接收到客户端发来的事务性请求,则会转发给leader,让leader进行处理,同时还负责在leader选举过程中参与投票
- observer:负责观察zookeeper集群最新状态的变化,并且将这些状态进行同步。对于非事务性请求可以进行独立处理;对于事务性请求,则会转发给leader服务器进行处理。它不参与任何形式的投票,只提供非事务性的服务,通常用于在不影响集群事务处理能力的前提下,提升集群的非事务处理能力(提高集群读的能力,也降低了集群选主的复杂程度)
observer观察者是针对查询操作作负载的,observer与follower服务器最大的区别在于observer没有投票权。
- 在客户端发起的增删改操作中,leader服务器是不会把消息传递给observer服务器,让其投票的。
- 但查询操作跟follower一样,客户端的查询到了observer服务器节点,observer服务器去访问leader服务器获取最新的数据,然后返回给客户端
选举机制
选举机制(FastLeaderElection算法):sid最大且被超过集群中半数的机器拥护时,就会成为leader
可以这样理解:客户端的增删改操作无论访问到了哪台zookeeper服务器,最终都会被转发给leader服务器,再由leader服务器分给zookeeper集群中所有的follower服务器去投票(投票指的是在内存中做增删改操作),半数投票通过就被认为操作可执行(commit),否则不可执行
只有两种情况无法选出leader
- 整个集群只有2台服务器(注意不是只剩2台,而是集群的总节点数为2)
- 整个集群超过半数机器挂掉
之所以推荐奇数台集群服务器,其实是集群的优化配置问题,即:集群的容灾数量=集群总节点数/2 - 1
- 2台服务器,至少2台正常运行才行(2的半数为1,半数以上最少为2),正常运行1台服务器都不允许挂掉
- 3台服务器,至少2台正常运行才行(3的半数为1.5,半数以上最少为2),正常运行可以允许1台服务器挂掉
- 4台服务器,至少3台正常运行才行(4的半数为2,半数以上最少为3),正常运行可以允许1台服务器挂掉
- 5台服务器,至少3台正常运行才行(5的半数为2.5,半数以上最少为3),正常运行可以允许2台服务器挂掉
- 6台服务器,至少3台正常运行才行(6的半数为3,半数以上最少为4),正常运行可以允许2台服务器挂掉
偶数台服务器相比于奇数台,除了增加成本,对宕机容错的能力并没有任何提升。因此推荐奇数台服务器
操作zookeeper
注意:使用virtualbox我只能搭建伪分布式集群;所以实际测试时,使用Vmware的分布式集群
要从宿主机外部操作虚拟机内部的zookeeper,要注意以下两点
- 查看防火墙状态
systemctl status firewalld - 打开防火墙
systemctl start firewalld - 关闭防火墙
systemctl stop firewalld
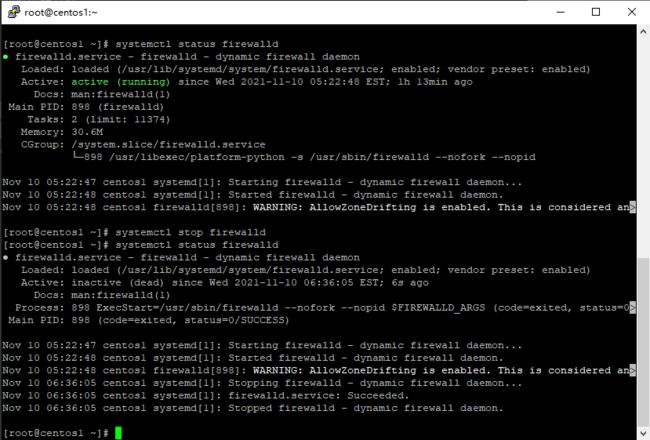
如果没有关闭防火墙,外面无法访问内部的虚拟机端口,就会报如下错误!
Session 0x0 for sever OJWP03VIFVO2JZ9/192.168.56.1:12181, Closing socket connection. Attempting reconnect except it is a SessionExpiredException.
java.net.ConnectException: Connection refused: no further information

3. 检测端口是否连通
检测端口连通性,可以使用NetCat命令.linux自带,window上需要下载 https://eternallybored.org/misc/netcat/
- linux上开启服务端:nc -l -p 9999
- window开启客户端:nc localhost 9999,然后键入数据即可
- 版本号问题
在创建节点时,可以指定一个初始版本号。后续对节点修改时,版本号会自动递增。删除时必须用当前最新的版本号,或者填入-1(不校验)版本号,否则报错KeeperErrorCode = BadVersion for /node

- 删除目录
要注意,目录为空才能删除。否则会报错KeeperErrorCode = Directory not empty for /node_6
所以,当删除目录时,必须递归删除其子目录。

使用java代码
java 代码演示了 连接zookeeper,创建节点,获取节点信息,修改节点,删除节点等功能。代码如下
import com.example.spring.util.Console;
import org.apache.zookeeper.*;
import org.apache.zookeeper.data.Stat;

import java.io.IOException;
import java.nio.charset.StandardCharsets;
import java.util.Arrays;
import java.util.List;
import java.util.Random;
import java.util.UUID;

public class zkCreateService {

    private static final String TAG = "zookeeper";
    private static Console.Log log = Console.getInstance(TAG);

    public void test() {
        String url = "192.168.100.101:2181";
        int sessionTimeout = 60000;
        ZooKeeper zooKeeper = null;
        try {
             zooKeeper = new ZooKeeper(url, sessionTimeout, watchedEvent -> {
                String path = watchedEvent.getPath();
                Watcher.Event.KeeperState state = watchedEvent.getState();
                Watcher.Event.EventType type = watchedEvent.getType();
                log.info(String.format("path = %s, state = %s, type = %s", path, state, type));
            });
            String path = "/node_" + new Random().nextInt(10);
            String subPath = path + "/sub";
            boolean isWatch = true;
            int version = 0;
            byte[] data;
            //判断节点是否存在
            if(zooKeeper.exists(path, isWatch) == null) {
                //创建目录节点
                String result = zooKeeper.create(path, UUID.randomUUID().toString().getBytes(StandardCharsets.UTF_8), ZooDefs.Ids.OPEN_ACL_UNSAFE, CreateMode.PERSISTENT);
                log.info("create -> " + result);
                //创建子节点
                result = zooKeeper.create(subPath, UUID.randomUUID().toString().getBytes(StandardCharsets.UTF_8), ZooDefs.Ids.OPEN_ACL_UNSAFE, CreateMode.PERSISTENT);
                log.info("create children -> " + result);
                //获取子节点
                List childrens = zooKeeper.getChildren(path, isWatch);
                log.info(path + " children -> " + Arrays.toString(childrens.toArray()));
                //如果没有子目录,会返回一个空数组
                childrens = zooKeeper.getChildren(subPath, isWatch);
                log.info(subPath + " children -> " + Arrays.toString(childrens.toArray()));
            }
            //查询节点
            data = zooKeeper.getData(path, isWatch, null);
            log.info("getData -> " + new String(data));
            //更新节点
            Stat stat = zooKeeper.setData(path, (path + "_" + UUID.randomUUID()).getBytes(StandardCharsets.UTF_8), version);
            log.info("setData -> " + stat.toString());
            log.info(String.format("version=%d, a=%d, c=%d", stat.getVersion(), stat.getAversion(), stat.getCversion()));
            //修改节点之后,要更新版本号,不然再次修改或删除会报错(KeeperErrorCode = BadVersion for node)
            version = stat.getVersion();
            //查询节点
            data = zooKeeper.getData(path, isWatch, null);
            //删除节点(版本号必须与当前一致,或者使用-1表示不校验;目录必须为空才能删除)
            zooKeeper.delete(subPath, -1);
            zooKeeper.delete(path, version);
        } catch (IOException e) {
            e.printStackTrace();
        } catch (InterruptedException e) {
            e.printStackTrace();
        } catch (KeeperException e) {
            e.printStackTrace();
        } finally {
            if(zooKeeper != null) {
                try {
                    zooKeeper.close();
                } catch (InterruptedException e) {
                    e.printStackTrace();
                }
            }
        }
    }
}
使用ZooInspector
首先,下载工具 https://issues.apache.org/jira/secure/attachment/12436620/ZooInspector.zip
找到 zookeeper-dev-ZooInspector,在命令行执行 java -jar zookeeper-dev-ZooInspector.jar

点击左上角运行标志,配置连接参数(这里用默认的即可)
如果连不上,可能是你的电脑比较慢,将 “Session Timeout” 的时间延长即可,我这里是改到 200000

连接上后,即可以看到 zookeeper 的内部目录结构了
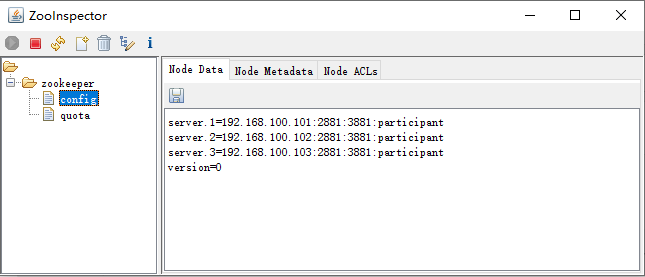
在zookeeper目录下,新建节点,然后

使用 zkCli.sh 工具
命令行的话,只要进入随便一台机器,在zookeeper的bin目录下,键入./zkCli.sh -server localhost:2181
# 查看目录内容,ls <以/打头的节点绝对路径>
ls /
# 创建一个节点,create <以/打头的节点绝对路径> <节点内容>
create /node "this is a node"
# 查看节点数据,get <以/打头的节点绝对路径>
get /node
# 修改节点数据,set <以/打头的节点绝对路径> <节点内容>
set /node "modify a node"
# 删除节点,delete <以/打头的节点绝对路径>
delete /node
# 退出客户端连接,quit
quit
