SpringBoot整合Mybatis、MySQL、Shiro实现登录认证和授权
一、Apache Shiro
1、什么是Shiro
Shiro是Java的一个安全框架。是一个权限管理的框架,实现 用户认证、用户授权。
2、Shiro的优点
(1)Shiro将安全认证相关的功能抽取出来组成一个框架,使用shiro就可以非常快速的完成认证、授权等功能的开发,降低系统成本。
(2)Shiro使用广泛,Shiro可以运行在web应用,非web应用,集群分布式应用中越来越多的用户开始使用Shiro。
(3)Java领域中spring security(原名Acegi)也是一个开源的权限管理框架,但是spring security依赖spring运行,而Shiro就相对独立,最主要是因为Shiro使用简单、灵活,所以现在越来越多的用户选择Shiro。
3、Shiro的架构
1)Subject
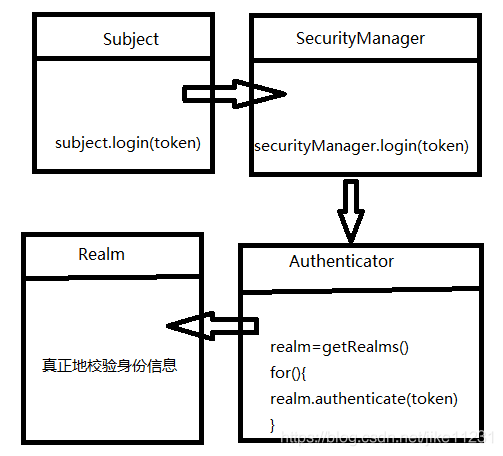
Subject即主体,外部应用与subject进行交互,subject记录了当前操作用户,将用户的概念理解为当前操作的主体,可能是一个通过浏览器请求的用户,也可能是一个运行的程序。 Subject在shiro中是一个接口,接口中定义了很多认证授相关的方法,外部程序通过subject进行认证授,而subject是通过SecurityManager安全管理器进行认证授权
2)SecurityManager
SecurityManager即安全管理器,对全部的subject进行安全管理,它是shiro的核心,负责对所有的subject进行安全管理。通过SecurityManager可以完成subject的认证、授权等,实质上SecurityManager是通过Authenticator进行认证,通过Authorizer进行授权,通过SessionManager进行会话管理等。
SecurityManager是一个接口,继承了Authenticator, Authorizer, SessionManager这三个接口。
3)Authenticator
Authenticator即认证器,对用户身份进行认证,Authenticator是一个接口,shiro提供ModularRealmAuthenticator实现类,通过ModularRealmAuthenticator基本上可以满足大多数需求,也可以自定义认证器。
4)Authorizer
Authorizer即授权器,用户通过认证器认证通过,在访问功能时需要通过授权器判断用户是否有此功能的操作权限。
5)Realm
Realm即领域,相当于datasource数据源,securityManager进行安全认证需要通过Realm获取用户权限数据,比如:如果用户身份数据在数据库那么realm就需要从数据库获取用户身份信息。
注意:不要把Realm理解成只是从数据源取数据,在Realm中还有认证授权校验的相关的代码。
6)sessionManager
sessionManager即会话管理,shiro框架定义了一套会话管理,它不依赖web容器的session,所以shiro可以使用在非web应用上,也可以将分布式应用的会话集中在一点管理,此特性可使它实现单点登录。
7)SessionDAO
SessionDAO即会话dao,是对session会话操作的一套接口,比如要将session存储到数据库,可以通过jdbc将会话存储到数据库。
8)CacheManager
CacheManager即缓存管理,将用户权限数据存储在缓存,这样可以提高性能。
9)Cryptography
Cryptography即密码管理,shiro提供了一套加密/解密的组件,方便开发。比如提供常用的散列、加/解密等功能。
总结来说:
subject 相当于用户主体
principals 相当于用户名
credentials 相当于用户密码
realms 相当于访问数据库用户身份数据的DAO,在这里可进行用户信息校验
这几个实体之间的关系如下图所示:
二、SpringBoot整合Shiro
本项目的shiro授权和认证流程大致如下,分为4个步骤:
(1)通过login.html进行登陆
通过ShiroConfig.java可以看出所有以"/admin/…“和”/user/…"开头的访问都需要进行authc验证。输入用户密码提交到后台控制层。
(2)利用subject通过token登陆进入shiro校验
这里用UsernamePasswordToken存储token。
       // 从SecurityUtils里边创建一个 subject
        Subject subject = SecurityUtils.getSubject();
        // 在认证提交前准备 token(令牌)
        UsernamePasswordToken token = new UsernamePasswordToken(username, password);
        String attributeValue = null;
        // 执行认证登陆
        try {
            subject.login(token);
            }
        ......
(3)身份认证
shiro从token中取出用户名,然后根据用户去查数据库,把数据库中的密码查出来。这部分代码我们自定义实现实现的一个realm即CustomRealm.java,重写doGetAuthenticationInfo方法。
     //System.out.println("-------身份认证方法--------");
        String account = (String) authenticationToken.getPrincipal();
        //String userPwd = new String((char[]) authenticationToken.getCredentials());
        //根据账户从数据库获取密码
        SystemUser systemUser = iSystemUserService.selectSystemUserByAccount(account);
        if(systemUser==null){
            throw new AccountException("用户名不正确");
        }
        //交给AuthenticatingRealm使用CredentialsMatcher进行密码匹配
        ByteSource salt = ByteSource.Util.bytes(account);
        //下面使用systemUser对象
        return new SimpleAuthenticationInfo(systemUser, systemUser.getPsd(), salt, getName());
SimpleAuthenticationInfo用来比较从数据库里查出来的用户密码和输入的用户密码是否匹配,验证登陆是否成功。
(4)权限认证相关
重写doGetAuthorizationInfo方法,从数据库获取账户权限信息,将user:show、user:no添加到授权列表中
protected AuthorizationInfo doGetAuthorizationInfo(PrincipalCollection principalCollection) {
        //System.out.println("-------权限相关--------");
        //账户
        SystemUser systemUser = (SystemUser) SecurityUtils.getSubject().getPrincipal();
        SimpleAuthorizationInfo info = new SimpleAuthorizationInfo();
        //从数据库获取账户权限信息,将user:show、user:no添加到授权列表中
        Set<String> stringSet = new HashSet<>();
        stringSet.add("user:show");
        stringSet.add("user:no");
        info.setStringPermissions(stringSet);
        return info;
    }
1、项目环境
Spring Boot 2.1.7
shiro       1.3.2
mysql       5.1.46
mybatis     1.3.2
2、类配置
2.1 ShiroConfig.java主要包括过滤的文件和权限,密码加密的算法,开启Shiro的注解等相关功能。
其中shiroFilter方法是shiro的过滤器,可以设置登录页面(setLoginUrl)、权限不足跳转页面(setUnauthorizedUrl)、具体某些页面的权限控制或者身份认证。
customRealm方法将customRealm的实例化交给spring去管理,当然这里也可以利用注解的方式去注入
package com.shiro.config;
/**
 * 过滤的文件和权限,密码加密的算法,其用注解等相关功能
 */
@Configuration
public class ShiroConfig {

    @Bean(name = "shiroFilter")
    public ShiroFilterFactoryBean shiroFilter(SecurityManager securityManager) {
        ShiroFilterFactoryBean shiroFilterFactoryBean = new ShiroFilterFactoryBean();
        // Shiro的核心安全接口,这个属性是必须的
        shiroFilterFactoryBean.setSecurityManager(securityManager);
        // 身份认证失败,则跳转到登录页面的配置
        shiroFilterFactoryBean.setLoginUrl("/login");
        // 权限认证失败,则跳转到指定页面
        shiroFilterFactoryBean.setUnauthorizedUrl("/notRole");
        Map<String, String> filterChainDefinitionMap = new LinkedHashMap<>();
        //
        filterChainDefinitionMap.put("/webjars/**", "anon");
        filterChainDefinitionMap.put("/login", "anon");
        filterChainDefinitionMap.put("/loginOut", "anon");
        filterChainDefinitionMap.put("/", "anon");
        filterChainDefinitionMap.put("/front/**", "anon");
        filterChainDefinitionMap.put("/api/**", "anon");
        filterChainDefinitionMap.put("/kaptcha/**", "anon");
        filterChainDefinitionMap.put("/success/**", "anon");
        filterChainDefinitionMap.put("/admin/**", "authc");
        filterChainDefinitionMap.put("/user/**", "authc");
        //主要这行代码必须放在所有权限设置的最后,不然会导致所有 url 都被拦截 剩余的都需要认证
        filterChainDefinitionMap.put("/**", "authc");
        shiroFilterFactoryBean.setFilterChainDefinitionMap(filterChainDefinitionMap);
        return shiroFilterFactoryBean;

    }

    @Bean
    public SecurityManager securityManager() {
        DefaultWebSecurityManager defaultSecurityManager = new DefaultWebSecurityManager();
        defaultSecurityManager.setRealm(customRealm());
        return defaultSecurityManager;
    }

    @Bean
    public CustomRealm customRealm() {
        CustomRealm customRealm = new CustomRealm();
        // 告诉realm,使用credentialsMatcher加密算法类来验证密文
        customRealm.setCredentialsMatcher(hashedCredentialsMatcher());
        customRealm.setCachingEnabled(false);
        return customRealm;
    }

    @Bean
    public LifecycleBeanPostProcessor lifecycleBeanPostProcessor() {
        return new LifecycleBeanPostProcessor();
    }

    /**
     * *
     * 开启Shiro的注解(如@RequiresRoles,@RequiresPermissions),需借助SpringAOP扫描使用Shiro注解的类,并在必要时进行安全逻辑验证
     * *
     * 配置以下两个bean(DefaultAdvisorAutoProxyCreator(可选)和AuthorizationAttributeSourceAdvisor)即可实现此功能
     * * @return
     */
    @Bean
    @DependsOn({"lifecycleBeanPostProcessor"})
    public DefaultAdvisorAutoProxyCreator advisorAutoProxyCreator() {
        DefaultAdvisorAutoProxyCreator advisorAutoProxyCreator = new DefaultAdvisorAutoProxyCreator();
        advisorAutoProxyCreator.setProxyTargetClass(true);
        return advisorAutoProxyCreator;
    }

    @Bean
    public AuthorizationAttributeSourceAdvisor authorizationAttributeSourceAdvisor() {
        AuthorizationAttributeSourceAdvisor authorizationAttributeSourceAdvisor = new AuthorizationAttributeSourceAdvisor();
        authorizationAttributeSourceAdvisor.setSecurityManager(securityManager());
        return authorizationAttributeSourceAdvisor;
    }

    /**
     * 加密配置
     */
    @Bean(name = "credentialsMatcher")
    public HashedCredentialsMatcher hashedCredentialsMatcher() {
        HashedCredentialsMatcher hashedCredentialsMatcher = new HashedCredentialsMatcher();
        // 散列算法:这里使用MD5算法;
        hashedCredentialsMatcher.setHashAlgorithmName("md5");
        // 散列的次数,比如散列两次,相当于 md5(md5(""));
        hashedCredentialsMatcher.setHashIterations(1024);
        // storedCredentialsHexEncoded默认是true,此时用的是密码加密用的是Hex编码;false时用Base64编码
        hashedCredentialsMatcher.setStoredCredentialsHexEncoded(true);
        return hashedCredentialsMatcher;
    }
    @Bean
    public ShiroDialect shiroDialect(){
        return new ShiroDialect();
    }
}
2.2 CustomRealm.java
自定义的CustomRealm继承AuthorizingRealm并且重写父类中的doGetAuthorizationInfo(权限相关)、doGetAuthenticationInfo(身份认证)这两个方法。
doGetAuthorizationInfo: 权限认证,即登录过后,每个身份不一定,对应的所能看的页面也不一样。
doGetAuthenticationInfo:身份认证。即登录通过账号和密码验证登陆人的身份信息。
package com.shiro.realm;

import com.shiro.pojo.SystemUser;
import com.shiro.service.ISystemUserService;
import org.apache.shiro.SecurityUtils;
import org.apache.shiro.authc.*;
import org.apache.shiro.authz.AuthorizationInfo;
import org.apache.shiro.authz.SimpleAuthorizationInfo;
import org.apache.shiro.realm.AuthorizingRealm;
import org.apache.shiro.subject.PrincipalCollection;
import org.apache.shiro.util.ByteSource;
import javax.annotation.Resource;
import java.util.HashSet;
import java.util.Set;

public class CustomRealm extends AuthorizingRealm {

    @Resource
    private ISystemUserService iSystemUserService;

    /**
     * 权限相关
     */
    @Override
    protected AuthorizationInfo doGetAuthorizationInfo(PrincipalCollection principalCollection) {
        //System.out.println("-------权限相关--------");
        //账户
        SystemUser systemUser = (SystemUser) SecurityUtils.getSubject().getPrincipal();
        SimpleAuthorizationInfo info = new SimpleAuthorizationInfo();
        //从数据库获取账户权限信息,将user:show、user:no添加到授权列表中
        Set<String> stringSet = new HashSet<>();
        stringSet.add("user:show");
        stringSet.add("user:no");
        info.setStringPermissions(stringSet);
        return info;
    }

    /**
     * 身份认证
     * 获取即将需要认证的信息
     * @param authenticationToken
     * @return
     * @throws AuthenticationException
     */
    @Override
    protected AuthenticationInfo doGetAuthenticationInfo(AuthenticationToken authenticationToken) throws AuthenticationException {
        //System.out.println("-------身份认证方法--------");
        String account = (String) authenticationToken.getPrincipal();
        //String userPwd = new String((char[]) authenticationToken.getCredentials());
        //根据账户从数据库获取密码
        SystemUser systemUser = iSystemUserService.selectSystemUserByAccount(account);
        if(systemUser==null){
            throw new AccountException("用户名不正确");
        }
        //交给AuthenticatingRealm使用CredentialsMatcher进行密码匹配
        ByteSource salt = ByteSource.Util.bytes(account);
        //下面使用systemUser对象
        return new SimpleAuthenticationInfo(systemUser, systemUser.getPsd(), salt, getName());
        //获取登录信息方式为
//        SystemUser systemUser = (SystemUser) SecurityUtils.getSubject().getPrincipal();
        //下面使用account参数
//        return new SimpleAuthenticationInfo(account, systemUser.getPsd(), salt, getName());
        //获取登录信息方式为
//        String account = (String) SecurityUtils.getSubject().getPrincipal();
    }
}
2.3 LoginController.java认证登陆功能
package com.shiro.controller;

import com.shiro.annotation.Log;
import com.shiro.enums.OperationType;
import com.shiro.enums.OperationUnit;
import org.apache.commons.lang.StringUtils;
import org.apache.shiro.SecurityUtils;
import org.apache.shiro.authc.*;
import org.apache.shiro.session.Session;
import org.apache.shiro.subject.Subject;
import org.springframework.stereotype.Controller;
import org.springframework.web.bind.annotation.*;
import org.springframework.web.servlet.mvc.support.RedirectAttributes;
import java.util.logging.Logger;

@Controller
@RequestMapping
public class LoginController {

    private Logger logger = Logger.getLogger(this.getClass().getName());

    /**
     * 界面
     */
    @RequestMapping(value = {"/login","/"}, method = RequestMethod.GET)
    public String defaultLogin() {
        return "login";
    }

    /**
     * 退出
     */
    @RequestMapping(value = "/loginOut", method = RequestMethod.GET)
    public String loginOut() {
        Subject subject = SecurityUtils.getSubject();
        subject.logout();
        return "redirect:login";
    }

    /**
     * 登录提交
     * @param username
     * @param tryCode
     * @param password
     * @param redirectAttributes
     * @return
     */
    @Log(detail = "登录提交",level = 1,operationUnit = OperationUnit.USER,operationType = OperationType.SELECT)
    @RequestMapping(value = "/login", method = RequestMethod.POST)
    public String login(@RequestParam("username") String username,
                        @RequestParam("tryCode") String tryCode,
                        @RequestParam("password") String password,
                        RedirectAttributes redirectAttributes) {

        //判断验证码
        if(StringUtils.isBlank(tryCode)){
            logger.info("验证码为空了!");
            redirectAttributes.addFlashAttribute("message", "验证码不能为空!");
            return "redirect:login";
        }
        Session session = SecurityUtils.getSubject().getSession();
        String code = (String) session.getAttribute("rightCode");
        System.out.println(code+"*************"+tryCode);
        if(!tryCode.equalsIgnoreCase(code)){
            logger.info("验证码错误!");
            redirectAttributes.addFlashAttribute("message", "验证码错误!");
            return "redirect:login";
        }
        // 从SecurityUtils里边创建一个 subject
        Subject subject = SecurityUtils.getSubject();
        // 在认证提交前准备 token(令牌)
        UsernamePasswordToken token = new UsernamePasswordToken(username, password);
        String attributeValue = null;
        // 执行认证登陆
        try {
            subject.login(token);
        } catch (UnknownAccountException uae) {
            attributeValue="未知账户!";
        } catch (IncorrectCredentialsException ice) {
            attributeValue="密码不正确!";
        } catch (LockedAccountException lae) {
            attributeValue= "账户已锁定";
        } catch (ExcessiveAttemptsException eae) {
            attributeValue= "用户名或密码错误次数过多";
        } catch (AuthenticationException ae) {
            attributeValue= "用户名或密码不正确!";
        }finally {
            redirectAttributes.addFlashAttribute("message", attributeValue);
            if (subject.isAuthenticated()) {
                logger.info("登录成功");
                return "success";
            } else {
                token.clear();
                return "redirect:login";
            }
        }
    }
}
2.4 UserController.java权限控制功能
package com.shiro.controller;

import com.shiro.annotation.Log;
import com.shiro.enums.OperationType;
import com.shiro.enums.OperationUnit;
import com.shiro.utils.BaseController;
import org.apache.shiro.SecurityUtils;
import org.apache.shiro.authz.annotation.RequiresPermissions;
import org.apache.shiro.session.Session;
import org.springframework.web.bind.annotation.RequestMapping;
import org.springframework.web.bind.annotation.RestController;

@RequestMapping("/user")
@RestController
public class UserController extends BaseController {

    @Log(detail = "查询信息",level = 3,operationUnit = OperationUnit.USER,operationType = OperationType.SELECT)
    @RequiresPermissions("user:show")   //添加 user:show 权限控制
    @RequestMapping("/show")
    public String showUser() {
        Session session = SecurityUtils.getSubject().getSession();
        return "用户信息:我就是张三丰!";
    }

    @Log(detail = "无权限查询信息",level = 1,operationUnit = OperationUnit.USER,operationType = OperationType.SELECT)
    @RequiresPermissions("user:list")   //添加 user:list 权限控制,如果用“http://127.0.0.1:8080/user/no”访问会报错:当前用户没有此权限
    @RequestMapping("/no")
    public String unshowUser() {
        return "没有获得授权!";
    }
}
2.5 LogAspect日志切面类,用于记录访问日志,存储到MySQL数据库
package com.shiro.aspectj;

import com.alibaba.fastjson.JSONObject;
import com.shiro.annotation.Log;
import com.shiro.pojo.SystemLog;
import com.shiro.pojo.SystemUser;
import com.shiro.service.ISystemLogService;
import com.shiro.utils.IpUtils;
import org.apache.shiro.SecurityUtils;
import org.aspectj.lang.JoinPoint;
import org.aspectj.lang.ProceedingJoinPoint;
import org.aspectj.lang.annotation.*;
import org.aspectj.lang.reflect.MethodSignature;
import org.springframework.stereotype.Component;
import javax.annotation.Resource;
import java.text.SimpleDateFormat;
import java.util.Date;
import java.util.HashMap;
import java.util.Map;
import java.util.UUID;

@Aspect
@Component
public class LogAspect {

    @Resource
    private ISystemLogService logService;
    /**
     * 此处的切点是注解的方式,也可以用包名的方式达到相同的效果
     * '@Pointcut("execution(* com.wwj.springboot.service.impl.*.*(..))")'
     */
    @Pointcut("@annotation(com.shiro.annotation.Log)")
    public void operationLog(){}


    /**
     * 环绕增强,相当于MethodInterceptor
     */
    @Around("operationLog()")
    public Object doAround(ProceedingJoinPoint joinPoint) throws Throwable {
        Object res = null;
        long time = System.currentTimeMillis();
        try {
            res =  joinPoint.proceed();
            time = System.currentTimeMillis() - time;
            return res;
        } finally {
            try {
                //方法执行完成后增加日志
                addOperationLog(joinPoint,res,time);
            }catch (Exception e){
                System.out.println("LogAspect 操作失败:" + e.getMessage());
                e.printStackTrace();
            }
        }
    }

    private void addOperationLog(JoinPoint joinPoint, Object res, long time){
        //获得登录用户信息
        SystemUser systemUser = (SystemUser) SecurityUtils.getSubject().getPrincipal();
        MethodSignature signature = (MethodSignature)joinPoint.getSignature();
        SystemLog operationLog = new SystemLog();
        //获取内网地址IpUtils.intranetIp()
        //获取外网地址IpUtils.internetIp()
        operationLog.setIpAddress(IpUtils.intranetIp());
        operationLog.setRunTime(time);
        operationLog.setReturnValue(JSONObject.toJSONString(res));
        operationLog.setId(UUID.randomUUID().toString());
        operationLog.setArgs(JSONObject.toJSONString(joinPoint.getArgs()));
        operationLog.setCreateTime(new SimpleDateFormat("yyyy-MM-dd HH:mm:ss").format(new Date()));
        operationLog.setMethod(signature.getDeclaringTypeName() + "." + signature.getName());
        operationLog.setUserId(systemUser.getId()+"");
        operationLog.setUserName(systemUser.getUserName());
        Log annotation = signature.getMethod().getAnnotation(Log.class);
        if(annotation != null){
            operationLog.setLogLevel(annotation.level());
            operationLog.setLogDescribe(getDetail(((MethodSignature)joinPoint.getSignature()).getParameterNames(),joinPoint.getArgs(),annotation));
            operationLog.setOperationType(annotation.operationType().getValue());
            operationLog.setOperationUnit(annotation.operationUnit().getValue());
        }
        //TODO 这里保存日志
        System.out.println("记录日志:" + operationLog.toString());
        int i = logService.addLog(operationLog);
        //System.out.println(i);
    }

    /**
     * 对当前登录用户和占位符处理
     * @param argNames 方法参数名称数组
     * @param args 方法参数数组
     * @param annotation 注解信息
     * @return 返回处理后的描述
     */
    private String getDetail(String[] argNames, Object[] args, Log annotation){
        //获得登录用户信息
        SystemUser systemUser = (SystemUser) SecurityUtils.getSubject().getPrincipal();
        Map<Object, Object> map = new HashMap<>(4);
        for(int i = 0;i < argNames.length;i++){
            map.put(argNames[i],args[i]);
        }

        String detail = annotation.detail();
        try {
            detail = "'" + systemUser.getUserName() + "'=》" + annotation.detail();
            for (Map.Entry<Object, Object> entry : map.entrySet()) {
                Object k = entry.getKey();
                Object v = entry.getValue();
                detail = detail.replace("{{" + k + "}}", JSONObject.toJSONString(v));
            }
        }catch (Exception e){
            e.printStackTrace();
        }
        return detail;
    }

    @Before("operationLog()")
    public void doBeforeAdvice(JoinPoint joinPoint){
        System.out.println("进入方法前执行.....");

    }

    /**
     * 处理完请求,返回内容
     * @param ret
     */
    @AfterReturning(returning = "ret", pointcut = "operationLog()")
    public void doAfterReturning(Object ret) {
        System.out.println("方法的返回值 : " + ret);
    }

    /**
     * 后置异常通知
     */
    @AfterThrowing("operationLog()")
    public void throwss(JoinPoint jp){
        System.out.println("方法异常时执行.....");
    }

    /**
     * 后置最终通知,final增强,不管是抛出异常或者正常退出都会执行
     */
    @After("operationLog()")
    public void after(JoinPoint jp){
        System.out.println("方法最后执行.....");
    }
}
2.6 application.yml配置文件
server:
  port: 8080
  servlet:
    context-path: /

#thymeleaf模板
spring:
  aop:
    auto: true #启动aop配置
  thymeleaf:
    cache: true
    prefix:
      classpath: /templates/
    suffix: .html
    mode: HTML5
    encoding: UTF-8
    servlet:
      content-type: text/html
  #数据连接
  datasource:
    driver-class-name: com.mysql.jdbc.Driver
    url: jdbc:mysql://localhost:3306/springboot?useUnicode=true&characterEncoding=utf8&serverTimezone=UTC
    username: root
    password: root

  # mybatis 配置
mybatis:
  mapper-locations: classpath:mybatis/mappers/*.xml
  configuration:
    map-underscore-to-camel-case: true #驼峰转换
    use-generated-keys: true #获取数据库自增列
    use-column-label: true #使用列别名替换列名
    log-impl: org.apache.ibatis.logging.stdout.StdOutImpl
三、操作步骤和测试结果
1.首先在MySQL中根据SystemUserMapper.xml和SystemLogMapper.xml创建2张表

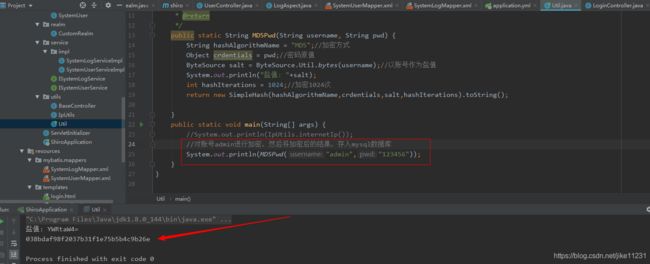
2.其次利用Util中的MD5Pwd方法,对账号admin的密码123456进行加密,然后将加密后的结果,存入MySQL数据库。

3.启动ShiroApplication,然后访问http://127.0.0.1:8080/login和http://127.0.0.1:8080/user/show
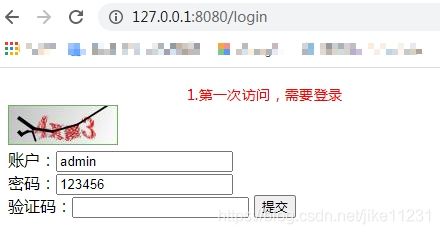
第一次访问http://127.0.0.1:8080/user/show时,需要登录。登录验证通过之后,就可以直接访问了。
操作步骤依次如下:


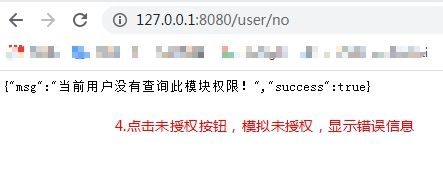

同时操作日志已经记录在MySQL中了

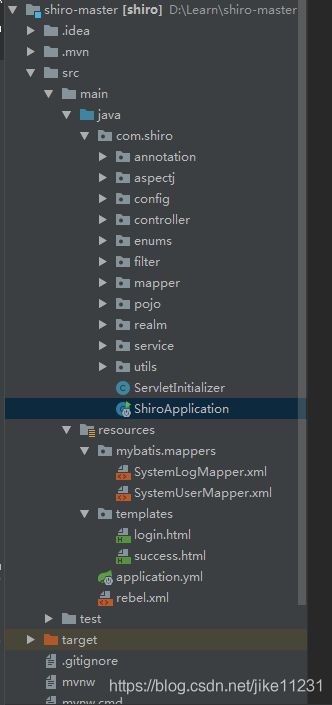
4.项目结构如下
项目代码链接
git仓库地址:https://gitee.com/codefarmer001/spring-boot-shiro.git
参考文章
https://blog.csdn.net/qq_40369944/article/details/99977892
https://www.iteye.com/blog/hnbcjzj-2394778
https://www.freebytes.net/it/java/shiro-study-3.html
https://www.jianshu.com/p/0b1131be7ace
https://www.cnblogs.com/jack1995/p/7445974.html
https://www.jianshu.com/p/7de749f6ae6a