基于 Alexnet 的服装图像模式识别系统的设计与实现
- 题目的主要研究内容工作的主要描述
本文设计实现了基于 Alexnet 的服装图像识别和分类系统,使用网络爬虫得到的图片进行了测试,对于模型中参数进行了调整以在本实验所用数据集上得到更好的效果,并且增加 CNN 模型作为对比项,结果显示使用 Alexnet 模型能够极好地胜任图像的识别和分类任务。本系统使用了 Fashion-MNIST 数据集,输出的总类别数为 10。
- 模型简介
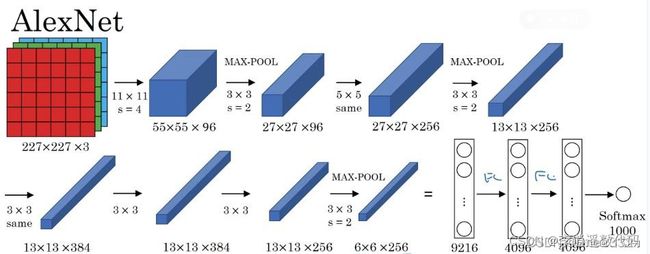
本设计采用 Alexnet 模型,Alexnet 模型共有五个卷积层、三个池化层和三个全连接层。其中五个卷积层和位于第一、第二、第五卷积层之后的池化层实现了特征提取功能,后三个全连接层把最后一个池化层的输出作为输入,输出对于待预测图像的预测概率值,Alexnet 模型结构图如图 1 所示。
-
-
- 系统流程图
-
图 1 Alexnet 网络结构图
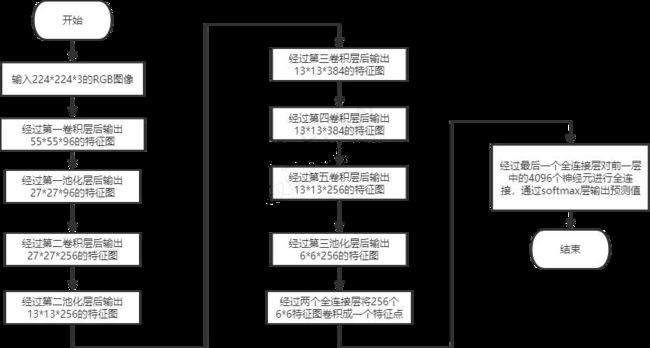
本设计将待预测图片作为输入传入Alexnet 模型,经过各卷积层、池化层和全连接层的计算转化后输出预测值,具体流程图如图 2 所示。
图 2 系统流程图
-
- 题目研究的工作基础或实验条件
- 硬件环境
gpu 1080 Ti
- 软件环境
python 3.7
-
- 数据集描述
本设计使用的是 Fashion-MNIST(服饰数据集),是经典 MNIST 数据集的替代,MNIST 数据集包含手写数字(阿拉伯数字)的图像,Fashion MNIST/ 服饰数据集包含 10 种类别,70000 张灰度图像,其中包含 60,000 个示例的训练集和 10,000 个示例的测试集,每个示例都是一个 28x28 灰度图像, Fashion MNIST 比常规 MNIST 手写数据将更具挑战性。两者数据集都较小, 主要适用于初学者学习或验证某个算法可否正常运行,是测试和调试代码的良好起点。
-
- 特征提取过程描述
Alexnet 网络结构如图所示,它是由 5 个卷积层和 3 个全连接层组成,前五个卷积层主要用于特征提取,其中第一、第二、第五卷积层后面各有一个池化层;后三个全连接层用于分类识别。本小节主要介绍用于特征提取的卷积层及池化层,从第一卷积层开始,每层输出作为输入传入下一层,各层具
体信息如表 1 所示:
表 1 Alexnet 模型中特征提取的各层具体信息表
| Layer_ name |
Conv1 |
Pool1 |
Conv2 |
Pool2 |
Conv3 |
Conv4 |
Conv5 |
Pool3 |
| 输入图像大小 |
224 * 224 * 3 |
55 * 55 * 96 |
27 * 27 * 96 |
27 * 27 * 256 |
13 * 13 * 256 |
13 * 13 * 384 |
13 * 13 * 384 |
13 * 13 * 256 |
| 卷积核 大小 |
11 * 11 |
5 * 5 |
3 * 3 |
3 * 3 |
3 * 3 |
|||
| 采样大 小 |
3 * 3 |
3 * 3 |
3 * 3 |
|||||
| 卷积核 个数 |
96 |
256 |
384 |
384 |
256 |
|||
| 步长 |
2 |
2 |
1 |
2 |
1 |
1 |
1 |
2 |
| padding 方式 |
VALID |
VALID |
VALID |
VALID |
SAME |
SAME |
SAME |
VALID |
| 输出feature Map 大小 |
55 * 55 * 96 |
27 * 27 * 96 |
27 * 27 * 256 |
13 * 13 * 256 |
13 * 13 * 384 |
13 * 13 * 384 |
13 * 13 * 256 |
6 * 6 * 256 |
dropout 是以一定的概率使神经元的输出为 0,AlexNet 设置概率为 0.5, 这种技术打破了神经元之间固定的依赖,使得学习到的参数更加健壮。AlexNet 在第 1,2 个全连接网络中使用了dropout,这使得迭代收敛的速度增加了一倍。
-
- 分类过程描述
本设计的分类功能由 Alexnet 网络结构的后 3 个全连接层实现,它们从前面卷积层获得输入,经过一系列转化,最后输出预测值。
FC6:全连接层,这里使用 4096 个神经元,对 256 个大小为 6X6 特征图, 进行一个全连接,也就是将 6X6 大小的特征图,进行卷积变为一个特征点, 然后对于 4096 个神经元中的一个点,是由 256 个特征图中某些个特征图卷积之后得到的特征点乘以相应的权重之后,再加上一个偏置得到,之后再进行一个 dropout 操作,也就是随机从 4096 个节点中丢掉一些节点信息(清 0
操作),然后就得到新的 4096 个神经元。
FC7:与前一层相同。
F8:采用的是 10 个神经元,通过 sofmax,得到 10 个类别的概率值,也就是预测值。
-
- 主要程序代码
import numpy as np import pandas as pd
from sklearn.metrics import accuracy_score, confusion_matrix, classification_report import matplotlib.pyplot as plt
import seaborn as sns import copy
import time import torch
import torch.nn as nn
from torch.optim import Adam import torch.utils.data as Data
from torchvision import transforms, datasets from torchvision.datasets import FashionMNIST from torch.utils.data import Dataset, DataLoader import torchvision
import torch.optim as optim import matplotlib.pyplot as plt import torch.nn.functional as F from PIL import Image
import os os.environ["CUDA_VISIBLE_DEVICES"] = '1'
# training batches of our network EPOCHS = 2000
# size of each batch BATCH_SIZE = 512
DEVICE = ("cuda" if torch.cuda.is_available() else "cpu") class_names = ['T-shirt/top', 'Trouser', 'Pullover', 'Dress', 'Coat',
'Sandal', 'Shirt', 'Sneaker', 'Bag', 'Ankle boot'] print(torch. version )
print(DEVICE)
# 处理训练集数据
# def train_data_process():
# 加载 FashionMNIST 数据集
train_data = pd.read_csv('./data/mnist/FashionMNIST/raw/fashion-mnist_train.csv') test_data = pd.read_csv('./data/mnist/FashionMNIST/raw/fashion-mnist_test.csv')
# train_data = FashionMNIST(root="/mnt/fashion-mnist/data/FashionMNIST/", # 数据路
径
# train=True, # 只使用训练数据集
#
transform=transforms.Compose([transforms.Resize(size=224), transforms.ToTensor()]), # AlexNet 的输入数据大小为 224*224,因此这里将 FashionMNIST 数据集的尺寸从 28 扩展到224
# 把 PIL.Image 或者 numpy.array 数据类型转变为 torch.FloatTensor 类型
# download=True, # 若本身没有下载相应的数据集,则选择
True
# )
class FashionDataset(Dataset):
def init (self, data, transform=None): self.fashion_MNIST = list(data.values) self.transform = transform
label, image = [], []
for i in self.fashion_MNIST: label.append(i[0])
image.append(i[1:])
self.labels = np.asarray(label)
self.images = np.asarray(image).reshape(-1, 28, 28).astype('float32') def len (self):
return len(self.images) def getitem (self, idx):
label = self.labels[idx] image = self.images[idx]
if self.transform is not None:
# transfrom the numpy array to PIL image before the transform function pil_image = Image.fromarray(np.uint8(image))
image = self.transform(pil_image) return image, label
AlexTransform = transforms.Compose([ transforms.Resize((227, 227)), transforms.ToTensor(), transforms.Normalize((0.1307,), (0.3081,))]) train_loader = DataLoader(
FashionDataset(train_data, transform=AlexTransform), batch_size=BATCH_SIZE, shuffle=True)
test_loader = DataLoader(
FashionDataset(test_data, transform=AlexTransform), batch_size=BATCH_SIZE, shuffle=True)
# helper function to show an image def matplotlib_imshow(img):
img = img.mean(dim=0)
img = img / 2 + 0.5 # unnormalize npimg = img.numpy() plt.imshow(npimg, cmap="Greys")
# get some random training images dataiter = iter(train_loader)
images, labels = dataiter.next() # creat grid of images
img_grid = torchvision.utils.make_grid(images[0]) # show images & labels matplotlib_imshow(img_grid) print(class_names[labels[0]])
class AlexNet(nn.Module): def init (self):
super(). init () self.conv1 = nn.Sequential(
nn.Conv2d(in_channels=1, out_channels=96, kernel_size=11, stride=4,
padding=0),
nn.ReLU(), nn.MaxPool2d(kernel_size=3, stride=2) ) self.conv2 = nn.Sequential( nn.Conv2d(96, 256, 5, 1, 2),
nn.ReLU(), nn.MaxPool2d(3, 2) ) self.conv3 = nn.Sequential( nn.Conv2d(256, 384, 3, 1, 1), nn.ReLU() )
self.conv4 = nn.Sequential( nn.Conv2d(384, 384, 3, 1, 1), nn.ReLU())
self.conv5 = nn.Sequential( nn.Conv2d(384, 256, 3, 1, 1),
nn.ReLU(), nn.MaxPool2d(3, 2))
self.fc1 = nn.Linear(256 * 6 * 6, 4096) self.fc2 = nn.Linear(4096, 4096)
self.fc3 = nn.Linear(4096, 10) def forward(self, x):
out = self.conv1(x) out = self.conv2(out) out = self.conv3(out) out = self.conv4(out) out = self.conv5(out)
out = out.view(out.size(0), -1)
out = F.relu(self.fc1(out)) # 256*6*6 -> 4096 out = F.dropout(out, 0.5)
out = F.relu(self.fc2(out)) out = F.dropout(out, 0.5) out = self.fc3(out)
out = F.log_softmax(out, dim=1) return out
def train(model, device, train_loader, optimizer, epoch): model.train()
for batch_idx, (data, target) in enumerate(train_loader): target = target.type(torch.LongTensor)
data, target = data.to(device), target.to(device) optimizer.zero_grad()
output = model(data)
loss = criterion(output, target) loss.backward() optimizer.step()
if (batch_idx + 1) % 30 == 0:
print("Train Epoch:{} [{}/{} ({:.0f}%)]\tLoss: {:.6f}".format( epoch, batch_idx * len(data), len(train_loader.dataset),
100. * batch_idx / len(train_loader), loss.item())) def test(model, device, test_loader):
model.eval() test_loss = 0
correct = 0
with torch.no_grad():
for data, target in test_loader:
data, target = data.to(device), target.to(device) output = model(data)
test_loss += criterion(output, target, reduction='sum').item() pred = output.max(1, keepdim=True)[1]
correct += pred.eq(target.view_as(pred)).sum().item()
test_loss /= len(test_loader.dataset) # loss 之和除以 data 数量 -> mean print("\nTest set: Average loss: {:.4f}, Accuracy: {}/{} ({:.0f}%)\n".format(
test_loss, correct, len(test_loader.dataset), 100. * correct / len(test_loader.dataset)))
print('='*50)
if name == ' main ': train_rate=0.8
model = AlexNet().to(DEVICE) criterion = F.nll_loss
optimizer = optim.Adam(model.parameters())
-
- 运行结果及分析
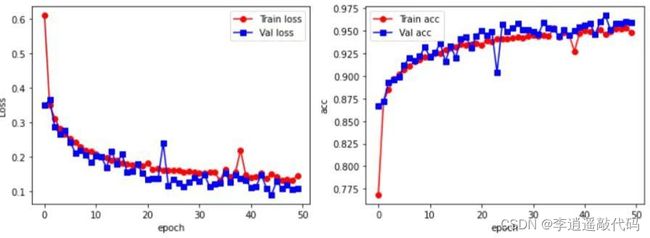
根据原始 AlexNet 模型的输入尺寸为 227*227,通过改变图片的分辨率改成了 227*227 的灰度图片,批处理大小(batch_size)为 50,Dropout=0.5, 对于 epoch 的选择,实验分别设计了 50,100,150,如图 3 所示,可以看到在 epoch 达到 150 的时候模型几乎都达到了过拟合,而 epoch=100 时,精度并没有得到显著的提高,所以最后将 epoch 设为 50。对于训练结果,AlexNet 的表现最好,准确度达到了 92%,AlexNet 模型训练结果如图 3 所示。
图 3 AlexNet 训练结果图
使用爬虫对百度图片进行爬取,将图片进行处理之后输入到模型中,部分图像如图 4 所示,右侧为爬取的图片,左侧为处理后的图片。
图 4 爬虫图片
本设计增加了 CNN 网络模型与 AlexNet 模型作比较,结果表明 AlexNet 模型效果更好,预测值准确度更高,能更为准确得识别图片,CNN 模型和AlexNet 模型的预测结果如图 5 所示,左为 CNN,右为 AlexNet。
图 5 CNN 以及 AlexNet 的预测结果图


