vue + element-ui 搭建简单的后台管理系统
基于vue + element-ui搭建简单的后台管理系统一
-
- 1.路由配置
1.路由配置
const routes = [
  {
    path: '/',
    name: 'Login',
    component: () => import('@/views/login/login.vue'),
  },
  {
    path: '/manager',
    name: 'Manager',
    redirect: '/manager/index',
    meta: { title: '管理信息' },
    component: Home,
    children: [
      {
        path: 'index',
        name: 'Index',
        component: () => import('@/views/manager/index.vue'),
        meta: { title: '首页' },
      },
      {
        path: 'user',
        name: 'User',
        component: () => import('@/views/manager/user.vue'),
        meta: { title: '用户管理' },
      },
      {
        path: 'logout',
        name: 'Logout',
        component: () => import('@/views/manager/logout.vue'),
        meta: { title: '退出' },
      },
    ],
  },
  {
    path: '/pro',
    component: Home,
    redirect: '/pro/proclass',
    // name: 'Pro',
    meta: { title: '产品管理' },
    children: [
      {
        path: 'proclass',
        name: 'Proclass',
        component: () => import('@/views/pro/proclass.vue'),
        meta: { title: '产品分类列表' }
      },
      {
        path: 'prolist',
        name: 'Prolist',
        component: () => import('@/views/pro/prolist.vue'),
        meta: { title: '产品列表' }
      },
    ]
  },
  // 等等,后面的路径按照这种方式去写
  ]
简单描述:
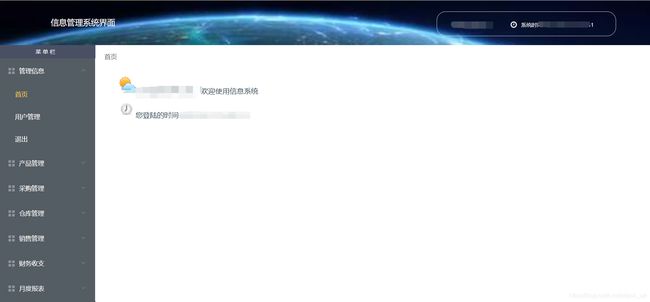
1.简单分析界面渲染内容,包括共同头部,共同侧边栏和各自主题内容,然后去element-ui组件库中,正好有el-container 布局容器我们所需的内容,按照需求
<template>
  <el-container>
    <el-header height="100px" style="padding: 0">
      <Head></Head> <!-- 此处写头部的html代码,如果比较多可以放到一个新组件中,按需导入即可--!>
    </el-header>
    <el-container>
      <el-aside :width="isCollapse ? '64px' : '220px'">
      <!-- 侧边栏公共代码,从路由中获取信息,循环添加到侧边栏,这里也是用el的导航菜单组件,有几个比较重要的地方,
      1.select事件的回调参数,index: 选中菜单项的 index, indexPath: 选中菜单项的 index path
      2.router ,默认false,是否使用vue-router模式,启用该模式会在激活导航时,将index作为path进行路由跳转
--!>
        <div class="toggle-button" @click="togglrCollapse">菜单栏</div>
        <el-menu
          :default-active="$route.path"
          class="el-menu-vertical-demo"
          @open="handleOpen"
          @close="handleClose"
          @select="son"
          background-color="#545c64"
          text-color="#fff"
          active-text-color="#ffd04b"
          unique-opened
          :collapse="isCollapse"
          :collapse-transition="false"
          router
        >
          <el-submenu :index="item.path" v-for="item in menus" :key="item.name">
            <template slot="title">
              <i class="el-icon-menu"></i>
              <span>{{ item.meta.title }}</span>
            </template>
            <!-- <el-menu-item-group> -->
            <el-menu-item
              :index="item.path + '/' + val.path"
              v-for="val in item.children"
              :key="val.name"
              >{{ val.meta.title }}</el-menu-item
            >
            <!-- </el-menu-item-group> -->
          </el-submenu>
        </el-menu>
      </el-aside>
      <el-main>
        <router-view :key="key"></router-view>
      </el-main>
    </el-container>
  </el-container>
</template>
export default {
  data() {
    return {
      isCollapse: false,
      menus: [],
      key: this.$route.path,
    };
  },
  created() {
    //console.log(this.$router.options.routes);
    let info = this.$router.options.routes;
    this.menus = [
      info[2],
      info[3],
    ];
  },
简单描述: 有了这个el-submenu组件说明,我们就可以通过$router.options.routes获取路由配置参数中的信息,然后一级路由渲染到el-submenu中,二级路由在children数组里,再次进行循环遍历,渲染到el-menu-item中,这样点击侧边栏,就可以对应跳转响应的路由。
当时,我在这里遇到了一个问题,也就是二级路由跳转不了,因为我路由配置中,二级子路由直接写路径,并没有写父路径,然后在遍历的时候也没有添加父路径,这边会报错,RangeError: Maximum call stack size exceeded,在子路由index跳转时,拼接父路径即可。
