【Spring】快速入门Spring框架
文章目录
- 1. 对Spring的理解
- 2. Spring IoC
- 3. DI
- 4. 如何创建一个Spring项目
-
- 4.1 创建一个Maven项目
- 4.2 添加Spring框架支持
- 4.3 添加启动类
- 5. 存储Bean对象
-
- 5.1 添加配置文件
- 5.2 创建Bean对象
- 5.3 注册Bean
- 6. 获取并使用Bean对象
- 7. 更简单存储Bean对象的方式
-
- 7.1 前置工作
- 7.2 添加存储对象的注解
-
- 7.2.1 类注解
- 7.2.2 方法注解
- 8. 对象装配/对象注入
-
- 8.1 属性注入
- 8.2 构造方法注入
- 8.3 Setter注入
- 8.4 @Resource注解
- 8.5 @Bean将一个对象多次注入问题
1. 对Spring的理解
Spring是一个框架,包含了众多工具方法的IoC容器
什么是容器?
容器就是容纳物品的装置,比如:
- List/Map,用来储存数据,说明它是一个数据存储容器
- Tomcat,webapps目录下保存多个web应用程序,说明它是一个web容器
什么是IoC?
IoC的意思就是控制反转,是一种设计原则,主要通过IoC容器实现控制权发生反转,如对象的初始化及依赖关系(对象引用另一个对象),由程序自己控制这部分逻辑转变为由容器统一控制
IoC的优点: 实现代码的解耦,将对象的生命周期交给IoC容器来管理,程序员无需管理
2. Spring IoC
前面说了Spring是一个包含众多工具方法的IoC容器,所以关键还是在容器上,所谓容器,就得具有容器的基本功能,取东西,存东西,对应这里的Spring容器,它具有最基本的功能为:
- 将对象存储到容器
- 从容器中将对象取出
将容器中存储的对象称为Bean对象(Java中的普通对象),Spring是一个IoC容器也就是将对象的创建和销毁的权利都交给Spring来管理,它本身具备了存储对象和获取对象的能力
3. DI
DI的意思为依赖注入,就是由IoC容器在运行期间,动态的将某种依赖关系注入到对象中
DI与IoC的区别?
IoC是一种思想,DI为具体实现,它俩是从不同角度描述同一件事情,就是利用IoC容器,利用依赖关系注入的方式实现对象之间的解耦,例如:吃饭(IoC),吃米饭(DI)
4. 如何创建一个Spring项目
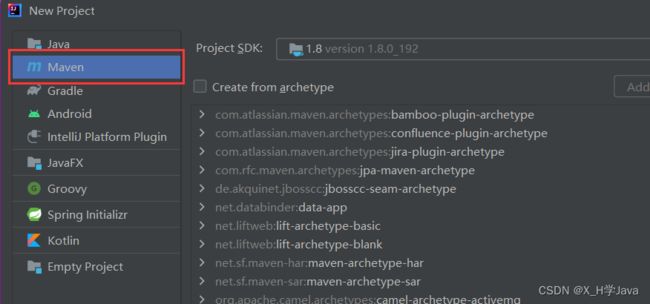
4.1 创建一个Maven项目
4.2 添加Spring框架支持
在pom.xml中添加Spring的框架支持,xml配置如下:
    <dependencies>
        <dependency>
            <groupId>org.springframeworkgroupId>
            <artifactId>spring-contextartifactId>
            <version>5.3.23version>
        dependency>
        <dependency>
            <groupId>org.springframeworkgroupId>
            <artifactId>spring-beansartifactId>
            <version>5.3.23version>
        dependency>
    dependencies>
4.3 添加启动类
在java文件夹下,创建一个启动类,包含main方法
5. 存储Bean对象
5.1 添加配置文件
第一次添加需要在项目中添加Spring配置文件(只需第一次添加)
在resources目录下创建一个spring-config.xml(此文件名可以为别的,建议为spring-config)
<beans xmlns="http://www.springframework.org/schema/beans"
xmlns:xsi="http://www.w3.org/2001/XMLSchema-instance"
xsi:schemaLocation="http://www.springframework.org/schema/beans
http://www.springframework.org/schema/beans/spring-beans.xsd">
beans>
5.2 创建Bean对象
Bean对象就是Java中普通的对象,这里我们创建一个Dog类
public class Dog {
    public void say(String name){
        System.out.println(name+":旺旺~");
    }
}
5.3 注册Bean
将创建好的Bean对象通过配置文件注册到Spring中
<bean id="dog" class="com.beans.Dog">bean>
6. 获取并使用Bean对象
使用Spring上下文的方式获取Bean对象
- 先获取Spring上下文
- 再通过上下文对象提供的方法获取指定的Bean对象
public class App {
    public static void main(String[] args) {
        ApplicationContext context = new ClassPathXmlApplicationContext("spring-config.xml");
        Dog dog = (Dog)context.getBean("dog");
        dog.say("旺财");
    }
}
- 使用bean name获取bean(需强转,返回类型为Object)
Dog dog = (Dog)context.getBean("dog");
- 使用bean type获取bean(该类必须唯一,也就是多个该类型被注入到Spring中会报错)
Dog dog = context.getBean(Dog.class);
- 使用bean name和type获取bean
Dog dog = context.getBean("dog",Dog.class);
使用Bean工厂的方式获取Bean对象
- 先获取bean工厂对象
- 再使用该对象的getBean方法获取Bean对象
public class App {
    public static void main(String[] args) {
        BeanFactory factory = new XmlBeanFactory(new ClassPathResource("spring-config.xml"));
        Dog dog = factory.getBean("dog",Dog.class);
        dog.say("旺财");
    }
}
ApplicationContext与BeanFactory有什么区别?
- ApplicationContext属于BeanFactory的子类
- BeanFactory只提供了基础访问Bean的方法,而ApplicationContext除了拥有BeanFactory的所有功能外,还提供了更多的方法实现,如对国际化的支持,资源访问的支持以及事件和传播等方面的支持
- 性能两者不同,BeanFactory是按需加载Bean类似懒加载,而ApplicationContext在创建时会将所有Bean加载起来,属于饿汉式
7. 更简单存储Bean对象的方式
7.1 前置工作
在Spring配置文件中设置bean扫描路径,将前面配置的xml文件换成下面的,但是注意下面存放bean对象的路径要和自己的创建的bean对象的路径要对应
<beans xmlns="http://www.springframework.org/schema/beans"
       xmlns:xsi="http://www.w3.org/2001/XMLSchema-instance"
       xmlns:content="http://www.springframework.org/schema/context"
       xsi:schemaLocation="http://www.springframework.org/schema/beans
http://www.springframework.org/schema/beans/spring-beans.xsd
http://www.springframework.org/schema/context
https://www.springframework.org/schema/context/spring-context.xsd">

    <content:component-scan base-package="com.beans">content:component-scan>
beans>
7.2 添加存储对象的注解
7.2.1 类注解
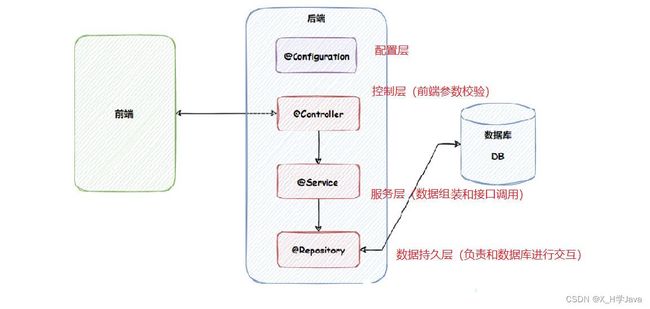
- @Controller,控制层(前端参数校验)
- @Service,服务层(数据组装和接口调用)
- @Repository,数据持久层(负责和数据库进行交互)
- @Component,组件(非其他四类)
- @Configuration,配置层(系统运行前,提前加载一些资源)
@Controller
public class UserController {
    public void sayHello(){
        System.out.println("hello Controller");
    }
}
public class Application1 {
    public static void main(String[] args) {
        ApplicationContext context = new ClassPathXmlApplicationContext("spring-config.xml");
        //bean name为类名改写为小驼峰方式
        UserController userController = context.getBean("userController",UserController.class);
        userController.sayHello();
    }
}
为什么需要五大类注解
类注解的关系
@Controller,@Service,@Repository,@Configuration都是基于@Component实现的,所以可以认为@Component是它们的父类
Spring使用五大类注解成bean Name问题
- 如果一个类名的第一个字母为大写,第二个字母也为大写,那么bean Name就为改类名
- 如果一个类名的第一个字母为大写,第二个字母为小写,那么bean Name就为小驼峰格式的类名
7.2.2 方法注解
@Bean注解加到方法上,将方法的返回值添加到容器中
注意: @Bean注解必须结合五大类注解来使用
@Component
public class Students {
    @Bean
    public Student s1(){
        Student student = new Student();
        student.setName("张三");
        student.setAge(23);
        return student;
    }
}
public class App1 {
    public static void main(String[] args) {
        ApplicationContext context = new ClassPathXmlApplicationContext("spring-config.xml");
        Student student = context.getBean("s1",Student.class);
        System.out.println(student);
    }
}
@Bean重命名
@Bean命名规则:
- 当没有设置name属性时,方法名为bean名称
- 当设置了name属性,只能通过name属性对应的值来获取,使用方法名就获取不到
@Component
public class Students {
    @Bean(name = "student1")
    public Student s1(){
        Student student = new Student();
        student.setName("张三");
        student.setAge(23);
        return student;
    }
}
public class App1 {
    public static void main(String[] args) {
        ApplicationContext context = new ClassPathXmlApplicationContext("spring-config.xml");
        Student student = context.getBean("student1",Student.class);
        System.out.println(student);
    }
}
8. 对象装配/对象注入
8.1 属性注入
使用@Autowired注解获取到Spring中的Student对象,将其注入到UserController1的属性中
@Controller
public class UserController1 {

    @Autowired
    private Student student;

    public void sayHello(){
        System.out.println(student);
    }
}
public class App2 {
    public static void main(String[] args) {
        ApplicationContext context = new ClassPathXmlApplicationContext("spring-config.xml");
        UserController1 userController1 = context.getBean(UserController1.class);
        userController1.sayHello();
    }
}
8.2 构造方法注入
构造方法注入是在构造方法上加@Autowired,实现注入
@Service
public class UserService {

    private Student student;

    @Autowired
    public UserService(Student student1){
        this.student = student1;
    }
    public void say(){
        System.out.println(student);
    }
}
public class App2 {
    public static void main(String[] args) {
        ApplicationContext context = new ClassPathXmlApplicationContext("spring-config.xml");
        UserService userService = context.getBean(UserService.class);
        userService.say();
    }
}
如果当前类中只存在一个构造方法,那么@Autowired可以省略
8.3 Setter注入
Setter注入是在设置的set方法上加@Autowired注解
@Controller
public class UserController2 {
    private Student student;

    @Autowired
    public void setStudent(Student student) {
        this.student = student;
    }

    public void say(){
        System.out.println(student);
    }
}
public class App1 {
    public static void main(String[] args) {
        ApplicationContext context = new ClassPathXmlApplicationContext("spring-config.xml");
        UserController2 userController2 = context.getBean(UserController2.class);
        userController2.say();
    }
}
8.4 @Resource注解
在进行对象注入的时候,除了可以使用 @Autowired 关键字之外,我们还可以使用 @Resource 进行注入
public class UserService2 {
    @Resource(name = "student1")
    private Student student;

    public void say(){
        System.out.println(student);
    }
}
@Autowired与@Resource区别
- 出身不同:@Resource来自于jdk,@Autowired时Spring框架提供的
- 用法不同:@Autowried可以用于属性注入,构造方法注入,Setter注入,@Resource不支持构造方法注入
- 参数不同:@Resource支持更多的参数设置,比如name,type,而@Autowried只支持required参数
8.5 @Bean将一个对象多次注入问题
先创建一个Cat类,属性有name和color,并提供get,set,toString方法
往Spring中注入多个Cat对象
@Controller
public class Cats {
    @Bean
    public void cat1(){
        Cat cat = new Cat();
        cat.setName("糯米");
        cat.setColor("白色");
    }

    @Bean
    public void cat2(){
        Cat cat = new Cat();
        cat.setName("汤圆");
        cat.setColor("黑色");
    }
}
在另一个类中获取Cat对象
@Controller
public class CatController {

    @Autowired
    private Cat cat;

    public void getCat(){
        System.out.println(cat);
    }
}
创建启动类
public class App3 {
    public static void main(String[] args) {
        ApplicationContext context = new ClassPathXmlApplicationContext("spring-config.xml");
        CatController catController = context.getBean(CatController.class);
        catController.getCat();
    }
}
![]()
发现报错了,因为Spring中已经注入了两个Cat对象,所以此时不知道获取哪个对象
三种解决方案
- 精确的描述bean的名称(将注入的名称写对)
- 使用
@Rsource设置name方式来重命名注入对象 - 使用
@Autowired+@Qualifier来筛选bean对象
方案一:精确的描述bean的名称(将注入的名称写对)
@Controller
public class CatController {

    @Autowired
    private Cat cat1; //精确描述bean名称

    public void getCat(){
        System.out.println(cat1);
    }
}
方案二: 使用@Rsource设置name方式来重命名注入对象
@Controller
public class CatController {

    @Resource(name = "cat2")
    private Cat cat;

    public void getCat(){
        System.out.println(cat);
    }
}
方案三:使用@Autowired+@Qualifier来筛选bean对象
@Controller
public class CatController {

    @Autowired
    @Qualifier(value = "cat1")
    private Cat cat;

    public void getCat(){
        System.out.println(cat);
    }
}


