【云原生之k8s】k8s配置管理
目录
一、configmap
1.1 configmap概述
1.2 configmap作用
1.2 configmap特点
1.3 configmap结构
2、创建方法
2.1 命令行直接创建
2.2 通过文件/目录创建
2.3 YAML创建
3、使用
3.1 变量引入
3.2 文件挂载
二、Secret
1、概述
2、创建
2.1 命令行创建
2.2 YAML文件创建
3、使用
3.1 变量引用
3.2 文件挂载

一、configmap
1.1 configmap概述
Configmap 是 k8s 中的资源对象,用于保存非机密性的配置的,数据可以用 key/value 键值对的形式保存,也可通过文件的形式保存。
1.2 configmap作用
我们在部署服务的时候,每个服务都有自己的配置文件,
- 如果一台服务器上部署多个服务:nginx、tomcat、apache等,那么这些配置都存在这个节点上
- 假如一台服务器不能满足线上高并发的要求,需要对服务器扩容,扩容之后的服务器还是需要部署多个服务:nginx、tomcat、apache,新增加的服务器上还是要管理这些服务的配置
- 如果有一个服务出现问题,需要修改配置文件,每台物理节点上的配置都需要修改,这种方式肯定满足不了线上大批量的配置变更要求
- 所以,k8s 中引入了 Configmap资源对象,可以当成 volume 挂载到 pod 中,实现统一的配置管理。
1.2 configmap特点
- Configmap 是 k8s 中的资源, 相当于配置文件,可以有一个或者多个 Configmap;
- Configmap 可以做成 Volume,k8s pod 启动之后,通过 volume 形式映射到容器内部指定目录上;
- 容器中应用程序按照原有方式读取容器特定目录上的配置文件;
- 在容器看来,配置文件就像是打包在容器内部特定目录,整个过程对应用没有任何侵入。
1.3 configmap结构
2、创建方法
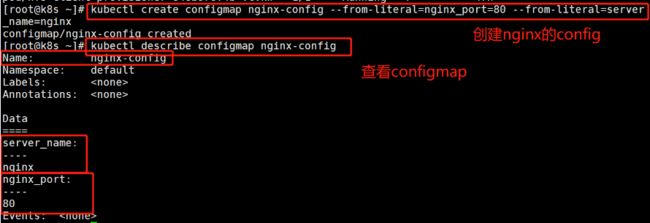
2.1 命令行直接创建
直接在命令行中指定 configmap 参数创建,通过**–from-literal** 指定参数
#创建
kubectl create configmap nginx-config --from-literal=nginx_port=80 --from-literal=server_name=nginx
#查看configmap
kubectl describe configmap nginx-config
2.2 通过文件/目录创建
通过指定文件创建一个 configmap,–from-file=<文件/目录>
vim nginx.conf

server {
 server_name www.nginx.com;
 listen 80;
 root /home/nginx/www/
}
通过指定文件创建
 kubectl create configmap www-nginx --from-file=www=/opt/config/nginx.conf
 kubectl describe configmap www-nginx

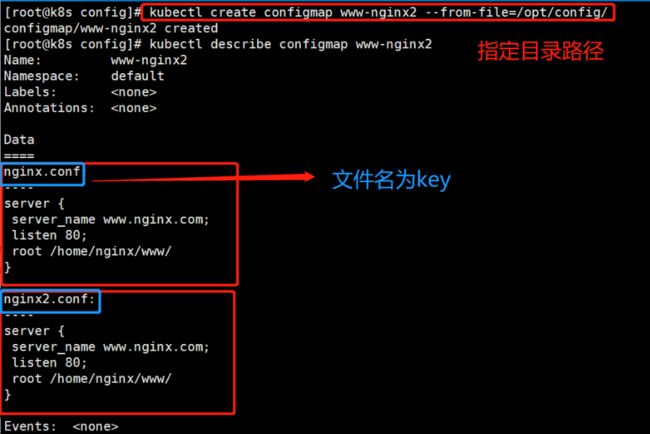
通过目录创建
当某些服务存在多个配置文件时,放在同一目录下,我们可以指定目录,进行创建

kubectl create configmap www-nginx2 --from-file=/opt/config/
kubectl describe configmap www-nginx2
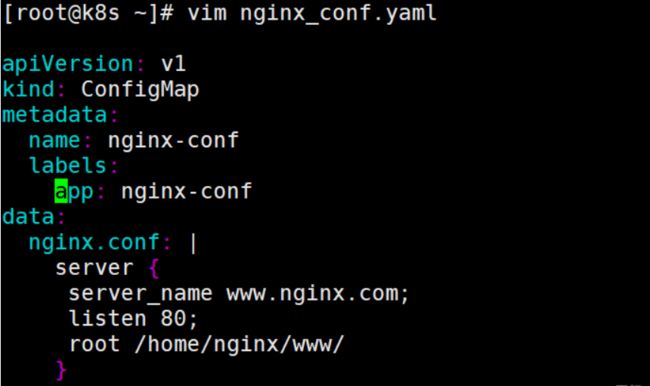
2.3 YAML创建
apiVersion: v1
kind: ConfigMap
metadata:
  name: nginx-conf
  labels:
    app: nginx-conf
data:
  nginx.conf: |
    server {
     server_name www.nginx.com;
     listen 80;
     root /home/nginx/www/
    }

3、使用
新创一个configmap用于测试
apiVersion: v1
kind: ConfigMap
metadata:
  name: test
  labels:
    app: test
data:
  xy: "xiayan"
  hi: "hello world"
kubectl apply -f test.yaml
3.1 变量引入
创建一个pod,引用configmap
apiVersion: v1
kind: Pod
metadata:
  name: mypod
spec:
  containers:
    - name: busybox
      image: busybox
      command: [ "/bin/sh", "-c", "echo $(LEVEL) $(TYPE)" ]
      env:
        - name: LEVEL
          valueFrom:
            configMapKeyRef:
              name: test
              key: xy
        - name: TYPE
          valueFrom:
            configMapKeyRef:
              name: test
              key: hi
  restartPolicy: Never

kubectl apply -f pod-configmap.yaml
kubectl get pod
kubectl logs mypod

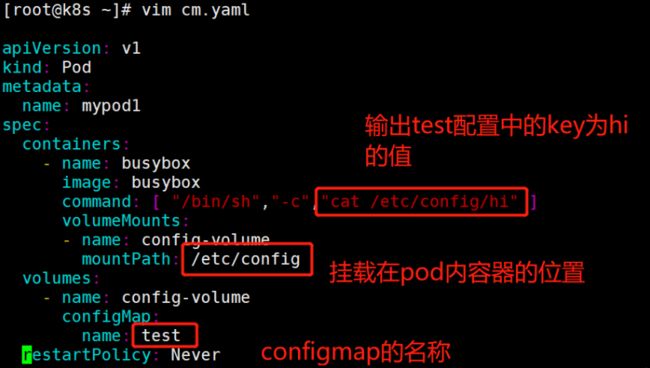
3.2 文件挂载
apiVersion: v1
kind: Pod
metadata:
  name: mypod1
spec:
  containers:
    - name: busybox
      image: busybox
      command: [ "/bin/sh","-c","cat /etc/config/hi" ]
      volumeMounts:
      - name: config-volume
        mountPath: /etc/config
  volumes:
    - name: config-volume
      configMap:
        name: test
  restartPolicy: Never
#创建pod
kubectl apply -f cm.yaml
#查看pod日志
kubectl logs mypod1

二、Secret
1、概述
Secret 解决了密码、token、秘钥等敏感数据的配置问题,而不需要把这些敏感数据暴露到镜像或者 Pod Spec 中。Secret 可以以 Volume 或者环境变量的方式使用。
secret 可选参数有三种:
- generic: 通用类型,通常用于存储密码数据。
- tls:此类型仅用于存储私钥和证书。
- docker-registry: 若要保存 docker 仓库的认证信息的话,就必须使用此种类型来创建。
Secret 类型:
- Service Account:用于被 serviceaccount 引用。serviceaccout 创建时 Kubernetes 会默认创建对应的 secret。Pod 如果使用了 serviceaccount,对应的 secret 会自动挂载到 Pod的/run/secrets/kubernetes.io/serviceaccount 目录中。
- Opaque:base64 编码格式的 Secret,用来存储密码、秘钥等。可以通过 base64 --decode 解码获得原始数据,因此安全性弱。
- kubernetes.io/dockerconfigjson:用来存储私有 docker registry 的认证信息。
2、创建
2.1 命令行创建
Secret的命令行创建方法与configmap一样,可以通过命令行或者文件/目录的方式创建,这里就不过多介绍,此处使用命名行创建,其它方法可以参照上方的方法进行创建
把 mysql 的 root 用户的 password 创建成 secret
kubectl create secret generic mysql-password --from-literal=password=xy123456
# 查看secret详细信息
kubectl describe secret mysql-password

2.2 YAML文件创建
通过手动加密,基于base64加密
echo -n 'admin' | base64
YWRtaW4=
echo -n 'xy123456' | base64
eHkxMjM0NTY=
创建YAML
apiVersion: v1
kind: Secret
metadata:
  name: mysecret
type: Opaque
data:
  username: YWRtaW4=
  password: eHkxMjM0NTY=

kubectl apply -f secret.yaml
kubectl get secret
kubectl describe secret mysecret

3、使用
使用方法与configmap一样
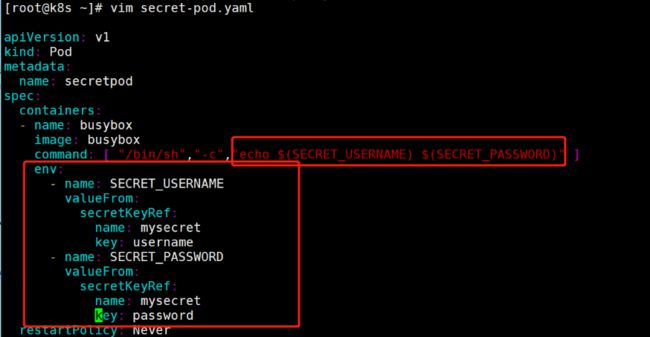
3.1 变量引用
apiVersion: v1
kind: Pod
metadata:
  name: secretpod
spec:
  containers:
  - name: busybox
    image: busybox
    command: [ "/bin/sh","-c","echo $(SECRET_USERNAME) $(SECRET_PASSWORD)" ]
    env:
      - name: SECRET_USERNAME
        valueFrom:
          secretKeyRef:
            name: mysecret
            key: username
      - name: SECRET_PASSWORD
        valueFrom:
          secretKeyRef:
            name: mysecret
            key: password
  restartPolicy: Never
kubectl apply -f secret-pod.yaml
kubectl get pod
kubectl logs secretpod

3.2 文件挂载
将 Secret 挂载到 Volume 中
vim pod_secret_volume.yaml
apiVersion: v1
kind: Pod
metadata:
  name: secret-volume-pod
spec:
  containers:
  - name: nginx
    image: nginx
    volumeMounts:
    - name: secret-volume
      mountPath: "/etc/secret"
      readOnly: true
  volumes:
  - name: secret-volume
    secret:
      secretName: mysecret

kubectl apply -f pod_secret_volume.yaml
kubectl get pod
kubectl exec -it secret-volume-pod /bin/bash
![]()

进入pod可以看到/etc/secret下有password和username两个文件,查看内容和我们创建的secret内容吻合。