分享一款开源堡垒机-jumpserver
JumpServer是由FIT2CLOUD(飞致远)公司旗下一款开源的堡垒机,这款也是全球首款开源的堡垒机,使用 GNU GPL v2.0 开源协议,是符合 4A 规范的运维安全审计系统,使用 Python 开发,遵循 Web 2.0 规范,配备了业界领先的 Web Terminal 方案,交互界面美观、用户体验好,同时采纳分布式架构,支持多机房跨区域部署以及横向扩展,无资产数量及并发限制。这款开源堡垒机不但提供了社区开源版本并且还提供了企业使用的企业版本,企业版功能更加强大。
飞致远官网地址:https://www.fit2cloud.com/
旗下开源软件:
- MeterSphere:是一站式开源持续测试平台, 涵盖测试跟踪、接口测试、性能测试、 团队协作等功能,全面兼容 JMeter、Postman、Swagger 等开源、主流标准,有效助力开发和测试团队充分利用云弹性进行高度可扩展的自动化测试,加速高质量的软件交付,推动中国测试行业整体效率的提升。
- KubeOperator:是一个开源的轻量级 Kubernetes 发行版,专注于帮助企业规划、部署和运营生产级别的 Kubernetes 集群。
- DataEase:是开源的数据可视化分析工具,帮助用户快速分析数据并洞察业务趋势,从而实现业务的改进与优化。DataEase 支持丰富的数据源连接,能够通过拖拉拽方式快速制作图表,并可以方便的与他人分享。
- RackShift:是开源的裸金属服务器管理平台,功能覆盖裸金属服务器的发现、带外管理、RAID 配置、固件更新、操作系统安装等。
- RiskScanner:是开源的裸金属服务器管理平台,功能覆盖裸金属服务器的发现、带外管理、RAID 配置、固件更新、操作系统安装等。
- HaLo:一款现代化的开源博客/CMS系统,值得试一试
- RackShift:是开源的裸金属服务器管理平台,功能覆盖裸金属服务器的发现、带外管理、RAID 配置、固件更新、操作系统安装等。
- RiskScanner:是开源的多云安全合规扫描平台,基于 Cloud Custodian 和 Nuclei 引擎,实现对主流公(私)有云资源的安全合规扫描和漏洞扫描。
开局之前在这里先感谢飞致远为为我们带来了这么多开源好用的平台
准备工作
- 一台Linux主机,当然如果你条件够的话可以采用主机,这里如果你不是正式环境使用不建议你使用真实主机,而是采用虚拟主机,主机规格建议不低于2核4G的配置,当然测试你可以使用更低的规格。
- 联网,这里建议全网放通,需要下载一些更新文件和github上的主文件
- 建议准备双网卡,大家都知道堡垒机可以在内网也可以在外网,当然大多数堡垒机都是有一条内网网卡和一条外网网卡的,为了真实模拟这里建议采用双网卡。
- 操作系统建议采用CentOs或者RedHat,不建议采用Ubuntu或其他开源linux操作系统,这里就不跟大家说原因了,大家有兴趣可以去尝试
外置环境要求:
这里所说的外置环境要求,其实就是当你堡垒机单独使用一台虚机或主机,这个时候你就需要有另外的数据库和redis存在,并且需要你在堡垒机安装完成后去配置指定它们,堡垒机运行需要它们。
- MySQL:版本不低于5.7
- MariaDB: 版本不低于10.2
- Redis:版本不低于5.0
准备好这些就可以试着开始安装了
安装
在官网上提供的部署方式有很多,我感觉用的最多的就是负载均衡部署和单机部署,因为我这虚拟主机数量不太够这里就采用单机部署的方式了,官网上提供的安装方式也有很多:
- 一键部署:这种方式是我比较喜欢的一种,简单粗暴快捷,但是会存在很多限制。
- 手动部署:困难程度一般,有一定难度需要大家对部署有一定了解。
- 离线部署(amd64):困难程度一般,有一定难度需要大家对部署有一定了解。
- 离线部署(arm64):困难程度一般,有一定难度需要大家对部署有一定了解。
- 源码部署:部署相对来说困难很多,你要好好了解一下架构然后再试着去安装部署。
- 容器部署:这个容器化部署就需要你对K8s有一定熟悉。
大家可以选择自己合适的方式去安装就可以了,有兴趣的可以试试所有方式哦,这对你的学习会很有帮助的
一、 一键部署
一键部署时安装jumpserver最简单的一种方式,这种方式你只需要在官网是把命令复制到你的主机上进行执行等待执行成功就可以了,然后就是找到安装目录进行启动就可以使用了,下面我们来看下具体操作
主要操作说明
# 默认会安装到 /opt/jumpserver-installer-v2.17.2 目录
curl -sSL https://github.com/jumpserver/jumpserver/releases/download/v2.17.2/quick_start.sh | bash
cd /opt/jumpserver-installer-v2.17.2
# 安装完成后配置文件 /opt/jumpserver/config/config.txt
# 如果你外置了MySQL/MariaDB和Redis你就必须要修改本文件,指定你的地址和密码
cd /opt/jumpserver-installer-v2.17.2

# 启动
./jmsctl.sh start

# 停止
./jmsctl.sh down

# 卸载
./jmsctl.sh uninstall

# 帮助
./jmsctl.sh -h
详细步骤
- 主机检查
首先需要检查下你的网卡是否两个都生效
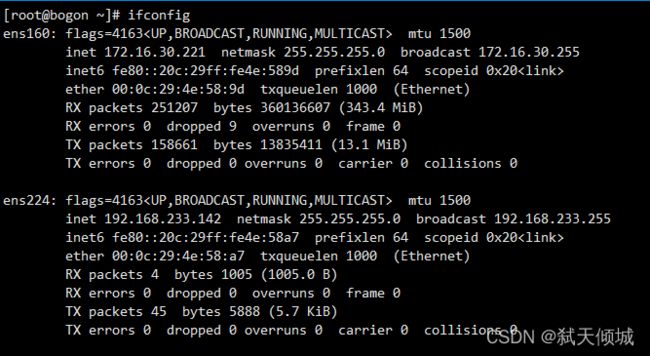
测试忘了连通性,一键部署需要联网才可进行下载安装包及资源

查看是否存在一些已安装的冲突包,这里一定要注意要确定这些服务没用后才能卸载哦,我这里是虚机无所谓所以直接用*来卸载一些没用的安装包

- 下载安装程序
我们把上面的第一条命令复制出来,然后粘贴到我们命令行进行执行即可

因为是需要在github上面下载主安装文件,大家都懂的在github下载东西是特别慢的,甚至等了半天都没下载成功,下面教大家一个加速小技巧嘿嘿。
我们来看看下面地址的不同
https://github.com/jumpserver/jumpserver/releases/download/v2.17.2/quick_start.sh
对比
https://github.com.cnpmjs.org/jumpserver/jumpserver/releases/download/v2.17.2/quick_start.sh
对比一下就知道这两个地址里面不同的地方就是在github.com后面增加了cnpmjs.org,这个原理就是使用镜像服务器来下载这些服务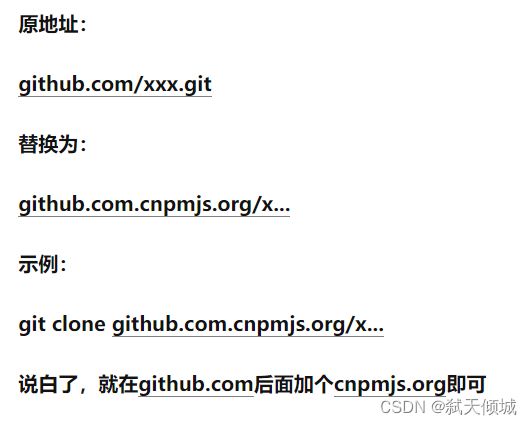
下面我们再来试着下载一下,但是这个时候就要注意一下把上面地址中的**| bash**去掉,不然还是会提示你下载失败的情况,下面给大家更新下下载链接地址
wget https://github.com.cnpmjs.org/jumpserver/jumpserver/releases/download/v2.17.2/quick_start.sh
这样下载就没问题了。

下载完成后需要打开这个文件,修改里面github的下载地址
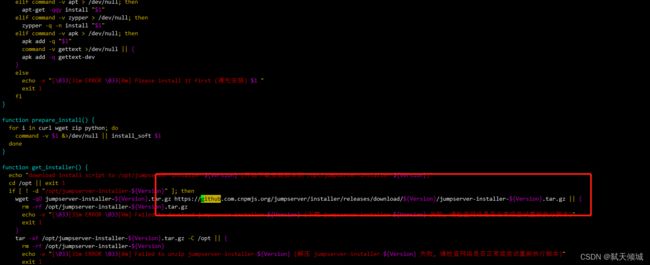
修改完成后保存,然后再使用bash进行执行就可以了,执行命令如下:
bash quick_start.sh
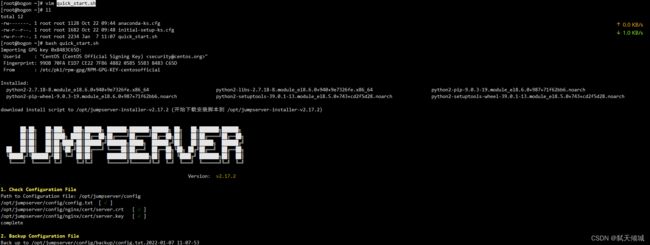
中间可能会出现提问大家选择y即可


下面这些是是否需要设置扩展excel和redis以及jumpserver的对外端口,我这里就保持默认了
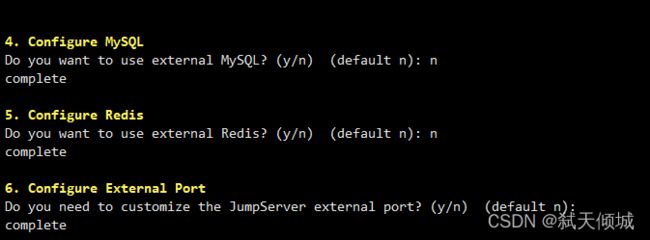
接下来就是等待执行完成了,其中需要下载很多镜像,等待时间会较长
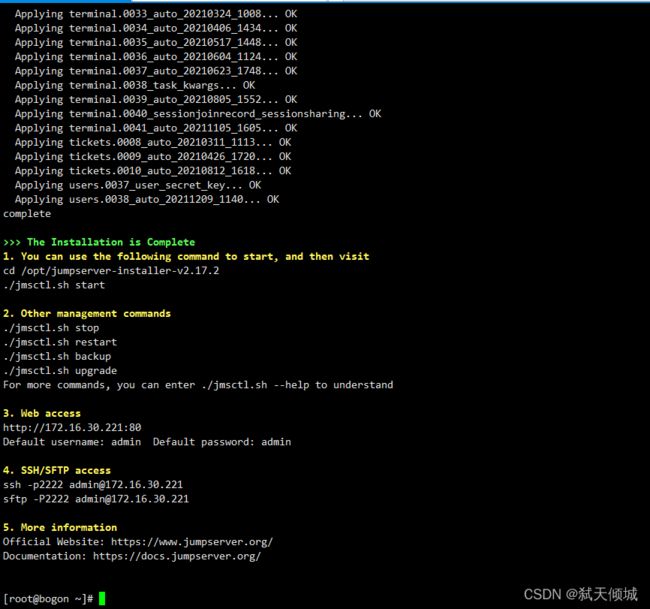
经过漫长的等待终于搞定了,接下来我们去启动jumpserver,根据安装完成的提示进行启动即可

启动成功后使用浏览器访问外网的地址即可,我这里使用内网进行访问
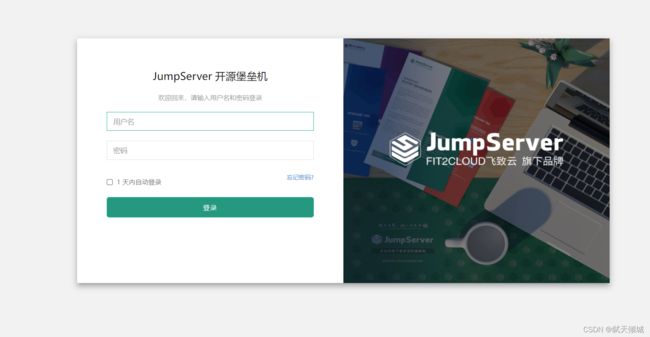
默认账号密码为admin,首次登录需要重置密码
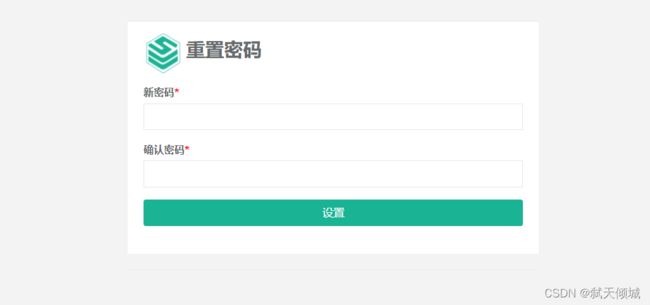
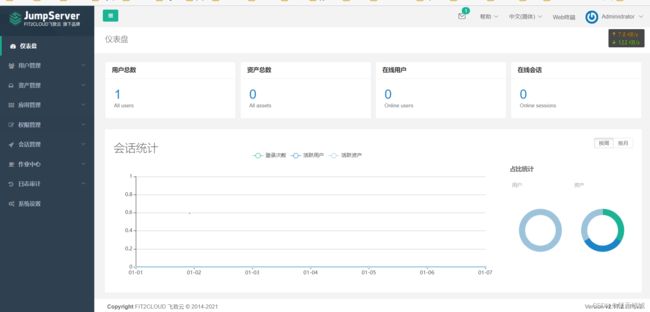
到这里就已经安装完成了。下面安装我就写简要安装了
二、 手动部署
cd /opt
wget https://github.com/jumpserver/installer/releases/download/v2.17.2/jumpserver-installer-v2.17.2.tar.gz
tar -xf jumpserver-installer-v2.17.2.tar.gz
cd jumpserver-installer-v2.17.2
# 根据需要修改配置文件模板, 如果不清楚用途可以跳过修改
cat config-example.txt
# 以下设置如果为空系统会自动生成随机字符串填入
## 迁移请修改 SECRET_KEY 和 BOOTSTRAP_TOKEN 为原来的设置
## 完整参数文档 https://docs.jumpserver.org/zh/master/admin-guide/env/

## 安装配置, amd64 默认使用华为云加速下载, arm64 请注释掉 DOCKER_IMAGE_PREFIX=swr.cn-south-1.myhuaweicloud.com
# DOCKER_IMAGE_PREFIX=swr.cn-south-1.myhuaweicloud.com
VOLUME_DIR=/opt/jumpserver
DOCKER_DIR=/var/lib/docker
SECRET_KEY=
BOOTSTRAP_TOKEN=
LOG_LEVEL=ERROR

##  MySQL 配置, USE_EXTERNAL_MYSQL=1 表示使用外置数据库, 请输入正确的 MySQL 信息
USE_EXTERNAL_MYSQL=0
DB_HOST=mysql
DB_PORT=3306
DB_USER=root
DB_PASSWORD=
DB_NAME=jumpserver

##  Redis 配置, USE_EXTERNAL_REDIS=1 表示使用外置数据库, 请输入正确的 Redis 信息
USE_EXTERNAL_REDIS=0
REDIS_HOST=redis
REDIS_PORT=6379
REDIS_PASSWORD=

## Compose 项目设置, 如果 192.168.250.0/24 网段与你现有网段冲突, 请修改然后重启 JumpServer
COMPOSE_PROJECT_NAME=jms
COMPOSE_HTTP_TIMEOUT=3600
DOCKER_CLIENT_TIMEOUT=3600
DOCKER_SUBNET=192.168.250.0/24

## IPV6 设置, 容器是否开启 ipv6 nat, USE_IPV6=1 表示开启, 为 0 的情况下 DOCKER_SUBNET_IPV6 定义不生效
USE_IPV6=0
DOCKER_SUBNET_IPV6=2001:db8:10::/64

## Nginx 配置, USE_LB=1 表示开启, 为 0 的情况下, HTTPS_PORT 定义不生效
HTTP_PORT=80
SSH_PORT=2222
RDP_PORT=3389

USE_LB=0
HTTPS_PORT=443

## Task 配置, 是否启动 jms_celery 容器, 单节点必须开启
USE_TASK=1

## XPack, USE_XPACK=1 表示开启, 开源版本设置无效
USE_XPACK=0

# Core 配置, Session 定义, SESSION_COOKIE_AGE 表示闲置多少秒后 session 过期, SESSION_EXPIRE_AT_BROWSER_CLOSE=true 表示关闭浏览器即 session 过期
# SESSION_COOKIE_AGE=86400
SESSION_EXPIRE_AT_BROWSER_CLOSE=true

# Koko Lion XRDP 组件配置
CORE_HOST=http://core:8080

# 额外的配置
CURRENT_VERSION=
# 安装
./jmsctl.sh install

# 启动
./jmsctl.sh start
# 安装完成后配置文件 /opt/jumpserver/config/config.txt
cd /opt/jumpserver-installer-v2.17.2

# 启动
./jmsctl.sh start

# 停止
./jmsctl.sh down

# 卸载
./jmsctl.sh uninstall

# 帮助
./jmsctl.sh -h
三、离线部署(amd64)
cd /opt
tar -xf jumpserver-offline-installer-v2.17.2-amd64-84.tar.gz
cd jumpserver-offline-installer-v2.17.2-amd64-84
# 根据需要修改配置文件模板, 如果不清楚用途可以跳过修改
cat config-example.txt
# 以下设置如果为空系统会自动生成随机字符串填入
## 迁移请修改 SECRET_KEY 和 BOOTSTRAP_TOKEN 为原来的设置
## 完整参数文档 https://docs.jumpserver.org/zh/master/admin-guide/env/

## 安装配置, amd64 默认使用华为云加速下载, arm64 请注释掉 DOCKER_IMAGE_PREFIX=swr.cn-south-1.myhuaweicloud.com
# DOCKER_IMAGE_PREFIX=swr.cn-south-1.myhuaweicloud.com
VOLUME_DIR=/opt/jumpserver
DOCKER_DIR=/var/lib/docker
SECRET_KEY=
BOOTSTRAP_TOKEN=
LOG_LEVEL=ERROR

##  MySQL 配置, USE_EXTERNAL_MYSQL=1 表示使用外置数据库, 请输入正确的 MySQL 信息
USE_EXTERNAL_MYSQL=0
DB_HOST=mysql
DB_PORT=3306
DB_USER=root
DB_PASSWORD=
DB_NAME=jumpserver

##  Redis 配置, USE_EXTERNAL_REDIS=1 表示使用外置数据库, 请输入正确的 Redis 信息
USE_EXTERNAL_REDIS=0
REDIS_HOST=redis
REDIS_PORT=6379
REDIS_PASSWORD=

## Compose 项目设置, 如果 192.168.250.0/24 网段与你现有网段冲突, 请修改然后重启 JumpServer
COMPOSE_PROJECT_NAME=jms
COMPOSE_HTTP_TIMEOUT=3600
DOCKER_CLIENT_TIMEOUT=3600
DOCKER_SUBNET=192.168.250.0/24

## IPV6 设置, 容器是否开启 ipv6 nat, USE_IPV6=1 表示开启, 为 0 的情况下 DOCKER_SUBNET_IPV6 定义不生效
USE_IPV6=0
DOCKER_SUBNET_IPV6=2001:db8:10::/64

## Nginx 配置, USE_LB=1 表示开启, 为 0 的情况下, HTTPS_PORT 定义不生效
HTTP_PORT=80
SSH_PORT=2222
RDP_PORT=3389

USE_LB=0
HTTPS_PORT=443

## Task 配置, 是否启动 jms_celery 容器, 单节点必须开启
USE_TASK=1

## XPack, USE_XPACK=1 表示开启, 开源版本设置无效
USE_XPACK=0

# Core 配置, Session 定义, SESSION_COOKIE_AGE 表示闲置多少秒后 session 过期, SESSION_EXPIRE_AT_BROWSER_CLOSE=true 表示关闭浏览器即 session 过期
# SESSION_COOKIE_AGE=86400
SESSION_EXPIRE_AT_BROWSER_CLOSE=true

# Koko Lion XRDP 组件配置
CORE_HOST=http://core:8080

# 额外的配置
CURRENT_VERSION=
# 安装
./jmsctl.sh install

# 启动
./jmsctl.sh start
# 安装完成后配置文件 /opt/jumpserver/config/config.txt
cd /opt/jumpserver-installer-v2.17.2

# 启动
./jmsctl.sh start

# 停止
./jmsctl.sh down

# 卸载
./jmsctl.sh uninstall

# 帮助
./jmsctl.sh -h
四、离线部署(arm64)
cd /opt
tar -xf jumpserver-offline-installer-v2.17.2-amd64-84.tar.gz
cd jumpserver-offline-installer-v2.17.2-amd64-84
# 根据需要修改配置文件模板, 如果不清楚用途可以跳过修改
cat config-example.txt
# 以下设置如果为空系统会自动生成随机字符串填入
## 迁移请修改 SECRET_KEY 和 BOOTSTRAP_TOKEN 为原来的设置
## 完整参数文档 https://docs.jumpserver.org/zh/master/admin-guide/env/

## 安装配置, amd64 默认使用华为云加速下载, arm64 请注释掉 DOCKER_IMAGE_PREFIX=swr.cn-south-1.myhuaweicloud.com
# DOCKER_IMAGE_PREFIX=swr.cn-south-1.myhuaweicloud.com
VOLUME_DIR=/opt/jumpserver
DOCKER_DIR=/var/lib/docker
SECRET_KEY=
BOOTSTRAP_TOKEN=
LOG_LEVEL=ERROR

##  MySQL 配置, USE_EXTERNAL_MYSQL=1 表示使用外置数据库, 请输入正确的 MySQL 信息
USE_EXTERNAL_MYSQL=0
DB_HOST=mysql
DB_PORT=3306
DB_USER=root
DB_PASSWORD=
DB_NAME=jumpserver

##  Redis 配置, USE_EXTERNAL_REDIS=1 表示使用外置数据库, 请输入正确的 Redis 信息
USE_EXTERNAL_REDIS=0
REDIS_HOST=redis
REDIS_PORT=6379
REDIS_PASSWORD=

## Compose 项目设置, 如果 192.168.250.0/24 网段与你现有网段冲突, 请修改然后重启 JumpServer
COMPOSE_PROJECT_NAME=jms
COMPOSE_HTTP_TIMEOUT=3600
DOCKER_CLIENT_TIMEOUT=3600
DOCKER_SUBNET=192.168.250.0/24

## IPV6 设置, 容器是否开启 ipv6 nat, USE_IPV6=1 表示开启, 为 0 的情况下 DOCKER_SUBNET_IPV6 定义不生效
USE_IPV6=0
DOCKER_SUBNET_IPV6=2001:db8:10::/64

## Nginx 配置, USE_LB=1 表示开启, 为 0 的情况下, HTTPS_PORT 定义不生效
HTTP_PORT=80
SSH_PORT=2222
RDP_PORT=3389

USE_LB=0
HTTPS_PORT=443

## Task 配置, 是否启动 jms_celery 容器, 单节点必须开启
USE_TASK=1

## XPack, USE_XPACK=1 表示开启, 开源版本设置无效
USE_XPACK=0

# Core 配置, Session 定义, SESSION_COOKIE_AGE 表示闲置多少秒后 session 过期, SESSION_EXPIRE_AT_BROWSER_CLOSE=true 表示关闭浏览器即 session 过期
# SESSION_COOKIE_AGE=86400
SESSION_EXPIRE_AT_BROWSER_CLOSE=true

# Koko Lion XRDP 组件配置
CORE_HOST=http://core:8080

# 额外的配置
CURRENT_VERSION=
# 安装
./jmsctl.sh install

# 启动
./jmsctl.sh start
# 安装完成后配置文件 /opt/jumpserver/config/config.txt**加粗样式**
cd /opt/jumpserver-installer-v2.17.2

# 启动
./jmsctl.sh start

# 停止
./jmsctl.sh down

# 卸载
./jmsctl.sh uninstall

# 帮助
./jmsctl.sh -h
五、Kubernetes
helm repo add jumpserver https://jumpserver.github.io/helm-charts
helm repo list
vi values.yaml
# 模板 https://github.com/jumpserver/helm-charts/blob/main/charts/jumpserver/values.yaml
# Default values for jumpserver.
# This is a YAML-formatted file.
# Declare variables to be passed into your templates.

nameOverride: ""
fullnameOverride: ""

## @param global.imageRegistry Global Docker image registry
## @param global.imagePullSecrets Global Docker registry secret names as an array
## @param global.storageClass Global StorageClass for Persistent Volume(s)
## @param global.redis.password Global Redis™ password (overrides `auth.password`)
##
global:
  imageRegistry: "docker.io"    # 国内可以使用华为云加速 swr.cn-south-1.myhuaweicloud.com
  imageTag: v2.16.3             # 版本号
  ## E.g.
  #  imagePullSecrets:
  #  - myRegistryKeySecretName
  ##
  imagePullSecrets: []
      # - name: yourSecretKey
  storageClass: ""              # NFS SC

## If the Redis database included in the chart is disabled, JumpServer will
## use below parameters to connect to an external Redis server.
##
externalDatabase:               # 数据库相关设置
  engine: mysql
  host: localhost
  port: 3306
  user: root
  password: ""
  database: jumpserver

## If the MySQL database included in the chart is disabled, JumpServer will
## use below parameters to connect to an external MySQL server.
##
externalRedis:                  # Redis 设置
  host: localhost
  port: 6379
  password: ""

serviceAccount:
  # Specifies whether a service account should be created
  create: false
  # The name of the service account to use.
  # If not set and create is true, a name is generated using the fullname template
  name:

ingress:
  enabled: true
  annotations:
    # kubernetes.io/tls-acme: "true"
    compute-full-forwarded-for: "true"
    use-forwarded-headers: "true"
    kubernetes.io/ingress.class: nginx
    nginx.ingress.kubernetes.io/configuration-snippet: |
       proxy_set_header Upgrade "websocket";
       proxy_set_header Connection "Upgrade";
  hosts:
    - "test.jumpserver.org"                 # 对外域名
  tls: []
  #  - secretName: chart-example-tls
  #    hosts:
  #      - chart-example.local

core:
  enabled: true

  labels:
    app.jumpserver.org/name: jms-core

  config:
    # Generate a new random secret key by execute `cat /dev/urandom | tr -dc A-Za-z0-9 | head -c 50`
    secretKey: ""                            # 加密敏感信息的 secret_key, 长度推荐大于 50 位
    # Generate a new random bootstrap token by execute `cat /dev/urandom | tr -dc A-Za-z0-9 | head -c 16`
    bootstrapToken: ""                       # 组件认证使用的 token, 长度推荐大于 24 位
    # Enabled it for debug
    debug: false
    log:
      level: ERROR

  replicaCount: 1

  image:
    registry: docker.io
    repository: jumpserver/core
    tag: v2.13.2
    pullPolicy: IfNotPresent

  command: []

  env: []

  livenessProbe:
    failureThreshold: 30
    httpGet:
      path: /api/health/
      port: web

  readinessProbe:
    failureThreshold: 30
    httpGet:
      path: /api/health/
      port: web

  podSecurityContext: {}
    # fsGroup: 2000

  securityContext: {}
    # capabilities:
    #   drop:
    #   - ALL
    # readOnlyRootFilesystem: true
    # runAsNonRoot: true
    # runAsUser: 1000

  service:
    type: ClusterIP
    web:
      port: 8080
    ws:
      port: 8070

  resources: {}
    # We usually recommend not to specify default resources and to leave this as a conscious
    # choice for the user. This also increases chances charts run on environments with little
    # resources, such as Minikube. If you do want to specify resources, uncomment the following
    # lines, adjust them as necessary, and remove the curly braces after 'resources:'.
    # limits:
    #   cpu: 1000m
    #   memory: 2048Mi
    # requests:
    #   cpu: 500m
    #   memory: 1024Mi

  persistence:
    storageClassName: jumpserver-data
    accessModes:
      - ReadWriteMany
    size: 10Gi
    # annotations: {}
    finalizers:
      - kubernetes.io/pvc-protection
    # subPath: ""
    # existingClaim:

  volumeMounts: []

  volumes: []

  nodeSelector: {}

  tolerations: []

  affinity: {}

koko:
  enabled: true

  labels:
    app.jumpserver.org/name: jms-koko

  config:
    log:
      level: ERROR

  replicaCount: 1

  image:
    registry: docker.io
    repository: jumpserver/koko
    tag: v2.13.2
    pullPolicy: IfNotPresent

  command: []

  env: []

  livenessProbe:
    failureThreshold: 30
    httpGet:
      path: /koko/health/
      port: web

  readinessProbe:
    failureThreshold: 30
    httpGet:
      path: /koko/health/
      port: web

  podSecurityContext: {}
    # fsGroup: 2000

  securityContext:
    privileged: true
    # capabilities:
    #   drop:
    #   - ALL
    # readOnlyRootFilesystem: true
    # runAsNonRoot: true
    # runAsUser: 1000

  service:
    type: ClusterIP
    web:
      port: 5000
    ssh:
      port: 2222

  resources: {}
    # We usually recommend not to specify default resources and to leave this as a conscious
    # choice for the user. This also increases chances charts run on environments with little
    # resources, such as Minikube. If you do want to specify resources, uncomment the following
    # lines, adjust them as necessary, and remove the curly braces after 'resources:'.
    # limits:
    #   cpu: 100m
    #   memory: 128Mi
    # requests:
    #   cpu: 100m
    #   memory: 128Mi

  persistence:
    storageClassName: jumpserver-data
    accessModes:
      - ReadWriteMany
    size: 10Gi
    # annotations: {}
    finalizers:
      - kubernetes.io/pvc-protection

  volumeMounts: []

  volumes: []

  nodeSelector: {}

  tolerations: []

  affinity: {}

lion:
  enabled: true

  labels:
    app.jumpserver.org/name: jms-lion

  config:
    log:
      level: ERROR

  replicaCount: 1

  image:
    registry: docker.io
    repository: jumpserver/lion
    tag: v2.13.2
    pullPolicy: IfNotPresent

  command: []

  env: []

  livenessProbe:
    failureThreshold: 30
    httpGet:
      path: /lion/health/
      port: web

  readinessProbe:
    failureThreshold: 30
    httpGet:
      path: /lion/health/
      port: web

  podSecurityContext: {}
    # fsGroup: 2000

  securityContext: {}
    # capabilities:
    #   drop:
    #   - ALL
    # readOnlyRootFilesystem: true
    # runAsNonRoot: true
    # runAsUser: 1000

  service:
    type: ClusterIP
    web:
      port: 8081

  resources: {}
    # We usually recommend not to specify default resources and to leave this as a conscious
    # choice for the user. This also increases chances charts run on environments with little
    # resources, such as Minikube. If you do want to specify resources, uncomment the following
    # lines, adjust them as necessary, and remove the curly braces after 'resources:'.
    # limits:
    #   cpu: 100m
    #   memory: 512Mi
    # requests:
    #   cpu: 100m
    #   memory: 512Mi

  persistence:
    storageClassName: jumpserver-data
    accessModes:
      - ReadWriteMany
    size: 10Gi
    # annotations: {}
    finalizers:
      - kubernetes.io/pvc-protection

  volumeMounts: []

  volumes: []

  nodeSelector: {}

  tolerations: []

  affinity: {}

xpack:
  enabled: false      # 企业版本打开此选项

omnidb:
  labels:
    app.jumpserver.org/name: jms-omnidb

  config:
    log:
      level: ERROR

  replicaCount: 1

  image:
    registry: registry.fit2cloud.com
    repository: jumpserver/omnidb
    tag: v2.13.2
    pullPolicy: IfNotPresent

  command: []

  env: []

  livenessProbe:
    failureThreshold: 30
    tcpSocket:
      port: web

  readinessProbe:
    failureThreshold: 30
    tcpSocket:
      port: web

  podSecurityContext: {}
    # fsGroup: 2000

  securityContext: {}
    # capabilities:
    #   drop:
    #   - ALL
    # readOnlyRootFilesystem: true
    # runAsNonRoot: true
    # runAsUser: 1000

  service:
    type: ClusterIP
    web:
      port: 8082
    ws:
      port: 8071

  resources: {}
    # We usually recommend not to specify default resources and to leave this as a conscious
    # choice for the user. This also increases chances charts run on environments with little
    # resources, such as Minikube. If you do want to specify resources, uncomment the following
    # lines, adjust them as necessary, and remove the curly braces after 'resources:'.
    # limits:
    #   cpu: 100m
    #   memory: 128Mi
    # requests:
    #   cpu: 100m
    #   memory: 128Mi

  persistence:
    storageClassName: jumpserver-data
    accessModes:
      - ReadWriteMany
    size: 10Gi
    # annotations: {}
    finalizers:
      - kubernetes.io/pvc-protection

  volumeMounts: []

  volumes: []

  nodeSelector: {}

  tolerations: []

  affinity: {}

xrdp:
  labels:
    app.jumpserver.org/name: jms-xrdp

  config:
    log:
      level: ERROR

  replicaCount: 1

  image:
    registry: registry.fit2cloud.com
    repository: jumpserver/xrdp
    tag: v2.13.2
    pullPolicy: IfNotPresent

  command: []

  env: []

  livenessProbe:
    failureThreshold: 30
    tcpSocket:
      port: rdp

  readinessProbe:
    failureThreshold: 30
    tcpSocket:
      port: rdp

  podSecurityContext: {}
    # fsGroup: 2000

  securityContext: {}
    # capabilities:
    #   drop:
    #   - ALL
    # readOnlyRootFilesystem: true
    # runAsNonRoot: true
    # runAsUser: 1000

  service:
    type: ClusterIP
    rdp:
      port: 3389

  resources: {}
    # We usually recommend not to specify default resources and to leave this as a conscious
    # choice for the user. This also increases chances charts run on environments with little
    # resources, such as Minikube. If you do want to specify resources, uncomment the following
    # lines, adjust them as necessary, and remove the curly braces after 'resources:'.
    # limits:
    #   cpu: 100m
    #   memory: 128Mi
    # requests:
    #   cpu: 100m
    #   memory: 128Mi

  persistence:
    storageClassName: jumpserver-data
    accessModes:
      - ReadWriteMany
    size: 10Gi
    # annotations: {}
    finalizers:
      - kubernetes.io/pvc-protection

  volumeMounts: []

  volumes: []

  nodeSelector: {}

  tolerations: []

  affinity: {}

web:
  enabled: true

  labels:
    app.jumpserver.org/name: jms-web

  replicaCount: 1

  image:
    registry: docker.io
    repository: jumpserver/web
    tag: v2.13.2
    pullPolicy: IfNotPresent

  command: []

  env: []

  livenessProbe:
    failureThreshold: 30
    httpGet:
      path: /api/health/
      port: web

  readinessProbe:
    failureThreshold: 30
    httpGet:
      path: /api/health/
      port: web

  podSecurityContext: {}
    # fsGroup: 2000

  securityContext: {}
    # capabilities:
    #   drop:
    #   - ALL
    # readOnlyRootFilesystem: true
    # runAsNonRoot: true
    # runAsUser: 1000

  service:
    type: ClusterIP
    web:
      port: 80

  resources: {}
    # We usually recommend not to specify default resources and to leave this as a conscious
    # choice for the user. This also increases chances charts run on environments with little
    # resources, such as Minikube. If you do want to specify resources, uncomment the following
    # lines, adjust them as necessary, and remove the curly braces after 'resources:'.
    # limits:
    #   cpu: 100m
    #   memory: 128Mi
    # requests:
    #   cpu: 100m
    #   memory: 128Mi

  persistence:
    storageClassName: jumpserver-data
    accessModes:
      - ReadWriteMany
    size: 1Gi
    # annotations: {}
    finalizers:
      - kubernetes.io/pvc-protection

  volumeMounts: []

  volumes: []

  nodeSelector: {}

  tolerations: []

  affinity: {}
# 安装
helm install jms-k8s jumpserver/jumpserver -n default -f values.yaml

# 卸载
helm uninstall jms-k8s -n default
六、源码安装
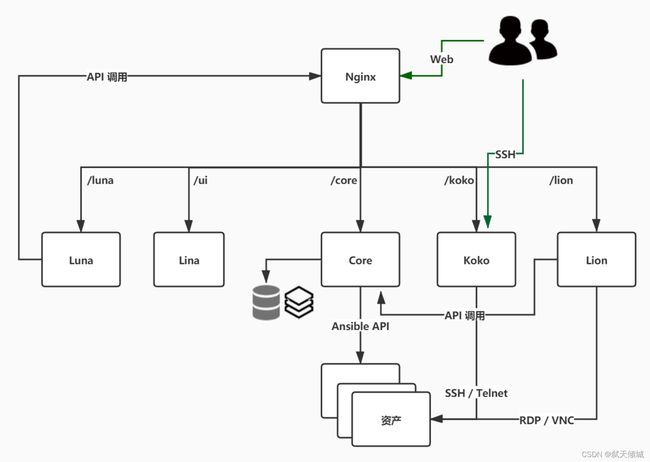
这个建议去参考下官网编译文档:https://docs.jumpserver.org/zh/master/dev/build/
使用
使用全部图形化界面相当简单,特别容易上手,简单摸索一下就可以了,这里就不叙述了。这是官方文档地址:https://docs.jumpserver.org/zh/master/user-guide/assets/user-asset/
大家可以作为参考
![]()