SpringBoot 2022.10.15
SpringBoot
-
- 1、简介
- 2、第一个SpringBoot程序
- 3、原理初探
-
- 3.1、主启动类
- 3.4、注解剖析
- 4、yaml配置注入
-
- 4.1、注入配置文件
- 4.2、配置文件占位符
- 5、JSR303数据校验及多环境切换
-
- 5.1、JSR303数据校验
- 5.2、多环境配置切换
- 5.3、配置文件加载位置
- 6、自动配置原理
-
- 6.1、精髓
- 7、整合JDBC
- 8、整合Druid
-
- 8.1、配置数据源
- 8.2、配置Druid数据源监控
- 9、整合Mybatis
- 10、Thymeleaf模板引擎
-
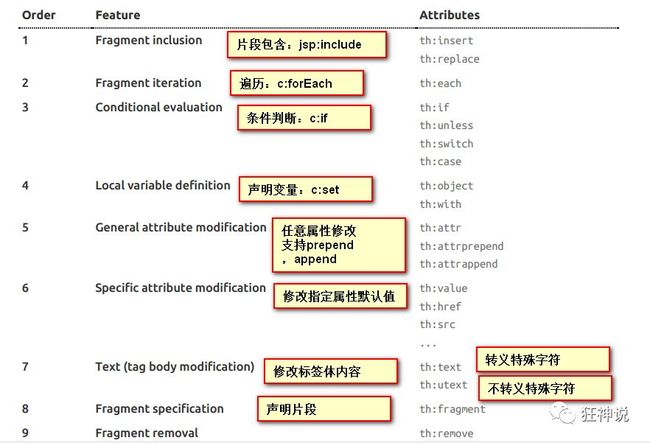
- Thymelea的使用语法:
- 11、SpingBoot扩展SpringMVC
-
- 扩展使用SpringMVC
- 12、页面国际化
- 13、拦截器
1、简介
Spring Boot是由Pivotal团队提供的全新框架,其设计目的是用来简化新Spring应用的初始搭建以及开发过程。该框架使用了特定的方式来进行配置,从而使开发人员不再需要定义样板化的配置。通过这种方式,Spring Boot致力于在蓬勃发展的快速应用开发领域(rapid application development)成为领导者。
Spring Boot 出生名门,从一开始就站在一个比较高的起点,又经过这几年的发展,生态足够完善,Spring Boot 已经当之无愧成为 Java 领域最热门的技术。
Spring Boot的主要优点:
- 没有冗余代码生成和XML配置的要求
- 可以创建独立的Spring应用程序,并且基于其Maven或Gradle插件,可以创建可执行的JARs和WARs;
- 内嵌Tomcat或Jetty等Servlet容器;
- 提供自动配置的“starter”项目对象模型(POMS)以简化Maven配置;
- 尽可能自动配置Spring容器;
- 提供准备好的特性,如指标、健康检查和外部化配置;
2、第一个SpringBoot程序
创建一个SpringBoot项目
可以在官网创建,然后下载其源码:https://start.spring.io/,然后将项目导入到idea中即可。
IDEA集成了这个网站!
- 可以在官网直接下载后,导入idea开发(官网在哪)
- 直接使用idea创建一个springBoot项目 (一般开发直接在IDEA创建)
项目目录结构:
- 主启动类 XXXApplication.java
- 配置文件application.properties (推荐使用yaml)
- 一个测试类
- 一个pom.xml
pom.xml 依赖全部都是starter启动器
<parent>
    <groupId>org.springframework.bootgroupId>
    <artifactId>spring-boot-starter-parentartifactId>
    <version>2.7.4version>
    <relativePath/>
parent>

<dependencies>

    <dependency>
        <groupId>org.springframework.bootgroupId>
        <artifactId>spring-boot-starter-webartifactId>
    dependency>


    <dependency>
        <groupId>org.springframework.bootgroupId>
        <artifactId>spring-boot-starter-testartifactId>
        <scope>testscope>
    dependency>
dependencies>


<build>
    <plugins>
        <plugin>
            <groupId>org.springframework.bootgroupId>
            <artifactId>spring-boot-maven-pluginartifactId>
        plugin>
    plugins>
build>
- 编写一个http接口,用来测试项目是否能够成功启动。
- 编写的IndexController类所属的controller包的必须和主启动类为同级目录,不同级的话主启动类需要扫描这个包
//templates目录下的所有页面,只能通过controller跳转
@RestController
public class IndexController {

    @RequestMapping("/test")
    public String test(){
        return "hello world";
    }
}
- 启动主启动,进入浏览器测试

3、原理初探
我们之前写的HelloSpringBoot,到底是怎么运行的呢,Maven项目,我们一般从pom.xml文件探究起;pom.xml
父依赖
其中它主要是依赖一个父项目,主要是管理项目的资源过滤及插件!
<parent>
    <groupId>org.springframework.bootgroupId>
    <artifactId>spring-boot-starter-parentartifactId>
    <version>2.2.5.RELEASEversion>
    <relativePath/>
parent>
点进去,发现还有一个父依赖
<parent>
    <groupId>org.springframework.bootgroupId>
    <artifactId>spring-boot-dependenciesartifactId>
    <version>2.2.5.RELEASEversion>
    <relativePath>../../spring-boot-dependenciesrelativePath>
parent>
这里才是真正管理SpringBoot应用里面所有依赖版本的地方,SpringBoot的版本控制中心;
以后我们导入依赖默认是不需要写版本;但是如果导入的包没有在依赖中管理着就需要手动配置版本了;
启动器 spring-boot-starter
<dependency>
    <groupId>org.springframework.bootgroupId>
    <artifactId>spring-boot-starter-webartifactId>
dependency>
springboot-boot-starter-xxx:就是spring-boot的场景启动器
spring-boot-starter-web:帮我们导入了web模块正常运行所依赖的组件;
SpringBoot将所有的功能场景都抽取出来,做成一个个的starter (启动器),只需要在项目中引入这些starter即可,所有相关的依赖都会导入进来 , 我们要用什么功能就导入什么样的场景启动器即可 ;我们未来也可以自己自定义 starter;
3.1、主启动类
分析完了 pom.xml 来看看这个启动类
默认的主启动类
//@SpringBootApplication 来标注一个主程序类
//说明这是一个Spring Boot应用
@SpringBootApplication
public class SpringbootApplication {

   public static void main(String[] args) {
     //以为是启动了一个方法,没想到启动了一个服务
      SpringApplication.run(SpringbootApplication.class, args);
   }

}
但是一个简单的启动类并不简单我们来分析一下这些注解都干了什么
@SpringBootApplication
作用:标注在某个类上说明这个类是SpringBoot的主配置类 , SpringBoot就应该运行这个类的main方法来启动SpringBoot应用;
进入这个注解:可以看到上面还有很多其他注解!
@Target(ElementType.TYPE)
@Retention(RetentionPolicy.RUNTIME)
@Documented
@Inherited
@SpringBootConfiguration
@EnableAutoConfiguration
@ComponentScan(
    excludeFilters = { @Filter(
        type = FilterType.CUSTOM, classes = TypeExcludeFilter.class),
		@Filter(
        type = FilterType.CUSTOM, classes = AutoConfigurationExcludeFilter.class)
        }
)
public @interface SpringBootApplication {
}
3.4、注解剖析
@ComponentScan
这个注解在Spring中很重要 ,它对应XML配置中的元素。
作用:自动扫描并加载符合条件的组件或者bean , 将这个bean定义加载到IOC容器中
@SpringBootConfiguration
作用:SpringBoot的配置类 ,标注在某个类上 , 表示这是一个SpringBoot的配置类;
我们继续进去这个注解查看
// 点进去得到下面的
@Configuration
public @interface SpringBootConfiguration {}

@Component
public @interface Configuration {}
这里的 @Configuration,说明这是一个配置类 ,配置类就是对应Spring的xml 配置文件;
里面的 @Component 这就说明,启动类本身也是Spring中的一个组件而已,负责启动应用!
我们回到 SpringBootApplication 注解中继续看。
@EnableAutoConfiguration
@EnableAutoConfiguration :开启自动配置功能
以前我们需要自己配置的东西,而现在SpringBoot可以自动帮我们配置 ;@EnableAutoConfiguration告诉SpringBoot开启自动配置功能,这样自动配置才能生效;
点进注解接续查看:
@AutoConfigurationPackage :自动配置包
@Import(AutoConfigurationPackages.Registrar.class)
public @interface AutoConfigurationPackage {}
@Import :Spring底层注解@Import , 给容器中导入一个组件
Registrar.class 作用:将主启动类的所在包及包下面所有子包里面的所有组件扫描到Spring容器 ;
这个分析完了,退到上一步,继续看
@Import({AutoConfigurationImportSelector.class}) :给容器导入组件 ;
AutoConfigurationImportSelector :自动配置导入选择器,那么它会导入哪些组件的选择器呢?我们点击去这个类看源码:
1、这个类中有一个这样的方法
// 获得候选的配置
protected List<String> getCandidateConfigurations(AnnotationMetadata metadata, AnnotationAttributes attributes) {
    //这里的getSpringFactoriesLoaderFactoryClass()方法
    //返回的就是我们最开始看的启动自动导入配置文件的注解类;EnableAutoConfiguration
    List<String> configurations = new ArrayList<>(
        SpringFactoriesLoader.loadFactoryNames(getSpringFactoriesLoaderFactoryClass(), getBeanClassLoader()));
    ImportCandidates.load(AutoConfiguration.class, getBeanClassLoader()).forEach(configurations::add);
    Assert.notEmpty(configurations,"No auto configuration classes found in META-INF/spring.factories nor in META-INF/spring/org.springframework.boot.autoconfigure.AutoConfiguration.imports. If you are using a custom packaging, make sure that file is correct.");
    return configurations;
}
2、这个方法又调用了 SpringFactoriesLoader 类的静态方法!我们进入SpringFactoriesLoader类loadFactoryNames() 方法
public static List<String> loadFactoryNames(Class<?> factoryClass, @Nullable ClassLoader classLoader) {
    String factoryClassName = factoryClass.getName();
    //这里它又调用了 loadSpringFactories 方法
    return (List)loadSpringFactories(classLoader).getOrDefault(factoryClassName, Collections.emptyList());
}                                                                                  }
3、我们继续点击查看 loadSpringFactories 方法
private static Map<String, List<String>> loadSpringFactories(@Nullable ClassLoader classLoader) {
    //获得classLoader,我们返回可以看到这里得到的就是EnableAutoConfiguration标注的类本身
    MultiValueMap<String, String> result = (MultiValueMap)cache.get(classLoader);
    if (result != null) {
        return result;
    } else {
        try {
            //去获取一个资源 "META-INF/spring.factories"
            Enumeration<URL> urls = classLoader != null ? classLoader.getResources("META-INF/spring.factories") : ClassLoader.getSystemResources("META-INF/spring.factories");
            LinkedMultiValueMap result = new LinkedMultiValueMap();

            //将读取到的资源遍历,封装成为一个Properties
            while(urls.hasMoreElements()) {
                URL url = (URL)urls.nextElement();
                UrlResource resource = new UrlResource(url);
                Properties properties = PropertiesLoaderUtils.loadProperties(resource);
                Iterator var6 = properties.entrySet().iterator();

                while(var6.hasNext()) {
                    Entry<?, ?> entry = (Entry)var6.next();
                    String factoryClassName = ((String)entry.getKey()).trim();
                    String[] var9 = StringUtils.commaDelimitedListToStringArray((String)entry.getValue());
                    int var10 = var9.length;

                    for(int var11 = 0; var11 < var10; ++var11) {
                        String factoryName = var9[var11];
                        result.add(factoryClassName, factoryName.trim());
                    }
                }
            }

            cache.put(classLoader, result);
            return result;
        } catch (IOException var13) {
            throw new IllegalArgumentException("Unable to load factories from location [META-INF/spring.factories]", var13);
        }
    }
}
4、发现一个多次出现的文件:spring.factories,全局搜索它
spring.factories
我们根据源头打开spring.factories , 看到了很多自动配置的文件;这就是自动配置根源所在!
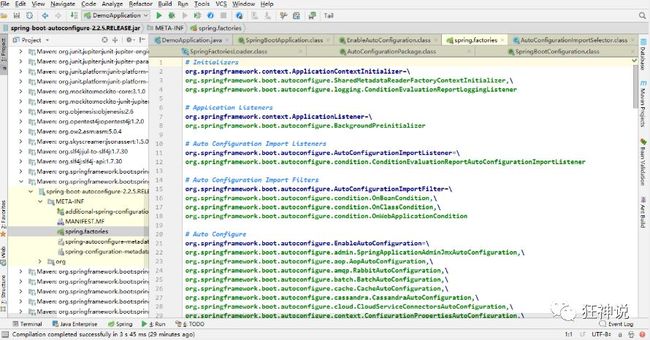
WebMvcAutoConfiguration
我们在上面的自动配置类随便找一个打开看看,比如 :WebMvcAutoConfiguration.java
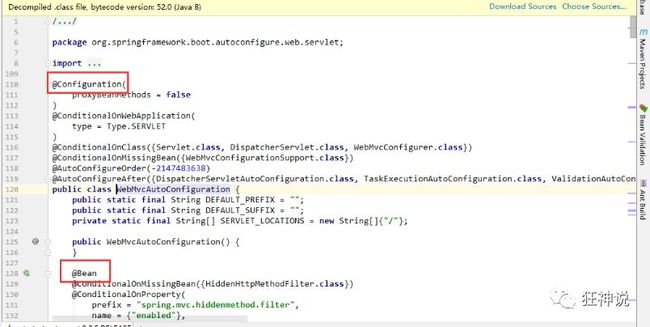
可以看到这些一个个的都是JavaConfig配置类,而且都注入了一些Bean,可以找一些自己认识的类,看着熟悉一下!
所以,自动配置真正实现是从classpath中搜寻所有的META-INF/spring.factories配置文件 ,并将其中对应的 org.springframework.boot.autoconfigure. 包下的配置项,通过反射实例化为对应标注了 @Configuration的JavaConfig形式的IOC容器配置类 , 然后将这些都汇总成为一个实例并加载到IOC容器中。
结论:
- SpringBoot在启动的时候从类路径下的META-INF/spring.factories中获取EnableAutoConfiguration指定的值
- 将这些值作为自动配置类导入容器 , 自动配置类就生效 , 帮我们进行自动配置工作;
- 整个J2EE的整体解决方案和自动配置都在springboot-autoconfigure的jar包中;
- 它会给容器中导入非常多的自动配置类 (xxxAutoConfiguration), 就是给容器中导入这个场景需要的所有组件 , 并配置好这些组件 ;
- 有了自动配置类 , 免去了我们手动编写配置注入功能组件等的工作;
现在大家应该大概的了解了下,SpringBoot的运行原理,后面我们还会深化一次!
SpringApplication
不简单的方法
我最初以为就是运行了一个main方法,没想到却开启了一个服务;
@SpringBootApplicationpublic class SpringbootApplication {
public static void main(String[] args) { 						            SpringApplication.run(SpringbootApplication.class, args);
	}
}
SpringApplication.run分析
分析该方法主要分两部分,一部分是SpringApplication的实例化,二是run方法的执行;
SpringApplication
这个类主要做了以下四件事情:
1、推断应用的类型是普通的项目还是Web项目
2、查找并加载所有可用初始化器 , 设置到initializers属性中
3、找出所有的应用程序监听器,设置到listeners属性中
4、推断并设置main方法的定义类,找到运行的主类
查看构造器:
public SpringApplication(ResourceLoader resourceLoader, Class<?>... primarySources) {
    this.resourceLoader = resourceLoader;
    Assert.notNull(primarySources, "PrimarySources must not be null");
    this.primarySources = new LinkedHashSet<>(Arrays.asList(primarySources));
    this.webApplicationType = WebApplicationType.deduceFromClasspath();
    this.bootstrapRegistryInitializers = new ArrayList<>(
        getSpringFactoriesInstances(BootstrapRegistryInitializer.class));
    setInitializers((Collection) getSpringFactoriesInstances(ApplicationContextInitializer.class));
    setListeners((Collection) getSpringFactoriesInstances(ApplicationListener.class));
    this.mainApplicationClass = deduceMainApplicationClass();
}
run方法流程分析
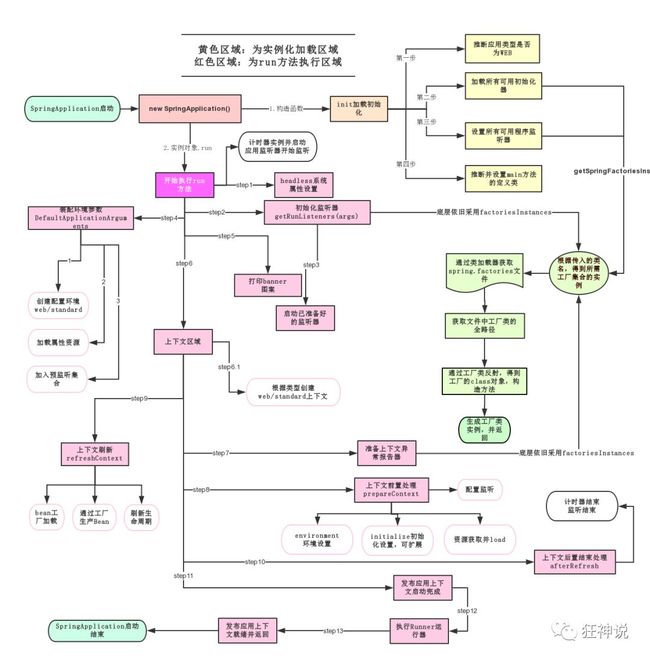
跟着源码和这幅图就可以一探究竟了!
4、yaml配置注入
配置文件:
SpringBoot使用一个全局的配置文件 , 配置文件名称是固定
- application.properties
-
- 语法结构 :key=value
- application.yml
-
- 语法结构 :key:空格 value
配置文件的作用:
修改SpringBoot自动配置的默认值,因为SpringBoot在底层都给我们自动配置好了;
yaml概述:
YAML是 “YAML Ain’t a Markup Language” (YAML不是一种标记语言)的递归缩写。在开发的这种语言时,YAML 的意思其实是:“Yet Another Markup Language”(仍是一种标记语言)
这种语言以数据作为中心,而不是以标记语言为重点!
以前的配置文件,大多数都是使用xml来配置;比如一个简单的端口配置,我们来对比下yaml和xml
传统xml配置:
<server>
    <port>8081<port>
server>
yaml配置:
server:
	prot: 8080
yaml基础语法
说明:语法要求严格!
1、空格不能省略
2、以缩进来控制层级关系,只要是左边对齐的一列数据都是同一个层级的。
3、属性和值的大小写都是十分敏感的。
举例:
# 普通键值对
name: 乔巴

# 对象
student:
  name: habi
  age: 19

# 对象行内写法
student1: {name: qiaoba,age: 19}

# 数组
pets:
  - dog
  - cat
4.1、注入配置文件
yaml文件更强大的地方在于,他可以给我们的实体类直接注入匹配值!
yaml注入配置文件
1、在springboot项目中的resources目录下新建一个文件 application.yml
2、编写一个实体类 Person;
@Component //注册bean到容器中
public class Person {
    private String name;
    private Integer age;
    private Boolean happy;
    private Date birth;
    private Map<String,Object> maps;
    private List<Object> lists;
    private Dog dog;

    //有参无参构造、get、set方法、toString()方法
}
3、我们来使用yaml配置的方式进行注入,大家写的时候注意区别和优势,我们编写一个yaml配置!
person:
  name: 乔巴
  age: 17
  map: {key: abc,value: 这个}
  birth: 2022/10/16
  list:
    - hobby
    - basketball
  happy: true
  dog:
    name: 哈巴
    age: 17
4、IDEA 提示,springboot配置注解处理器没有找到,让我们看文档,我们可以查看文档,找到一个依赖!
这里弄不弄都不影响运行
<dependency>
  <groupId>org.springframework.bootgroupId>
  <artifactId>spring-boot-configuration-processorartifactId>
  <optional>trueoptional>
dependency>
5、去我们之前的实体类Person中绑定属性的值
//绑定配置文件
@ConfigurationProperties(prefix = "person")
@Component
public class Person {
    private String name;
    private int age;
    private Map map;
    private Date birth;
    private List list;
    private boolean happy;
    private Dog dog;

}
6、确认以上配置都OK之后,我们去测试类中测试一下:
@SpringBootTest
class Springboot02ConfigApplicationTests {

    @Autowired
    private Person  person;

    @Test
    void contextLoads() {
        System.out.println(person);
    }

}
结果:所有值注入成功

4.2、配置文件占位符
配置文件还可以编写占位符生成随机数
person:
    name: xing${random.uuid} # 随机uuid
    age: ${random.int}  # 随机int
    happy: false
    birth: 2000/01/01
    maps: {k1: v1,k2: v2}
    lists:
      - code
      - girl
      - music
    dog:
    # hello值如果存在则取出来用,不存在就用other代替
      name: ${person.hello:other}_旺财
      age: 1
5、JSR303数据校验及多环境切换
5.1、JSR303数据校验
使用数据校验:
Springboot中可以用@validated来校验数据,如果数据异常则会统一抛出异常,方便异常中心统一处理。我们这里来写个注解让我们的name只能支持Email格式;
@ConfigurationProperties(prefix = "person")
@Component
@Validated  //数据校验
public class Person {

    //邮件格式数据校验
    @Email(message = "邮件格式错误")
    private String name;
    private int age;
    private Map map;
    private Date birth;
    private List list;
    private boolean happy;
    private Dog dog;

}
运行结果:default message [不是一个合法的电子邮件地址];

使用数据校验可以保证数据的正确性
常见参数:
@NotNull(message="名字不能为空")
private String userName;
@Max(value=120,message="年龄最大不能查过120")
private int age;
@Email(message="邮箱格式错误")
private String email;

空检查
@Null       验证对象是否为null
@NotNull    验证对象是否不为null, 无法查检长度为0的字符串
@NotBlank   检查约束字符串是不是Null还有被Trim的长度是否大于0,只对字符串,且会去掉前后空格.
@NotEmpty   检查约束元素是否为NULL或者是EMPTY.

Booelan检查
@AssertTrue     验证 Boolean 对象是否为 true
@AssertFalse    验证 Boolean 对象是否为 false

长度检查
@Size(min=, max=) 验证对象(Array,Collection,Map,String)长度是否在给定的范围之内
@Length(min=, max=) string is between min and max included.

日期检查
@Past       验证 Date 和 Calendar 对象是否在当前时间之前
@Future     验证 Date 和 Calendar 对象是否在当前时间之后
@Pattern    验证 String 对象是否符合正则表达式的规则

.......等等
除此以外,我们还可以自定义一些数据校验规则
5.2、多环境配置切换
profile是Spring对不同环境提供不同配置功能的支持,可以通过激活不同的环境版本,实现快速切换环境;
多环境配置文件
我们在主配置文件编写的时候,文件名可以是 application-{profile}.properties/yml , 用来指定多个环境版本;
例如:
application-test.properties 代表测试环境配置
application-dev.properties 代表开发环境配置
但是Springboot并不会直接启动这些配置文件,它默认使用application.properties主配置文件;
我们需要通过一个配置来选择需要激活的环境:
#比如在配置文件中指定使用dev环境,我们可以通过设置不同的端口号进行测试;
#我们启动SpringBoot,就可以看到已经切换到dev下的配置了;
spring.profiles.active=dev
yaml的多文档块
yaml文档是springboot官方推荐使用的,他在这里的优势是只创建一个文件就可以配置多套环境
server:
  port: 8081
#选择要激活哪个环境模块
spring:
  profiles:
    active: prod

---
server:
  port: 8083
spring:
  profiles: dev #配置环境的名称


---

server:
  port: 8084
spring:
  profiles: prod  #配置环境的名称
注意:如果yml和properties同时都配置了端口,并且没有激活其他环境 , 默认会使用properties配置文件的!
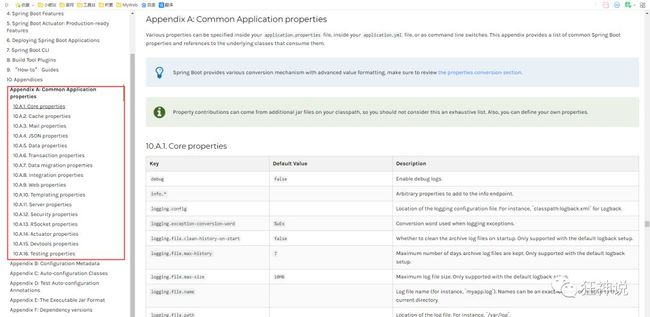
5.3、配置文件加载位置
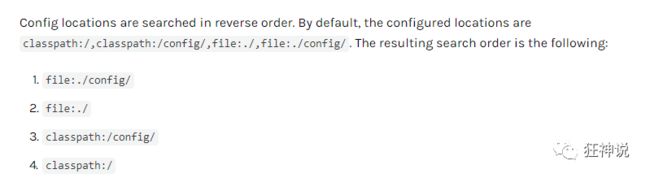
这张图是application文件是springboot启动有限加载的顺序
springboot 的默认配置文件
优先级1:项目路径下的config文件夹配置文件
优先级2:项目路径下配置文件
优先级3:资源路径下的config文件夹配置文件
优先级4:资源路径下配置文件
优先级由高到底,高优先级的配置会覆盖低优先级的配置;
6、自动配置原理
配置文件到底能写什么?怎么写?
SpringBoot官方文档中有大量的配置,我们无法全部记住
分析自动配置原理:
我们以HttpEncodingAutoConfiguration(Http编码自动配置)0为例解释自动配置原理;
//表示这是一个配置类,和以前编写的配置文件一样,也可以给容器中添加组件;
@Configuration

//启动指定类的ConfigurationProperties功能;
  //进入这个HttpProperties查看,将配置文件中对应的值和HttpProperties绑定起来;
  //并把HttpProperties加入到ioc容器中
@EnableConfigurationProperties({HttpProperties.class})

//Spring底层@Conditional注解
  //根据不同的条件判断,如果满足指定的条件,整个配置类里面的配置就会生效;
  //这里的意思就是判断当前应用是否是web应用,如果是,当前配置类生效
@ConditionalOnWebApplication(
    type = Type.SERVLET
)

//判断当前项目有没有这个类CharacterEncodingFilter;SpringMVC中进行乱码解决的过滤器;
@ConditionalOnClass({CharacterEncodingFilter.class})

  //判断配置文件中是否存在某个配置:spring.http.encoding.enabled;
  //如果不存在,判断也是成立的
  //即使我们配置文件中不配置pring.http.encoding.enabled=true,也是默认生效的;
@ConditionalOnProperty(
    prefix = "spring.http.encoding",
    value = {"enabled"},
    matchIfMissing = true
)

public class HttpEncodingAutoConfiguration {
    //他已经和SpringBoot的配置文件映射了
    private final Encoding properties;
    //只有一个有参构造器的情况下,参数的值就会从容器中拿
    public HttpEncodingAutoConfiguration(HttpProperties properties) {
        this.properties = properties.getEncoding();
    }

    //给容器中添加一个组件,这个组件的某些值需要从properties中获取
    @Bean
    @ConditionalOnMissingBean //判断容器没有这个组件?
    public CharacterEncodingFilter characterEncodingFilter() {
        CharacterEncodingFilter filter = new OrderedCharacterEncodingFilter();
        filter.setEncoding(this.properties.getCharset().name());
        filter.setForceRequestEncoding(this.properties.shouldForce(org.springframework.boot.autoconfigure.http.HttpProperties.Encoding.Type.REQUEST));
        filter.setForceResponseEncoding(this.properties.shouldForce(org.springframework.boot.autoconfigure.http.HttpProperties.Encoding.Type.RESPONSE));
        return filter;
    }
    //。。。。。。。
}
一句话总结 :根据当前不同的条件判断,决定这个配置类是否生效!
- 一但这个配置类生效;这个配置类就会给容器中添加各种组件;
- 这些组件的属性是从对应的properties类中获取的,这些类里面的每一个属性又是和配置文件绑定的;
- 所有在配置文件中能配置的属性都是在xxxxProperties类中封装着;
- 配置文件能配置什么就可以参照某个功能对应的这个属性类
//从配置文件中获取指定的值和bean的属性进行绑定
@ConfigurationProperties(prefix = "spring.http")
public class HttpProperties {
    // .....
}
这就是自动装配的原理!
6.1、精髓
1、SpringBoot启动会加载大量的自动配置类
2、我们看我们需要的功能有没有在SpringBoot默认写好的自动配置类当中;
3、我们再来看这个自动配置类中到底配置了哪些组件;(只要我们要用的组件存在在其中,我们就不需要再手动配置了)
4、给容器中自动配置类添加组件的时候,会从properties类中获取某些属性。我们只需要在配置文件中指定这些属性的值即可;
**xxxxAutoConfigurartion:自动配置类;**给容器中添加组件
xxxxProperties:封装配置文件中相关属性;
了解:@Conditional
了解完自动装配的原理后,我们来关注一个细节问题,自动配置类必须在一定的条件下才能生效;
@Conditional派生注解(Spring注解版原生的@Conditional作用)
作用:必须是@Conditional指定的条件成立,才给容器中添加组件,配置配里面的所有内容才生效;

那么多的自动配置类,必须在一定的条件下才能生效;也就是说,我们加载了这么多的配置类,但不是所有的都生效了。
我们怎么知道哪些自动配置类生效?
我们可以通过启用 debug=true属性;来让控制台打印自动配置报告,这样我们就可以很方便的知道哪些自动配置类生效;
#开启springboot的调试类
debug=true
Positive matches:(自动配置类启用的:正匹配)
Negative matches:(没有启动,没有匹配成功的自动配置类:负匹配)
Unconditional classes: (没有条件的类)
【演示:查看输出的日志】
7、整合JDBC
SpringData简介:
对于数据访问层,无论是 SQL(关系型数据库) 还是 NOSQL(非关系型数据库),Spring Boot 底层都是采用 Spring Data 的方式进行统一处理。
Spring Boot 底层都是采用 Spring Data 的方式进行统一处理各种数据库,Spring Data 也是 Spring 中与 Spring Boot、Spring Cloud 等齐名的知名项目。
整合JDBC
创建项目测试数据源
1、我去新建一个项目测试:springboot-data-jdbc ; 引入相应的模块!基础模块
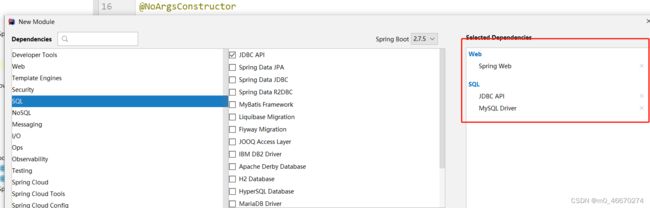
2、项目建好之后,发现自动帮我们导入了如下的启动器:
<dependency>
    <groupId>org.springframework.bootgroupId>
    <artifactId>spring-boot-starter-data-jdbcartifactId>
dependency>

<dependency>
    <groupId>mysqlgroupId>
    <artifactId>mysql-connector-javaartifactId>
dependency>
3、编写yaml配置文件连接数据库;
spring:
datasource:
url: jdbc:mysql://localhost/mybatis?serverTimezone=UTC&useSSL=true&useUnicode=true&characterEncoding=utf8
username: root
password: 440823
type: com.alibaba.druid.pool.DruidDataSource
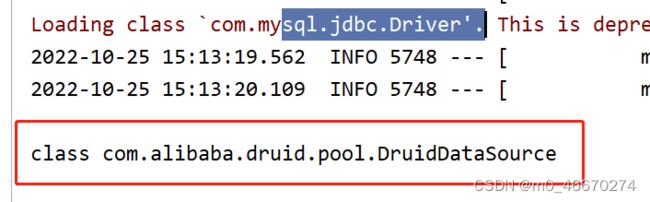
driver-class-name: com.mysql.jdbc.Driver
4、配置完这一些东西后,我们就可以直接去使用了,因为SpringBoot已经默认帮我们进行了自动配置;去测试类测试一下
@SpringBootTest
class Springboot05DataApplicationTests {


    @Autowired
    DataSource dataSource;

    @Test
    void contextLoads() {
        System.out.println(dataSource.getClass());
    }

}
运行结果:
数据源为:class com.zaxxer.hikari.HikariDataSource
我们并没有手动配置这个数据源,我们来全局搜索一下,找到数据源的所有自动配置都在 :DataSourceAutoConfiguration文件:
@Configuration(proxyBeanMethods = false)
@Conditional(PooledDataSourceCondition.class)
@ConditionalOnMissingBean({ DataSource.class, XADataSource.class })
@Import({ DataSourceConfiguration.Hikari.class, DataSourceConfiguration.Tomcat.class,
      DataSourceConfiguration.Dbcp2.class, DataSourceConfiguration.OracleUcp.class,
      DataSourceConfiguration.Generic.class, DataSourceJmxConfiguration.class })
protected static class PooledDataSourceConfiguration {

}
这里导入的类都在 DataSourceConfiguration 配置类下,可以看出 Spring Boot 2.7.4 默认使用HikariDataSource 数据源,而以前版本,如 Spring Boot 1.5 默认使用 org.apache.tomcat.jdbc.pool.DataSource 作为数据源;
HikariDataSource 号称 Java WEB 当前速度最快的数据源,相比于传统的 C3P0 、DBCP、Tomcat jdbc 等连接池更加优秀;
可以使用 spring.datasource.type 指定自定义的数据源类型,值为 要使用的连接池实现的完全限定名。
关于数据源我们并不做介绍,有了数据库连接,显然就可以 CRUD 操作数据库了。但是我们需要先了解一个对象 JdbcTemplate
JDBCTemplate: (一个模板,封装了很多方法在里面,程序猿提供了很多方便)
1、有了数据源(com.zaxxer.hikari.HikariDataSource),然后可以拿到数据库连接(java.sql.Connection),有了连接,就可以使用原生的 JDBC 语句来操作数据库;
2、即使不使用第三方第数据库操作框架,如 MyBatis等,Spring 本身也对原生的JDBC 做了轻量级的封装,即JdbcTemplate。
3、数据库操作的所有 CRUD 方法都在 JdbcTemplate 中。
4、Spring Boot 不仅提供了默认的数据源,同时默认已经配置好了 JdbcTemplate 放在了容器中,程序员只需自己注入即可使用
5、JdbcTemplate 的自动配置是依赖 org.springframework.boot.autoconfigure.jdbc 包下的 JdbcTemplateConfiguration 类
JdbcTemplate主要提供以下几类方法:
- execute方法:可以用于执行任何SQL语句,一般用于执行DDL语句;
- update方法及batchUpdate方法:update方法用于执行新增、修改、删除等语句;batchUpdate方法用于执行批处理相关语句;
- query方法及queryForXXX方法:用于执行查询相关语句;
- call方法:用于执行存储过程、函数相关语句。
测试
编写一个Controller,注入 jdbcTemplate,编写测试方法进行访问测试;
package com.xing.controller;

import org.springframework.beans.factory.annotation.Autowired;
import org.springframework.jdbc.core.JdbcTemplate;
import org.springframework.web.bind.annotation.GetMapping;
import org.springframework.web.bind.annotation.PathVariable;
import org.springframework.web.bind.annotation.RequestMapping;
import org.springframework.web.bind.annotation.RestController;
import java.util.Date;
import java.util.List;
import java.util.Map;

@RestController
@RequestMapping("/jdbc")
public class JdbcController {

   /**
    * Spring Boot 默认提供了数据源,默认提供了 org.springframework.jdbc.core.JdbcTemplate
    * JdbcTemplate 中会自己注入数据源,用于简化 JDBC操作
    * 还能避免一些常见的错误,使用起来也不用再自己来关闭数据库连接
    */
   @Autowired
   private JdbcTemplate jdbcTemplate;

   //查询user表中所有数据
   //List 中的1个 Map 对应数据库的 1行数据
   //Map 中的 key 对应数据库的字段名,value 对应数据库的字段值
   @GetMapping("/list")
   public List<Map<String, Object>> userList(){
       String sql = "select * from user";
       List<Map<String, Object>> maps = jdbcTemplate.queryForList(sql);
       return maps;
   }

   //新增一个用户
   @GetMapping("/add")
   public String addUser(){
       //插入语句,注意时间问题
       String sql = "insert into user(last_name, email,gender,department,birth)" +
               " values ('乔巴','[email protected]',1,101,'"+ new Date().toLocaleString() +"')";
       jdbcTemplate.update(sql);
       //查询
       return "addOk";
   }

   //修改用户信息,有效防止SQL注入
   @GetMapping("/update/{id}")
   public String updateUser(@PathVariable("id") int id){
       //插入语句
       String sql = "update user set last_name=?,email=? where id="+id;
       //数据
       Object[] objects = new Object[2];
       objects[0] = "哈比";
       objects[1] = "[email protected]";
       jdbcTemplate.update(sql,objects);
       //查询
       return "updateOk";
   }

   //删除用户
   @GetMapping("/delete/{id}")
   public String delUser(@PathVariable("id") int id){
       //插入语句
       String sql = "delete from user where id=?";
       jdbcTemplate.update(sql,id);
       //查询
       return "deleteOk";
   }

}
测试请求,结果正常;
到此,CURD的基本操作,使用 JDBC 就搞定了。
8、整合Druid
Druid简介:
Java程序很大一部分要操作数据库,为了提高性能操作数据库的时候,又不得不使用数据库连接池。
Druid 是阿里巴巴开源平台上一个数据库连接池实现,结合了 C3P0、DBCP 等 DB 池的优点,同时加入了日志监控。
Druid 可以很好的监控 DB 池连接和 SQL 的执行情况,天生就是针对监控而生的 DB 连接池。
Druid已经在阿里巴巴部署了超过600个应用,经过一年多生产环境大规模部署的严苛考验。
Spring Boot 2.0 以上默认使用 Hikari 数据源,可以说 Hikari 与 Driud 都是当前 Java Web 上最优秀的数据源,我们来重点介绍 Spring Boot 如何集成 Druid 数据源,如何实现数据库监控。
Github地址:https://github.com/alibaba/druid/
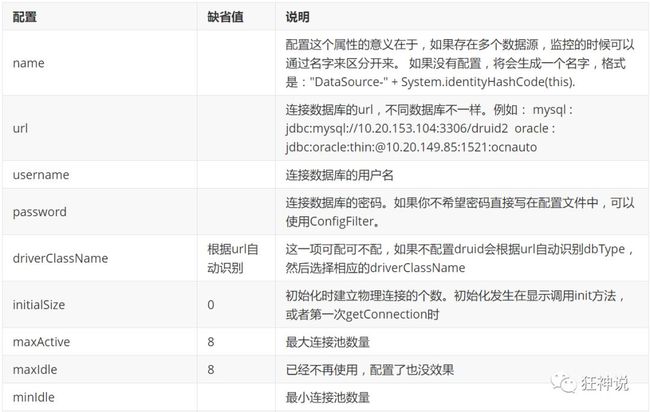
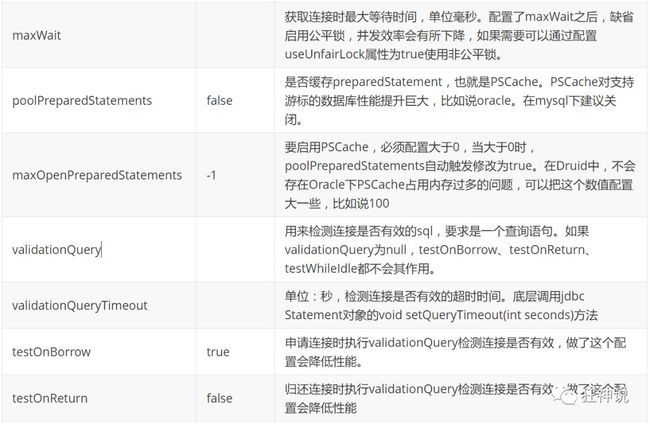
com.alibaba.druid.pool.DruidDataSource 基本配置参数如下:

8.1、配置数据源
-
添加上 Druid 数据源依赖。
在maven仓库中看到了
Druid Spring Boot Starter依赖,后续使用这个应该会更加方便<dependency> <groupId>com.alibabagroupId> <artifactId>druidartifactId> <version>1.2.12version> dependency> -
切换数据源;之前已经说过 Spring Boot 2.0 以上默认使用 com.zaxxer.hikari.HikariDataSource 数据源,但可以 通过 spring.datasource.type 指定数据源。
spring: datasource: url: jdbc:mysql://localhost/mybatis?serverTimezone=UTC&useSSL=true&useUnicode=true&characterEncoding=utf8 username: root password: 440823 type: com.alibaba.druid.pool.DruidDataSource driver-class-name: com.mysql.jdbc.Driver -
数据源切换之后,在测试类中注入 DataSource,然后获取到它,输出一看便知是否成功切换;
-
切换成功!既然切换成功,就可以设置数据源连接初始化大小、最大连接数、等待时间、最小连接数 等设置项;可以查看源码
spring: datasource: url: jdbc:mysql://localhost/mybatis?serverTimezone=UTC&useSSL=true&useUnicode=true&characterEncoding=utf8 username: root password: 440823 type: com.alibaba.druid.pool.DruidDataSource driver-class-name: com.mysql.jdbc.Driver #Spring Boot 默认是不注入这些属性值的,需要自己绑定 #druid 数据源专有配置 initialSize: 5 minIdle: 5 maxActive: 20 maxWait: 60000 timeBetweenEvictionRunsMillis: 60000 minEvictableIdleTimeMillis: 300000 validationQuery: SELECT 1 FROM DUAL testWhileIdle: true testOnBorrow: false testOnReturn: false poolPreparedStatements: true #配置监控统计拦截的filters,stat:监控统计、log4j:日志记录、wall:防御sql注入 #如果允许时报错 java.lang.ClassNotFoundException: org.apache.log4j.Priority #则导入 log4j 依赖即可,Maven 地址:https://mvnrepository.com/artifact/log4j/log4j filters: stat,wall,log4j maxPoolPreparedStatementPerConnectionSize: 20 useGlobalDataSourceStat: true connectionProperties: druid.stat.mergeSql=true;druid.stat.slowSqlMillis=500 -
导入Log4j 的依赖
<dependency> <groupId>log4jgroupId> <artifactId>log4jartifactId> <version>1.2.17version> dependency> -
现在需要程序员自己为 DruidDataSource 绑定全局配置文件中的参数,再添加到容器中,而不再使用 Spring Boot 的自动生成了;我们需要 自己添加 DruidDataSource 组件到容器中,并绑定属性;
package com.xing.config; import com.alibaba.druid.pool.DruidDataSource; import org.springframework.boot.context.properties.ConfigurationProperties; import org.springframework.context.annotation.Bean; import org.springframework.context.annotation.Configuration; import javax.sql.DataSource; @Configuration public class DruidConfig { /* 将自定义的 Druid数据源添加到容器中,不再让 Spring Boot 自动创建 绑定全局配置文件中的druid数据源属性到com.alibaba.druid.pool.DruidDataSource从而让它们生效 @ConfigurationProperties(prefix = "spring.datasource"):作用就是将全局配置文件中 前缀为 spring.datasource的属性值注入到 com.alibaba.druid.pool.DruidDataSource 的同名参数中 */ @ConfigurationProperties(prefix = "spring.datasource") @Bean public DataSource druidDataSource() { return new DruidDataSource(); } } -
测试;看是否成功!
@SpringBootTest
class SpringbootDataJdbcApplicationTests {

    //DI注入数据源
    @Autowired
    DataSource dataSource;

    @Test
    public void contextLoads() throws SQLException {
        //看一下默认数据源
        System.out.println(dataSource.getClass());
        //获得连接
        Connection connection =   dataSource.getConnection();
        System.out.println(connection);

        DruidDataSource druidDataSource = (DruidDataSource) dataSource;
        System.out.println("druidDataSource 数据源最大连接数:" + druidDataSource.getMaxActive());
        System.out.println("druidDataSource 数据源初始化连接数:" + druidDataSource.getInitialSize());
        //关闭连接
        connection.close();
    }
}
输出结果 :可见配置参数已经生效!

8.2、配置Druid数据源监控
Druid 数据源具有监控的功能,并提供了一个 web 界面方便用户查看,类似安装 路由器 时,人家也提供了一个默认的 web 页面。
所以第一步需要设置 Druid 的后台管理页面,比如 登录账号、密码等;配置后台管理;
//配置 Druid 监控管理后台的Servlet;
//内置 Servlet 容器时没有web.xml文件,所以使用 Spring Boot 的注册 Servlet 方式
@Bean
public ServletRegistrationBean statViewServlet() {
    ServletRegistrationBean bean = new ServletRegistrationBean(
        new StatViewServlet(), "/druid/*");
    /*        另外一种方法
        ServletRegistrationBean bean = new ServletRegistrationBean<>();
        bean.setServlet(new StatViewServlet());
        Collection url = new ArrayList<>();
        url.add("/druid/*");
        bean.setUrlMappings(url);*/

    // 这些参数可以在 com.alibaba.druid.support.http.StatViewServlet
    // 的父类 com.alibaba.druid.support.http.ResourceServlet 中找到
    Map<String, String> initParams = new HashMap<>();
    initParams.put("loginUsername", "admin"); //后台管理界面的登录账号
    initParams.put("loginPassword", "123456"); //后台管理界面的登录密码

    //后台允许谁可以访问
    //initParams.put("allow", "localhost"):表示只有本机可以访问
    //initParams.put("allow", ""):为空或者为null时,表示允许所有访问
    initParams.put("allow", "");
    //deny:Druid 后台拒绝谁访问
    //initParams.put("kuangshen", "192.168.1.20");表示禁止此ip访问

    //设置初始化参数
    bean.setInitParameters(initParams);
    return bean;
}
配置完毕后,我们可以选择访问 :http://localhost:8080/druid/login.html
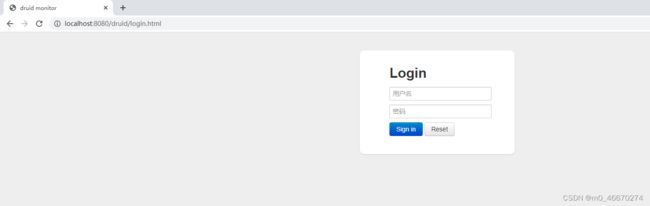
输入设置好的账号和密码,进入页面内
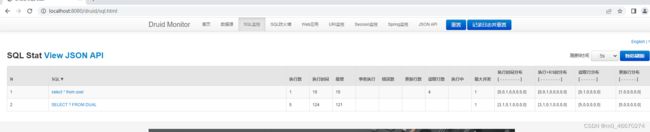
配置 Druid web 监控 filter 过滤器
//配置 Druid 监控 之  web 监控的 filter
//WebStatFilter:用于配置Web和Druid数据源之间的管理关联监控统计
@Bean
public FilterRegistrationBean webStatFilter() {
    FilterRegistrationBean bean = new FilterRegistrationBean();
    bean.setFilter(new WebStatFilter());

    //exclusions:设置哪些请求进行过滤排除掉,从而不进行统计
    Map<String, String> initParams = new HashMap<>();
    initParams.put("exclusions", "*.js,*.css,/druid/*,/jdbc/*");
    bean.setInitParameters(initParams);

    // "/*" 表示过滤所有请求
    bean.setUrlPatterns(Arrays.asList("/*"));
    return bean;
}
按需求操作过滤器!!!
9、整合Mybatis
重要步骤:
- 配置数据源
- 其他跟mybatis普通操作基本没多区别
整合测试:
-
导入Mybatis依赖
<dependency> <groupId>org.mybatis.spring.bootgroupId> <artifactId>mybatis-spring-boot-starterartifactId> <version>2.2.2version> dependency> -
配置数据库连接信息
spring: datasource: username: root password: 440823 url: jdbc:mysql://localhost/mybatis?serverTimezone=UTC&useSSL=true&useUnicode=true&characterEncoding=utf8 driver-class-name: com.mysql.cj.jdbc.Driver -
测试数据库是否连接成功!

-
创建实体类,导入 Lombok!
User.java
@Data @AllArgsConstructor @NoArgsConstructor public class User { private Integer id; private String name; private String pwd; } -
创建mapper目录以及对应的 Mapper 接口
UserMapper.java 这里记得加上@Mapper注解
//这个注解表示了这是一个 mybatis 的mapper类:Dao @Mapper public interface UserMapper { //查询所有用户 ArrayList<User> queryUsers(); } -
对应的Mapper映射文件
UserMapper.xml
DOCTYPE mapper PUBLIC "-//mybatis.org//DTD Mapper 3.0//EN" "http://mybatis.org/dtd/mybatis-3-mapper.dtd"> <mapper namespace="com.xing.mapper.UserMapper"> <select id="queryUsers" resultType="user"> select * from user; select> mapper> -
在application文件中绑定注册UserMapper.xml文件
mybatis: #别名 type-aliases-package: com.xing.pojo #绑定mapper文件夹下的所有xml文件 mapper-locations: classpath:mybatis/mapper/*.xml -
maven配置资源过滤问题
<resources> <resource> <directory>src/main/javadirectory> <includes> <include>**/*.xmlinclude> includes> <filtering>truefiltering> resource> resources> -
编写部门的 MapperController进行测试!
@RestController
public class UserController {

    @Autowired
    private UserMapper userMapper;

    //查询所用用户
    @RequestMapping("/query")
    public List<User> queryAllUser(){
        return userMapper.queryUsers();
    }
}
启动项目测试:

10、Thymeleaf模板引擎
模板引擎
前端交给我们的页面,是html页面。如果是我们以前开发,我们需要把他们转成jsp页面,jsp好处就是当我们查出一些数据转发到JSP页面以后,我们可以用jsp轻松实现数据的显示,及交互等。
jsp支持非常强大的功能,包括能写Java代码,但是呢,我们现在的这种情况,SpringBoot这个项目首先是以jar的方式,不是war,像第二,我们用的还是嵌入式的Tomcat,所以呢,他现在默认是不支持jsp的。
那不支持jsp,如果我们直接用纯静态页面的方式,那给我们开发会带来非常大的麻烦,那怎么办呢?
SpringBoot推荐你可以来使用模板引擎:
模板引擎,我们其实大家听到很多,其实jsp就是一个模板引擎,还有用的比较多的freemarker,包括SpringBoot给我们推荐的Thymeleaf,模板引擎有非常多,但再多的模板引擎,他们的思想都是一样的,什么样一个思想呢我们来看一下这张图:

模板引擎的作用就是我们来写一个页面模板,比如有些值呢,是动态的,我们写一些表达式。而这些值,从哪来呢,就是我们在后台封装一些数据。然后把这个模板和这个数据交给我们模板引擎,模板引擎按照我们这个数据帮你把这表达式解析、填充到我们指定的位置,然后把这个数据最终生成一个我们想要的内容给我们写出去,这就是我们这个模板引擎,不管是jsp还是其他模板引擎,都是这个思想。只不过呢,就是说不同模板引擎之间,他们可能这个语法有点不一样。其他的我就不介绍了,我主要来介绍一下SpringBoot给我们推荐的Thymeleaf模板引擎,这模板引擎呢,是一个高级语言的模板引擎,他的这个语法更简单。而且呢,功能更强大。
我们呢,就来看一下这个模板引擎,那既然要看这个模板引擎。首先,我们来看SpringBoot里边怎么用。
引入Thymeleaf
导入依赖
<dependency>
    <groupId>org.springframework.bootgroupId>
    <artifactId>spring-boot-starter-thymeleafartifactId>
dependency>
Thymeleaf分析
前面呢,我们已经引入了Thymeleaf,那这个要怎么使用呢?
我们首先得按照SpringBoot的自动配置原理看一下我们这个Thymeleaf的自动配置规则,在按照那个规则,我们进行使用。
我们去找一下Thymeleaf的自动配置类:ThymeleafProperties
@ConfigurationProperties(prefix = "spring.thymeleaf")
public class ThymeleafProperties {
   private static final Charset DEFAULT_ENCODING = StandardCharsets.UTF_8;
   public static final String DEFAULT_PREFIX = "classpath:/templates/";
   public static final String DEFAULT_SUFFIX = ".html";
   private boolean checkTemplate = true;
   private boolean checkTemplateLocation = true;
   private String prefix = DEFAULT_PREFIX;
   private String suffix = DEFAULT_SUFFIX;
   private String mode = "HTML";
   private Charset encoding = DEFAULT_ENCODING;
   private boolean cache = true;
   private Integer templateResolverOrder;
   private String[] viewNames;
   private String[] excludedViewNames;
   private boolean enableSpringElCompiler;
   private boolean renderHiddenMarkersBeforeCheckboxes = false;
}
我们可以在其中看到默认的前缀和后缀!
我们只需要把我们的html页面放在类路径下的templates下,thymeleaf就可以帮我们自动渲染了。
使用thymeleaf什么都不需要配置,只需要将他放在指定的文件夹下即可!
测试
1、编写一个TestController
@Controllerpublic class TestController {
    @RequestMapping("/t1")
    public String test1(){
        //classpath:/templates/test.html
        return "test";
    }
}
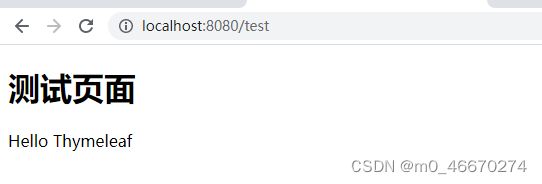
2、编写一个测试页面 test.html 放在 templates 目录下
DOCTYPE html>
<html lang="en">
<head>
    <meta charset="UTF-8">
    <title>Titletitle>
head>
<body>
<h1>测试页面h1>

body>
html>
3、启动项目测试

Thymeleaf 语法学习
Thymeleaf 官网:https://www.thymeleaf.org/ , 可以在里面学习基本的语法
做一个简单的练习:我们需要查出一些数据,在页面中展示
-
修改测试请求,增加数据传输
@RequestMapping("/test") public String test(Model model){ model.addAttribute("msg","Hello Thymeleaf"); return "test"; } -
我们要使用thymeleaf,需要在html文件中导入命名空间的约束,方便提示。
我们可以去官方文档的#3中看一下命名空间拿来过来:
xmlns:th="http://www.thymeleaf.org" -
前端页面
DOCTYPE html>
<html lang="en" xmlns:th="http://www.thymeleaf.org">
<head>
    <meta charset="UTF-8">
    <title>Titletitle>
head>
<body>
<h1>测试页面h1>
<div th:text="${msg}">div>
body>
html>
- 启动测试
Thymelea的使用语法:
1、我们可以使用任意的 th:attr 来替换Html中原生属性的值!
2、我们能写哪些表达式呢?
Simple expressions:(表达式语法)
Variable Expressions: ${...}:获取变量值;OGNL;
    1)、获取对象的属性、调用方法
    2)、使用内置的基本对象:#18
         #ctx : the context object.
         #vars: the context variables.
         #locale : the context locale.
         #request : (only in Web Contexts) the HttpServletRequest object.
         #response : (only in Web Contexts) the HttpServletResponse object.
         #session : (only in Web Contexts) the HttpSession object.
         #servletContext : (only in Web Contexts) the ServletContext object.

    3)、内置的一些工具对象:
      #execInfo : information about the template being processed.
      #uris : methods for escaping parts of URLs/URIs
      #conversions : methods for executing the configured conversion service (if any).
      #dates : methods for java.util.Date objects: formatting, component extraction, etc.
      #calendars : analogous to #dates , but for java.util.Calendar objects.
      #numbers : methods for formatting numeric objects.
      #strings : methods for String objects: contains, startsWith, prepending/appending, etc.
      #objects : methods for objects in general.
      #bools : methods for boolean evaluation.
      #arrays : methods for arrays.
      #lists : methods for lists.
      #sets : methods for sets.
      #maps : methods for maps.
      #aggregates : methods for creating aggregates on arrays or collections.
==================================================================================

  Selection Variable Expressions: *{...}:选择表达式:和${}在功能上是一样;
  Message Expressions: #{...}:获取国际化内容
  Link URL Expressions: @{...}:定义URL;
  Fragment Expressions: ~{...}:片段引用表达式

Literals(字面量)
      Text literals: 'one text' , 'Another one!' ,…
      Number literals: 0 , 34 , 3.0 , 12.3 ,…
      Boolean literals: true , false
      Null literal: null
      Literal tokens: one , sometext , main ,…

Text operations:(文本操作)
    String concatenation: +
    Literal substitutions: |The name is ${name}|

Arithmetic operations:(数学运算)
    Binary operators: + , - , * , / , %
    Minus sign (unary operator): -

Boolean operations:(布尔运算)
    Binary operators: and , or
    Boolean negation (unary operator): ! , not

Comparisons and equality:(比较运算)
    Comparators: > , < , >= , <= ( gt , lt , ge , le )
    Equality operators: == , != ( eq , ne )

Conditional operators:条件运算(三元运算符)
    If-then: (if) ? (then)
    If-then-else: (if) ? (then) : (else)
    Default: (value) ?: (defaultvalue)

Special tokens:
    No-Operation: _
练习测试:
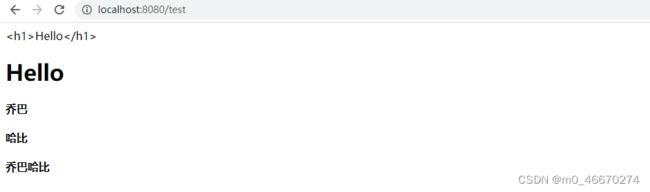
1、 我们编写一个Controller,放一些数据;Map集合也可以传递数据
@RequestMapping("/test")
public String test(Map<String,Object> map){
map.put("msg","Hello
");
map.put("users", Arrays.asList("乔巴","哈比"));
return "test";
}
2、测试页面取出数据
DOCTYPE html>
<html lang="en" xmlns:th="http://www.thymeleaf.org">
<head>
    <meta charset="UTF-8">
    <title>Titletitle>
head>
<body>

    <div th:text="${msg}">div>

    <div th:utext="${msg}">div>


    <h4 th:each="user:${users}" th:text="${user}">h4>

    <h4>

        <span th:each="user:${users}">[[${user}]]span>
    h4>
body>
html>
3、启动项目测试!!!
11、SpingBoot扩展SpringMVC
官网阅读
在进行项目编写前,我们还需要知道一个东西,就是SpringBoot对我们的SpringMVC还做了哪些配置,包括如何扩展,如何定制。
只有把这些都搞清楚了,我们在之后使用才会更加得心应手。途径一:源码分析,途径二:官方文档!
地址 :https://docs.spring.io/spring-boot/docs/2.2.5.RELEASE/reference/htmlsingle/#boot-features-spring-mvc-auto-configuration
Spring MVC Auto-configuration
// Spring Boot为Spring MVC提供了自动配置,它可以很好地与大多数应用程序一起工作。
Spring Boot provides auto-configuration for Spring MVC that works well with most applications.
// 自动配置在Spring默认设置的基础上添加了以下功能:
The auto-configuration adds the following features on top of Spring’s defaults:
// 包含视图解析器
Inclusion of ContentNegotiatingViewResolver and BeanNameViewResolver beans.
// 支持静态资源文件夹的路径,以及webjars
Support for serving static resources, including support for WebJars
// 自动注册了Converter:
// 转换器,这就是我们网页提交数据到后台自动封装成为对象的东西,比如把"1"字符串自动转换为int类型
// Formatter:【格式化器,比如页面给我们了一个2019-8-10,它会给我们自动格式化为Date对象】
Automatic registration of Converter, GenericConverter, and Formatter beans.
// HttpMessageConverters
// SpringMVC用来转换Http请求和响应的的,比如我们要把一个User对象转换为JSON字符串,可以去看官网文档解释;
Support for HttpMessageConverters (covered later in this document).
// 定义错误代码生成规则的
Automatic registration of MessageCodesResolver (covered later in this document).
// 首页定制
Static index.html support.
// 图标定制
Custom Favicon support (covered later in this document).
// 初始化数据绑定器:帮我们把请求数据绑定到JavaBean中!
Automatic use of a ConfigurableWebBindingInitializer bean (covered later in this document).

/*
如果您希望保留Spring Boot MVC功能,并且希望添加其他MVC配置(拦截器、格式化程序、视图控制器和其他功能),则可以添加自己
的@configuration类,类型为webmvcconfiguer,但不添加@EnableWebMvc。如果希望提供
RequestMappingHandlerMapping、RequestMappingHandlerAdapter或ExceptionHandlerExceptionResolver的自定义
实例,则可以声明WebMVCregistrationAdapter实例来提供此类组件。
*/
If you want to keep Spring Boot MVC features and you want to add additional MVC configuration
(interceptors, formatters, view controllers, and other features), you can add your own
@Configuration class of type WebMvcConfigurer but without @EnableWebMvc. If you wish to provide
custom instances of RequestMappingHandlerMapping, RequestMappingHandlerAdapter, or
ExceptionHandlerExceptionResolver, you can declare a WebMvcRegistrationsAdapter instance to provide such components.

// 如果您想完全控制Spring MVC,可以添加自己的@Configuration,并用@EnableWebMvc进行注释。
If you want to take complete control of Spring MVC, you can add your own @Configuration annotated with @EnableWebMvc.
MVC配置原理:https://www.bilibili.com/video/BV1PE411i7CV?p=18&vd_source=1d6328b5d12a95cd9ef5d32399407e2e
观看狂神视频,自行研究
扩展使用SpringMVC
官方文档如下:
If you want to keep Spring Boot MVC features and you want to add additional MVC configuration (interceptors, formatters, view controllers, and other features), you can add your own @Configuration class of type WebMvcConfigurer but without @EnableWebMvc. If you wish to provide custom instances of RequestMappingHandlerMapping, RequestMappingHandlerAdapter, or ExceptionHandlerExceptionResolver, you can declare a WebMvcRegistrationsAdapter instance to provide such components.
我们要做的就是编写一个@Configuration注解类,并且类型要为WebMvcConfigurer,还不能标注@EnableWebMvc注解;我们去自己写一个;我们新建一个包叫config,写一个类MyMvcConfig;
//应为类型要求为WebMvcConfigurer,所以我们实现其接口
//可以使用自定义类扩展MVC的功能
@Configuration
public class MyMvcConfig implements WebMvcConfigurer {

    @Override
    public void addViewControllers(ViewControllerRegistry registry) {
        // 浏览器发送/test , 就会跳转到test页面;
        registry.addViewController("/test").setViewName("test");
    }
}
去浏览器访问:

分析原理:
1、WebMvcAutoConfiguration 是 SpringMVC的自动配置类,里面有一个类WebMvcAutoConfigurationAdapter
2、这个类上有一个注解,在做其他自动配置时会导入:@Import(EnableWebMvcConfiguration.class)
3、我们点进EnableWebMvcConfiguration这个类看一下,它继承了一个父类:DelegatingWebMvcConfiguration
这个父类中有这样一段代码:
public class DelegatingWebMvcConfiguration extends WebMvcConfigurationSupport {
    private final WebMvcConfigurerComposite configurers = new WebMvcConfigurerComposite();

  // 从容器中获取所有的webmvcConfigurer
    @Autowired(required = false)
    public void setConfigurers(List<WebMvcConfigurer> configurers) {
        if (!CollectionUtils.isEmpty(configurers)) {
            this.configurers.addWebMvcConfigurers(configurers);
        }
    }
}
4、我们可以在这个类中去寻找一个我们刚才设置的viewController当做参考,发现它调用了一个
protected void addViewControllers(ViewControllerRegistry registry) {
    this.configurers.addViewControllers(registry);
}
5、点进去看一下
public void addViewControllers(ViewControllerRegistry registry) {
    Iterator var2 = this.delegates.iterator();

    while(var2.hasNext()) {
        // 将所有的WebMvcConfigurer相关配置来一起调用!包括我们自己配置的和Spring给我们配置的
        WebMvcConfigurer delegate = (WebMvcConfigurer)var2.next();
        delegate.addViewControllers(registry);
    }

}
12、页面国际化
有时候我们的网站会涉及多种语言切换
准备工作:
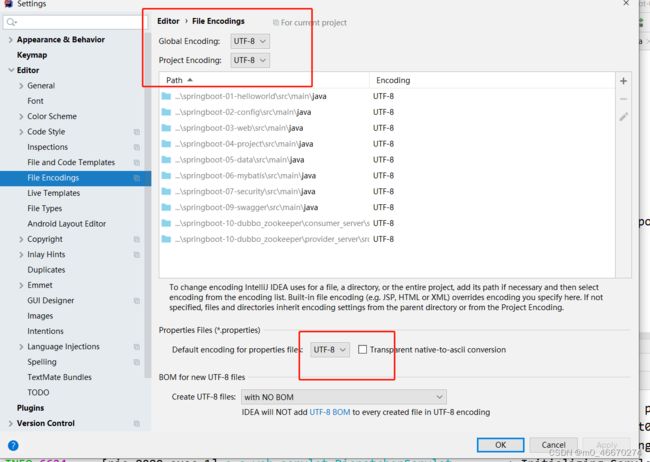
将idea中的编码同意设置为UTF-8
配置文件编写
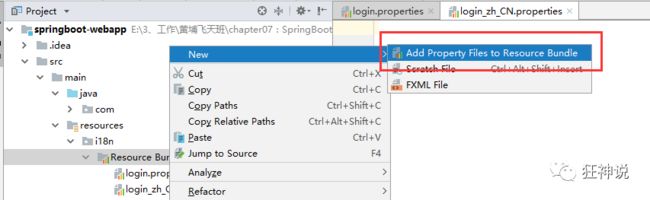
1、我们在resources资源文件下新建一个i18n目录,存放国际化配置文件
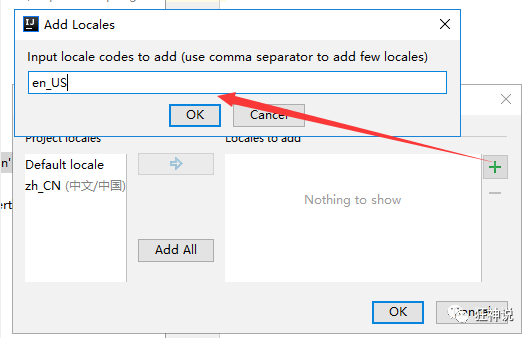
2、建立一个login.properties文件,还有一个login_zh_CN.properties;发现IDEA自动识别了我们要做国际化操作;文件夹变了!

3、我们可以在这上面去新建一个文件
弹出如下页面:我们再添加一个英文的;
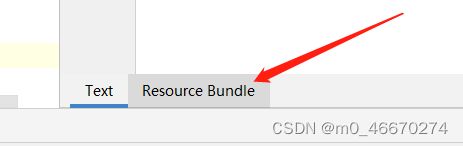
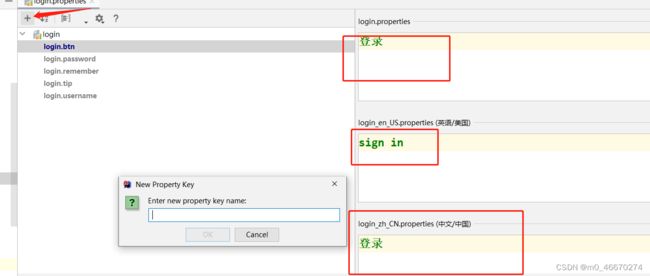
4、接下来,我们就来编写配置,我们可以看到idea下面有另外一个视图;
这个视图我们点击 + 号就可以直接添加属性了;我们新建一个login.tip,可以看到边上有三个文件框可以输入
查看我们的配置文件:
login.properties 默认:
login.btn=登录
login.password=密码
login.remember=记住我
login.tip=请登录
login.username=用户名
login_en_US.properties 中文:
login.btn=登录
login.password=密码
login.remember=记住我
login.tip=请登录
login.username=用户名
login_en_US.properties 英文:
login.btn=sign in
login.password=password
login.remember=remember
login.tip=Please Sign in
login.username=username
探究配置文件为什么生效:
我们去看一下SpringBoot对国际化的自动配置!这里又涉及到一个类:MessageSourceAutoConfiguration
里面有一个方法,这里发现SpringBoot已经自动配置好了管理我们国际化资源文件的组件 ResourceBundleMessageSource;
// 获取 properties 传递过来的值进行判断
@Bean
public MessageSource messageSource(MessageSourceProperties properties) {
    ResourceBundleMessageSource messageSource = new ResourceBundleMessageSource();
    if (StringUtils.hasText(properties.getBasename())) {
        // 设置国际化文件的基础名(去掉语言国家代码的)
        messageSource.setBasenames(
            StringUtils.commaDelimitedListToStringArray(
                                       StringUtils.trimAllWhitespace(properties.getBasename())));
    }
    if (properties.getEncoding() != null) {
        messageSource.setDefaultEncoding(properties.getEncoding().name());
    }
    messageSource.setFallbackToSystemLocale(properties.isFallbackToSystemLocale());
    Duration cacheDuration = properties.getCacheDuration();
    if (cacheDuration != null) {
        messageSource.setCacheMillis(cacheDuration.toMillis());
    }
    messageSource.setAlwaysUseMessageFormat(properties.isAlwaysUseMessageFormat());
    messageSource.setUseCodeAsDefaultMessage(properties.isUseCodeAsDefaultMessage());
    return messageSource;
}
我们真实 的情况是放在了i18n目录下,所以我们要去配置这个messages的路径,在application文件中配置;
spring:
  messages:
    basename: i18n.login
配置页面国际化值:
去页面获取国际化的值,查看Thymeleaf的文档,找到message取值操作为:#{…}。我们去页面测试下:

启动项目测试:
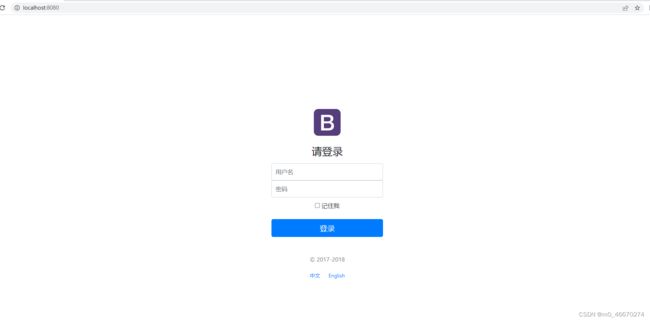
如何实现点击按钮自动切换中英文呢!
配置国际化解析:
在Spring中有一个国际化的Locale (区域信息对象);里面有一个叫做LocaleResolver (获取区域信息对象)的解析器!
我们去我们webmvc自动配置文件,寻找一下!看到SpringBoot默认配置:
@Bean
@ConditionalOnMissingBean
@ConditionalOnProperty(prefix = "spring.mvc", name = "locale")
public LocaleResolver localeResolver() {
    // 容器中没有就自己配,有的话就用用户配置的
    if (this.mvcProperties.getLocaleResolver() == WebMvcProperties.LocaleResolver.FIXED) {
        return new FixedLocaleResolver(this.mvcProperties.getLocale());
    }
    // 接收头国际化分解
    AcceptHeaderLocaleResolver localeResolver = new AcceptHeaderLocaleResolver();
    localeResolver.setDefaultLocale(this.mvcProperties.getLocale());
    return localeResolver;
}
AcceptHeaderLocaleResolver 这个类中有一个方法
public Locale resolveLocale(HttpServletRequest request) {
   Locale defaultLocale = this.getDefaultLocale();
   // 默认的就是根据请求头带来的区域信息获取Locale进行国际化
   if (defaultLocale != null && request.getHeader("Accept-Language") == null) {
       return defaultLocale;
   } else {
       Locale requestLocale = request.getLocale();
       List<Locale> supportedLocales = this.getSupportedLocales();
       if (!supportedLocales.isEmpty() && !supportedLocales.contains(requestLocale)) {
           Locale supportedLocale = this.findSupportedLocale(request, supportedLocales);
           if (supportedLocale != null) {
               return supportedLocale;
           } else {
               return defaultLocale != null ? defaultLocale : requestLocale;
           }
       } else {
           return requestLocale;
       }
   }
}
那假如我们现在想点击链接让我们的国际化资源生效,就需要让我们自己的Locale生效!
我们去自己写一个自己的LocaleResolver,可以在链接上携带区域信息!
修改一下前端页面的跳转连接:
<a class="btn btn-sm" th:href="@{/index.html(language='zh_CN')}">中文a>
<a class="btn btn-sm" th:href="@{/index.html(language='en_US')}">Englisha>
写一个处理的组件类
//可以在链接上携带区域信息
public class MyLocaleResolver implements LocaleResolver {

    //解析请求
    @Override
    public Locale resolveLocale(HttpServletRequest request) {
        String parameter = request.getParameter("language");
        Locale locale = Locale.getDefault();	// 如果没有获取到就使用系统默认的
        //如果请求链接不为空
        if (StringUtils.hasLength(parameter)){
            //分割请求参数
            String[] s = parameter.split("_");
            //国家,地区
            locale = new Locale(s[0],s[1]);
        }
        return locale;
    }

    @Override
    public void setLocale(HttpServletRequest request, HttpServletResponse response, Locale locale) {
    }
}
为了让我们的区域化信息能够生效,我们需要再配置一下这个组件!在我们自己的MvcConofig下添加bean;
@Bean
public LocaleResolver localeResolver(){
    return new MyLocaleResolver();
}
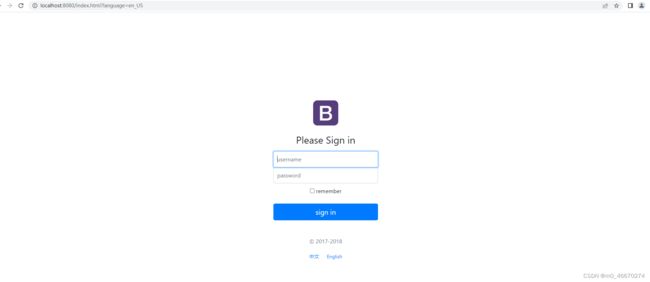
重启项目,访问页面:
13、拦截器
拦截器和过滤器的区别:
- 相同点
- Spring的拦截器与Servlet的Filter有相似之处,比如二者都是AOP编程思想的体现,都能实现权限检查、日志记录等。
- 不同点
- 使用范围不同:Filter是Servlet规范规定的,只能用于Web程序中。而拦截器既可以用于Web程序,也可以用于Application、Swing程序中。
- 规范不同:Filter是在Servlet规范中定义的,是Servlet容器支持的。而拦截器是在Spring容器内的,是Spring框架支持的。
- 使用的资源不同:同其他的代码块一样,拦截器也是一个Spring的组件,归Spring管理,配置在Spring文件中,因此能使用Spring里的任何资源 对象,例如Service对象、数据源、事务管理等,通过IoC注入到拦截器即可;而Filter则不能。
- 深度不同:Filter在只在Servlet前后起作用。而拦截器能够深入到方法前后、异常抛出前后等,因此拦截器的使用具有更大的弹性。所以在 Spring构架的程序中,要优先使用拦截器。
自定义拦截器:
那如何实现拦截器呢?
想要自定义拦截器,必须实现 HandlerInterceptor 接口。
下面我们自定义一个登录验证的测试:
1、编写一个实现了HandlerInterceptor 接口的类 MyInterceptor
package com.xing.config;

import org.springframework.util.StringUtils;
import org.springframework.web.servlet.HandlerInterceptor;
import javax.servlet.http.HttpServletRequest;
import javax.servlet.http.HttpServletResponse;
import javax.servlet.http.HttpSession;

public class MyInterceptor implements HandlerInterceptor {

    @Override
    public boolean preHandle(HttpServletRequest request, HttpServletResponse response, Object handler) throws Exception {
        HttpSession session = request.getSession();
        String userLogin = (String) session.getAttribute("userLogin");
        if (StringUtils.hasLength(userLogin)){
            return true;
        }else {
            //跳转页面
            request.setAttribute("msg","没有权限,请先登录");
            request.getRequestDispatcher("/index.html").forward(request,response);
            return false;
        }
    }
}
疑问:接口HandlerInterceptor不重写它的方法为什么不会报错?
解答:原来这是jdk1.8的新特性。查看 handlerIntercepter的接口方法都有default修饰。即使不重写也不会报错的
2、通过登录页面之后跳转到里面的页面,需要拦截器进行验证用户是否登录
//登录页面控制器
@Controller
@RequestMapping("/user")
public class LoginController {

    @RequestMapping("/login")
    public String login(Model model, @RequestParam("username")String username, @RequestParam("password") String password,
                        HttpSession session){
        //添加用户登录的session
        if (username != null && password.equals("123456")){
            session.setAttribute("userLogin",username);
            return "redirect:/main.html";
        }else {
            //告诉用户,你登录失败了
            model.addAttribute("msg","用户名或者密码错误");
            return "index";
        }
    }
}
3、在Myconfig中配置上拦截器,注意:这里需要给我们的静态资源放行
@Bean
    public LocaleResolver localeResolver(){
        return new MyLocaleResolver();
    }

    //添加拦截器
    @Override
    public void addInterceptors(InterceptorRegistry registry) {
        //添加拦截器,然后添加拦截的请求,再设置不拦截的请求
        registry.addInterceptor(new MyInterceptor()).
        //拦截所有请求
        addPathPatterns("/**").
        //不拦截请求,静态资源,主页,登录页面
        excludePathPatterns("/","/index.html","/css/**","/img/**","/js/**","/user/login");
    }
在这里我们除了首页、登录页面、静态资源不拦截外,其他页面都会被拦截器拦截!!!
4、前端页面代码
注意这里要是想thymeleaf有提示要开启idea的thymeleaf插件,和添加xmlns:th="http://www.thymeleaf.org"支持
首页
doctype html>
<html lang="en" xmlns:th="http://www.thymeleaf.org">
<head>
   <meta charset="UTF-8">
   <meta name="viewport"
        content="width=device-width, user-scalable=no, initial-scale=1.0, maximum-scale=1.0, minimum-scale=1.0">
   <meta http-equiv="X-UA-Compatible" content="ie=edge">
   <title>Documenttitle>
head>
<body>
   <h1>这是首页h1>
   <form th:action="@{/user/login}">
      账号:<input type="text" name="username" placeholder="请输入账号"><br>
      密码:<input type="password" name="password" placeholder="请输入密码"><br>
      <button type="submit">登录button>
   form>
body>
html>
登录成功后的页面
doctype html>
<html lang="en" xmlns:th="http://www.thymeleaf.org">
<head>
    <meta charset="UTF-8">
    <meta name="viewport"
          content="width=device-width, user-scalable=no, initial-scale=1.0, maximum-scale=1.0, minimum-scale=1.0">
    <meta http-equiv="X-UA-Compatible" content="ie=edge">
    <title>Documenttitle>
head>
<body>
    <h1><p th:text="${session.userLogin}">p>h1>
body>
html>
5、启动项目测试,我们出了登录成功外能够进入里面的页面,其他任何请求都不会成功进入里面的页面!