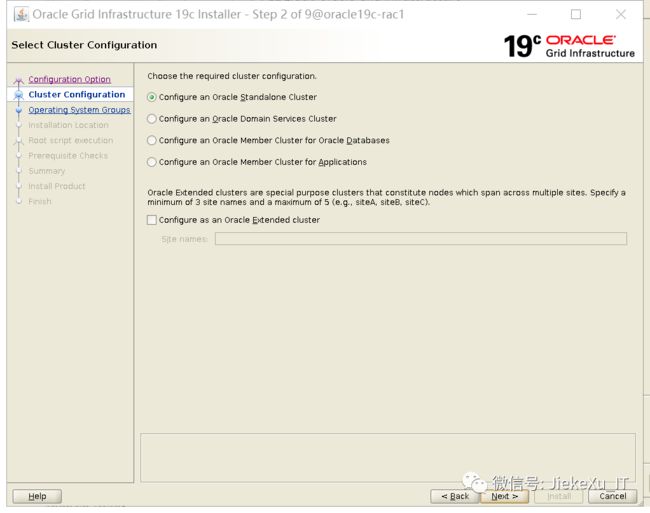
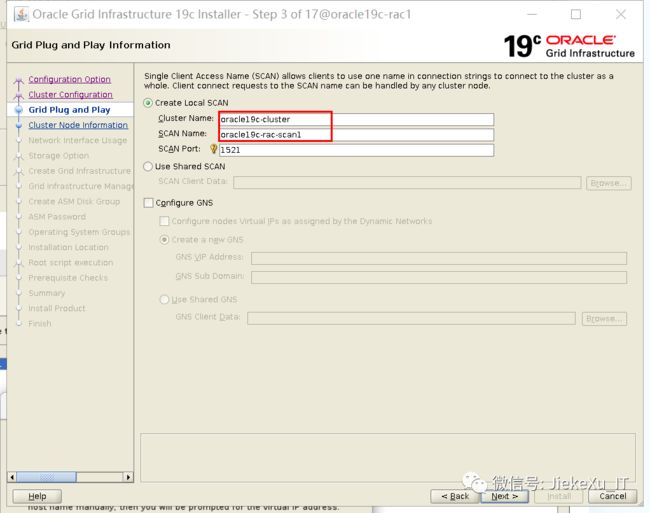
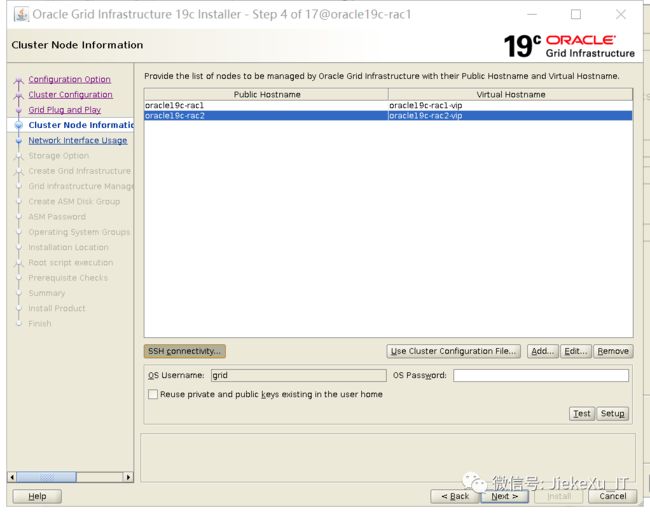
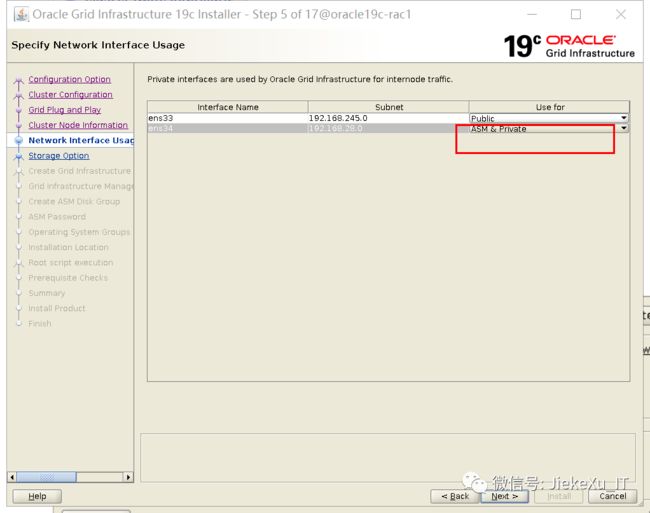
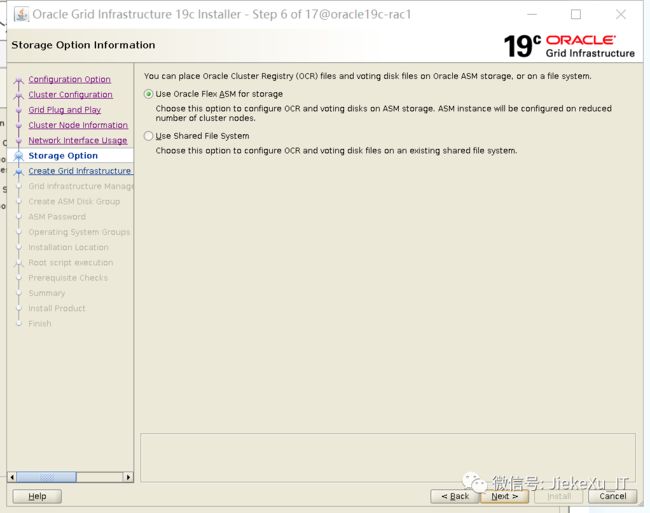
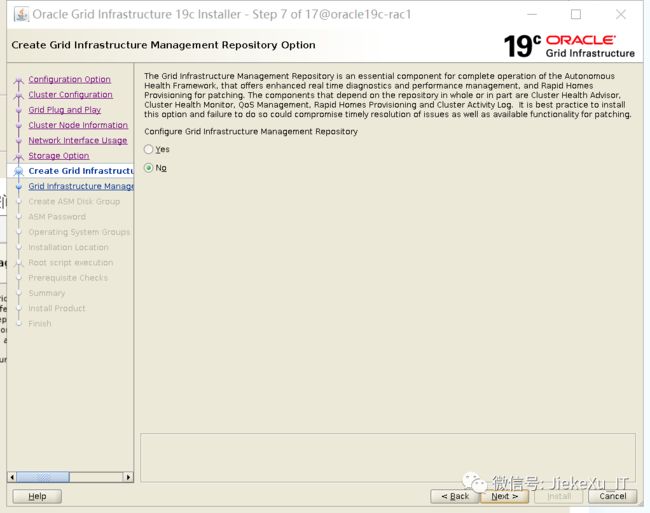
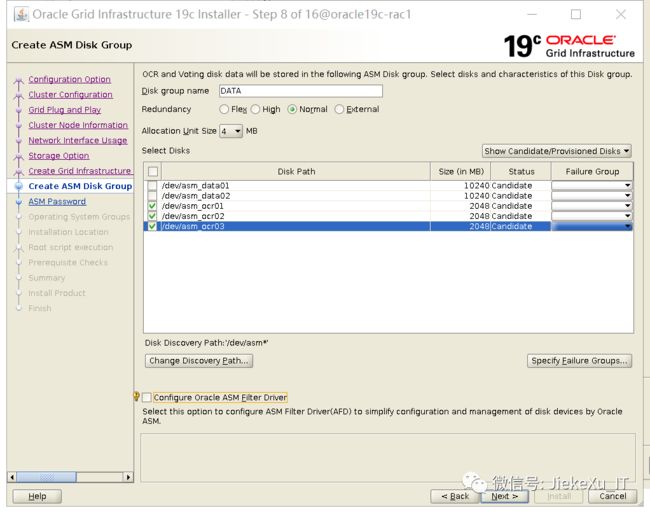
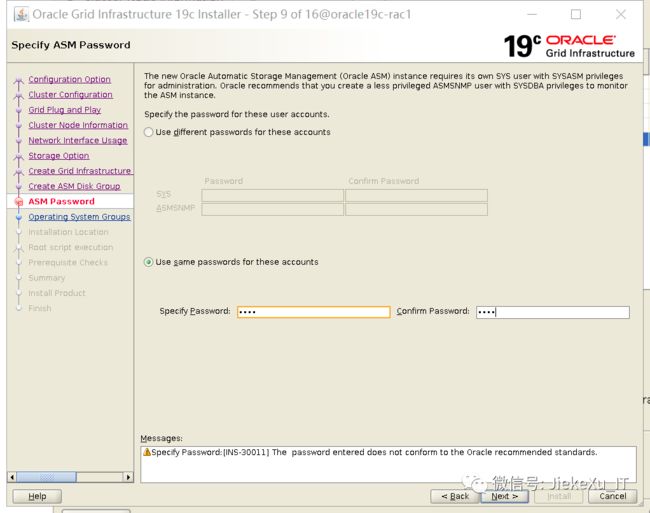
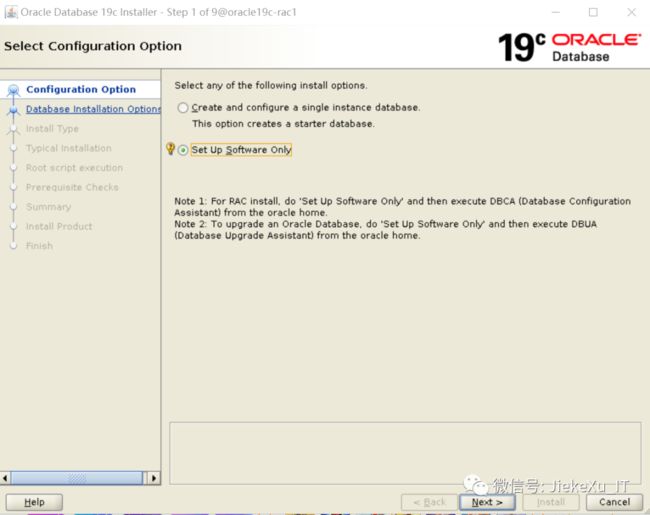
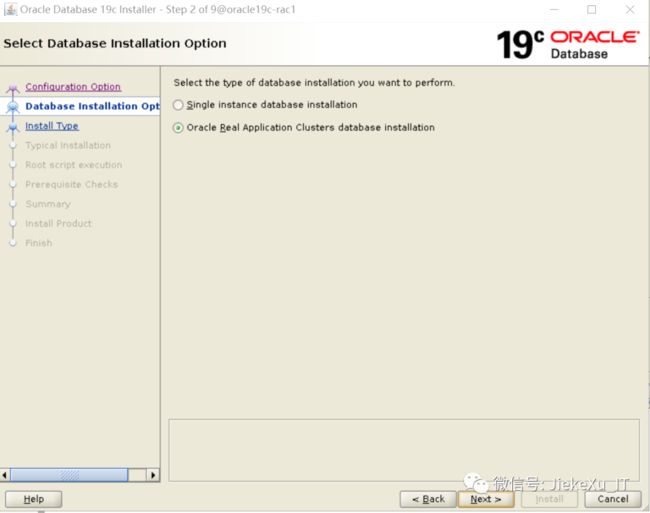
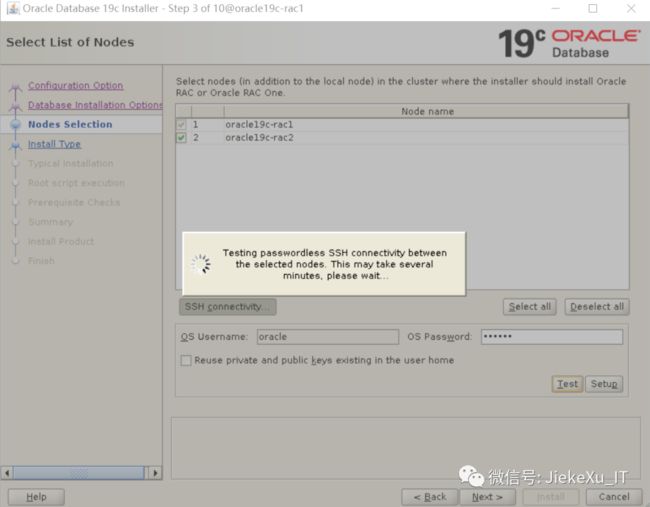
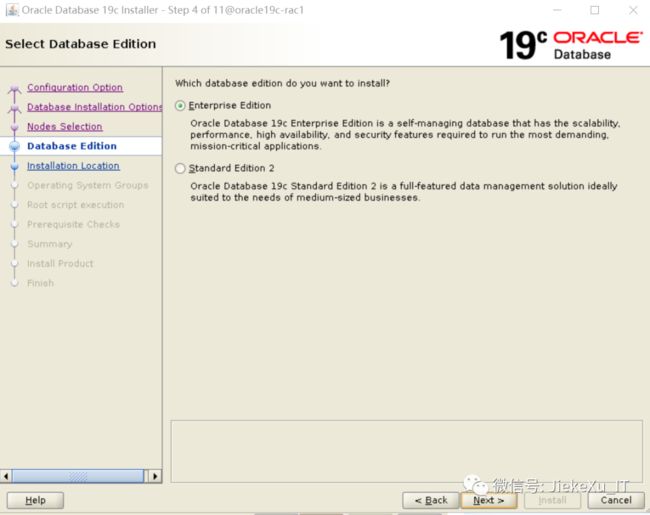
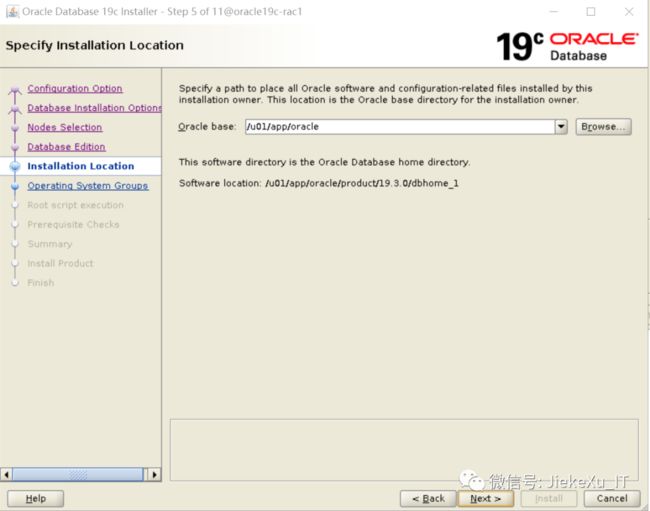
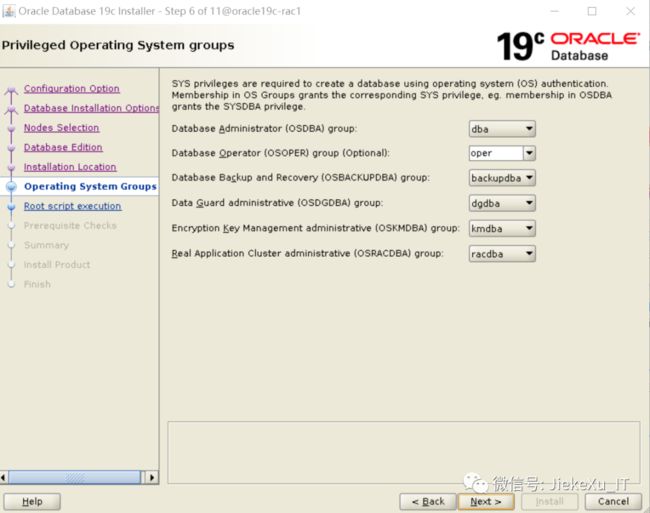
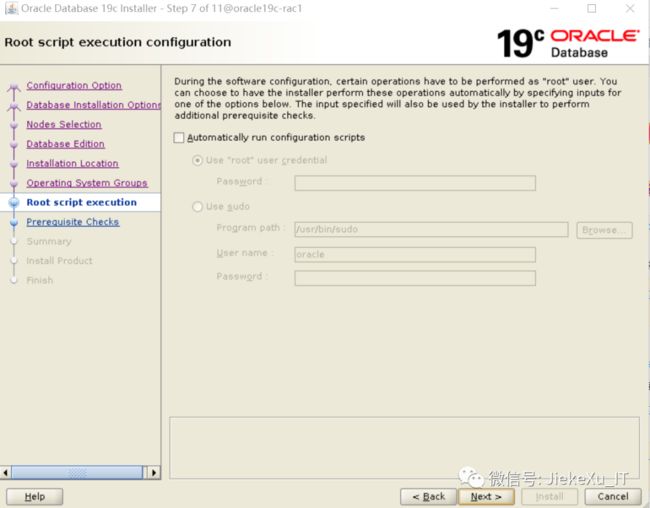
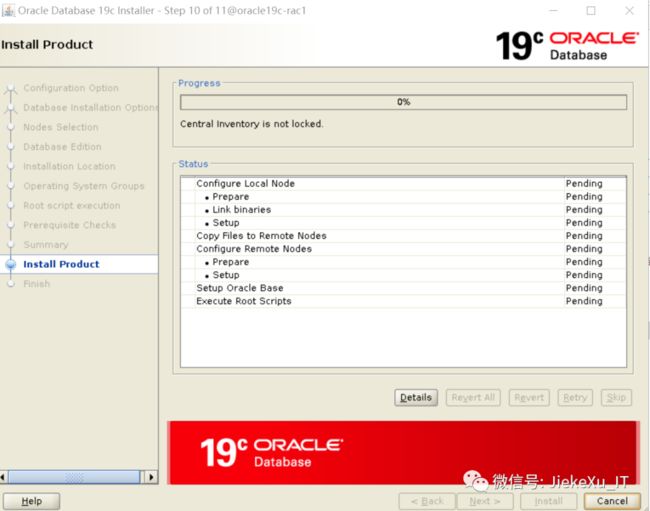
【安装篇】- 基于 VMWARE Oracle Linux7.9 安装 Oracle19c RAC 详细配置方案
![]()
作者 | yanwei
来源 | 墨天轮 https://www.modb.pro/db/95684
大家好,我是 JiekeXu,很高兴又和大家见面了,今天和大家一起来看看 Linux7.9 安装 Oracle19c RAC 详细配置方案,欢迎点击上方蓝字关注我,标星或置顶,更多干货第一时间到达!
《基于 VMWARE Oracle Linux7.9 安装 Oracle19c RAC》4 万多字,是我看过的 Oracle 19c RAC 安装学习篇最好的一篇,这一篇认真看完,必定收获满满。尤其后面章节连接测试,日常管理,值得推荐。
目 录
一、安装规划
-
1.1 软件规划
-
1.1.1 软件下载
-
1.1.1.1 OS下载
1.1.1.2 RAC软件下载
1.1.1.3 RU下载
1.1.2 操作系统认证
1.2 虚拟机规划
1.3 网络规划
1.4 操作系统规划
-
1.4.1 操作系统目录
1.4.2 软件包
1.5 共享存储规划
1.6 Oracle规划
-
1.6.1 软件规划
1.6.2 用户组和用户
1.6.3 软件目录规划
1.6.4 整体数据库安装规划
1.6.5 RU升级规划
二、虚拟机安装
-
2.1 选择硬件兼容性
2.2 选择操作系统ISO
2.3 命名虚拟机
2.4 CPU
2.5 内存
2.6 网卡
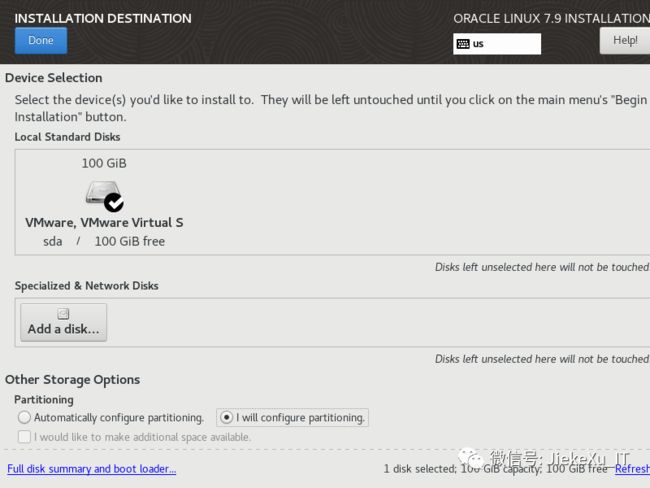
2.7 硬盘
2.8 添加网卡
2.9 同样方式创建RAC2节点
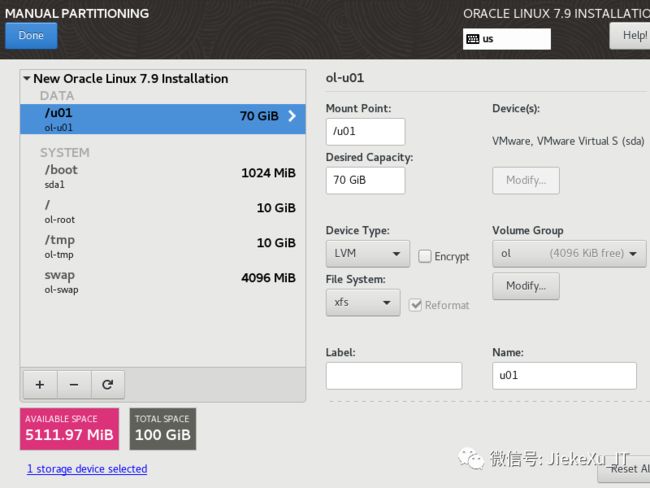
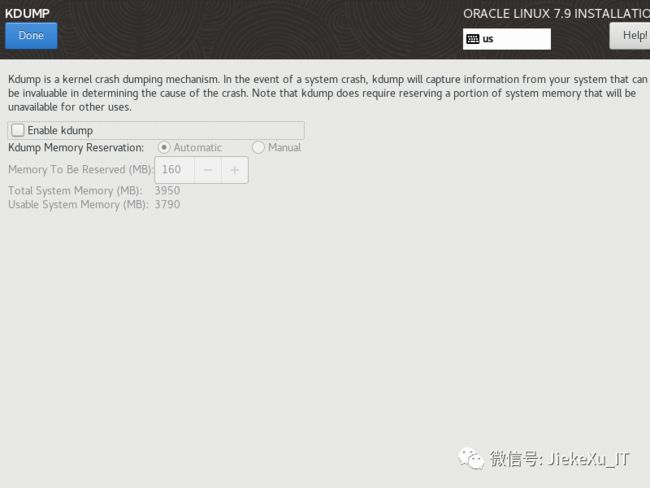
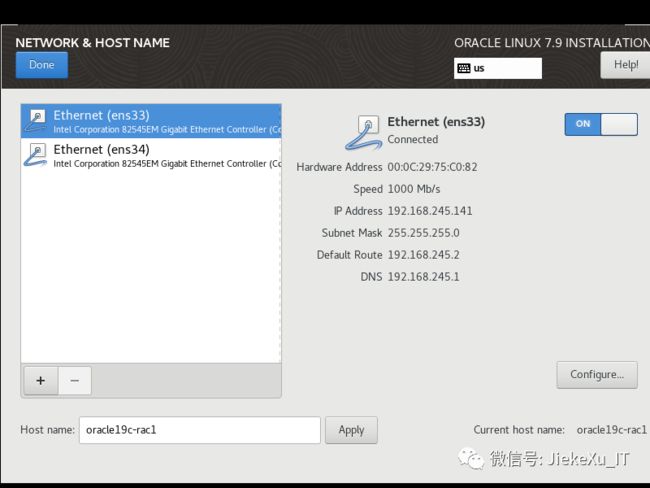
2.10 分别安装操作系统
2.11 安装完成之后,加快SSH登录
三、共享存储配置
-
3.1 创建共享磁盘-命令行
3.2 创建共享磁盘-图形(可选,本次未采用)
3.3 关闭两台虚拟机,编辑相关vmx文件
3.4 重新启动虚拟机
3.5 multipath+udev方式绑定存储
四、19cRAC安装准备工作
-
4.1 硬件配置和系统情况
-
4.1.1 检查操作系统
4.1.2 检查内存
4.1.3 检查swap
4.1.4 检查/tmp
4.1.4 检查时间和时区
4.2 主机名和hosts文件
-
4.2.1 设置和检查主机名
4.2.2 调整hosts文件
4.3 网卡(虚拟)配置、netwok文件
-
4.3.1 (可选)禁用虚拟网卡
4.3.2 检查节点的网卡名和IP
4.3.3 测试连通性
4.3.4 调整network
4.4 调整/dev/shm
4.5 关闭THP和numa
4.6 关闭防火墙
4.7 关闭selinux
4.8 配置软件yum源
4.8 安装软件包
4.9 配置核心参数
4.10 关闭avahi服务
4.11 关闭其他服务
4.12 配置ssh服务
4.13 hugepage配置(可选)
4.14 修改login配置
4.15 配置用户限制
4.16 配置NTP服务(可选)
-
4.16.1 使用ctss
4.16.2 使用ntp
4.16.3 使用chony
4.17 创建组和用户
4.18 创建目录
4.19 配置用户环境变量
-
4.19.1 grid
4.19.2 oracle
4.20 配置共享存储(multipath+udev)
-
4.20.1 multipath
4.20.2 UDEV
4.20.2 UDEV(非multipath)
4.20.3 afd(不推荐)
4.21 配置IO调度
4.22 重启OS
4.23 整体check脚本检查
五、安装GI+RU
-
5.1 修改软件包权限
5.2 解压缩软件
-
5.2.1 解压缩grid 软件
5.2.2 升级OPatch
5.2.3 解压缩19.11RU
5.3 安装cvuqdisk软件
5.4 配置grid 用户ssh(可选)
5.5 安装前检查
5.6 执行安装(直接升级19.11)
-
5.6.1 图形截图
5.6.2 执行脚本
5.6.3 检查
六 创建磁盘组
七、安装Oracle软件+RU
-
7.1 修改软件包权限
7.2 解压缩到oracle_home
7.3 升级opatch版本
7.4 安装Oracle软件(直接升级RU19.11)
7.5 安装截图
八 创建数据库
-
8.1 数据库规划
8.2 dbca建库
8.3 连接测试
-
8.3.1 连接CDB
8.3.2 连接pdb
8.3.3 datafile
九 RAC日常管理命令
-
9.1 集群资源状态
9.2 集群服务状态
9.3 数据库状态
9.4 监听状态
9.5 scan状态
9.6 nodeapps状态
9.7 VIP状态
9.8 数据库配置
9.9 OCR
9.10 VOTEDISK
9.11 GI版本
9.12 ASM
9.13 启动和关闭RAC
9.14 节点状态
9.15 切换scan
9.16 切换VIP
一、安装规划
1.1 软件规划
| 软件 | 版本 |
|---|---|
| 虚拟化软件 | VMware®Workstation16 Pro15.0.0 build-10134415 |
| OS软件 | OracleLinux-R7-U9-Server-x86_64-dvd.iso,要求7.4以上 |
| Oracle软件 | LINUX.X64_193000_db_home.zip(安装包) |
| GI软件 | LINUX.X64_193000_grid_home.zip(安装包) |
| RU软件 | p32545008_190000_Linux-x86-64.zip -19.11(非滚动升级方式)p32895426_190000_Linux-x86-64.zip(滚动升级方式) --编者 不太懂能从 RU 区分是否滚动升级方式? |
1.1.1 软件下载
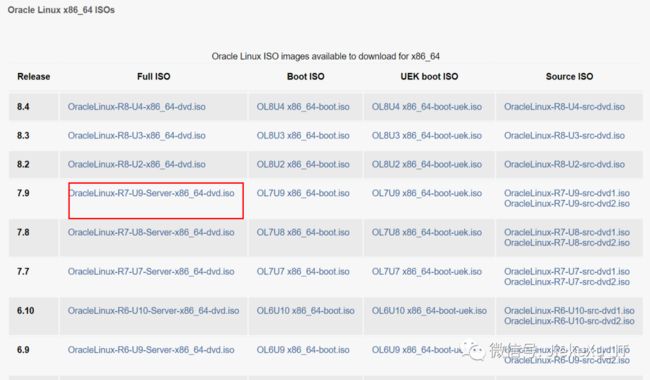
1.1.1.1 OS下载
https://yum.oracle.com/oracle-linux-isos.html
1.1.1.2 RAC软件下载
https://www.oracle.com/database/technologies/oracle19c-linux-downloads.html
![]()
可以利用sha256sum检验软件的完整性。
[root@dwrac1 soft]# sha256sum LINUX.X64_193000_db_home.zip
ba8329c757133da313ed3b6d7f86c5ac42cd9970a28bf2e6233f3235233aa8d8  LINUX.X64_193000_db_home.zip
[root@dwrac1 soft]# sha256sum LINUX.X64_193000_grid_home.zip
d668002664d9399cf61eb03c0d1e3687121fc890b1ddd50b35dcbe13c5307d2e  LINUX.X64_193000_grid_home.zip
1.1.1.3 RU下载
每个 RU 大小在 2.5G 左右。
编者注:19.11 RU 下载 32578973 即可,包含 GI and DB,还有 OJVM 补丁,比较方便。不过现在 19.12 RU Linux 版已经发布了,可查看:https://www.modb.pro/download/137693 。
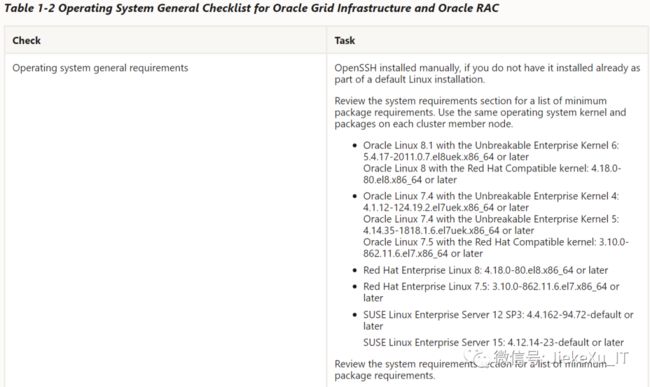
1.1.2 操作系统认证
因此安装 Oracle19c RAC,选择 Linux 操作系统,要求最好在 7.5 版本以上。这点请注意。
1.2 虚拟机规划
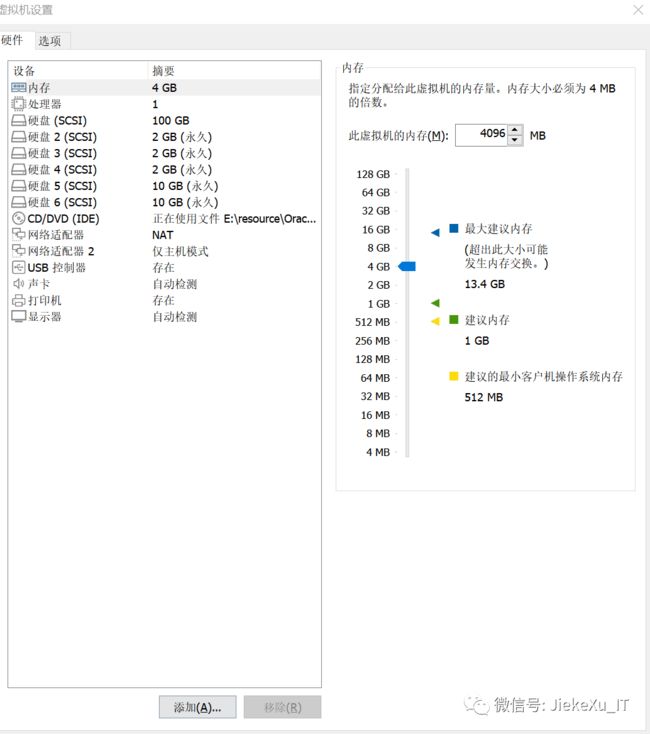
硬件要求 8G 内存,但是无奈自己的笔记本只有16G.因此每个虚拟机划分为 4G。尝试安装。
| 配置 | |
|---|---|
| CPU | 2core |
| MEM | 4G |
| DISK | 100G |
| 网卡 | 两个网卡,一块Public IP、一块Private IP |
| ISO | OracleLinux-R7-U9-Server-x86_64-dvd.iso |
1.3 网络规划
| 节点名称 | Public IP(NAT) | Private IP(HOST) | Virtual IP | SCAN 名称 | SCAN IP |
|---|---|---|---|---|---|
| oracle19c-rac1 | 192.168.245.141 | 192.168.28.141 | 192.168.245.143 | rac-scan | 192.168.245.145 |
| oracle19c-rac2 | 192.168.245.142 | 192.168.28.142 | 192.168.245.144 |
cp /etc/hosts /etc/hosts_`date +"%Y%m%d_%H%M%S"`
echo '#public ip
192.168.245.141  oracle19c-rac1
192.168.245.142  oracle19c-rac2
#private ip
192.168.28.141 oracle19c-rac1-priv
192.168.28.142 oracle19c-rac2-priv
#vip
192.168.245.143 oracle19c-rac1-vip
192.168.245.144 oracle19c-rac2-vip
#scanip
192.168.245.145 oracle19c-rac-scan1'>> /etc/hosts
1.4 操作系统规划
Table 1-3 Server Configuration Checklist for Oracle Grid Infrastructure
| Check | Task |
|---|---|
| Disk space allocated to the temporary file system | At least 1 GB of space in the temporary disk space (/tmp) directory. |
| Swap space allocation relative to RAM | Between 4 GB and 16 GB: Equal to RAM More than 16 GB: 16 GB Note: If you enable HugePages for your Linux servers, then you should deduct the memory allocated to HugePages from the available RAM before calculating swap space. |
| HugePages memory allocation | Allocate memory to HugePages large enough for the System Global Areas (SGA) of all databases planned to run on the cluster, and to accommodate the System Global Area for the Grid Infrastructure Management Repository. |
| Mount point paths for the software binaries | Oracle recommends that you create an Optimal Flexible Architecture configuration as described in the appendix “Optimal Flexible Architecture” in Oracle Grid Infrastructure Installation and Upgrade Guide for your platform. |
| Ensure that the Oracle home (the Oracle home path you select for Oracle Database) uses only ASCII characters | The ASCII character restriction includes installation owner user names, which are used as a default for some home paths, as well as other directory names you may select for paths. |
| Set locale (if needed) | Specify the language and the territory, or locale, in which you want to use Oracle components. A locale is a linguistic and cultural environment in which a system or program is running. NLS (National Language Support) parameters determine the locale-specific behavior on both servers and clients. The locale setting of a component determines the language of the user interface of the component, and the globalization behavior, such as date and number formatting. |
| Set Network Time Protocol for Cluster Time Synchronization | Oracle Clusterware requires the same time zone environment variable setting on all cluster nodes.Ensure that you set the time zone synchronization across all cluster nodes using either an operating system configured network time protocol (NTP) or Oracle Cluster Time Synchronization Service. |
| Check Shared Memory File System Mount | By default, your operating system includes an entry in /etc/fstab to mount /dev/shm. However, if your Cluster Verification Utility (CVU) or Oracle Universal Installer (OUI) checks fail, then ensure that the /dev/shm mount area is of type tmpfs and is mounted with the following options:rw and exec permissions set on itWithout noexec or nosuid set on itNote: Your operating system usually sets these options as the default permissions. If they are set by the operating system, then they are not listed on the mount options. |
| 要求 | |
|---|---|
| 软件目录 | 安装Grid Infrastracture所需空间:12GB 安装Oracle Database所需空间:7.3GB 此外安装过程中分析、收集、跟踪文件所需空间:10GB 建议总共至少100GB(此处不包含ASM或NFS的空间需求) |
| /tmp | 至少1G |
| swap | 4-16G等于内存;大于16G选择16G |
| /dev/shm | 6G |
| HugePages | 本方案不做配置 |
| 时间同步 |
1.4.1 操作系统目录
| 分区 | 大小 |
|---|---|
| /boot | 1G |
| / | 10G |
| /tmp | 10G |
| SWAP | 8G |
| /u01 | 70G |
1.4.2 软件包
Table 4-2 x86-64 Oracle Linux 7 Minimum Operating System Requirements
| Item | Requirements |
|---|---|
| SSH Requirement | Ensure that OpenSSH is installed on your servers. OpenSSH is the required SSH software. |
| Oracle Linux 7 | Subscribe to the Oracle Linux 7 channel on the Unbreakable Linux Network, or configure a yum repository from the Oracle Linux yum server website, and then install the Oracle Preinstallation RPM. This RPM installs all required kernel packages for Oracle Grid Infrastructure and Oracle Database installations, and performs other system configuration.Supported distributions:Oracle Linux 7.4 with the Unbreakable Enterprise Kernel 4: 4.1.12-124.19.2.el7uek.x86_64 or laterOracle Linux 7.4 with the Unbreakable Enterprise Kernel 5: 4.14.35-1818.1.6.el7uek.x86_64 or laterOracle Linux 7.5 with the Red Hat Compatible kernel: 3.10.0-862.11.6.el7.x86_64 or later |
| Packages for Oracle Linux 7 | Install the latest released versions of the following packages: bc binutils compat-libcap1 compat-libstdc33 elfutils-libelf elfutils-libelf-devel fontconfig-devel glibc glibc-devel ksh libaio libaio-devel libXrender libXrender-devel libX11 libXau libXi libXtst libgcc libstdclibstdc+±devel libxcb make smartmontools sysstat Note:If you intend to use 32-bit client applications to access 64-bit servers, then you must also install (where available) the latest 32-bit versions of the packages listed in this table. |
| Optional Packages for Oracle Linux 7 | Based on your requirement, install the latest released versions of the following packages: ipmiutil (for Intelligent Platform Management Interface) net-tools (for Oracle RAC and Oracle Clusterware) nfs-utils (for Oracle ACFS) python (for Oracle ACFS Remote) python-configshell (for Oracle ACFS Remote) python-rtslib (for Oracle ACFS Remote) python-six (for Oracle ACFS Remote) targetcli (for Oracle ACFS Remote) |
| KVM virtualization | Kernel-based virtual machine (KVM), also known as KVM virtualization, is certified on Oracle Database 19c for all supported Oracle Linux 7 distributions. For more information on supported virtualization technologies for Oracle Database, refer to the virtualization matrix:https://www.oracle.com/database/technologies/virtualization-matrix.html |
1.5 共享存储规划
able 1-6 Oracle Grid Infrastructure Storage Configuration Checks
| Check | Task |
|---|---|
| Minimum disk space (local or shared) for Oracle Grid Infrastructure Software | At least 12 GB of space for the Oracle Grid Infrastructure for a cluster home (Grid home). Oracle recommends that you allocate 100 GB to allow additional space for patches. At least 10 GB for Oracle Database Enterprise Edition.Allocate additional storage space as per your cluster configuration, as described in Oracle Clusterware Storage Space Requirements. |
| Select Oracle ASM Storage Options | During installation, based on the cluster configuration, you are asked to provide Oracle ASM storage paths for the Oracle Clusterware files. These path locations must be writable by the Oracle Grid Infrastructure installation owner (Grid user). These locations must be shared across all nodes of the cluster on Oracle ASM because the files in the Oracle ASM disk group created during installation must be available to all cluster member nodes.For Oracle Standalone Cluster deployment, shared storage, either Oracle ASM or shared file system, is locally mounted on each of the cluster nodes.For Oracle Domain Services Cluster deployment, Oracle ASM storage is shared across all nodes, and is available to Oracle Member Clusters. Oracle Member Cluster for Oracle Databases can either use storage services from the Oracle Domain Services Cluster or local Oracle ASM storage shared across all the nodes. Oracle Member Cluster for Applications always use storage services from the Oracle Domain Services Cluster. Before installing Oracle Member Cluster, create a Member Cluster Manifest file that specifies the storage details.Voting files are files that Oracle Clusterware uses to verify cluster node membership and status. Oracle Cluster Registry files (OCR) contain cluster and database configuration information for Oracle Clusterware. |
| Select Grid Infrastructure Management Repository (GIMR) Storage Option | Depending on the type of cluster you are installing, you can choose to either host the Grid Infrastructure Management Repository (GIMR) for a cluster on the same cluster or on a remote cluster.Note:Starting with Oracle Grid Infrastructure 19c, configuring GIMR is optional for Oracle Standalone Cluster deployments.For Oracle Standalone Cluster deployment, you can specify the same or separate Oracle ASM disk group for the GIMR.For Oracle Domain Services Cluster deployment, the GIMR must be configured on a separate Oracle ASM disk group.Oracle Member Clusters use the remote GIMR of the Oracle Domain Services Cluster. You must specify the GIMR details when you create the Member Cluster Manifest file before installation. |
Table 8-1 Minimum Available Space Requirements for Oracle Standalone Cluster With GIMR Configuration
| Redundancy Level | DATA Disk Group | MGMT Disk Group | Oracle Fleet Patching and Provisioning | Total Storage |
|---|---|---|---|---|
| External | 1 GB | 28 GBEach node beyond four:5 GB | 1 GB | 30 GB |
| Normal | 2 GB | 56 GBEach node beyond four:5 GB | 2 GB | 60 GB |
| High/Flex/Extended | 3 GB | 84 GBEach node beyond four:5 GB | 3 GB | 90 GB |
Table 8-2 Minimum Available Space Requirements for Oracle Standalone Cluster Without GIMR Configuration
| Redundancy Level | DATA Disk Group | Oracle Fleet Patching and Provisioning | Total Storage |
|---|---|---|---|
| External | 1 GB | 1 GB | 2 GB |
| Normal | 2 GB | 2 GB | 4 GB |
| High/Flex/Extended | 3 GB | 3 GB | 6 GB |
根据要求,采用的磁盘组策略如下:
| 磁盘组 | 大小 |
|---|---|
| OCRVOTE | 3*2G |
| DATA | 2*10G |
1.6 Oracle规划
1.6.1 软件规划
| 软件 | 版本 |
|---|---|
| Oracle软件 | LINUX.X64_193000_db_home.zip(安装包) |
| GI软件 | LINUX.X64_193000_grid_home.zip(安装包) |
| RU软件 | p32545008_190000_Linux-x86-64.zip -19.11(安装直接升级方式)p32895426_190000_Linux-x86-64.zip(非滚动升级方式) |
| opatch版本 | OPatch 12.2.0.1.25 for DB 12.x, 18.x, 19.x, 20.x and 21.x releases (May 2021) |
1.6.2 用户组和用户
常见用户组说明
| 组 | 角色 | 权限 |
|---|---|---|
| oinstall | 安装和升级oracle软件 | |
| dba | sysdba | 创建、删除、修改、启动、关闭数据库,切换日志归档模式,备份恢复数据库 |
| oper | sysoper | 启动、关闭、修改、备份、恢复数据库,修改归档模式 |
| asmdba | sysdba自动存储管理 | 管理ASM实例 |
| asmoper | sysoper自动存储管理 | 启动、停止ASM实例 |
| asmadmin | sysasm | 挂载、卸载磁盘组,管理其他存储设备 |
| backupdba | sysbackup | 启动关闭和执行备份恢复(12c) |
| dgdba | sysdg | 管理Data Guard(12c) |
| kmdba | syskm | 加密管理相关操作 |
| racdba | rac管理 |
| **GroupName** | **GroupID** | **说明** |
|---|---|---|
| oinstall | 54421 | Oracle清单和软件所有者 |
| dba | 54322 | 数据库管理员 |
| oper | 54323 | DBA操作员组 |
| backupdba | 54324 | 备份管理员 |
| dgdba | 54325 | DG管理员 |
| kmdba | 54326 | KM管理员 |
| asmdba | 54327 | ASM数据库管理员组 |
| asmoper | 54328 | ASM操作员组 |
| asmadmin | 54329 | Oracle自动存储管理组 |
| racdba | 54330 | RAC管理员 |
| 用户UID | OS用户 | 主 | 用户目录 | 默认shell | |
|---|---|---|---|---|---|
| 10000 | oracle | oinstall | dba,asmdba,backupdba,dgdba,kmdba,racdba,oper | /home/oracle | bash |
| 10001 | grid | oinstall | dba,asmadmin,asmdba,racdba,asmoper | /home/grid | bash |
1.6.3 软件目录规划
| 目录名称 | 路径 | 说明 |
|---|---|---|
| ORACLE_BASE (oracle) | /u01/app/oracle | oracle基目录 |
| ORACLE_HOME (oracle) | /u01/app/oracle/product/19.3.0/dbhome_1 | oracle用户HOME目录 |
| ORACLE_BASE (grid) | /u01/app/grid | grid基目录 |
| ORACLE_HOME (grid) | /u01/app/19.3.0/grid | grid用户HOME目录 |
1.6.4 整体数据库安装规划
| 规划内容 | 规划描述 |
|---|---|
| PDB | ocrlpdb |
| 内存规划 | SGA PGA |
| processes | 1000 |
| 字符集 | ZHS16GBK |
| 归档模式 | 非 |
| redo | 5组 每组200M |
| undo | 2G 自动扩展 最大4G |
| temp | 4G |
| 闪回配置 | 4G大小 |
| 归档模式 | 非归档(手工调整归档模式) |
1.6.5 RU升级规划
安装完成之后,计划升级到最新的RU 19.11版本。
二、虚拟机安装
两台虚拟机创建方式相同,只是IP和主机名不同,因此相关说明只截取一台
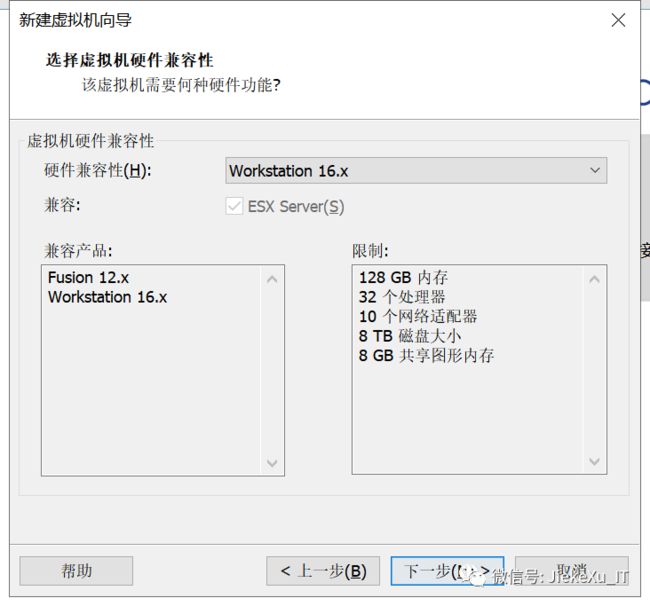
2.1 选择硬件兼容性
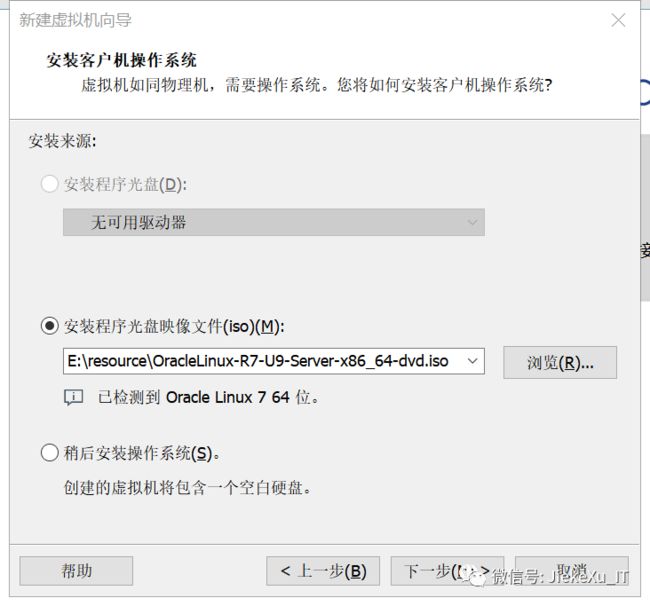
2.2 选择操作系统ISO
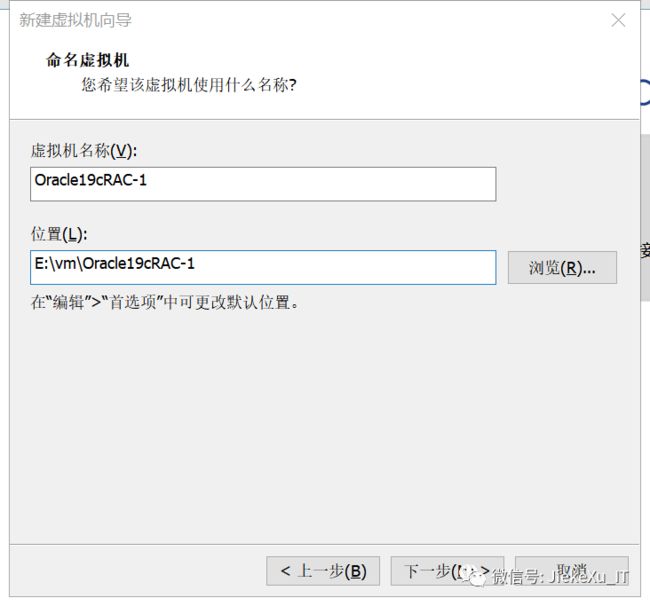
2.3 命名虚拟机
2.4 CPU
2.5 内存
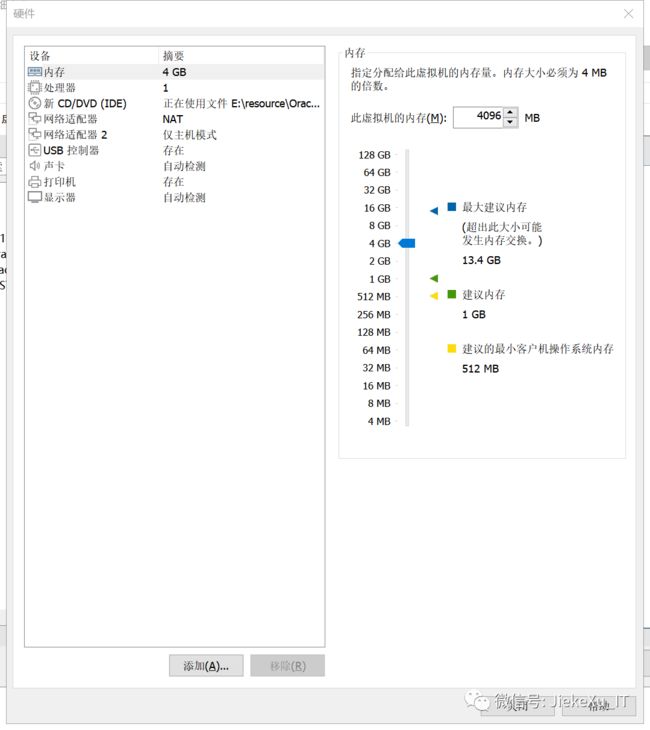
编者注:内存这块虽是个人学习,但也需要至少 8GB 的内存方可,GI 安装官方文档说明最低需要 8GB 内存。
2.6 网卡
2.7 硬盘
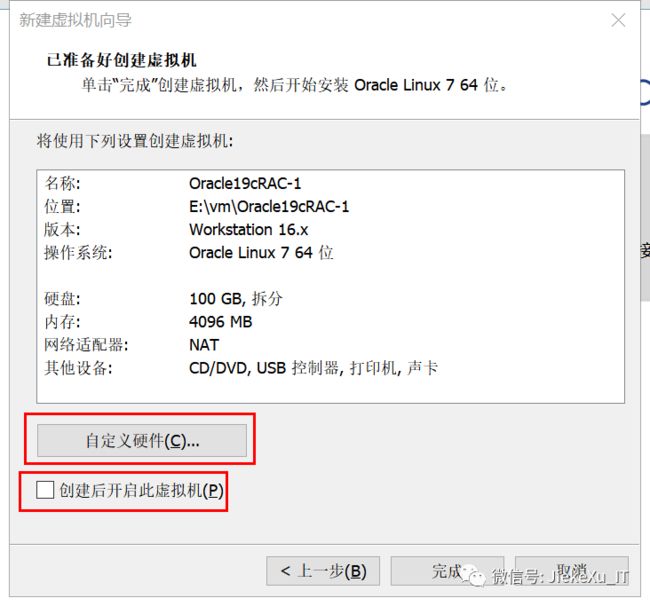
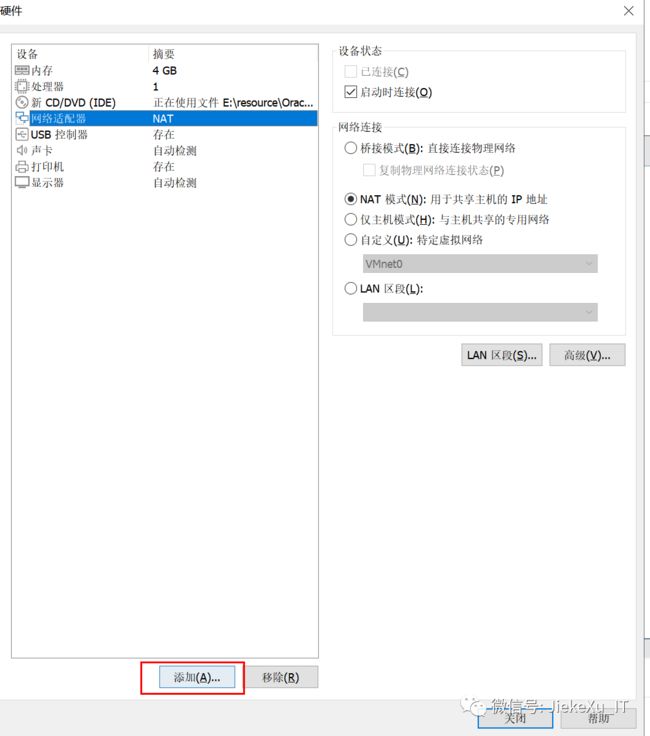
2.8 添加网卡
2.9 同样方式创建 RAC2 节点
过程省略……
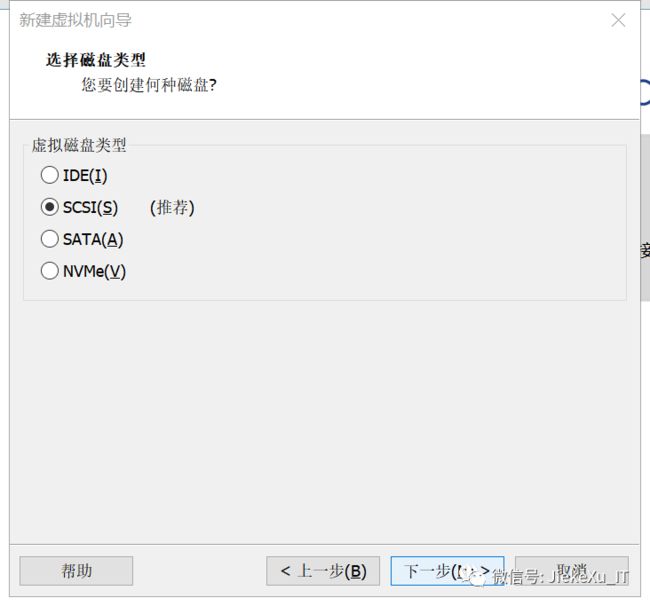
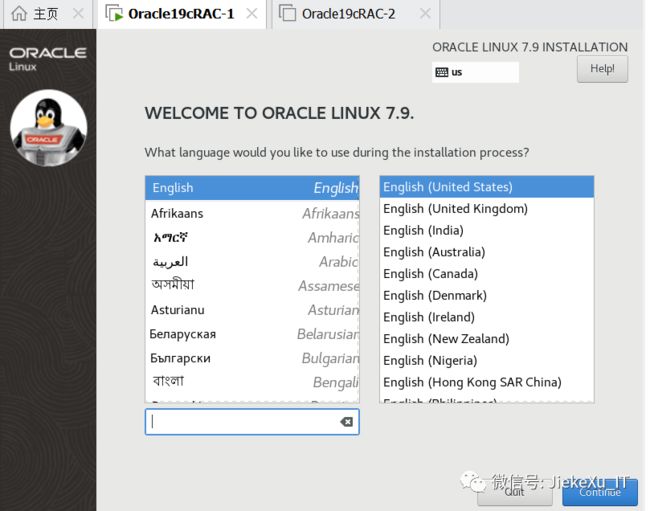
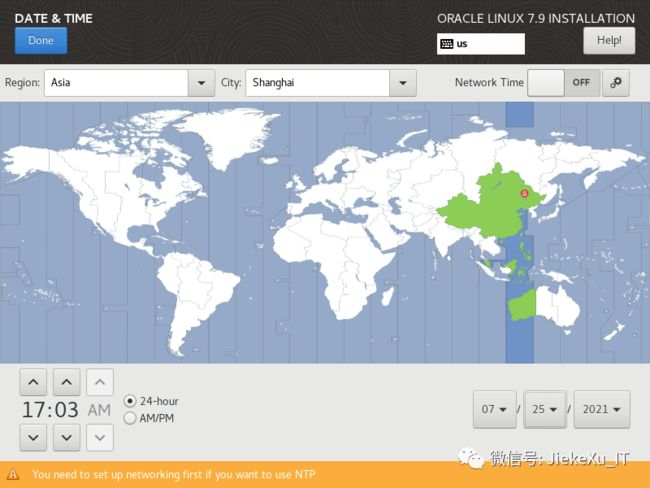
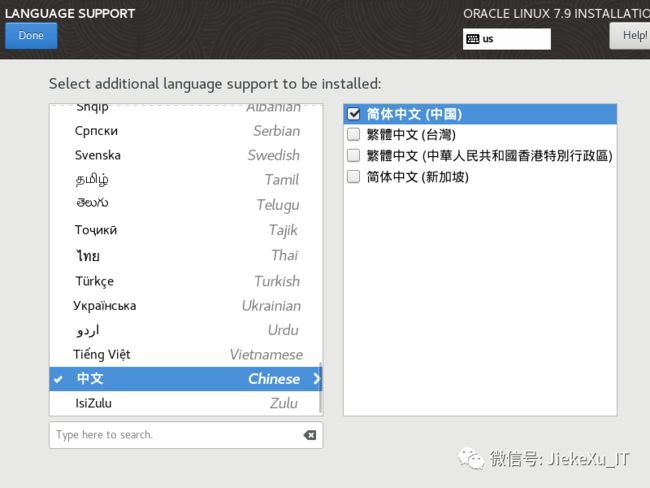
2.10 分别安装操作系统
2.11 安装完成之后,加快 SSH 登录
--配置LoginGraceTime参数为0, 将timeout wait设置为无限制
cp /etc/ssh/sshd_config /etc/ssh/sshd_config_`date +"%Y%m%d_%H%M%S"` && sed -i '/#LoginGraceTime 2m/ s/#LoginGraceTime 2m/LoginGraceTime 0/' /etc/ssh/sshd_config && grep LoginGraceTime /etc/ssh/sshd_config


--加快SSH登陆速度,禁用DNS
cp /etc/ssh/sshd_config /etc/ssh/sshd_config_`date +"%Y%m%d_%H%M%S"` && sed -i '/#UseDNS yes/ s/#UseDNS yes/UseDNS no/' /etc/ssh/sshd_config && grep UseDNS /etc/ssh/sshd_config
三、共享存储配置
3.1 创建共享磁盘-命令行
vmware-vdiskmanager.exe -c -s 2g -a lsilogic -t 2 "E:\vm\sharedisk19c\share-ocr01.vmdk" vmware-vdiskmanager.exe -c -s 2g -a lsilogic -t 2 "E:\vm\sharedisk19c\share-ocr02.vmdk" vmware-vdiskmanager.exe -c -s 2g -a lsilogic -t 2 "E:\vm\sharedisk19c\share-ocr03.vmdk" vmware-vdiskmanager.exe -c -s 10GB -a lsilogic -t 2 "E:\vm\sharedisk19c\share-data01.vmdk"vmware-vdiskmanager.exe -c -s 10GB -a lsilogic -t 2 "E:\vm\sharedisk19c\share-data02.vmdk"
执行过程:
PS D:\app\vmware16> .\vmware-vdiskmanager.exe -c -s 2g -a lsilogic -t 2 "E:\vm\sharedisk19c\share-ocr01.vmdk"Creating disk 'E:\vm\sharedisk19c\share-ocr01.vmdk'  Create: 100% done.Virtual disk creation successful.
PS D:\app\vmware16> .\vmware-vdiskmanager.exe -c -s 2g -a lsilogic -t 2 "E:\vm\sharedisk19c\share-ocr02.vmdk"Creating disk 'E:\vm\sharedisk19c\share-ocr02.vmdk'  Create: 100% done.Virtual disk creation successful.PS D:\app\vmware16>PS D:\app\vmware16> .\vmware-vdiskmanager.exe -c -s 2g -a lsilogic -t 2 "E:\vm\sharedisk19c\share-ocr03.vmdk"Creating disk 'E:\vm\sharedisk19c\share-ocr03.vmdk'  Create: 100% done.Virtual disk creation successful.PS D:\app\vmware16>PS D:\app\vmware16> .\vmware-vdiskmanager.exe -c -s 10GB -a lsilogic -t 2 "E:\vm\sharedisk19c\share-data01.vmdk"Creating disk 'E:\vm\sharedisk19c\share-data01.vmdk'  Create: 100% done.Virtual disk creation successful.PS D:\app\vmware16> .\vmware-vdiskmanager.exe -c -s 10GB -a lsilogic -t 2 "E:\vm\sharedisk19c\share-data02.vmdk"Creating disk 'E:\vm\sharedisk19c\share-data02.vmdk'  Create: 100% done.Virtual disk creation successful.

相关命令说明:vmware-vdiskmanager [选项]这里的选项你必须包含以下的一些选择项或参数选项和参数描述
虚拟磁盘文件的名字。虚拟磁盘文件必须是.vmdk为扩展名。你能够指定一个你想要储存的虚拟磁盘文件的路径。如果你在你的宿主机中映射了网络共享,你也可以提供确切的虚拟磁盘文件的路径信息来创建虚拟磁盘在这个网络共享中
-c创建虚拟磁盘。你必须用-a, -s 和 -t 并指定选项参数,然后你需要指定所要创建的虚拟磁盘文件的文件名。
-s [GB|MB]指定虚拟磁盘的大小。确定大小用GB或MB做单位。你必须在创建磁盘时指定其大小。尽管你必须指定虚拟磁盘的大小,但当你增长它的大小时,你不能用-s这个选项。可以指定的磁盘大小规定:IDE和SCSI适配器都为最小100MB,最大950GB。
-a [ ide | buslogic | lsilogic ]指定磁盘适配器的类型。你在创建新的虚拟磁盘时必须指定其类型。选择以下类型之一:ide —— IDE接口适配器buslogic —— BusLogic SCSI接口适配器lsilogic —— LSI Logic SCSI接口适配器
-t [0|1|2|3]你在创建一个新的虚拟磁盘或者重新配置一个虚拟磁盘时必须指定虚拟磁盘的类型。指定以下类型之一:0 —— 创建一个包含在单一虚拟文件中的可增长虚拟磁盘1 —— 创建一个被分割为每个文件2GB大小的可增长虚拟磁盘2 —— 创建一个包含在单一虚拟文件中的预分配虚拟磁盘3 —— 创建一个被分割为每个文件2GB大小的预分配虚拟磁盘
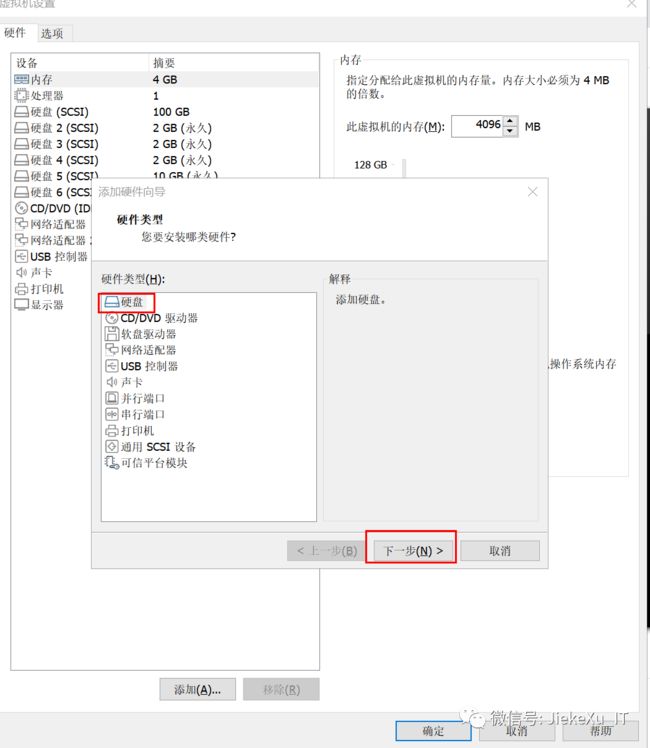
3.2 创建共享磁盘-图形(可选,本次未采用)
通过界面创建方法:
添加硬盘
![]()
3.3 关闭两台虚拟机,编辑相关vmx文件
#shared disks configure
diskLib.dataCacheMaxSize=0
diskLib.dataCacheMaxReadAheadSize=0
diskLib.dataCacheMinReadAheadSize=0
diskLib.dataCachePageSize=4096
diskLib.maxUnsyncedWrites = "0"


disk.locking = "FALSE"
scsi1.sharedBus = "virtual"
scsi1.present = "TRUE"
scsi1.virtualDev = "lsilogic"


scsi1:0.mode = "independent-persistent"
scsi1:0.deviceType = "disk"
scsi1:0.present = "TRUE"
scsi1:0.fileName = "E:\vm\sharedisk19c\share-ocr01.vmdk"
scsi1:0.redo = ""


scsi1:1.mode = "independent-persistent"
scsi1:1.deviceType = "disk"
scsi1:1.present = "TRUE"
scsi1:1.fileName = "E:\vm\sharedisk19c\share-ocr02.vmdk"
scsi1:1.redo = ""


scsi1:2.mode = "independent-persistent"
scsi1:2.deviceType = "disk"
scsi1:2.present = "TRUE"
scsi1:2.fileName = "E:\vm\sharedisk19c\share-ocr03.vmdk"
scsi1:2.redo = ""


scsi1:3.mode = "independent-persistent"
scsi1:3.deviceType = "disk"
scsi1:3.present = "TRUE"
scsi1:3.fileName = "E:\vm\sharedisk19c\share-data01.vmdk"
scsi1:3.redo = ""


scsi1:4.mode = "independent-persistent"
scsi1:4.deviceType = "disk"
scsi1:4.present = "TRUE"
scsi1:4.fileName = "E:\vm\sharedisk19c\share-data02.vmdk"
scsi1:4.redo = ""
3.4 重新启动虚拟机
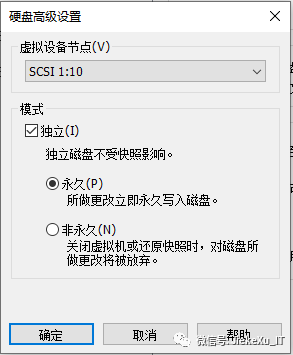
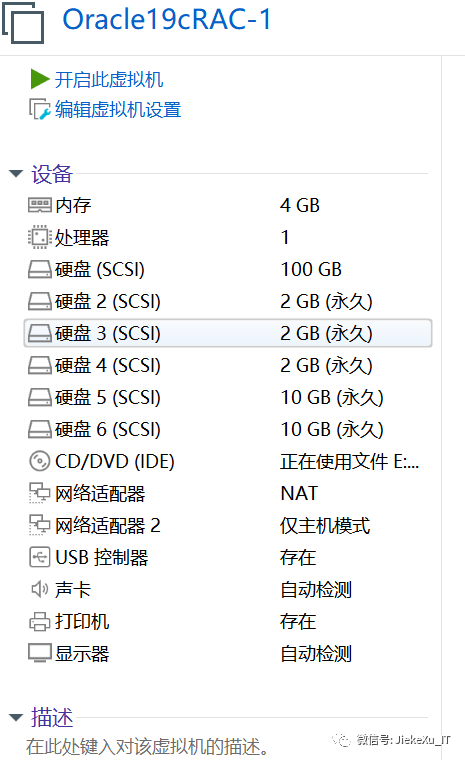
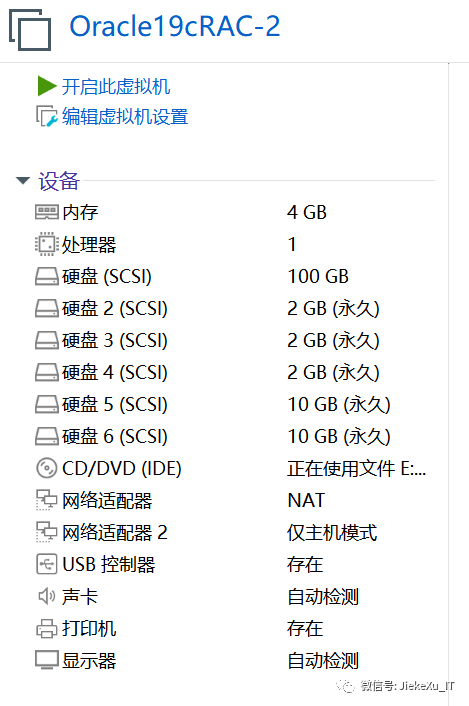
重新打开虚拟机设置进行确认
3.5 multipath+udev方式绑定存储
详情见 4.20 后面配置
四、19cRAC安装准备工作
4.1 硬件配置和系统情况
4.1.1 检查操作系统
[root@oracle19c-rac1 ~]#  cat /etc/oracle-release
Oracle Linux Server release 7.9


[root@oracle19c-rac2 ~]#  cat /etc/oracle-release
Oracle Linux Server release 7.9
[root@oracle19c-rac1 ~]# dmidecode |grep Name
        Product Name: VMware Virtual Platform
        Product Name: 440BX Desktop Reference Platform
        Manufacturer Name: Intel


CPU:
[root@oracle19c-rac1 ~]# dmidecode |grep -i cpu|grep -i version|awk -F ':' '{print $2}'
 Intel(R) Core(TM) i5-10210U CPU @ 1.60GHz
4.1.2 检查内存
dmidecode|grep -A5 "Memory Device"|grep Size|grep -v No |grep -v Range
[root@oracle19c-rac1 ~]# dmidecode|grep -A5 "Memory Device"|grep Size|grep -v No |grep -v Range
        Size: 4096 MB
[root@oracle19c-rac2 ~]# dmidecode|grep -A5 "Memory Device"|grep Size|grep -v No |grep -v Range
        Size: 4096 MB


or
grep MemTotal /proc/meminfo | awk '{print $2}'
4.1.3 检查swap
[root@oracle19c-rac1 ~]# free -h
              total        used        free      shared  buff/cache   available
Mem:           3.8G        154M        3.6G        8.8M        121M        3.5G
Swap:          4.0G          0B        4.0G
[root@oracle19c-rac1 ~]#


[root@oracle19c-rac2 ~]# free -h
              total        used        free      shared  buff/cache   available
Mem:           3.8G        155M        3.6G        8.8M        121M        3.5G
Swap:          4.0G          0B        4.0G


or
grep SwapTotal /proc/meminfo | awk '{print $2}'
[root@oracle19c-rac1 ~]# grep MemTotal /proc/meminfo | awk '{print $2}'
4021836
[root@oracle19c-rac1 ~]# grep SwapTotal /proc/meminfo | awk '{print $2}'
4194300
4.1.4 检查/tmp
[root@oracle19c-rac1 ~]# df -h /tmp
Filesystem          Size  Used Avail Use% Mounted on
/dev/mapper/ol-tmp   10G   33M   10G   1% /tmp


[root@oracle19c-rac2 ~]# df -h /tmp
Filesystem          Size  Used Avail Use% Mounted on
/dev/mapper/ol-tmp   10G   33M   10G   1% /tmp
4.1.4 检查时间和时区
检查时间和时区
[root@oracle19c-rac1 ~]# date
Tue Jul 27 23:14:02 CST 2021
[root@oracle19c-rac2 ~]# date
Tue Jul 27 23:14:01 CST 2021


时区:
[root@oracle19c-rac1 ~]#  timedatectl status|grep Local
      Local time: Tue 2021-07-27 23:15:42 CST
[root@oracle19c-rac1 ~]# date -R
Tue, 27 Jul 2021 23:16:21 +0800


[root@oracle19c-rac2 ~]#  timedatectl status|grep Local
      Local time: Tue 2021-07-27 23:15:41 CST
[root@oracle19c-rac2 ~]# date -R
Tue, 27 Jul 2021 23:16:20 +0800
[root@oracle19c-rac2 ~]#


[root@oracle19c-rac1 ~]# timedatectl | grep "Asia/Shanghai"
       Time zone: Asia/Shanghai (CST, +0800)
[root@oracle19c-rac2 ~]# timedatectl | grep "Asia/Shanghai"
       Time zone: Asia/Shanghai (CST, +0800)


--设置时区:
 timedatectl set-timezone "Asia/Shanghai" && timedatectl status|grep Local
4.2 主机名和hosts文件
4.2.1 设置和检查主机名
[root@oracle19c-rac1 ~]# hostnamectl status
   Static hostname: oracle19c-rac1
         Icon name: computer-vm
           Chassis: vm
        Machine ID: 34ebaf27901a40b48fc42276652571d4
           Boot ID: 0f9f03ed0ac1456aa94b5a76fe8bbead
    Virtualization: vmware
  Operating System: Oracle Linux Server 7.9
       CPE OS Name: cpe:/o:oracle:linux:7:9:server
            Kernel: Linux 5.4.17-2102.201.3.el7uek.x86_64
      Architecture: x86-64


[root@oracle19c-rac2 ~]# hostnamectl status
   Static hostname: oracle19c-rac2
         Icon name: computer-vm
           Chassis: vm
        Machine ID: f1b57a32977647909b24903f1e20dcf6
           Boot ID: 32567092d4c140e6a1f82cada7da5e07
    Virtualization: vmware
  Operating System: Oracle Linux Server 7.9
       CPE OS Name: cpe:/o:oracle:linux:7:9:server
            Kernel: Linux 5.4.17-2102.201.3.el7uek.x86_64
      Architecture: x86-64


设置方法:
 hostnamectl set-hostname oracle19c-rac1
 hostnamectl set-hostname oracle19c-rac2


 --主机名允许使用小写字母、数字和中横线(-),并且只能以小写字母开头。
4.2.2 调整hosts文件
cp /etc/hosts /etc/hosts_`date +"%Y%m%d_%H%M%S"`
echo '#public ip
192.168.245.141  oracle19c-rac1
192.168.245.142  oracle19c-rac2
#private ip
192.168.28.141 oracle19c-rac1-priv
192.168.28.142 oracle19c-rac2-priv
#vip
192.168.245.143 oracle19c-rac1-vip
192.168.245.144 oracle19c-rac2-vip
#scanip
192.168.245.145 oracle19c-rac-scan1'>> /etc/hosts


[root@oracle19c-rac1 ~]# cat /etc/hosts
127.0.0.1   localhost localhost.localdomain localhost4 localhost4.localdomain4
::1         localhost localhost.localdomain localhost6 localhost6.localdomain6
#public ip
192.168.245.141  oracle19c-rac1
192.168.245.142  oracle19c-rac2
#private ip
192.168.28.141 oracle19c-rac1-priv
192.168.28.142 oracle19c-rac2-priv
#vip
192.168.245.143 oracle19c-rac1-vip
192.168.245.144 oracle19c-rac2-vip
#scanip
192.168.245.145 oracle19c-rac-scan1


[root@oracle19c-rac2 ~]# cat /etc/hosts
127.0.0.1   localhost localhost.localdomain localhost4 localhost4.localdomain4
::1         localhost localhost.localdomain localhost6 localhost6.localdomain6
#public ip
192.168.245.141  oracle19c-rac1
192.168.245.142  oracle19c-rac2
#private ip
192.168.28.141 oracle19c-rac1-priv
192.168.28.142 oracle19c-rac2-priv
#vip
192.168.245.143 oracle19c-rac1-vip
192.168.245.144 oracle19c-rac2-vip
#scanip
192.168.245.145 oracle19c-rac-scan1
4.3 网卡(虚拟)配置、netwok文件
4.3.1 (可选)禁用虚拟网卡
systemctl stop libvirtd
systemctl disable libvirtd
Note:对于虚拟机可选,需要重启操作系统
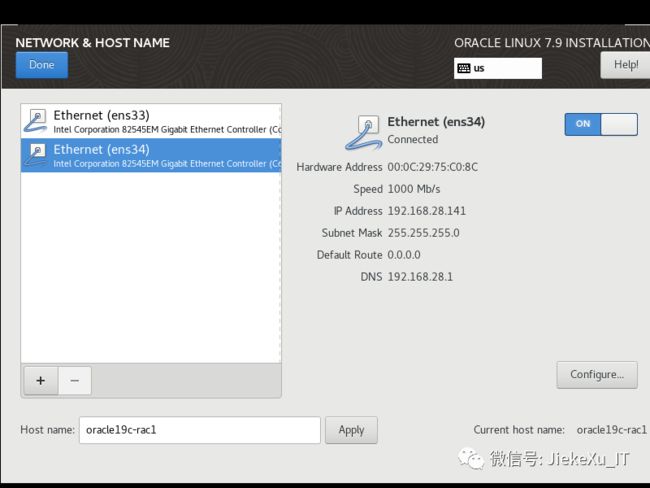
4.3.2 检查节点的网卡名和IP
[root@oracle19c-rac1 ~]# ip a
1: lo:  mtu 65536 qdisc noqueue state UNKNOWN group default qlen 1000
    link/loopback 00:00:00:00:00:00 brd 00:00:00:00:00:00
    inet 127.0.0.1/8 scope host lo
       valid_lft forever preferred_lft forever
    inet6 ::1/128 scope host
       valid_lft forever preferred_lft forever
2: ens33:  mtu 1500 qdisc pfifo_fast state UP group default qlen 1000
    link/ether 00:0c:29:75:c0:82 brd ff:ff:ff:ff:ff:ff
    inet 192.168.245.141/24 brd 192.168.245.255 scope global noprefixroute ens33
       valid_lft forever preferred_lft forever
    inet6 fe80::29c:ece5:a550:57c0/64 scope link noprefixroute
       valid_lft forever preferred_lft forever
3: ens34:  mtu 1500 qdisc pfifo_fast state UP group default qlen 1000
    link/ether 00:0c:29:75:c0:8c brd ff:ff:ff:ff:ff:ff
    inet 192.168.28.141/24 brd 192.168.28.255 scope global noprefixroute ens34
       valid_lft forever preferred_lft forever
    inet6 fe80::df7c:406a:1561:b983/64 scope link noprefixroute
       valid_lft forever preferred_lft forever
[root@oracle19c-rac1 ~]#


[root@oracle19c-rac2 ~]# ip a
1: lo:  mtu 65536 qdisc noqueue state UNKNOWN group default qlen 1000
    link/loopback 00:00:00:00:00:00 brd 00:00:00:00:00:00
    inet 127.0.0.1/8 scope host lo
       valid_lft forever preferred_lft forever
    inet6 ::1/128 scope host
       valid_lft forever preferred_lft forever
2: ens33:  mtu 1500 qdisc pfifo_fast state UP group default qlen 1000
    link/ether 00:0c:29:4f:be:2e brd ff:ff:ff:ff:ff:ff
    inet 192.168.245.142/24 brd 192.168.245.255 scope global noprefixroute ens33
       valid_lft forever preferred_lft forever
    inet6 fe80::bba7:d9fc:63bf:363d/64 scope link noprefixroute
       valid_lft forever preferred_lft forever
3: ens34:  mtu 1500 qdisc pfifo_fast state UP group default qlen 1000
    link/ether 00:0c:29:4f:be:38 brd ff:ff:ff:ff:ff:ff
    inet 192.168.28.142/24 brd 192.168.28.255 scope global noprefixroute ens34
       valid_lft forever preferred_lft forever
    inet6 fe80::1d01:e007:acaf:aaf2/64 scope link noprefixroute
       valid_lft forever preferred_lft forever
需要确认两个节点的网卡名一致,否者安装会出现问题。
如何两个节点名称不一致,可以通过如下方式修改某一个节点.
cat /etc/udev/rules.d/70-persistent-net.rules
ACTION=="add", SUBSYSTEM=="net", DRIVERS=="?*", ATTR{type}=="1", ATTR{address}=="00:50:56:86:64:82", KERNEL=="ens256" NAME="ens224"
ACTION=="add", SUBSYSTEM=="net", DRIVERS=="?*", ATTR{type}=="1", ATTR{address}=="00:50:56:86:05:a1", KERNEL=="ens161" NAME="ens192"
4.3.3 测试连通性
[root@oracle19c-rac1 ~]# ping oracle19c-rac1PING oracle19c-rac1 (192.168.245.141) 56(84) bytes of data.64 bytes from oracle19c-rac1 (192.168.245.141): icmp_seq=1 ttl=64 time=0.101 ms64 bytes from oracle19c-rac1 (192.168.245.141): icmp_seq=2 ttl=64 time=0.056 ms^C--- oracle19c-rac1 ping statistics ---2 packets transmitted, 2 received, 0% packet loss, time 1009msrtt min/avg/max/mdev = 0.056/0.078/0.101/0.024 ms[root@oracle19c-rac1 ~]# ping oracle19c-rac2PING oracle19c-rac2 (192.168.245.142) 56(84) bytes of data.64 bytes from oracle19c-rac2 (192.168.245.142): icmp_seq=1 ttl=64 time=0.313 ms64 bytes from oracle19c-rac2 (192.168.245.142): icmp_seq=2 ttl=64 time=3.21 ms64 bytes from oracle19c-rac2 (192.168.245.142): icmp_seq=3 ttl=64 time=0.484 ms^C--- oracle19c-rac2 ping statistics ---3 packets transmitted, 3 received, 0% packet loss, time 2021msrtt min/avg/max/mdev = 0.313/1.337/3.216/1.330 ms[root@oracle19c-rac1 ~]# ping oracle19c-rac2-privPING oracle19c-rac2-priv (192.168.28.142) 56(84) bytes of data.64 bytes from oracle19c-rac2-priv (192.168.28.142): icmp_seq=1 ttl=64 time=0.867 ms64 bytes from oracle19c-rac2-priv (192.168.28.142): icmp_seq=2 ttl=64 time=0.453 ms^C--- oracle19c-rac2-priv ping statistics ---2 packets transmitted, 2 received, 0% packet loss, time 1002msrtt min/avg/max/mdev = 0.453/0.660/0.867/0.207 ms[root@oracle19c-rac1 ~]# ping oracle19c-rac1-privPING oracle19c-rac1-priv (192.168.28.141) 56(84) bytes of data.64 bytes from oracle19c-rac1-priv (192.168.28.141): icmp_seq=1 ttl=64 time=0.534 ms64 bytes from oracle19c-rac1-priv (192.168.28.141): icmp_seq=2 ttl=64 time=0.049 ms64 bytes from oracle19c-rac1-priv (192.168.28.141): icmp_seq=3 ttl=64 time=0.114 ms^C--- oracle19c-rac1-priv ping statistics ---3 packets transmitted, 3 received, 0% packet loss, time 2074msrtt min/avg/max/mdev = 0.049/0.232/0.534/0.215 ms
4.3.4 调整network
当使用Oracle集群的时候,Zero Configuration Network一样可能会导致节点间的通信问题,所以也应该停掉Without zeroconf, a network administrator must set up network services, such as Dynamic Host Configuration Protocol (DHCP) and Domain Name System (DNS), or configure each computer's network settings manually.在使用平常的网络设置方式的情况下是可以停掉Zero Conf的
两个节点执行
echo "NOZEROCONF=yes"  >>/etc/sysconfig/network && cat /etc/sysconfig/network


[root@oracle19c-rac1 ~]# echo "NOZEROCONF=yes"  >>/etc/sysconfig/network && cat /etc/sysconfig/network
# Created by anaconda
NOZEROCONF=yes


[root@oracle19c-rac2 ~]# echo "NOZEROCONF=yes"  >>/etc/sysconfig/network && cat /etc/sysconfig/network
# Created by anaconda
NOZEROCONF=yes
4.4 调整/dev/shm
[root@oracle19c-rac1 ~]# df -h
Filesystem           Size  Used Avail Use% Mounted on
devtmpfs             2.0G     0  2.0G   0% /dev
tmpfs                2.0G     0  2.0G   0% /dev/shm
tmpfs                2.0G  8.8M  2.0G   1% /run
tmpfs                2.0G     0  2.0G   0% /sys/fs/cgroup
/dev/mapper/ol-root   10G  1.4G  8.7G  14% /
/dev/mapper/ol-u01    70G  8.1G   62G  12% /u01
/dev/mapper/ol-tmp    10G   33M   10G   1% /tmp
/dev/sda1           1014M  169M  846M  17% /boot
tmpfs                393M     0  393M   0% /run/user/0


[root@oracle19c-rac2 ~]# df -h
Filesystem           Size  Used Avail Use% Mounted on
devtmpfs             2.0G     0  2.0G   0% /dev
tmpfs                2.0G     0  2.0G   0% /dev/shm
tmpfs                2.0G  8.8M  2.0G   1% /run
tmpfs                2.0G     0  2.0G   0% /sys/fs/cgroup
/dev/mapper/ol-root   10G  1.4G  8.7G  14% /
/dev/mapper/ol-u01    70G   33M   70G   1% /u01
/dev/mapper/ol-tmp    10G   33M   10G   1% /tmp
/dev/sda1           1014M  169M  846M  17% /boot
tmpfs                393M     0  393M   0% /run/user/0
需要把/dev/shm调整到4G
Linux OL7/RHEL7: PRVE-0421 : No entry exists in /etc/fstab for mounting /dev/shm (文档 ID 2065603.1)


cp /etc/fstab /etc/fstab_`date +"%Y%m%d_%H%M%S"`
echo "tmpfs    /dev/shm    tmpfs    rw,exec,size=4G    0 0">>/etc/fstab


[root@oracle19c-rac1 ~]# cp /etc/fstab /etc/fstab_`date +"%Y%m%d_%H%M%S"`
[root@oracle19c-rac1 ~]# echo "tmpfs    /dev/shm    tmpfs    rw,exec,size=4G    0 0">>/etc/fstab
[root@oracle19c-rac1 ~]#
[root@oracle19c-rac1 ~]# cat /etc/fstab


#
# /etc/fstab
# Created by anaconda on Sun Jul 25 17:13:08 2021
#
# Accessible filesystems, by reference, are maintained under '/dev/disk'
# See man pages fstab(5), findfs(8), mount(8) and/or blkid(8) for more info
#
/dev/mapper/ol-root     /                       xfs     defaults        0 0
UUID=9d5cc891-b252-41b1-a721-0ce462e56a30 /boot                   xfs     defaults        0 0
/dev/mapper/ol-tmp      /tmp                    xfs     defaults        0 0
/dev/mapper/ol-u01      /u01                    xfs     defaults        0 0
/dev/mapper/ol-swap     swap                    swap    defaults        0 0
tmpfs    /dev/shm    tmpfs    rw,exec,size=4G    0 0
[root@oracle19c-rac1 ~]#
[root@oracle19c-rac1 ~]# mount -o remount /dev/shm
[root@oracle19c-rac1 ~]# df -h
Filesystem           Size  Used Avail Use% Mounted on
devtmpfs             2.0G     0  2.0G   0% /dev
tmpfs                4.0G     0  4.0G   0% /dev/shm
tmpfs                2.0G  8.8M  2.0G   1% /run
tmpfs                2.0G     0  2.0G   0% /sys/fs/cgroup
/dev/mapper/ol-root   10G  1.4G  8.7G  14% /
/dev/mapper/ol-u01    70G  8.1G   62G  12% /u01
/dev/mapper/ol-tmp    10G   33M   10G   1% /tmp
/dev/sda1           1014M  169M  846M  17% /boot
tmpfs                393M     0  393M   0% /run/user/0
4.5 关闭THP和numa
检查:
 cat /sys/kernel/mm/transparent_hugepage/enabled
 cat /sys/kernel/mm/transparent_hugepage/defrag


修改
sed -i 's/quiet/quiet transparent_hugepage=never numa=off/' /etc/default/grub
grep quiet  /etc/default/grub
grub2-mkconfig -o /boot/grub2/grub.cfg


重启后检查是否生效:


cat /sys/kernel/mm/transparent_hugepage/enabled
cat /proc/cmdline


#不重启,临时生效
echo never > /sys/kernel/mm/transparent_hugepage/enabled
cat /sys/kernel/mm/transparent_hugepage/enabled
4.6 关闭防火墙
#关闭防火墙
systemctl stop firewalld
systemctl disable firewalld
systemctl status firewalld
[root@oracle19c-rac1 ~]# systemctl stop firewalld
[root@oracle19c-rac1 ~]# systemctl disable firewalld
Removed symlink /etc/systemd/system/multi-user.target.wants/firewalld.service.
Removed symlink /etc/systemd/system/dbus-org.fedoraproject.FirewallD1.service.
[root@oracle19c-rac2 ~]# echo never > /sys/kernel/mm/transparent_hugepage/enabled
[root@oracle19c-rac2 ~]# cat /sys/kernel/mm/transparent_hugepage/enabled
always madvise [never]
4.7 关闭selinux
cp /etc/selinux/config /etc/selinux/config_`date +"%Y%m%d_%H%M%S"`&& sed -i 's/SELINUX\=enforcing/SELINUX\=disabled/g' /etc/selinux/config
cat /etc/selinux/config
#不重启
setenforce 0
getenforce


[root@oracle19c-rac1 ~]# sestatus
SELinux status:                 enabled
SELinuxfs mount:                /sys/fs/selinux
SELinux root directory:         /etc/selinux
Loaded policy name:             targeted
Current mode:                   permissive
Mode from config file:          disabled
Policy MLS status:              enabled
Policy deny_unknown status:     allowed
Max kernel policy version:      31
[root@oracle19c-rac2 ~]# sestatus
SELinux status:                 enabled
SELinuxfs mount:                /sys/fs/selinux
SELinux root directory:         /etc/selinux
Loaded policy name:             targeted
Current mode:                   permissive
Mode from config file:          disabled
Policy MLS status:              enabled
Policy deny_unknown status:     allowed
Max kernel policy version:      31
4.8 配置软件yum源,安装软件包
#mount cdrom
mount /dev/cdrom /mnt
#设置
cd /etc/yum.repos.d/
mkdir bak
mv *.repo ./bak/
cat >> /etc/yum.repos.d/oracle-linux-ol7.repo << "EOF"
[base]
name=base
baseurl=file:///mnt
enabled=1
gpgcheck=0
EOF
#测试
yum repolist
#检查(根据官方文档要求)
rpm -q --qf '%{NAME}-%{VERSION}-%{RELEASE} (%{ARCH})\n' \
bc \
binutils \
compat-libcap1 \
compat-libstdc++-33 \
elfutils-libelf \
elfutils-libelf-devel \
fontconfig-devel \
glibc \
gcc \
gcc-c++  \
glibc \
glibc-devel \
ksh \
libstdc++ \
libstdc++-devel \
libaio \
libaio-devel \
libXrender \
libXrender-devel \
libxcb \
libX11 \
libXau \
libXi \
libXtst \
libgcc \
libstdc++-devel \
make \
sysstat \
unzip \
readline \
smartmontools


#安装软件包和工具包
yum install -y bc*  ntp* binutils*  compat-libcap1*  compat-libstdc++*  dtrace-modules*  dtrace-modules-headers*  dtrace-modules-provider-headers*  dtrace-utils*  elfutils-libelf*  elfutils-libelf-devel* fontconfig-devel*  glibc*  glibc-devel*  ksh*  libaio*  libaio-devel*  libdtrace-ctf-devel*  libXrender*  libXrender-devel*  libX11*  libXau*  libXi*  libXtst*  libgcc*  librdmacm-devel*  libstdc++*  libstdc++-devel*  libxcb*  make*  net-tools*  nfs-utils*  python*  python-configshell*  python-rtslib*  python-six*  targetcli*  smartmontools*  sysstat* gcc* nscd* unixODBC* unzip readline tigervnc*


已经上传相关软件到/u01/sw下,两个节点
rpm -ivh /u01/sw/compat-libstdc++-33-3.2.3-72.el7.x86_64.rpm
#检查
rpm -q --qf '%{NAME}-%{VERSION}-%{RELEASE} (%{ARCH})\n' \
bc \
binutils \
compat-libcap1 \
compat-libstdc++-33 \
elfutils-libelf \
elfutils-libelf-devel \
fontconfig-devel \
glibc \
gcc \
gcc-c++  \
glibc \
glibc-devel \
ksh \
libstdc++ \
libstdc++-devel \
libaio \
libaio-devel \
libXrender \
libXrender-devel \
libxcb \
libX11 \
libXau \
libXi \
libXtst \
libgcc \
libstdc++-devel \
make \
sysstat \
unzip \
readline \
smartmontools
4.9 配置核心参数
编者注:在 Linux 7之前,内核参数文件是修改 /etc/sysctl.conf 文件,但在 Linux 7.x 之后发生了变化(/etc/sysctl.d/97-oracle-database-sysctl.conf):但仍然可以修改这个文件,没有什么不一样,官方文档中 19c 使用 97-oracle-database-sysctl.conf。生效方式: /sbin/sysctl --system
主要核心参数手工计算如下:
MEM=$(expr $(grep MemTotal /proc/meminfo|awk '{print $2}') \* 1024)
SHMALL=$(expr $MEM / $(getconf PAGE_SIZE))
SHMMAX=$(expr $MEM \* 3 / 5) # 这里配置为3/5 RAM大小
echo $MEM
echo $SHMALL
echo $SHMMAX
min_free_kbytes = sqrt(lowmem_kbytes * 16) = 4 * sqrt(lowmem_kbytes)(注:lowmem_kbytes即可认为是系统内存大小)
vm.nr_hugepages =(内存M/3+ASM内存大小4096M)/Hugepagesize M
#操作系统内存的1/3加上ASM实例内存4G。
#x86平台 Hugepagesize =2048即2M,linuxone平台Hugepagesize=1024 即1M
# 例x86平台64G内存 (64G*1024/3+4096M)/2M=12971
例x86平台32G内存 (32G*1024/3+4096M)/2M=7509
例x86平台16G内存 (16G*1024/3+4096M)/2M=4778
#linuxone平台 64G内存 (64G*1024/3+4096M)/1M=25942
#linuxone平台 32G内存 (32G*1024/3+4096M)/1M=12971
256*1024/3+4096
cp /etc/sysctl.conf /etc/sysctl.conf.bak
memTotal=$(grep MemTotal /proc/meminfo | awk '{print $2}')
totalMemory=$((memTotal / 2048))
shmall=$((memTotal / 4))
if [ $shmall -lt 2097152 ]; then
  shmall=2097152
fi
shmmax=$((memTotal * 1024 - 1))
if [ "$shmmax" -lt 4294967295 ]; then
  shmmax=4294967295
fi
cat <>/etc/sysctl.conf
fs.aio-max-nr = 1048576
fs.file-max = 6815744
kernel.shmall = $shmall
kernel.shmmax = $shmmax
kernel.shmmni = 4096
kernel.sem = 250 32000 100 128
net.ipv4.ip_local_port_range = 9000 65500
net.core.rmem_default = 16777216
net.core.rmem_max = 16777216
net.core.wmem_max = 16777216
net.core.wmem_default = 16777216
fs.aio-max-nr = 6194304
vm.dirty_ratio=20
vm.dirty_background_ratio=3
vm.dirty_writeback_centisecs=100
vm.dirty_expire_centisecs=500
vm.swappiness=10
vm.min_free_kbytes=524288
net.core.netdev_max_backlog = 30000
net.core.netdev_budget = 600
#vm.nr_hugepages =
net.ipv4.conf.all.rp_filter = 2
net.ipv4.conf.default.rp_filter = 2
net.ipv4.ipfrag_time = 60
net.ipv4.ipfrag_low_thresh=6291456
net.ipv4.ipfrag_high_thresh = 8388608
EOF


sysctl -p


[root@oracle19c-rac2 ~]# sysctl -p
fs.aio-max-nr = 1048576
fs.file-max = 6815744
kernel.shmall = 2097152
kernel.shmmax = 4294967295
kernel.shmmni = 4096
kernel.sem = 250 32000 100 128
net.ipv4.ip_local_port_range = 9000 65500
net.core.rmem_default = 16777216
net.core.rmem_max = 16777216
net.core.wmem_max = 16777216
net.core.wmem_default = 16777216
fs.aio-max-nr = 6194304
vm.dirty_ratio = 20
vm.dirty_background_ratio = 3
vm.dirty_writeback_centisecs = 100
vm.dirty_expire_centisecs = 500
vm.swappiness = 10
vm.min_free_kbytes = 524288
net.core.netdev_max_backlog = 30000
net.core.netdev_budget = 600
net.ipv4.conf.all.rp_filter = 2
net.ipv4.conf.default.rp_filter = 2
net.ipv4.ipfrag_time = 60
net.ipv4.ipfrag_low_thresh = 6291456
net.ipv4.ipfrag_high_thresh = 8388608
4.10 关闭avahi服务
systemctl stop avahi-deamon
systemctl disable avahi-deamon
systemctl stop avahi-chsconfd
systemctl disable  avahi-chsconfd
4.11 关闭其他服务
--禁用开机启动
systemctl disable accounts-daemon.service
systemctl disable atd.service
systemctl disable avahi-daemon.service
systemctl disable avahi-daemon.socket
systemctl disable bluetooth.service
systemctl disable brltty.service
--systemctl disable chronyd.service
systemctl disable colord.service
systemctl disable cups.service
systemctl disable debug-shell.service
systemctl disable firewalld.service
systemctl disable gdm.service
systemctl disable ksmtuned.service
systemctl disable ktune.service
systemctl disable libstoragemgmt.service
systemctl disable mcelog.service
systemctl disable ModemManager.service
--systemctl disable ntpd.service
systemctl disable postfix.service
systemctl disable postfix.service
systemctl disable rhsmcertd.service
systemctl disable rngd.service
systemctl disable rpcbind.service
systemctl disable rtkit-daemon.service
systemctl disable tuned.service
systemctl disable upower.service
systemctl disable wpa_supplicant.service
--停止服务
systemctl stop accounts-daemon.service
systemctl stop atd.service
systemctl stop avahi-daemon.service
systemctl stop avahi-daemon.socket
systemctl stop bluetooth.service
systemctl stop brltty.service
--systemctl stop chronyd.service
systemctl stop colord.service
systemctl stop cups.service
systemctl stop debug-shell.service
systemctl stop firewalld.service
systemctl stop gdm.service
systemctl stop ksmtuned.service
systemctl stop ktune.service
systemctl stop libstoragemgmt.service
systemctl stop mcelog.service
systemctl stop ModemManager.service
--systemctl stop ntpd.service
systemctl stop postfix.service
systemctl stop postfix.service
systemctl stop rhsmcertd.service
systemctl stop rngd.service
systemctl stop rpcbind.service
systemctl stop rtkit-daemon.service
systemctl stop tuned.service
systemctl stop upower.service
systemctl stop wpa_supplicant.service


暂时不停止chrony和ntp
4.12 配置ssh服务
--配置LoginGraceTime参数为0, 将timeout wait设置为无限制
cp /etc/ssh/sshd_config /etc/ssh/sshd_config_`date +"%Y%m%d_%H%M%S"` && sed -i '/#LoginGraceTime 2m/ s/#LoginGraceTime 2m/LoginGraceTime 0/' /etc/ssh/sshd_config && grep LoginGraceTime /etc/ssh/sshd_config
--加快SSH登陆速度,禁用DNS
cp /etc/ssh/sshd_config /etc/ssh/sshd_config_`date +"%Y%m%d_%H%M%S"` && sed -i '/#UseDNS yes/ s/#UseDNS yes/UseDNS no/' /etc/ssh/sshd_config && grep UseDNS /etc/ssh/sshd_config
4.13 hugepage配置(可选)
与AMM冲突
如果您有较大的RAM和SGA,则HugePages对于在Linux上提高Oracle数据库性能至关重要
grep HugePagesize /proc/meminfo
Hugepagesize:    2048 kB


chmod 755 hugepages_settings.sh
需要在数据库启动情况下执行


脚本:
cat hugepages_settings.sh
#!/bin/bash
#
# hugepages_settings.sh
#
# Linux bash script to compute values for the
# recommended HugePages/HugeTLB configuration
# on Oracle Linux
#
# Note: This script does calculation for all shared memory
# segments available when the script is run, no matter it
# is an Oracle RDBMS shared memory segment or not.
#
# This script is provided by Doc ID 401749.1 from My Oracle Support
# http://support.oracle.com


# Welcome text
echo "
This script is provided by Doc ID 401749.1 from My Oracle Support
(http://support.oracle.com) where it is intended to compute values for
the recommended HugePages/HugeTLB configuration for the current shared
memory segments on Oracle Linux. Before proceeding with the execution please note following:
 * For ASM instance, it needs to configure ASMM instead of AMM.
 * The 'pga_aggregate_target' is outside the SGA and
   you should accommodate this while calculating the overall size.
 * In case you changes the DB SGA size,
   as the new SGA will not fit in the previous HugePages configuration,
   it had better disable the whole HugePages,
   start the DB with new SGA size and run the script again.
And make sure that:
 * Oracle Database instance(s) are up and running
 * Oracle Database 11g Automatic Memory Management (AMM) is not setup
   (See Doc ID 749851.1)
 * The shared memory segments can be listed by command:
     # ipcs -m


Press Enter to proceed..."


read


# Check for the kernel version
KERN=`uname -r | awk -F. '{ printf("%d.%d/n",$1,$2); }'`


# Find out the HugePage size
HPG_SZ=`grep Hugepagesize /proc/meminfo | awk '{print $2}'`
if [ -z "$HPG_SZ" ];then
    echo "The hugepages may not be supported in the system where the script is being executed."
    exit 1
fi


# Initialize the counter
NUM_PG=0


# Cumulative number of pages required to handle the running shared memory segments
for SEG_BYTES in `ipcs -m | cut -c44-300 | awk '{print $1}' | grep "[0-9][0-9]*"`
do
    MIN_PG=`echo "$SEG_BYTES/($HPG_SZ*1024)" | bc -q`
    if [ $MIN_PG -gt 0 ]; then
        NUM_PG=`echo "$NUM_PG+$MIN_PG+1" | bc -q`
    fi
done


RES_BYTES=`echo "$NUM_PG * $HPG_SZ * 1024" | bc -q`


# An SGA less than 100MB does not make sense
# Bail out if that is the case
if [ $RES_BYTES -lt 100000000 ]; then
    echo "***********"
    echo "** ERROR **"
    echo "***********"
    echo "Sorry! There are not enough total of shared memory segments allocated for
HugePages configuration. HugePages can only be used for shared memory segments
that you can list by command:


    # ipcs -m


of a size that can match an Oracle Database SGA. Please make sure that:
 * Oracle Database instance is up and running
 * Oracle Database 11g Automatic Memory Management (AMM) is not configured"
    exit 1
fi


# Finish with results
case $KERN in
    '2.4') HUGETLB_POOL=`echo "$NUM_PG*$HPG_SZ/1024" | bc -q`;
           echo "Recommended setting: vm.hugetlb_pool = $HUGETLB_POOL" ;;
    '2.6') echo "Recommended setting: vm.nr_hugepages = $NUM_PG" ;;
    '3.8') echo "Recommended setting: vm.nr_hugepages = $NUM_PG" ;;
    '3.10') echo "Recommended setting: vm.nr_hugepages = $NUM_PG" ;;
    '4.1') echo "Recommended setting: vm.nr_hugepages = $NUM_PG" ;;
    '4.14') echo "Recommended setting: vm.nr_hugepages = $NUM_PG" ;;
    '4.18') echo "Recommended setting: vm.nr_hugepages = $NUM_PG" ;;
    '5.4') echo "Recommended setting: vm.nr_hugepages = $NUM_PG" ;;
    *) echo "Kernel version $KERN is not supported by this script (yet). Exiting." ;;
esac


# End
计算需要的页数:
linux 一个大页的大小为 2M,开启大页的总内存应该比 sga_max_size 稍稍大一点,比如
sga_max_size=3g,则:hugepages > (3*1024)/2 = 1536
配置 sysctl.conf 文件,添加:
[root@ node01 ~]$ vi /etc/sysctl.conf
vm.nr_hugepages = 1550
配置/etc/security/limits.conf,添加(比 sga_max_size 稍大,官方建议为总物理内存的 90%,以 K 为
单位):
[root@ node01 ~]$ vi /etc/security/limits.conf
oracle soft memlock 3400000
oracle hard memlock 3400000


# vim /etc/sysctl.conf
vm.nr_hugepages = xxxx


# sysctl -p
vim /etc/security/limits.conf
oracle soft memlock xxxxxxxxxxx
oracle hard memlock xxxxxxxxxxx
4.14 修改login配置
cat >> /etc/pam.d/login <4.15 配置用户限制
cat >> /etc/security/limits.conf <4.16 配置NTP服务(可选)
ntp
chony
-x
4.16.1 使用ctss
各节点系统时间校对:
--检验时间和时区确认正确
date


--关闭chrony服务,移除chrony配置文件(后续使用ctss)
systemctl list-unit-files|grep chronyd
systemctl status chronyd


systemctl disable chronyd
systemctl stop chronyd


mv /etc/chrony.conf /etc/chrony.conf_bak
mv /etc/ntp.conf /etc/ntp.conf_bak
systemctl list-unit-files|grep -E 'ntp|chrony'
--这里实验环境,选择不使用NTP和chrony,这样Oracle会自动使用自己的ctss服务
4.16.2 使用ntp
1)修改所有节点的/etc/ntp.conf
【命令】vi /etc/ntp.conf
【内容】
restrict 192.168.6.3 nomodify notrap nopeer noquery          //当前节点IP地址
restrict 192.168.6.2 mask 255.255.255.0 nomodify notrap  //集群所在网段的网关(Gateway),子网掩码(Genmask)


2)选择一个主节点,修改其/etc/ntp.conf
【命令】vi /etc/ntp.conf
【内容】在server部分添加一下部分,并注释掉server 0 ~ n


server 127.127.1.0
Fudge 127.127.1.0 stratum 10


3)主节点以外,继续修改/etc/ntp.conf
【命令】vi /etc/ntp.conf
【内容】在server部分添加如下语句,将server指向主节点。
server 192.168.6.3
Fudge 192.168.6.3 stratum 10


节点1
echo
systemctl status ntpd
systemctl stop ntpd
systemctl stop chronyd
systemctl disable chronyd
sed -i 's/OPTIONS="-g"/OPTIONS="-g -x"/' /etc/sysconfig/ntpd
vim /etc/ntp.conf
注释server
sed '/^server/s/^/#/' /etc/ntp.conf -i
server 127.127.1.0
Fudge 127.127.1.0 stratum 10
# Hosts on local network are less restricted.
restrict 192.168.245.0 mask 255.255.255.0 nomodify notrap
把网段改为 192.168.245.0,取消注释
# Use public servers from the pool.ntp.org project.
# Please consider joining the pool (http://www.pool.ntp.org/join.html).
#server 0.rhel.pool.ntp.org iburst
#server 1.rhel.pool.ntp.org iburst
#server 2.rhel.pool.ntp.org iburst
#server 3.rhel.pool.ntp.org iburst


server 127.127.1.0
Fudge 127.127.1.0 stratum 10


#broadcast 192.168.1.255 autokey        # broadcast server
#broadcastclient                        # broadcast client
#broadcast 224.0.1.1 autokey            # multicast server
#multicastclient 224.0.1.1              # multicast client
#manycastserver 239.255.254.254         # manycast server
#manycastclient 239.255.254.254 autokey # manycast client


# Enable public key cryptography.
#crypto


includefile /etc/ntp/crypto/pw


# Key file containing the keys and key identifiers used when operating
# with symmetric key cryptography.
keys /etc/ntp/keys
---
把网段改为 192.168.245.0


systemctl start ntpd
systemctl enable ntpd
echo


节点2
echo
systemctl stop ntpd
systemctl stop chronyd
systemctl disable chronyd
sed -i 's/OPTIONS="-g"/OPTIONS="-g -x"/' /etc/sysconfig/ntpd
sed -i 's/^server/#server/g' /etc/ntp.conf
sed -i '$a server 192.168.245.141  iburst' /etc/ntp.conf


systemctl start ntpd
systemctl enable ntpd
echo
检查ntp配置文件/etc/sysconfig/ntpd,也已经从默认值OPTIONS="-g"修改成OPTIONS="-x -g",但是在使用命令$ cluvfy comp clocksync -n all –verbose检查时为什么会失败呢?
通过MOS文档《Linux:CVU NTP Prerequisite check fails with PRVF-7590, PRVG-1024 and PRVF-5415 (Doc ID2126223.1)》分析可以看出:If var/run/ntpd.pid does not existon the server, the CVU command fails. This is due to unpublished bug 19427746 which has been fixed in Oracle 12.2.(意思是:如果服务器上不存在/var/run/ntpd.pid,则CVU命令失败。这是由于未发布的错误BUG 19427746,该错误已在Oracle 12.2中修复。)
4.16.3 使用chony
最小化安装没有安装相关包
需要自行安装 yum -y install chrony
配置文件说明
$ cat /etc/chrony.conf


# 使用pool.ntp.org项目中的公共服务器。以server开,理论上你想添加多少时间服务器都可以。
# Please consider joining the pool (http://www.pool.ntp.org/join.html).
server 0.centos.pool.ntp.org iburst
server 1.centos.pool.ntp.org iburst
server 2.centos.pool.ntp.org iburst
server 3.centos.pool.ntp.org iburst


# 根据实际时间计算出服务器增减时间的比率,然后记录到一个文件中,在系统重启后为系统做出最佳时间补偿调整。
driftfile /var/lib/chrony/drift
# chronyd根据需求减慢或加速时间调整,
# 在某些情况下系统时钟可能漂移过快,导致时间调整用时过长。
# 该指令强制chronyd调整时期,大于某个阀值时步进调整系统时钟。
# 只有在因chronyd启动时间超过指定的限制时(可使用负值来禁用限制)没有更多时钟更新时才生效。
makestep 1.0 3


# 将启用一个内核模式,在该模式中,系统时间每11分钟会拷贝到实时时钟(RTC)。
rtcsync


# Enable hardware timestamping on all interfaces that support it.
# 通过使用hwtimestamp指令启用硬件时间戳
#hwtimestamp eth0
#hwtimestamp eth1
#hwtimestamp *


# Increase the minimum number of selectable sources required to adjust
# the system clock.
#minsources 2


# 指定一台主机、子网,或者网络以允许或拒绝NTP连接到扮演时钟服务器的机器
#allow 192.168.0.0/16
#deny 192.168/16


# Serve time even if not synchronized to a time source.
local stratum 10


# 指定包含NTP验证密钥的文件。
#keyfile /etc/chrony.keys


# 指定日志文件的目录。
logdir /var/log/chrony


# Select which information is logged.
#log measurements statistics tracking
RAC1:


1 先注释server :
sed '/^server/s/^/#/' /etc/chrony.conf -i
注释server


2
# vi /etc/chrony.conf
# Serve time even if not synchronized to a time source.开启该服务,在不与外网同步时间的情况下,依然为下层终端提供同步服务


local stratum 10


#allow用来标记允许同步的网段或主机,下例是允许192.168.245.0/24这个网段的终端来同步,127/8是本机和自己同步。


allow 192.168.245.0/24


server 127.0.0.1 iburst  --表示本机同步
allow            #允许所有网段连入
local stratum 10


3 重新启动 systemctl restart chronyd.service


RAC2:


1 先注释server :
sed '/^server/s/^/#/' /etc/chrony.conf -i
注释server


2
# vi /etc/chrony.conf
server 192.168.245.141 iburst  --表示RAC1同步


  重启时间同步服务:
 systemctl restart chronyd.service
 systemctl enable chronyd.service
  查看时间同步源:
 # chronyc sources -v
 chronyc sourcestats -v


 查看 ntp_servers 是否在线
chronyc activity -v


查看 ntp 详细信息
chronyc tracking -v
4.17 创建组和用户
groupadd -g 54321 oinstall
groupadd -g 54322 dba
groupadd -g 54323 oper
groupadd -g 54324 backupdba
groupadd -g 54325 dgdba
groupadd -g 54326 kmdba
groupadd -g 54327 asmdba
groupadd -g 54328 asmoper
groupadd -g 54329 asmadmin
groupadd -g 54330 racdba
useradd -g oinstall -G dba,oper,backupdba,dgdba,kmdba,asmdba,racdba -u 10000 oracle
useradd -g oinstall -G dba,asmdba,asmoper,asmadmin,racdba -u 10001 grid
echo "oracle" | passwd --stdin oracle
echo "grid" | passwd --stdin grid
4.18 创建目录
mkdir -p /u01/app/19.3.0/grid
mkdir -p /u01/app/grid
mkdir -p /u01/app/oracle/product/19.3.0/dbhome_1
chown -R grid:oinstall /u01
chown -R oracle:oinstall /u01/app/oracle
chmod -R 775 /u01/
4.19 配置用户环境变量
4.19.1 grid
cat >> /home/grid/.bash_profile << "EOF"
################add#########################
umask 022
export TMP=/tmp
export TMPDIR=$TMP
export ORACLE_BASE=/u01/app/grid
export ORACLE_HOME=/u01/app/19.3.0/grid
export TNS_ADMIN=$ORACLE_HOME/network/admin
export NLS_LANG=AMERICAN_AMERICA.AL32UTF8
export LD_LIBRARY_PATH=$ORACLE_HOME/lib:/lib:/usr/lib
export ORACLE_SID=+ASM1
export PATH=/usr/sbin:$PATH
export PATH=$ORACLE_HOME/bin:$ORACLE_HOME/OPatch:$PATH
alias sas='sqlplus / as sysasm'
export PS1="[\`whoami\`@\`hostname\`:"'$PWD]\$ '


EOF


cat >> /home/grid/.bash_profile << "EOF"
################ enmo add#########################
umask 022
export TMP=/tmp
export TMPDIR=$TMP
export ORACLE_BASE=/u01/app/grid
export ORACLE_HOME=/u01/app/19.3.0/grid
export TNS_ADMIN=$ORACLE_HOME/network/admin
export NLS_LANG=AMERICAN_AMERICA.AL32UTF8
export LD_LIBRARY_PATH=$ORACLE_HOME/lib:/lib:/usr/lib
export ORACLE_SID=+ASM2
export PATH=/usr/sbin:$PATH
export PATH=$ORACLE_HOME/bin:$ORACLE_HOME/OPatch:$PATH
alias sas='sqlplus / as sysasm'
export PS1="[\`whoami\`@\`hostname\`:"'$PWD]\$ '


EOF
4.19.2 oracle
cat >> /home/oracle/.bash_profile << "EOF"
################ add#########################
umask 022
export TMP=/tmp
export TMPDIR=$TMP
export NLS_LANG=AMERICAN_AMERICA.AL32UTF8
export ORACLE_BASE=/u01/app/oracle
export ORACLE_HOME=$ORACLE_BASE/product/19.3.0/dbhome_1
export ORACLE_HOSTNAME=oracle19c-rac1
export TNS_ADMIN=\$ORACLE_HOME/network/admin
export LD_LIBRARY_PATH=\$ORACLE_HOME/lib:/lib:/usr/lib
export ORACLE_SID=orcl1
export PATH=/usr/sbin:$PATH
export PATH=$ORACLE_HOME/bin:$ORACLE_HOME/OPatch:$PATH
alias sas='sqlplus / as sysdba'
export PS1="[\`whoami\`@\`hostname\`:"'$PWD]\$ '
EOF


cat >> /home/oracle/.bash_profile << "EOF"
################ add#########################
umask 022
export TMP=/tmp
export TMPDIR=$TMP
export NLS_LANG=AMERICAN_AMERICA.AL32UTF8
export ORACLE_BASE=/u01/app/oracle
export ORACLE_HOME=$ORACLE_BASE/product/19.3.0/dbhome_1
export ORACLE_HOSTNAME=oracle19c-rac1
export TNS_ADMIN=\$ORACLE_HOME/network/admin
export LD_LIBRARY_PATH=\$ORACLE_HOME/lib:/lib:/usr/lib
export ORACLE_SID=orcl2
export PATH=/usr/sbin:$PATH
export PATH=$ORACLE_HOME/bin:$ORACLE_HOME/OPatch:$PATH
alias sas='sqlplus / as sysdba'
export PS1="[\`whoami\`@\`hostname\`:"'$PWD]\$ '
EOF
4.20 配置共享存储(multipath+udev)
4.20.1 multipath
##安装multipath
yum install -y device-mapper*
mpathconf --enable --with_multipathd y
##查看共享盘的scsi_id
/usr/lib/udev/scsi_id -g -u /dev/sdb
/usr/lib/udev/scsi_id -g -u /dev/sdc
/usr/lib/udev/scsi_id -g -u /dev/sdd
/usr/lib/udev/scsi_id -g -u /dev/sde
/usr/lib/udev/scsi_id -g -u /dev/sdf
##配置multipath,wwid的值为上面获取的scsi_id,alias可自定义,这里配置3块OCR盘,2块DATA盘
defaults {
    user_friendly_names yes
}
这里可以和之前的冲突了


cp /etc/multipath.conf /etc/multipath.conf.bak
sed '/^/s/^/#/' /etc/ntp.conf -i  注释所有的行


cat <> /etc/multipath.conf
defaults {
    user_friendly_names yes
}


blacklist {
  devnode "^sda"
}


multipaths {
  multipath {
  wwid "36000c29a961f7eb1208473713ca7b007"
  alias asm_ocr01
  }
  multipath {
  wwid "36000c29f87ed61db71c60bd3d6e737dc"
  alias asm_ocr02
  }
  multipath {
  wwid "36000c297c53b91255620471a6deb6853"
  alias asm_ocr03
  }
  multipath {
  wwid "36000c29e516572af5c105d12e8c0db12"
  alias asm_data01
  }
  multipath {
  wwid "36000c29d6be6679787ceadf23b29b180"
  alias asm_data02
  }
}
EOF


激活multipath多路径:
multipath -F
multipath -v2
multipath -ll
4.20.2 UDEV
cd /dev/mapper
for i in asm_*; do
  printf "%s %s\n" "$i" "$(udevadm info --query=all --name=/dev/mapper/"$i" | grep -i dm_uuid)" >>/dev/mapper/udev_info
done
while read -r line; do
  dm_uuid=$(echo "$line" | awk -F'=' '{print $2}')
  disk_name=$(echo "$line" | awk '{print $1}')
  echo "KERNEL==\"dm-*\",ENV{DM_UUID}==\"${dm_uuid}\",SYMLINK+=\"${disk_name}\",OWNER=\"grid\",GROUP=\"asmadmin\",MODE=\"0660\"" >>/etc/udev/rules.d/99-oracle-asmdevices.rules
done < /dev/mapper/udev_info
##重载udev
udevadm control --reload-rules
udevadm trigger --type=devices
ll /dev/asm*


[root@oracle19c-rac2 dev]# more /etc/udev/rules.d/99-oracle-asmdevices.rules
KERNEL=="dm-*",ENV{DM_UUID}=="mpath-36000c29e516572af5c105d12e8c0db12",SYMLINK+="asm_data01",OWNER="grid",GROUP="asmadmin",MODE="0660"
KERNEL=="dm-*",ENV{DM_UUID}=="mpath-36000c29d6be6679787ceadf23b29b180",SYMLINK+="asm_data02",OWNER="grid",GROUP="asmadmin",MODE="0660"
KERNEL=="dm-*",ENV{DM_UUID}=="mpath-36000c29a961f7eb1208473713ca7b007",SYMLINK+="asm_ocr01",OWNER="grid",GROUP="asmadmin",MODE="0660"
KERNEL=="dm-*",ENV{DM_UUID}=="mpath-36000c29f87ed61db71c60bd3d6e737dc",SYMLINK+="asm_ocr02",OWNER="grid",GROUP="asmadmin",MODE="0660"
KERNEL=="dm-*",ENV{DM_UUID}=="mpath-36000c297c53b91255620471a6deb6853",SYMLINK+="asm_ocr03",OWNER="grid",GROUP="asmadmin",MODE="0660"
[root@oracle19c-rac2 dev]#


[root@oracle19c-rac2 mapper]# ll
total 4
lrwxrwxrwx 1 root root       7 Jul 28 15:44 asm_data01 -> ../dm-7
lrwxrwxrwx 1 root root       7 Jul 28 15:44 asm_data02 -> ../dm-8
lrwxrwxrwx 1 root root       7 Jul 28 15:44 asm_ocr01 -> ../dm-4
lrwxrwxrwx 1 root root       7 Jul 28 15:44 asm_ocr02 -> ../dm-5
lrwxrwxrwx 1 root root       7 Jul 28 15:44 asm_ocr03 -> ../dm-6
crw------- 1 root root 10, 236 Jul 28 15:44 control
lrwxrwxrwx 1 root root       7 Jul 28 15:44 ol-root -> ../dm-0
lrwxrwxrwx 1 root root       7 Jul 28 15:44 ol-swap -> ../dm-1
lrwxrwxrwx 1 root root       7 Jul 28 15:44 ol-tmp -> ../dm-2
lrwxrwxrwx 1 root root       7 Jul 28 15:44 ol-u01 -> ../dm-3
-rw-r--r-- 1 root root     307 Jul 28 15:44 udev_info
[root@oracle19c-rac2 mapper]# ll /dev/dm*
brw-rw---- 1 root disk     252, 0 Jul 28 15:44 /dev/dm-0
brw-rw---- 1 root disk     252, 1 Jul 28 15:44 /dev/dm-1
brw-rw---- 1 root disk     252, 2 Jul 28 15:44 /dev/dm-2
brw-rw---- 1 root disk     252, 3 Jul 28 15:44 /dev/dm-3
brw-rw---- 1 grid asmadmin 252, 4 Jul 28 15:44 /dev/dm-4
brw-rw---- 1 grid asmadmin 252, 5 Jul 28 15:44 /dev/dm-5
brw-rw---- 1 grid asmadmin 252, 6 Jul 28 15:44 /dev/dm-6
brw-rw---- 1 grid asmadmin 252, 7 Jul 28 15:44 /dev/dm-7
brw-rw---- 1 grid asmadmin 252, 8 Jul 28 15:44 /dev/dm-8
crw-rw---- 1 root audio     14, 9 Jul 28 15:44 /dev/dmmidi
4.20.2 UDEV(非multipath)
for i in b c d e ;
do
echo "KERNEL==\"sd*\", ENV{DEVTYPE}==\"disk\", SUBSYSTEM==\"block\", PROGRAM==\"/lib/udev/scsi_id -g -u -d \$devnode\",
RESULT==\"`/lib/udev/scsi_id -g -u -d /dev/sd$i`\", SYMLINK+=\"asm-disk$i\", OWNER=\"grid\", GROUP=\"asmadmin\", MODE=
\"0660\""      >> /etc/udev/rules.d/99-oracle-asmdevices.rules
done
# 加载rules文件,重新加载udev rule
/sbin/udevadm control --reload
# 检查新的设备名称
/sbin/udevadm trigger --type=devices --action=change
# 诊断udev rule
 /sbin/udevadm test /sys/block/*


用脚本生成udev 配置:


for i in b c d e f;
do
echo "KERNEL==/"sd*/",ENV{DEVTYPE}==/"disk/",SUBSYSTEM==/"block/",PROGRAM==/"/usr/lib/udev/scsi_id -g -u -d /$devnode/",RESULT==/"`/usr/lib/udev/scsi_id -g -u /dev/sd$i`/", RUN+=/"/bin/sh -c 'mknod /dev/asmdisk$i b  /$major /$minor; chown grid:asmadmin /dev/asmdisk$i; chmod 0660 /dev/asmdisk$i'/""
done
将脚本内容写入/etc/udev/rules.d/99-oracle-asmdevices.rules 文件。


[root@rac1 software]# vim /etc/udev/rules.d/99-oracle-asmdevices.rules
[root@rac1 software]# cat /etc/udev/rules.d/99-oracle-asmdevices.rules
KERNEL=="sd*",ENV{DEVTYPE}=="disk",SUBSYSTEM=="block",PROGRAM=="/usr/lib/udev/scsi_id -g -u -d $devnode",RESULT=="36000c29cf5ef7bd3907344106bcca59b", RUN+="/bin/sh -c 'mknod /dev/asmdiskb b  $major $minor; chown grid:asmadmin /dev/asmdiskb; chmod 0660 /dev/asmdiskb'"
KERNEL=="sd*",ENV{DEVTYPE}=="disk",SUBSYSTEM=="block",PROGRAM=="/usr/lib/udev/scsi_id -g -u -d $devnode",RESULT=="36000c293ef1e02395716263ee17e8926", RUN+="/bin/sh -c 'mknod /dev/asmdiskc b  $major $minor; chown grid:asmadmin /dev/asmdiskc; chmod 0660 /dev/asmdiskc'"
KERNEL=="sd*",ENV{DEVTYPE}=="disk",SUBSYSTEM=="block",PROGRAM=="/usr/lib/udev/scsi_id -g -u -d $devnode",RESULT=="36000c29a790b610473d4800954053180", RUN+="/bin/sh -c 'mknod /dev/asmdiskd b  $major $minor; chown grid:asmadmin /dev/asmdiskd; chmod 0660 /dev/asmdiskd'"
KERNEL=="sd*",ENV{DEVTYPE}=="disk",SUBSYSTEM=="block",PROGRAM=="/usr/lib/udev/scsi_id -g -u -d $devnode",RESULT=="36000c292fe31e2c5ec2cf689791c09d7", RUN+="/bin/sh -c 'mknod /dev/asmdiske b  $major $minor; chown grid:asmadmin /dev/asmdiske; chmod 0660 /dev/asmdiske'"
KERNEL=="sd*",ENV{DEVTYPE}=="disk",SUBSYSTEM=="block",PROGRAM=="/usr/lib/udev/scsi_id -g -u -d $devnode",RESULT=="36000c29c87abcc922d24e7bc0e2978a7", RUN+="/bin/sh -c 'mknod /dev/asmdiskf b  $major $minor; chown grid:asmadmin /dev/asmdiskf; chmod 0660 /dev/asmdiskf'"
KERNEL=="sd*",ENV{DEVTYPE}=="disk",SUBSYSTEM=="block",PROGRAM=="/usr/lib/udev/scsi_id -g -u -d $devnode",RESULT=="36000c297ede8a5b0a407451699668920", RUN+="/bin/sh -c 'mknod /dev/asmdiskg b  $major $minor; chown grid:asmadmin /dev/asmdiskg; chmod 0660 /dev/asmdiskg'"


让UDEV生效:/sbin/udevadm trigger —type=devices —action=change


or


KERNEL=="sdb", SUBSYSTEM=="block", PROGRAM=="/usr/lib/udev/scsi_id -g -u -d
/dev/$name",RESULT=="360003ff44dc75adc8cec9cce0033f402", OWNER="grid",
GROUP="asmadmin", MODE="0660"
KERNEL=="sdc", SUBSYSTEM=="block", PROGRAM=="/usr/lib/udev/scsi_id -g -u -d
/dev/$name",RESULT=="360003ff44dc75adc9ba684d395391bae", OWNER="grid",
GROUP="asmadmin", MODE="0660


ll /dev/asm*
4.20.3 afd(不推荐)
Use Oracle ASM command line tool (ASMCMD) to provision the disk devices
for use with Oracle ASM Filter Driver.
[root@19c-node1 grid]# asmcmd afd_label DATA1 /dev/sdb --init
[root@19c-node1 grid]# asmcmd afd_label DATA2 /dev/sdc --init
[root@19c-node1 grid]# asmcmd afd_label DATA3 /dev/sdd --init
[root@19c-node1 grid]# asmcmd afd_lslbl /dev/sdb
[root@19c-node1 grid]# asmcmd afd_lslbl /dev/sdc
[root@19c-node1 grid]# asmcmd afd_lslbl /dev/sdd
4.21 配置IO调度
说明:
# cat /sys/block/${ASM_DISK}/queue/scheduler
noop [deadline] cfq


If the default disk I/O scheduler is not Deadline, then set it using a rules file:
1. Using a text editor, create a UDEV rules file for the Oracle ASM devices:
# vi /etc/udev/rules.d/60-oracle-schedulers.rules
2. Add the following line to the rules file and save it:
ACTION=="add|change", KERNEL=="sd[a-z]", ATTR{queue/rotational}=="0",
ATTR{queue/scheduler}="deadline"
3. On clustered systems, copy the rules file to all other nodes on the cluster. For
example:
$ scp 60-oracle-schedulers.rules root@node2:/etc/udev/rules.d/
4. Load the rules file and restart the UDEV service. For example:
a. Oracle Linux and Red Hat Enterprise Linux
#udevadm control --reload-rules && udevadm trigger


操作:
cat /etc/udev/rules.d/60-oracle-schedulers.rules
ACTION=="add|change", KERNEL=="dm-[a-z]", ATTR{queue/rotational}=="0", ATTR{queue/scheduler}="deadline"
udevadm control --reload-rules && udevadm trigger


[root@oracle19c-rac1 dev]#  cat /sys/block/
dm-0/ dm-1/ dm-2/ dm-3/ dm-4/ dm-5/ dm-6/ dm-7/ dm-8/ sda/  sdb/  sdc/  sdd/  sde/  sdf/  sr0/
[root@oracle19c-rac1 dev]#  cat /sys/block/dm-4/queue/scheduler
[mq-deadline] kyber bfq none
[root@oracle19c-rac1 dev]#
[root@oracle19c-rac1 dev
4.22 重启OS
4.23 整体check脚本检查
###################################################################################
## 重启操作系统进行修改验证
## 需要人工干预
###################################################################################
###################################################################################
## 检查修改信息
###################################################################################
echo "###################################################################################"
echo "检查修改信息"
echo
echo "-----------------------------------------------------------------------------------"
echo
echo "/etc/selinux/config"
echo
cat /etc/selinux/config
echo
echo
echo "-----------------------------------------------------------------------------------"
echo
echo "/etc/sysconfig/network"
echo
cat /etc/sysconfig/network
echo
echo
echo "-----------------------------------------------------------------------------------"
echo
echo "/sys/kernel/mm/transparent_hugepage/enabled"
echo
cat /sys/kernel/mm/transparent_hugepage/enabled
echo
echo
echo "-----------------------------------------------------------------------------------"
echo
echo "/etc/hosts"
echo
cat /etc/hosts
echo
echo
echo "-----------------------------------------------------------------------------------"
echo
echo "/etc/ntp.conf"
echo
cat /etc/ntp.conf
echo
echo
echo "-----------------------------------------------------------------------------------"
echo
echo "/etc/sysctl.conf"
echo
cat /etc/sysctl.conf
echo
echo
echo "-----------------------------------------------------------------------------------"
echo
echo "/etc/security/limits.conf"
echo
cat /etc/security/limits.conf
echo
echo
echo "-----------------------------------------------------------------------------------"
echo
echo "/etc/pam.d/login"
echo
cat /etc/pam.d/login
echo
echo
echo "-----------------------------------------------------------------------------------"
echo
echo "/etc/profile"
echo
cat /etc/profile
echo
echo
echo "-----------------------------------------------------------------------------------"
echo
echo "/home/grid/.bash_profile"
echo
cat /home/grid/.bash_profile
echo
echo
echo "-----------------------------------------------------------------------------------"
echo
echo "/home/oracle/.bash_profile"
echo
cat /home/oracle/.bash_profile
echo
echo
echo "--------------------------------systemctl------------------------------------------"
echo
systemctl status firewalld
echo
systemctl status avahi-daemon
echo
systemctl status nscd
echo
systemctl status ntpd
echo
echo
echo "-----------------------------------------------------------------------------------"
echo
rpm -q --qf '%{NAME}-%{VERSION}-%{RELEASE} (%{ARCH})\n' bc binutils compat-libcap1 compat-libstdc++-33 elfutils-libelf elfutils-libelf-devel fontconfig-devel glibc glibc-devel ksh libaio libaio-devel libX11 libXau libXi libXtst libXrender libXrender-devel libgcc libstdc++ libstdc++-devel libxcb make net-tools nfs-utils python python-configshell python-rtslib python-six targetcli smartmontools sysstat gcc-c++ nscd unixODBC
echo
echo "################请仔细核对所有文件信息 !!!!!!!################"
[root@oracle19c-rac1 ~]# vi check.sh
[root@oracle19c-rac1 ~]# sh check.sh
###################################################################################
检查修改信息
-----------------------------------------------------------------------------------
/etc/selinux/config
# This file controls the state of SELinux on the system.
# SELINUX= can take one of these three values:
# enforcing - SELinux security policy is enforced.
# permissive - SELinux prints warnings instead of enforcing.
# disabled - No SELinux policy is loaded.
SELINUX=disabled
# SELINUXTYPE= can take one of three values:
# targeted - Targeted processes are protected,
# minimum - Modification of targeted policy. Only selected processes are protected.
# mls - Multi Level Security protection.
SELINUXTYPE=targeted
-----------------------------------------------------------------------------------
/etc/sysconfig/network
# Created by anaconda
NOZEROCONF=yes
-----------------------------------------------------------------------------------
/sys/kernel/mm/transparent_hugepage/enabled
always madvise [never]
-----------------------------------------------------------------------------------
/etc/hosts
127.0.0.1 localhost localhost.localdomain localhost4 localhost4.localdomain4
::1 localhost localhost.localdomain localhost6 localhost6.localdomain6
#public ip
192.168.245.141 oracle19c-rac1
192.168.245.142 oracle19c-rac2
#private ip
192.168.28.141 oracle19c-rac1-priv
192.168.28.142 oracle19c-rac2-priv
#vip
192.168.245.143 oracle19c-rac1-vip
192.168.245.144 oracle19c-rac2-vip
#scanip
192.168.245.145 oracle19c-rac-scan1
-----------------------------------------------------------------------------------
/etc/ntp.conf
cat: /etc/ntp.conf: No such file or directory
-----------------------------------------------------------------------------------
/etc/sysctl.conf
# sysctl settings are defined through files in
# /usr/lib/sysctl.d/, /run/sysctl.d/, and /etc/sysctl.d/.
#
# Vendors settings live in /usr/lib/sysctl.d/.
# To override a whole file, create a new file with the same in
# /etc/sysctl.d/ and put new settings there. To override
# only specific settings, add a file with a lexically later
# name in /etc/sysctl.d/ and put new settings there.
#
# For more information, see sysctl.conf(5) and sysctl.d(5).
fs.aio-max-nr = 1048576
fs.file-max = 6815744
kernel.shmall = 2097152
kernel.shmmax = 4294967295
kernel.shmmni = 4096
kernel.sem = 250 32000 100 128
net.ipv4.ip_local_port_range = 9000 65500
net.core.rmem_default = 16777216
net.core.rmem_max = 16777216
net.core.wmem_max = 16777216
net.core.wmem_default = 16777216
fs.aio-max-nr = 6194304
vm.dirty_ratio=20
vm.dirty_background_ratio=3
vm.dirty_writeback_centisecs=100
vm.dirty_expire_centisecs=500
vm.swappiness=10
vm.min_free_kbytes=524288
net.core.netdev_max_backlog = 30000
net.core.netdev_budget = 600
vm.nr_hugepages = 1550
net.ipv4.conf.all.rp_filter = 2
net.ipv4.conf.default.rp_filter = 2
net.ipv4.ipfrag_time = 60
net.ipv4.ipfrag_low_thresh=6291456
net.ipv4.ipfrag_high_thresh = 8388608
-----------------------------------------------------------------------------------
/etc/security/limits.conf
# /etc/security/limits.conf
#
#This file sets the resource limits for the users logged in via PAM.
#It does not affect resource limits of the system services.
#
#Also note that configuration files in /etc/security/limits.d directory,
#which are read in alphabetical order, override the settings in this
#file in case the domain is the same or more specific.
#That means for example that setting a limit for wildcard domain here
#can be overriden with a wildcard setting in a config file in the
#subdirectory, but a user specific setting here can be overriden only
#with a user specific setting in the subdirectory.
#
#Each line describes a limit for a user in the form:
#
# -
#
#Where:
# can be:
# - a user name
# - a group name, with @group syntax
# - the wildcard *, for default entry
# - the wildcard %, can be also used with %group syntax,
# for maxlogin limit
#
# can have the two values:
# - "soft" for enforcing the soft limits
# - "hard" for enforcing hard limits
#
#- can be one of the following:
# - core - limits the core file size (KB)
# - data - max data size (KB)
# - fsize - maximum filesize (KB)
# - memlock - max locked-in-memory address space (KB)
# - nofile - max number of open file descriptors
# - rss - max resident set size (KB)
# - stack - max stack size (KB)
# - cpu - max CPU time (MIN)
# - nproc - max number of processes
# - as - address space limit (KB)
# - maxlogins - max number of logins for this user
# - maxsyslogins - max number of logins on the system
# - priority - the priority to run user process with
# - locks - max number of file locks the user can hold
# - sigpending - max number of pending signals
# - msgqueue - max memory used by POSIX message queues (bytes)
# - nice - max nice priority allowed to raise to values: [-20, 19]
# - rtprio - max realtime priority
#
#
-
#
#* soft core 0
#* hard rss 10000
#@student hard nproc 20
#@faculty soft nproc 20
#@faculty hard nproc 50
#ftp hard nproc 0
#@student - maxlogins 4
# End of file
grid soft nproc 2047
grid hard nproc 16384
grid soft nofile 1024
grid hard nofile 65536
grid soft stack 10240
grid hard stack 32768
oracle soft nproc 2047
oracle hard nproc 16384
oracle soft nofile 1024
oracle hard nofile 65536
oracle soft stack 10240
oracle hard stack 32768
oracle soft memlock 3145728
oracle hard memlock 3145728
-----------------------------------------------------------------------------------
/etc/pam.d/login
#%PAM-1.0
auth [user_unknown=ignore success=ok ignore=ignore default=bad] pam_securetty.so
auth substack system-auth
auth include postlogin
account required pam_nologin.so
account include system-auth
password include system-auth
# pam_selinux.so close should be the first session rule
session required pam_selinux.so close
session required pam_loginuid.so
session optional pam_console.so
# pam_selinux.so open should only be followed by sessions to be executed in the user context
session required pam_selinux.so open
session required pam_namespace.so
session optional pam_keyinit.so force revoke
session include system-auth
session include postlogin
-session optional pam_ck_connector.so
session required pam_limits.so
-----------------------------------------------------------------------------------
/etc/profile
# /etc/profile
# System wide environment and startup programs, for login setup
# Functions and aliases go in /etc/bashrc
# It's NOT a good idea to change this file unless you know what you
# are doing. It's much better to create a custom.sh shell script in
# /etc/profile.d/ to make custom changes to your environment, as this
# will prevent the need for merging in future updates.
pathmunge () {
case ":${PATH}:" in
*:"$1":*)
;;
*)
if [ "$2" = "after" ] ; then
PATH=$PATH:$1
else
PATH=$1:$PATH
fi
esac
}
if [ -x /usr/bin/id ]; then
if [ -z "$EUID" ]; then
# ksh workaround
EUID=`/usr/bin/id -u`
UID=`/usr/bin/id -ru`
fi
USER="`/usr/bin/id -un`"
LOGNAME=$USER
MAIL="/var/spool/mail/$USER"
fi
# Path manipulation
if [ "$EUID" = "0" ]; then
pathmunge /usr/sbin
pathmunge /usr/local/sbin
else
pathmunge /usr/local/sbin after
pathmunge /usr/sbin after
fi
HOSTNAME=`/usr/bin/hostname 2>/dev/null`
HISTSIZE=1000
if [ "$HISTCONTROL" = "ignorespace" ] ; then
export HISTCONTROL=ignoreboth
else
export HISTCONTROL=ignoredups
fi
export PATH USER LOGNAME MAIL HOSTNAME HISTSIZE HISTCONTROL
# By default, we want umask to get set. This sets it for login shell
# Current threshold for system reserved uid/gids is 200
# You could check uidgid reservation validity in
# /usr/share/doc/setup-*/uidgid file
if [ $UID -gt 199 ] && [ "`/usr/bin/id -gn`" = "`/usr/bin/id -un`" ]; then
umask 002
else
umask 022
fi
for i in /etc/profile.d/*.sh /etc/profile.d/sh.local ; do
if [ -r "$i" ]; then
if [ "${-#*i}" != "$-" ]; then
. "$i"
else
. "$i" >/dev/null
fi
fi
done
unset i
unset -f pathmunge
-----------------------------------------------------------------------------------
/home/grid/.bash_profile
# .bash_profile
# Get the aliases and functions
if [ -f ~/.bashrc ]; then
. ~/.bashrc
fi
# User specific environment and startup programs
PATH=$PATH:$HOME/.local/bin:$HOME/bin
export PATH
################add#########################
umask 022
export TMP=/tmp
export TMPDIR=$TMP
export ORACLE_BASE=/u01/app/grid
export ORACLE_HOME=/u01/app/19.3.0/grid
export TNS_ADMIN=$ORACLE_HOME/network/admin
export NLS_LANG=AMERICAN_AMERICA.AL32UTF8
export LD_LIBRARY_PATH=$ORACLE_HOME/lib:/lib:/usr/lib
export ORACLE_SID=+ASM1
export PATH=/usr/sbin:$PATH
export PATH=$ORACLE_HOME/bin:$ORACLE_HOME/OPatch:$PATH
alias sas='sqlplus / as sysasm'
export PS1="[\`whoami\`@\`hostname\`:"'$PWD]\$ '
-----------------------------------------------------------------------------------
/home/oracle/.bash_profile
# .bash_profile
# Get the aliases and functions
if [ -f ~/.bashrc ]; then
. ~/.bashrc
fi
# User specific environment and startup programs
PATH=$PATH:$HOME/.local/bin:$HOME/bin
export PATH
################ add#########################
umask 022
export TMP=/tmp
export TMPDIR=$TMP
export NLS_LANG=AMERICAN_AMERICA.AL32UTF8
export ORACLE_BASE=/u01/app/oracle
export ORACLE_HOME=$ORACLE_BASE/product/19.3.0/dbhome_1
export ORACLE_HOSTNAME=oracle19c-rac1
export TNS_ADMIN=\$ORACLE_HOME/network/admin
export LD_LIBRARY_PATH=\$ORACLE_HOME/lib:/lib:/usr/lib
export ORACLE_SID=orcl1
export PATH=/usr/sbin:$PATH
export PATH=$ORACLE_HOME/bin:$ORACLE_HOME/OPatch:$PATH
alias sas='sqlplus / as sysdba'
export PS1="[\`whoami\`@\`hostname\`:"'$PWD]\$ '
--------------------------------systemctl------------------------------------------
● firewalld.service - firewalld - dynamic firewall daemon
Loaded: loaded (/usr/lib/systemd/system/firewalld.service; disabled; vendor preset: enabled)
Active: inactive (dead)
Docs: man:firewalld(1)
Unit avahi-daemon.service could not be found.
● nscd.service - Name Service Cache Daemon
Loaded: loaded (/usr/lib/systemd/system/nscd.service; disabled; vendor preset: disabled)
Active: inactive (dead)
● ntpd.service - Network Time Service
Loaded: loaded (/usr/lib/systemd/system/ntpd.service; disabled; vendor preset: disabled)
Active: inactive (dead)
Jul 28 14:46:53 oracle19c-rac1 ntpd[16379]: Listen normally on 5 lo ::1 UDP 123
Jul 28 14:46:53 oracle19c-rac1 ntpd[16379]: Listen normally on 6 ens33 fe80::29c:ece5:a550:57c0 UDP 123
Jul 28 14:46:53 oracle19c-rac1 ntpd[16379]: Listen normally on 7 ens34 fe80::df7c:406a:1561:b983 UDP 123
Jul 28 14:46:53 oracle19c-rac1 ntpd[16379]: Listening on routing socket on fd #24 for interface updates
Jul 28 14:46:53 oracle19c-rac1 ntpd[16379]: 0.0.0.0 c016 06 restart
Jul 28 14:46:53 oracle19c-rac1 ntpd[16379]: 0.0.0.0 c012 02 freq_set ntpd 0.000 PPM
Jul 28 14:46:53 oracle19c-rac1 ntpd[16379]: 0.0.0.0 c011 01 freq_not_set
Jul 28 14:46:54 oracle19c-rac1 ntpd[16379]: 0.0.0.0 c514 04 freq_mode
Jul 28 14:48:52 oracle19c-rac1 systemd[1]: Stopping Network Time Service...
Jul 28 14:48:52 oracle19c-rac1 systemd[1]: Stopped Network Time Service.
-----------------------------------------------------------------------------------
bc-1.06.95-13.el7 (x86_64)
binutils-2.27-44.base.0.1.el7 (x86_64)
compat-libcap1-1.10-7.el7 (x86_64)
compat-libstdc++-33-3.2.3-72.el7 (x86_64)
elfutils-libelf-0.176-5.el7 (x86_64)
elfutils-libelf-devel-0.176-5.el7 (x86_64)
fontconfig-devel-2.13.0-4.3.el7 (x86_64)
glibc-2.17-317.0.1.el7 (x86_64)
glibc-devel-2.17-317.0.1.el7 (x86_64)
ksh-20120801-142.0.1.el7 (x86_64)
libaio-0.3.109-13.el7 (x86_64)
libaio-devel-0.3.109-13.el7 (x86_64)
libX11-1.6.7-2.el7 (x86_64)
libXau-1.0.8-2.1.el7 (x86_64)
libXi-1.7.9-1.el7 (x86_64)
libXtst-1.2.3-1.el7 (x86_64)
libXrender-0.9.10-1.el7 (x86_64)
libXrender-devel-0.9.10-1.el7 (x86_64)
libgcc-4.8.5-44.0.3.el7 (x86_64)
libstdc++-4.8.5-44.0.3.el7 (x86_64)
libstdc++-devel-4.8.5-44.0.3.el7 (x86_64)
libxcb-1.13-1.el7 (x86_64)
make-3.82-24.el7 (x86_64)
net-tools-2.0-0.25.20131004git.el7 (x86_64)
nfs-utils-1.3.0-0.68.0.1.el7 (x86_64)
python-2.7.5-89.0.1.el7 (x86_64)
python-configshell-1.1.26-1.0.1.el7 (noarch)
python-rtslib-2.1.72-1.0.1.el7 (noarch)
python-six-1.9.0-2.el7 (noarch)
targetcli-2.1.51-2.0.1.el7 (noarch)
smartmontools-7.0-2.el7 (x86_64)
sysstat-10.1.5-19.el7 (x86_64)
gcc-c++-4.8.5-44.0.3.el7 (x86_64)
nscd-2.17-317.0.1.el7 (x86_64)
unixODBC-2.3.1-14.0.1.el7 (x86_64)
################请仔细核对所有文件信息 !!!!!!!################
五、安装GI+RU
5.1 修改软件包权限
[root@oracle19c-rac1 sw]# chown grid:oinstall LINUX.X64_193000_*
[root@oracle19c-rac1 sw]# chown grid:oinstall p*.zip
[root@oracle19c-rac1 sw]# ll
total 8393312
-rwxrwxr-x. 1 grid oinstall     195388 Jul 14 09:52 compat-libstdc++-33-3.2.3-72.el7.x86_64.rpm
-rwxrwxr-x. 1 grid oinstall 3059705302 Jul 12 16:32 LINUX.X64_193000_db_home.zip
-rwxrwxr-x. 1 grid oinstall 2889184573 Jul 12 17:19 LINUX.X64_193000_grid_home.zip
-rwxrwxr-x. 1 grid oinstall 2523672944 Jul 25 12:30 p32545008_190000_Linux-x86-64.zip
-rwxrwxr-x. 1 grid oinstall  121981878 Jul 16 22:41 p6880880_190000_Linux-x86-64.zip
[root@oracle19c-rac1 sw]#
5.2 解压缩软件
5.2.1 解压缩grid 软件
安全软件2.7G.解压后6.0
unzip LINUX.X64_193000_grid_home.zip -d $ORACLE_HOME
5.2.2 升级OPatch
[grid@oracle19c-rac1:/home/grid]$ opatch version
OPatch Version: 12.2.0.1.17


OPatch succeeded.


[grid@oracle19c-rac1:/u01/app/19.3.0/grid]$ mv OPatch/ OPatchbak
[grid@oracle19c-rac1:/u01/app/19.3.0/grid]$ cd /u01/sw
[grid@oracle19c-rac1:/u01/sw]$ unzip p6880880_190000_Linux-x86-64.zip -d $ORACLE_HOME


[grid@oracle19c-rac1:/u01/sw]$ opatch version
OPatch Version: 12.2.0.1.25


OPatch succeeded.
5.2.3 解压缩19.11RU
RU软件报是2.5G.解压缩为4.4G
目录是 /u01/sw/ru/3254500
5.3 安装cvuqdisk软件
cvuqdisk RPM 包含在 Oracle Grid Infrastructure 安装介质上的cv/rpm 目录中
设置环境变量 CVUQDISK_GRP,使其指向作为 cvuqdisk 的所有者所在的组(本文为 oinstall):
export CVUQDISK_GRP=oinstall
使用 CVU 验证是否满足 Oracle 集群件要求
记住要作为 grid 用户在将要执行 Oracle 安装的节点 (racnode1) 上运行。此外,必须为 grid
用户配置通过用户等效性实现的 SSH 连通性,
root执行
export CVUQDISK_GRP=oinstall
rpm -ivh cvuqdisk-1.0.7-1.rpm


[root@oracle19c-rac1 rpm]# export CVUQDISK_GRP=oinstall
[root@oracle19c-rac1 rpm]# rpm -ivh cvuqdisk-1.0.10-1.rpm
Preparing...                          ################################# [100%]
Updating / installing...
   1:cvuqdisk-1.0.10-1                ################################# [100%]
[root@oracle19c-rac1 rpm]# scp cvuqdisk-1.0.10-1.rpm oracle19c-rac2:/tmp
root@oracle19c-rac2's password:
cvuqdisk-1.0.10-1.rpm


传输到第 2 个节点上和安装
scp cvuqdisk-1.0.9-1.rpm [email protected]:/tmp
export CVUQDISK_GRP=oinstall
rpm -ivh cvuqdisk-1.0.7-1.rpm
5.4 配置grid 用户ssh(可选)
grid用户
$ORACLE_HOME/oui/prov/resources/scripts/sshUserSetup.sh -user grid  -hosts "19c-h1 19c-h2"  -advanced -noPromptPassphrase
这里主要为了进行安装前检查设置的。
[root@oracle19c-rac1 sw]# /u01/app/19.3.0/grid/oui/prov/resources/scripts/sshUserSetup.sh -user grid  -hosts "oracel19c-rac1 oracel19c-rac2"  -advanced -exverify –confirm
The output of this script is also logged into /tmp/sshUserSetup_2021-07-29-21-26-14.log
Hosts are oracel19c-rac1 oracel19c-rac2
user is grid
Platform:- Linux
Checking if the remote hosts are reachable
ping: oracel19c-rac1: Name or service not known
ping: oracel19c-rac2: Name or service not known
Remote host reachability check failed.
The following hosts are reachable: .
The following hosts are not reachable: oracel19c-rac1 oracel19c-rac2.
Please ensure that all the hosts are up and re-run the script.
Exiting now...
[root@oracle19c-rac1 sw]#
[root@oracle19c-rac1 sw]# pwd
/u01/sw
[root@oracle19c-rac1 sw]# /u01/app/19.3.0/grid/oui/prov/resources/scripts/sshUserSetup.sh -user grid  -hosts "oracel19c-rac1 oracel19c-rac2"  -advanced -exverify –confirm
The output of this script is also logged into /tmp/sshUserSetup_2021-07-29-21-27-01.log
Hosts are oracel19c-rac1 oracel19c-rac2
user is grid
Platform:- Linux
Checking if the remote hosts are reachable
ping: oracel19c-rac1: Name or service not known
ping: oracel19c-rac2: Name or service not known
Remote host reachability check failed.
The following hosts are reachable: .
The following hosts are not reachable: oracel19c-rac1 oracel19c-rac2.
Please ensure that all the hosts are up and re-run the script.
Exiting now...
[root@oracle19c-rac1 sw]# /u01/app/19.3.0/grid/oui/prov/resources/scripts/sshUserSetup.sh -user grid  -hosts "oracle19c-rac1 oracle19c-rac2"  -advanced -exverify –confirm
The output of this script is also logged into /tmp/sshUserSetup_2021-07-29-21-27-21.log
Hosts are oracle19c-rac1 oracle19c-rac2
user is grid
Platform:- Linux
Checking if the remote hosts are reachable
PING oracle19c-rac1 (192.168.245.141) 56(84) bytes of data.
64 bytes from oracle19c-rac1 (192.168.245.141): icmp_seq=1 ttl=64 time=0.018 ms
64 bytes from oracle19c-rac1 (192.168.245.141): icmp_seq=2 ttl=64 time=0.047 ms
64 bytes from oracle19c-rac1 (192.168.245.141): icmp_seq=3 ttl=64 time=0.032 ms
64 bytes from oracle19c-rac1 (192.168.245.141): icmp_seq=4 ttl=64 time=0.034 ms
64 bytes from oracle19c-rac1 (192.168.245.141): icmp_seq=5 ttl=64 time=0.042 ms


--- oracle19c-rac1 ping statistics ---
5 packets transmitted, 5 received, 0% packet loss, time 4132ms
rtt min/avg/max/mdev = 0.018/0.034/0.047/0.011 ms
PING oracle19c-rac2 (192.168.245.142) 56(84) bytes of data.
64 bytes from oracle19c-rac2 (192.168.245.142): icmp_seq=1 ttl=64 time=0.413 ms
64 bytes from oracle19c-rac2 (192.168.245.142): icmp_seq=2 ttl=64 time=0.429 ms
64 bytes from oracle19c-rac2 (192.168.245.142): icmp_seq=3 ttl=64 time=0.290 ms
64 bytes from oracle19c-rac2 (192.168.245.142): icmp_seq=4 ttl=64 time=1.53 ms
64 bytes from oracle19c-rac2 (192.168.245.142): icmp_seq=5 ttl=64 time=0.232 ms


--- oracle19c-rac2 ping statistics ---
5 packets transmitted, 5 received, 0% packet loss, time 4070ms
rtt min/avg/max/mdev = 0.232/0.579/1.531/0.481 ms
Remote host reachability check succeeded.
The following hosts are reachable: oracle19c-rac1 oracle19c-rac2.
The following hosts are not reachable: .
All hosts are reachable. Proceeding further...
firsthost oracle19c-rac1
numhosts 2
The script will setup SSH connectivity from the host oracle19c-rac1 to all
the remote hosts. After the script is executed, the user can use SSH to run
commands on the remote hosts or copy files between this host oracle19c-rac1
and the remote hosts without being prompted for passwords or confirmations.


NOTE 1:
As part of the setup procedure, this script will use ssh and scp to copy
files between the local host and the remote hosts. Since the script does not
store passwords, you may be prompted for the passwords during the execution of
the script whenever ssh or scp is invoked.


NOTE 2:
AS PER SSH REQUIREMENTS, THIS SCRIPT WILL SECURE THE USER HOME DIRECTORY
AND THE .ssh DIRECTORY BY REVOKING GROUP AND WORLD WRITE PRIVILEGES TO THESE
directories.


Do you want to continue and let the script make the above mentioned changes (yes/no)?
yes


The user chose yes
Please specify if you want to specify a passphrase for the private key this script will create for the local host. Passphrase is used to encrypt the private key and makes SSH much more secure. Type 'yes' or 'no' and then press enter. In case you press 'yes', you would need to enter the passphrase whenever the script executes ssh or scp. no
The estimated number of times the user would be prompted for a passphrase is 4. In addition, if the private-public files are also newly created, the user would have to specify the passphrase on one additional occasion.
Enter 'yes' or 'no'.
yes


The user chose yes
Creating .ssh directory on local host, if not present already
Creating authorized_keys file on local host
Changing permissions on authorized_keys to 644 on local host
Creating known_hosts file on local host
Changing permissions on known_hosts to 644 on local host
Creating config file on local host
If a config file exists already at /root/.ssh/config, it would be backed up to /root/.ssh/config.backup.
Removing old private/public keys on local host
Running SSH keygen on local host
Enter passphrase (empty for no passphrase):
Enter same passphrase again:
Generating public/private rsa key pair.
Your identification has been saved in /root/.ssh/id_rsa.
Your public key has been saved in /root/.ssh/id_rsa.pub.
The key fingerprint is:
SHA256:NN+syaOEXyu/gmTMQhY4aSiRZ5vJ11h9v5Z3JvoRtcE root@oracle19c-rac1
The key's randomart image is:
+---[RSA 1024]----+
|.+ o   .         |
|+ B . . . .   .  |
|.= = =  o. .   E.|
|  = = .. o o.  .o|
|   + o  S . oo.. |
|    . =. . o+ o.o|
|     +... *. o.+ |
|      .ooo o.  . |
|        o++. ..  |
+----[SHA256]-----+
Creating .ssh directory and setting permissions on remote host oracle19c-rac1
THE SCRIPT WOULD ALSO BE REVOKING WRITE PERMISSIONS FOR group AND others ON THE HOME DIRECTORY FOR grid. THIS IS AN SSH REQUIREMENT.
The script would create ~grid/.ssh/config file on remote host oracle19c-rac1. If a config file exists already at ~grid/.ssh/config, it would be backed up to ~grid/.ssh/config.backup.
The user may be prompted for a password here since the script would be running SSH on host oracle19c-rac1.
Warning: Permanently added 'oracle19c-rac1,192.168.245.141' (ECDSA) to the list of known hosts.
grid@oracle19c-rac1's password:
Done with creating .ssh directory and setting permissions on remote host oracle19c-rac1.
Creating .ssh directory and setting permissions on remote host oracle19c-rac2
THE SCRIPT WOULD ALSO BE REVOKING WRITE PERMISSIONS FOR group AND others ON THE HOME DIRECTORY FOR grid. THIS IS AN SSH REQUIREMENT.
The script would create ~grid/.ssh/config file on remote host oracle19c-rac2. If a config file exists already at ~grid/.ssh/config, it would be backed up to ~grid/.ssh/config.backup.
The user may be prompted for a password here since the script would be running SSH on host oracle19c-rac2.
Warning: Permanently added 'oracle19c-rac2,192.168.245.142' (ECDSA) to the list of known hosts.
grid@oracle19c-rac2's password:
Done with creating .ssh directory and setting permissions on remote host oracle19c-rac2.
Copying local host public key to the remote host oracle19c-rac1
The user may be prompted for a password or passphrase here since the script would be using SCP for host oracle19c-rac1.
grid@oracle19c-rac1's password:
Done copying local host public key to the remote host oracle19c-rac1
Copying local host public key to the remote host oracle19c-rac2
The user may be prompted for a password or passphrase here since the script would be using SCP for host oracle19c-rac2.
grid@oracle19c-rac2's password:
Done copying local host public key to the remote host oracle19c-rac2
Creating keys on remote host oracle19c-rac1 if they do not exist already. This is required to setup SSH on host oracle19c-rac1.
Generating public/private rsa key pair.
Your identification has been saved in .ssh/id_rsa.
Your public key has been saved in .ssh/id_rsa.pub.
The key fingerprint is:
SHA256:sxnr7OG+lxd7Hb4P0cLLY7rWiYy6bvriIzXpRagXRfk grid@oracle19c-rac1
The key's randomart image is:
+---[RSA 1024]----+
|       ...       |
|        o        |
|       o .       |
|      o . E  . . |
|     . +S     + .|
|    . = .*  .. = |
|     + o=  + =Bo.|
|    . ++..+ *o++.|
|     ooX%= ooo .+|
+----[SHA256]-----+
Creating keys on remote host oracle19c-rac2 if they do not exist already. This is required to setup SSH on host oracle19c-rac2.
Generating public/private rsa key pair.
Your identification has been saved in .ssh/id_rsa.
Your public key has been saved in .ssh/id_rsa.pub.
The key fingerprint is:
SHA256:UsTPrA5Zfr9Zj43RQQcXcmCsu1rQHgJ9Dz5XR4+pyYM grid@oracle19c-rac2
The key's randomart image is:
+---[RSA 1024]----+
|       ..   .+oo+|
|       .o   ..o*.|
|       ..= o. oo+|
|       .o B+ooo o|
|      .+S+E=*o . |
|      o.o =.+. ..|
|       o . +. o .|
|        . ...o * |
|         .. o.o o|
+----[SHA256]-----+
Updating authorized_keys file on remote host oracle19c-rac1
Updating known_hosts file on remote host oracle19c-rac1
The script will run SSH on the remote machine oracle19c-rac1. The user may be prompted for a passphrase here in case the private key has been encrypted with a passphrase.
Updating authorized_keys file on remote host oracle19c-rac2
Updating known_hosts file on remote host oracle19c-rac2
The script will run SSH on the remote machine oracle19c-rac2. The user may be prompted for a passphrase here in case the private key has been encrypted with a passphrase.
SSH setup is complete.


------------------------------------------------------------------------
Verifying SSH setup
===================
The script will now run the date command on the remote nodes using ssh
to verify if ssh is setup correctly. IF THE SETUP IS CORRECTLY SETUP,
THERE SHOULD BE NO OUTPUT OTHER THAN THE DATE AND SSH SHOULD NOT ASK FOR
PASSWORDS. If you see any output other than date or are prompted for the
password, ssh is not setup correctly and you will need to resolve the
issue and set up ssh again.
The possible causes for failure could be:
1. The server settings in /etc/ssh/sshd_config file do not allow ssh
for user grid.
2. The server may have disabled public key based authentication.
3. The client public key on the server may be outdated.
4. ~grid or ~grid/.ssh on the remote host may not be owned by grid.
5. User may not have passed -shared option for shared remote users or
may be passing the -shared option for non-shared remote users.
6. If there is output in addition to the date, but no password is asked,
it may be a security alert shown as part of company policy. Append the
additional text to the /sysman/prov/resources/ignoreMessages.txt file.
------------------------------------------------------------------------
--oracle19c-rac1:--
Running /usr/bin/ssh -x -l grid oracle19c-rac1 date to verify SSH connectivity has been setup from local host to oracle19c-rac1.
IF YOU SEE ANY OTHER OUTPUT BESIDES THE OUTPUT OF THE DATE COMMAND OR IF YOU ARE PROMPTED FOR A PASSWORD HERE, IT MEANS SSH SETUP HAS NOT BEEN SUCCESSFUL. Please note that being prompted for a passphrase may be OK but being prompted for a password is ERROR.
The script will run SSH on the remote machine oracle19c-rac1. The user may be prompted for a passphrase here in case the private key has been encrypted with a passphrase.
Thu Jul 29 21:28:14 CST 2021
------------------------------------------------------------------------
--oracle19c-rac2:--
Running /usr/bin/ssh -x -l grid oracle19c-rac2 date to verify SSH connectivity has been setup from local host to oracle19c-rac2.
IF YOU SEE ANY OTHER OUTPUT BESIDES THE OUTPUT OF THE DATE COMMAND OR IF YOU ARE PROMPTED FOR A PASSWORD HERE, IT MEANS SSH SETUP HAS NOT BEEN SUCCESSFUL. Please note that being prompted for a passphrase may be OK but being prompted for a password is ERROR.
The script will run SSH on the remote machine oracle19c-rac2. The user may be prompted for a passphrase here in case the private key has been encrypted with a passphrase.
Thu Jul 29 21:28:15 CST 2021
------------------------------------------------------------------------
------------------------------------------------------------------------
Verifying SSH connectivity has been setup from oracle19c-rac1 to oracle19c-rac1
------------------------------------------------------------------------
IF YOU SEE ANY OTHER OUTPUT BESIDES THE OUTPUT OF THE DATE COMMAND OR IF YOU ARE PROMPTED FOR A PASSWORD HERE, IT MEANS SSH SETUP HAS NOT BEEN SUCCESSFUL.
Thu Jul 29 21:28:15 CST 2021
------------------------------------------------------------------------
------------------------------------------------------------------------
Verifying SSH connectivity has been setup from oracle19c-rac1 to oracle19c-rac2
------------------------------------------------------------------------
IF YOU SEE ANY OTHER OUTPUT BESIDES THE OUTPUT OF THE DATE COMMAND OR IF YOU ARE PROMPTED FOR A PASSWORD HERE, IT MEANS SSH SETUP HAS NOT BEEN SUCCESSFUL.
Thu Jul 29 21:28:15 CST 2021
------------------------------------------------------------------------
-Verification from oracle19c-rac1 complete-
------------------------------------------------------------------------
Verifying SSH connectivity has been setup from oracle19c-rac2 to oracle19c-rac1
------------------------------------------------------------------------
IF YOU SEE ANY OTHER OUTPUT BESIDES THE OUTPUT OF THE DATE COMMAND OR IF YOU ARE PROMPTED FOR A PASSWORD HERE, IT MEANS SSH SETUP HAS NOT BEEN SUCCESSFUL.
Thu Jul 29 21:28:15 CST 2021
------------------------------------------------------------------------
------------------------------------------------------------------------
Verifying SSH connectivity has been setup from oracle19c-rac2 to oracle19c-rac2
------------------------------------------------------------------------
IF YOU SEE ANY OTHER OUTPUT BESIDES THE OUTPUT OF THE DATE COMMAND OR IF YOU ARE PROMPTED FOR A PASSWORD HERE, IT MEANS SSH SETUP HAS NOT BEEN SUCCESSFUL.
Thu Jul 29 21:28:16 CST 2021
------------------------------------------------------------------------
-Verification from oracle19c-rac2 complete-
SSH verification complete.
测试
[grid@oracle19c-rac1:/home/grid]$ ssh oracle19c-rac1 date;ssh oracle19c-rac2 date;ssh oracle19c-rac1-priv date;ssh oracle19c-rac2-priv date
Thu Jul 29 21:30:51 CST 2021
Thu Jul 29 21:30:51 CST 2021
The authenticity of host 'oracle19c-rac1-priv (192.168.28.141)' can't be established.
ECDSA key fingerprint is SHA256:mGQqK7wQTcVWLvVK2qcO5h9fZRNxTUoogoH5ZCaPoEE.
ECDSA key fingerprint is MD5:77:33:4d:11:43:f9:77:f9:68:12:5d:2d:cb:e6:cc:d8.
Are you sure you want to continue connecting (yes/no)? yes
Warning: Permanently added 'oracle19c-rac1-priv,192.168.28.141' (ECDSA) to the list of known hosts.
Thu Jul 29 21:30:53 CST 2021
The authenticity of host 'oracle19c-rac2-priv (192.168.28.142)' can't be established.
ECDSA key fingerprint is SHA256:+D0xlzh7YSO+ht9sgJ6XIHd3IGMaCB5JD329dKpTReo.
ECDSA key fingerprint is MD5:bd:b4:96:ec:fd:b9:88:94:d8:ef:58:5e:3d:c6:b6:46.
Are you sure you want to continue connecting (yes/no)? yes
Warning: Permanently added 'oracle19c-rac2-priv,192.168.28.142' (ECDSA) to the list of known hosts.
Thu Jul 29 21:30:54 CST 2021
[grid@oracle19c-rac1:/home/grid]$ ssh oracle19c-rac1 date;ssh oracle19c-rac2 date;ssh oracle19c-rac1-priv date;ssh oracle19c-rac2-priv date
Thu Jul 29 21:30:56 CST 2021
Thu Jul 29 21:30:56 CST 2021
Thu Jul 29 21:30:56 CST 2021
Thu Jul 29 21:30:57 CST 2021
[grid@oracle19c-rac1:/home/grid]$
oracle用户--oracle采用的图形方法
$ORACLE_HOME/oui/prov/resources/scripts/sshUserSetup.sh -user oracle -hosts "19c-h1 19c-h2" -advanced -noPromptPassphrase
普通配置方法
分别配置 grid 和 oracle 用户的 ssh 两个节点都执行
# su - oracle
$ mkdir -p ~/.ssh
$ chmod 700 ~/.ssh
$ ssh-keygen -t rsa ->回车->回车->回车
$ ssh-keygen -t dsa ->回车->回车->回车
----------------------------------------------------------------
# su - oracle
$ mkdir ~/.ssh
$ chmod 700 ~/.ssh
$ ssh-keygen -t rsa ->回车->回车->回车
$ ssh-keygen -t dsa ->回车->回车->回车
以上两个节点都执行,下面就一个节点执行即可
$ cat ~/.ssh/id_rsa.pub >> ~/.ssh/authorized_keys
$ cat ~/.ssh/id_dsa.pub >> ~/.ssh/authorized_keys
$ ssh oracle19c-rac2 cat ~/.ssh/id_rsa.pub >> ~/.ssh/authorized_keys ->输入 oracle19c-rac2 密码
$ ssh oracle19c-rac2 cat ~/.ssh/id_dsa.pub >> ~/.ssh/authorized_keys ->输入 oracle19c-rac2 密码
$ scp ~/.ssh/authorized_keys oracle19c-rac2:~/.ssh/authorized_keys ->输入 oracle19c-rac2 密码


测试两节点连通性:
$ ssh oracle19c-rac1 date
$ ssh oracle19c-rac2 date
$ ssh oracle19c-rac1-priv date
$ ssh oracle19c-rac2-priv date
$ ssh oracle19c-rac1 date
$ ssh oracle19c-rac2 date
$ ssh oracle19c-rac1-priv date
$ ssh oracle19c-rac2-priv date


分别使用grid和oracle用户验证SSH connectivity:
$ for h in test1 test1-priv test2 test2-priv;do
ssh -l grid -o StrictHostKeyChecking=no $h date;
done


$ for h in test1 test1-priv test2 test2-priv;do
ssh -l oracle -o StrictHostKeyChecking=no $h date;
done
5.5 安装前检查
RHEL 7 系统不支持 AFD,在安装 GRID 时,必须去掉 Configure Oracle ASM Fileter Driver,否则报错。
19C 版本 GIMR 管理功能是一个可选项,不强制要求配置,建议不配置此功能(本例是启用了 GIMR)。
如果要配置 GIMR 功能,需要的容量不少于 35G,建议最小配置为 40G。最好 OCR 的磁盘组和 GIMR 的实例 ASM 存储分开,以便于对 OCR 磁盘组的管理
GRID 安装完成,在进行集群校验时,因为 SCAN NAME 没有使用 DNS 解析报失败,此情况正常,忽略
在 grid 软件目录里运行以下命令:
使用 CVU 验证硬件和操作系统设置
./runcluvfy.sh stage -pre crsinst -n oracle19c-rac1,oracle19c-rac2 -fixup -verbose
./runcluvfy.sh stage -pre crsinst -n oracle19c-rac1,oracle19c-rac2 -verbose
./runcluvfy.sh stage -post hwos -n oracle19c-rac1,oracle19c-rac2 -verbos


在grid的ORACLE_HOME下
执行./runcluvfy.sh stage -post hwos -n oracle19c-rac1,oracle19c-rac2 -verbos


export CVUQDISK_GRP=oinstall
./runcluvfy.sh stage -pre crsinst -n oracle19c-rac1,oracle19c-rac2 -verbose
[grid@oracle19c-rac1:/u01/app/19.3.0/grid]$ ./runcluvfy.sh stage -post hwos -n oracle19c-rac1,oracle19c-rac2 -verbose


Verifying Node Connectivity ...
  Verifying Hosts File ...
  Node Name                             Status
  ------------------------------------  ------------------------
  oracle19c-rac2                        passed
  oracle19c-rac1                        passed
  Verifying Hosts File ...PASSED


Interface information for node "oracle19c-rac2"


 Name   IP Address      Subnet          Gateway         Def. Gateway    HW Address        MTU
 ------ --------------- --------------- --------------- --------------- ----------------- ------
 ens33  192.168.245.142 192.168.245.0   0.0.0.0         192.168.245.2   00:0C:29:4F:BE:2E 1500
 ens34  192.168.28.142  192.168.28.0    0.0.0.0         192.168.245.2   00:0C:29:4F:BE:38 1500


Interface information for node "oracle19c-rac1"


 Name   IP Address      Subnet          Gateway         Def. Gateway    HW Address        MTU
 ------ --------------- --------------- --------------- --------------- ----------------- ------
 ens33  192.168.245.141 192.168.245.0   0.0.0.0         192.168.245.2   00:0C:29:75:C0:82 1500
 ens34  192.168.28.141  192.168.28.0    0.0.0.0         192.168.245.2   00:0C:29:75:C0:8C 1500


Check: MTU consistency of the subnet "192.168.245.0".


  Node              Name          IP Address    Subnet        MTU
  ----------------  ------------  ------------  ------------  ----------------
  oracle19c-rac2    ens33         192.168.245.142  192.168.245.0  1500
  oracle19c-rac1    ens33         192.168.245.141  192.168.245.0  1500


Check: MTU consistency of the subnet "192.168.28.0".


  Node              Name          IP Address    Subnet        MTU
  ----------------  ------------  ------------  ------------  ----------------
  oracle19c-rac2    ens34         192.168.28.142  192.168.28.0  1500
  oracle19c-rac1    ens34         192.168.28.141  192.168.28.0  1500
  Verifying Check that maximum (MTU) size packet goes through subnet ...PASSED


  Source                          Destination                     Connected?
  ------------------------------  ------------------------------  ----------------
  oracle19c-rac1[ens33:192.168.245.141]  oracle19c-rac2[ens33:192.168.245.142]  yes


  Source                          Destination                     Connected?
  ------------------------------  ------------------------------  ----------------
  oracle19c-rac1[ens34:192.168.28.141]  oracle19c-rac2[ens34:192.168.28.142]  yes
  Verifying subnet mask consistency for subnet "192.168.245.0" ...PASSED
  Verifying subnet mask consistency for subnet "192.168.28.0" ...PASSED
Verifying Node Connectivity ...PASSED
Verifying Multicast or broadcast check ...
Checking subnet "192.168.245.0" for multicast communication with multicast group "224.0.0.251"
Verifying Multicast or broadcast check ...PASSED
Verifying Users With Same UID: 0 ...PASSED
Verifying Time zone consistency ...PASSED
Verifying Shared Storage Discovery ...FAILED (PRVG-13610)
Verifying DNS/NIS name service ...PASSED


Post-check for hardware and operating system setup was unsuccessful on all the nodes.


Failures were encountered during execution of CVU verification request "stage -post hwos".


Verifying Shared Storage Discovery ...FAILED
PRVG-13610 : No shared storage was found on nodes "oracle19c-rac2".


CVU operation performed:      stage -post hwos
Date:                         Jul 29, 2021 9:36:45 PM
CVU home:                     /u01/app/19.3.0/grid/
User:                         grid
5.6 执行安装(直接升级19.11)
export DISPLAY=192.168.245.110:0.0  -推荐用mobaXterm方便


执行安装程序开始安装,通过-applyRU参数指向补丁解压位置,提前安装grid补丁 ./gridSetup.sh -applyRU /soft/32545008


./gridSetup.sh -applyRU /u01/sw/ru/32545008
这里首先进行的是补丁升级,然后再启动安装界面
......
相关进程如下
grid      9368  5973  0 21:49 pts/0    00:00:00 /bin/sh ./gridSetup.sh -applyRU /u01/sw/ru/32545008
grid      9382  9368  0 21:49 pts/0    00:00:00 /u01/app/19.3.0/grid/perl/bin/perl -I/u01/app/19.3.0/grid/perl/lib -I/u01/app/19.3.0/gr
root      9396     2  0 21:49 ?        00:00:00 [kworker/u2:0-ev]
grid      9410  9382  0 21:49 pts/0    00:00:02 /tmp/GridSetupActions2021-07-29_09-49-06PM/tempHome/jre/bin/java -cp /tmp/GridSetupActi
grid      9501  9410  0 21:49 pts/0    00:00:00 /bin/sh /u01/app/19.3.0/grid/OPatch/opatchauto apply /u01/sw/ru/32545008 -no_relink -bi
grid      9508  9501  0 21:49 pts/0    00:00:00 /u01/app/19.3.0/grid/perl/bin/perl /u01/app/19.3.0/grid/OPatch/auto/database/bin/OPatch
grid      9601  9508 26 21:49 pts/0    00:02:36 /u01/app/19.3.0/grid/OPatch/jre/bin/java -d64 -Xmx3072m -cp /u01/app/19.3.0/grid/OPatch
这里进行软件的RU升级,并不做relink。升级上次测试需要半个多小时,去抽个烟。结果升级了3个小时。
相关的打补丁详细信息在/u01/app/19.3.0/grid/cfgtoollogs/
5.6.1 图形截图
凌晨1点30分终于见到图形界面了,赶紧安装完GI睡觉。
安装standalone cluster
填写集群名称和scan名字,scan名字和/etc/hosts一致
添加节点二信息,进行互信
确保对应网卡和IP网段对应即可,19C心跳网段需要选ASM & Private,用于ASM实例的托管
选择ASM
不安装GIMR
修改路径,取消driver
输入密码grid
不启动IPMI
不注册EM
核对用户组
5.6.2 执行脚本
[root@oracle19c-rac1 ~]# /u01/app/oraInventory/orainstRoot.sh
Changing permissions of /u01/app/oraInventory.
Adding read,write permissions for group.
Removing read,write,execute permissions for world.


Changing groupname of /u01/app/oraInventory to oinstall.
The execution of the script is complete.


[root@oracle19c-rac2 tmp]# /u01/app/oraInventory/orainstRoot.sh
Changing permissions of /u01/app/oraInventory.
Adding read,write permissions for group.
Removing read,write,execute permissions for world.


Changing groupname of /u01/app/oraInventory to oinstall.
The execution of the script is complete.


./rootcrs.sh -force -deconfig -verbose


[root@oracle19c-rac1 ~]# /u01/app/oraInventory/orainstRoot.sh
Changing permissions of /u01/app/oraInventory.
Adding read,write permissions for group.
Removing read,write,execute permissions for world.


Changing groupname of /u01/app/oraInventory to oinstall.
The execution of the script is complete.
[root@oracle19c-rac1 ~]# /u01/app/19.3.0/grid/root.sh
Performing root user operation.


The following environment variables are set as:
    ORACLE_OWNER= grid
    ORACLE_HOME=  /u01/app/19.3.0/grid


Enter the full pathname of the local bin directory: [/usr/local/bin]:
   Copying dbhome to /usr/local/bin ...
   Copying oraenv to /usr/local/bin ...
   Copying coraenv to /usr/local/bin ...


Creating /etc/oratab file...
Entries will be added to the /etc/oratab file as needed by
Database Configuration Assistant when a database is created
Finished running generic part of root script.
Now product-specific root actions will be performed.
Relinking oracle with rac_on option
Using configuration parameter file: /u01/app/19.3.0/grid/crs/install/crsconfig_params
The log of current session can be found at:
  /u01/app/grid/crsdata/oracle19c-rac1/crsconfig/rootcrs_oracle19c-rac1_2021-08-01_06-54-40PM.log
2021/08/01 18:55:00 CLSRSC-594: Executing installation step 1 of 19: 'SetupTFA'.
2021/08/01 18:55:00 CLSRSC-594: Executing installation step 2 of 19: 'ValidateEnv'.
2021/08/01 18:55:00 CLSRSC-594: Executing installation step 3 of 19: 'CheckFirstNode'.
2021/08/01 18:55:03 CLSRSC-594: Executing installation step 4 of 19: 'GenSiteGUIDs'.
2021/08/01 18:55:05 CLSRSC-594: Executing installation step 5 of 19: 'SetupOSD'.
Redirecting to /bin/systemctl restart rsyslog.service
2021/08/01 18:55:07 CLSRSC-594: Executing installation step 6 of 19: 'CheckCRSConfig'.
2021/08/01 18:55:11 CLSRSC-594: Executing installation step 7 of 19: 'SetupLocalGPNP'.
2021/08/01 18:55:13 CLSRSC-4004: Failed to install Oracle Trace File Analyzer (TFA) Collector. Grid Infrastructure operations will continue.
2021/08/01 18:55:25 CLSRSC-594: Executing installation step 8 of 19: 'CreateRootCert'.
2021/08/01 18:55:30 CLSRSC-594: Executing installation step 9 of 19: 'ConfigOLR'.
2021/08/01 18:55:44 CLSRSC-594: Executing installation step 10 of 19: 'ConfigCHMOS'.
2021/08/01 18:55:44 CLSRSC-594: Executing installation step 11 of 19: 'CreateOHASD'.
2021/08/01 18:55:52 CLSRSC-594: Executing installation step 12 of 19: 'ConfigOHASD'.
2021/08/01 18:55:53 CLSRSC-330: Adding Clusterware entries to file 'oracle-ohasd.service'
2021/08/01 18:57:22 CLSRSC-594: Executing installation step 13 of 19: 'InstallAFD'.
2021/08/01 18:57:23 CLSRSC-594: Executing installation step 14 of 19: 'InstallACFS'.
2021/08/01 18:59:21 CLSRSC-594: Executing installation step 15 of 19: 'InstallKA'.
2021/08/01 18:59:29 CLSRSC-594: Executing installation step 16 of 19: 'InitConfig'.


ASM has been created and started successfully.


[DBT-30001] Disk groups created successfully. Check /u01/app/grid/cfgtoollogs/asmca/asmca-210801PM070008.log for details.


2021/08/01 19:02:04 CLSRSC-482: Running command: '/u01/app/19.3.0/grid/bin/ocrconfig -upgrade grid oinstall'
CRS-4256: Updating the profile
Successful addition of voting disk b6fda7690d0e4fcdbfadc303580fb08d.
Successful addition of voting disk 8e02bf80da2e4fb8bf50d145561261c9.
Successful addition of voting disk bca68836396f4fcdbf307746a22941c5.
Successfully replaced voting disk group with +OCRVOTE.
CRS-4256: Updating the profile
CRS-4266: Voting file(s) successfully replaced
##  STATE    File Universal Id                File Name Disk group
--  -----    -----------------                --------- ---------
 1. ONLINE   b6fda7690d0e4fcdbfadc303580fb08d (/dev/asm_ocr01) [OCRVOTE]
 2. ONLINE   8e02bf80da2e4fb8bf50d145561261c9 (/dev/asm_ocr02) [OCRVOTE]
 3. ONLINE   bca68836396f4fcdbf307746a22941c5 (/dev/asm_ocr03) [OCRVOTE]
Located 3 voting disk(s).
2021/08/01 19:03:33 CLSRSC-594: Executing installation step 17 of 19: 'StartCluster'.
2021/08/01 19:04:45 CLSRSC-343: Successfully started Oracle Clusterware stack
2021/08/01 19:04:45 CLSRSC-594: Executing installation step 18 of 19: 'ConfigNode'.
2021/08/01 19:06:52 CLSRSC-594: Executing installation step 19 of 19: 'PostConfig'.
2021/08/01 19:07:37 CLSRSC-325: Configure Oracle Grid Infrastructure for a Cluster ... succeede


[root@oracle19c-rac2 ~]# /u01/app/19.3.0/grid/root.sh
Performing root user operation.


The following environment variables are set as:
    ORACLE_OWNER= grid
    ORACLE_HOME=  /u01/app/19.3.0/grid


Enter the full pathname of the local bin directory: [/usr/local/bin]:
   Copying dbhome to /usr/local/bin ...
   Copying oraenv to /usr/local/bin ...
   Copying coraenv to /usr/local/bin ...


Creating /etc/oratab file...
Entries will be added to the /etc/oratab file as needed by
Database Configuration Assistant when a database is created
Finished running generic part of root script.
Now product-specific root actions will be performed.
Relinking oracle with rac_on option


Using configuration parameter file: /u01/app/19.3.0/grid/crs/install/crsconfig_params
The log of current session can be found at:
  /u01/app/grid/crsdata/oracle19c-rac2/crsconfig/rootcrs_oracle19c-rac2_2021-08-01_07-09-35PM.log
2021/08/01 19:10:04 CLSRSC-594: Executing installation step 1 of 19: 'SetupTFA'.
2021/08/01 19:10:04 CLSRSC-594: Executing installation step 2 of 19: 'ValidateEnv'.
2021/08/01 19:10:04 CLSRSC-594: Executing installation step 3 of 19: 'CheckFirstNode'.
2021/08/01 19:10:06 CLSRSC-594: Executing installation step 4 of 19: 'GenSiteGUIDs'.
2021/08/01 19:10:06 CLSRSC-594: Executing installation step 5 of 19: 'SetupOSD'.
Redirecting to /bin/systemctl restart rsyslog.service
2021/08/01 19:10:08 CLSRSC-594: Executing installation step 6 of 19: 'CheckCRSConfig'.
2021/08/01 19:10:19 CLSRSC-594: Executing installation step 7 of 19: 'SetupLocalGPNP'.
2021/08/01 19:10:22 CLSRSC-594: Executing installation step 8 of 19: 'CreateRootCert'.
2021/08/01 19:10:22 CLSRSC-594: Executing installation step 9 of 19: 'ConfigOLR'.
2021/08/01 19:10:37 CLSRSC-594: Executing installation step 10 of 19: 'ConfigCHMOS'.
2021/08/01 19:10:38 CLSRSC-594: Executing installation step 11 of 19: 'CreateOHASD'.
2021/08/01 19:11:03 CLSRSC-594: Executing installation step 12 of 19: 'ConfigOHASD'.
2021/08/01 19:11:09 CLSRSC-330: Adding Clusterware entries to file 'oracle-ohasd.service'
2021/08/01 19:13:15 CLSRSC-4002: Successfully installed Oracle Trace File Analyzer (TFA) Collector.
2021/08/01 19:13:26 CLSRSC-594: Executing installation step 13 of 19: 'InstallAFD'.
2021/08/01 19:13:26 CLSRSC-594: Executing installation step 14 of 19: 'InstallACFS'.
2021/08/01 19:15:41 CLSRSC-594: Executing installation step 15 of 19: 'InstallKA'.
2021/08/01 19:15:42 CLSRSC-594: Executing installation step 16 of 19: 'InitConfig'.
2021/08/01 19:15:59 CLSRSC-594: Executing installation step 17 of 19: 'StartCluster'.
2021/08/01 19:18:45 CLSRSC-343: Successfully started Oracle Clusterware stack
2021/08/01 19:18:45 CLSRSC-594: Executing installation step 18 of 19: 'ConfigNode'.
2021/08/01 19:20:31 CLSRSC-594: Executing installation step 19 of 19: 'PostConfig'.
2021/08/01 19:21:21 CLSRSC-325: Configure Oracle Grid Infrastructure for a Cluster ... succeeded
[root@oracle19c-rac2 ~]#
继续执行图形,忽略
5.6.3 检查
[grid@oracle19c-rac1:/home/grid]$ crsctl stat res -t
--------------------------------------------------------------------------------
Name           Target  State        Server                   State details
--------------------------------------------------------------------------------
Local Resources
--------------------------------------------------------------------------------
ora.LISTENER.lsnr
               ONLINE  ONLINE       oracle19c-rac1           STABLE
               ONLINE  ONLINE       oracle19c-rac2           STABLE
ora.chad
               ONLINE  ONLINE       oracle19c-rac1           STABLE
               ONLINE  ONLINE       oracle19c-rac2           Wrong check return,S
                                                             TABLE
ora.net1.network
               ONLINE  ONLINE       oracle19c-rac1           STABLE
               ONLINE  ONLINE       oracle19c-rac2           STABLE
ora.ons
               ONLINE  ONLINE       oracle19c-rac1           STABLE
               ONLINE  ONLINE       oracle19c-rac2           STABLE
ora.proxy_advm
               OFFLINE OFFLINE      oracle19c-rac1           STABLE
               OFFLINE OFFLINE      oracle19c-rac2           STABLE
--------------------------------------------------------------------------------
Cluster Resources
--------------------------------------------------------------------------------
ora.ASMNET1LSNR_ASM.lsnr(ora.asmgroup)
      1        ONLINE  ONLINE       oracle19c-rac1           STABLE
      2        ONLINE  ONLINE       oracle19c-rac2           STABLE
ora.LISTENER_SCAN1.lsnr
      1        ONLINE  ONLINE       oracle19c-rac1           STABLE
ora.OCRVOTE.dg(ora.asmgroup)
      1        ONLINE  ONLINE       oracle19c-rac1           STABLE
      2        ONLINE  ONLINE       oracle19c-rac2           STABLE
ora.asm(ora.asmgroup)
      1        ONLINE  ONLINE       oracle19c-rac1           Started,STABLE
      2        ONLINE  ONLINE       oracle19c-rac2           Started,STABLE
ora.asmnet1.asmnetwork(ora.asmgroup)
      1        ONLINE  ONLINE       oracle19c-rac1           STABLE
      2        ONLINE  ONLINE       oracle19c-rac2           STABLE
ora.cvu
      1        ONLINE  ONLINE       oracle19c-rac1           STABLE
ora.oracle19c-rac1.vip
      1        ONLINE  ONLINE       oracle19c-rac1           STABLE
ora.oracle19c-rac2.vip
      1        ONLINE  ONLINE       oracle19c-rac2           STABLE
ora.qosmserver
      1        ONLINE  ONLINE       oracle19c-rac1           STABLE
ora.scan1.vip
      1        ONLINE  ONLINE       oracle19c-rac1           STABLE
--------------------------------------------------------------------------------


[root@oracle19c-rac1 system]# systemctl status oracle-ohasd.service
● oracle-ohasd.service - Oracle High Availability Services
   Loaded: loaded (/etc/systemd/system/oracle-ohasd.service; enabled; vendor preset: disabled)
  Drop-In: /etc/systemd/system/oracle-ohasd.service.d
           └─00_oracle-ohasd.conf
   Active: active (running) since Sun 2021-08-01 18:56:00 CST; 40min ago
 Main PID: 31147 (init.ohasd)
    Tasks: 1
六 创建磁盘组
su - grid
asmca
七、安装Oracle软件+RU
7.1 修改软件包权限
chown oracle:oinstall LINUX.X64_193000_db_home.zip
7.2 解压缩到oracle_home
unzip /u01/sw/LINUX.X64_193000_db_home.zip -d $ORACLE_HOME
7.3 升级opatch版本
[oracle@oracle19c-rac1:/u01/app/oracle/product/19.3.0/dbhome_1/OPatchbak]$ ./opatch version
OPatch Version: 12.2.0.1.17


OPatch succeeded.
[oracle@oracle19c-rac1:/u01/app/oracle/product/19.3.0/dbhome_1]$ mv OPatch/ OPatchbak
[oracle@oracle19c-rac1:/u01/app/oracle/product/19.3.0/dbhome_1]$ unzip /u01/sw/p6880880_190000_Linux-x86-64.zip -d $ORACLE_HOME


[oracle@oracle19c-rac1:/u01/app/oracle/product/19.3.0/dbhome_1/OPatchbak]$ ./opatch version
OPatch Version: 12.2.0.1.17


OPatch succeeded.
7.4 安装Oracle软件(直接升级RU19.11)
[oracle@oracle19c-rac1:/u01/app/oracle/product/19.3.0/dbhome_1]$ export DISPLAY=192.168.245.110:0.0
[oracle@oracle19c-rac1:/u01/app/oracle/product/19.3.0/dbhome_1]$ ./runInstaller -applyRU /u01/sw/ru/32545008


[oracle@oracle19c-rac1:/u01/app/oracle/product/19.3.0/dbhome_1]$ ./runInstaller -applyRU /u01/sw/ru/32545008
ERROR: Unable to verify the graphical display setup. This application requires X display. Make sure that xdpyinfo exist under PATH variable.
Preparing the home to patch...
Applying the patch /u01/sw/ru/32545008...
Successfully applied the patch.
7.5 安装截图
grid采用脚本,这次测试图形直接setup和test
执行脚本
[root@oracle19c-rac2 ~]# /u01/app/oracle/product/19.3.0/dbhome_1/root.sh
Performing root user operation.


The following environment variables are set as:
    ORACLE_OWNER= oracle
    ORACLE_HOME=  /u01/app/oracle/product/19.3.0/dbhome_1


Enter the full pathname of the local bin directory: [/usr/local/bin]:
The contents of "dbhome" have not changed. No need to overwrite.
The contents of "oraenv" have not changed. No need to overwrite.
The contents of "coraenv" have not changed. No need to overwrite.


Entries will be added to the /etc/oratab file as needed by
Database Configuration Assistant when a database is created
Finished running generic part of root script.
Now product-specific root actions will be performed.
确认版本
[oracle@oracle19c-rac1:/home/oracle]$ sqlplus /  as sysdba


SQL*Plus: Release 19.0.0.0.0 - Production on Tue Aug 3 18:26:38 2021
Version 19.11.0.0.0


Copyright (c) 1982, 2020, Oracle.  All rights reserved.
八 创建数据库
8.1 数据库规划
| **规划内容** | **规划描述** |
|---|---|
| 内存规划 | SGA PGA |
| processes | 1000 |
| 字符集 | ZHS16GBK |
| 归档模式 | 非 |
| redo | 5组 每组200M |
| undo | 2G 自动扩展 最大4G |
| temp | 4G |
| 闪回配置 | 4G大小 |
8.2 dbca建库
创建数据库
高级安装
选择一般用途
选择节点
**选择创建数据库名,**是否包含PDB
选择数据库安装路径和管理方式
是否启动FRA和归档
不使用vault
内存配置
process配置
字符集配置
数据示例
EM配置
用户密码
执行下一步
检查
安装汇总
安装完成
PS:通过对log日志的跟踪分析,因为之前升级到了19.11,因此需要进行datapatch,这块时间可能比较长
[progressPage.flowWorker] [ 2021-08-03 19:08:14.919 CST ] [CloneDBCreationStep.executeImpl:743]  Temp file to be added:=+DATA/ORCL/temp01.dbf
[progressPage.flowWorker] [ 2021-08-03 19:08:14.920 CST ] [CloneDBCreationStep.executeImpl:744]  Temp file size in KB:=20480
[progressPage.flowWorker] [ 2021-08-03 19:08:15.508 CST ] [CloneDBCreationStep.executeImpl:792]  Establish USERS as the default permanent tablespace of the database
[progressPage.flowWorker] [ 2021-08-03 19:08:16.070 CST ] [CloneDBCreationStep.executeImpl:805]  Resetting SYS and SYSTEM passwords
[progressPage.flowWorker] [ 2021-08-03 19:08:18.837 CST ] [CloneDBCreationStep.executeImpl:810]  SYS reset done
[progressPage.flowWorker] [ 2021-08-03 19:08:19.902 CST ] [CloneDBCreationStep.executeImpl:819]  SYSTEM reset done
[progressPage.flowWorker] [ 2021-08-03 19:08:19.907 CST ] [CloneDBCreationStep.executeImpl:831]  executing datapatch /u01/app/oracle/product/19.3.0/dbhome_1/OPatch/datapatch
确认版本信息
col status for a10
 col action for a10
 col action_time for a30
 col description for a60
 select patch_id,patch_type,action,status,action_time,description from dba_registry_sqlpatch;
  PATCH_ID PATCH_TYPE                     ACTION     STATUS     ACTION_TIME                    DESCRIPTION
---------- ------------------------------ ---------- ---------- ------------------------------ ------------------------------------------------------------
  32545013 RU                             APPLY      SUCCESS    03-AUG-21 07.35.57.810463 PM   Database Release Update : 19.11.0.0.210420 (32545013)

 col version for a25
 col comments for a80
 select ACTION_TIME,VERSION,COMMENTS from dba_registry_history;
 ACTION_TIME                    VERSION                   COMMENTS
------------------------------ ------------------------- --------------------------------------------------------------------------------
                               19                        RDBMS_19.11.0.0.0DBRU_LINUX.X64_210412
03-AUG-21 07.34.37.021250 PM   19.0.0.0.0                Patch applied from 19.3.0.0.0 to 19.11.0.0.0: Release_Update - 210413004009
8.3 连接测试
8.3.1 连接CDB
SQL> startup
ORACLE instance started.


Total System Global Area 1895824672 bytes
Fixed Size                  9141536 bytes
Variable Size            1140850688 bytes
Database Buffers          738197504 bytes
Redo Buffers                7634944 bytes
Database mounted.
Database opened.
SQL> show pdbs


    CON_ID CON_NAME                       OPEN MODE  RESTRICTED
---------- ------------------------------ ---------- ----------
         2 PDB$SEED                       READ ONLY  NO
         3 PDB1                           MOUNTED
SQL> select
  2   'DB Name: ' ||Sys_Context('Userenv', 'DB_Name')||
  3   ' / CDB?: ' ||case
  4   when Sys_Context('Userenv', 'CDB_Name') is not null then 'YES'
  5   else 'NO'
  6   end||
  7   ' / Auth-ID: ' ||Sys_Context('Userenv', 'Authenticated_Identity')||
  8   ' / Sessn-User: '||Sys_Context('Userenv', 'Session_User')||
  9   ' / Container: ' ||Nvl(Sys_Context('Userenv', 'Con_Name'), 'n/a')
 10   "Who am I?"
 11   from Dual
 12   /


Who am I?
--------------------------------------------------------------------------------
DB Name: orcl / CDB?: YES / Auth-ID: oracle / Sessn-User: SYS / Container: CDB$R
OOT


SQL> set linesize 300
SQL> /


Who am I?
------------------------------------------------------------------------------------------------------------------------------------------------------------------------------------------------------------------------------------------------------------------------------------------------------------
DB Name: orcl / CDB?: YES / Auth-ID: oracle / Sessn-User: SYS / Container: CDB$ROOT


SQL>
SQL> alter pluggable database pdb1 open;


Pluggable database altered.


SQL> show pdbs


    CON_ID CON_NAME                       OPEN MODE  RESTRICTED
---------- ------------------------------ ---------- ----------
         2 PDB$SEED                       READ ONLY  NO
         3 PDB1                           READ WRITE NO
SQL>
8.3.2 连接pdb
ORACLE_PDB_SID方式
export ORACLE_PDB_SID=pdb1
[oracle@oracle19c-rac1:/home/oracle]$ export ORACLE_PDB_SID=pdb1
[oracle@oracle19c-rac1:/home/oracle]$ env|grep PDB
ORACLE_PDB_SID=pdb1
[oracle@oracle19c-rac1:/home/oracle]$ sqlplus / as sysdba


SQL*Plus: Release 19.0.0.0.0 - Production on Wed Aug 4 11:08:03 2021
Version 19.11.0.0.0


Copyright (c) 1982, 2020, Oracle.  All rights reserved.


Connected to:
Oracle Database 19c Enterprise Edition Release 19.0.0.0.0 - Production
Version 19.11.0.0.0


SQL> show pdbs


    CON_ID CON_NAME                       OPEN MODE  RESTRICTED
---------- ------------------------------ ---------- ----------
         3 PDB1                           READ WRITE NO
SQL>
SET CONTAINER方式
ALTER SESSION SET CONTAINER = PDB1;
 Connected to:
Oracle Database 19c Enterprise Edition Release 19.0.0.0.0 - Production
Version 19.11.0.0.0


SQL>  ALTER SESSION SET CONTAINER = PDB01;
ERROR:
ORA-65011: Pluggable database PDB01 does not exist.


SQL>  ALTER SESSION SET CONTAINER = PDB1;


Session altered.


SQL> show pdbs


    CON_ID CON_NAME                       OPEN MODE  RESTRICTED
---------- ------------------------------ ---------- ----------
         3 PDB1                           READ WRITE NO
SQL>
service方式+tnsnames.ora
[oracle@oracle19c-rac1:/home/oracle]$ lsnrctl status


LSNRCTL for Linux: Version 19.0.0.0.0 - Production on 04-AUG-2021 11:13:08


Copyright (c) 1991, 2021, Oracle.  All rights reserved.


Connecting to (ADDRESS=(PROTOCOL=tcp)(HOST=)(PORT=1521))
STATUS of the LISTENER
------------------------
Alias                     LISTENER
Version                   TNSLSNR for Linux: Version 19.0.0.0.0 - Production
Start Date                04-AUG-2021 10:36:15
Uptime                    0 days 0 hr. 36 min. 54 sec
Trace Level               off
Security                  ON: Local OS Authentication
SNMP                      OFF
Listener Parameter File   /u01/app/19.3.0/grid/network/admin/listener.ora
Listener Log File         /u01/app/grid/diag/tnslsnr/oracle19c-rac1/listener/alert/log.xml
Listening Endpoints Summary...
  (DESCRIPTION=(ADDRESS=(PROTOCOL=ipc)(KEY=LISTENER)))
  (DESCRIPTION=(ADDRESS=(PROTOCOL=tcp)(HOST=192.168.245.141)(PORT=1521)))
  (DESCRIPTION=(ADDRESS=(PROTOCOL=tcp)(HOST=192.168.245.143)(PORT=1521)))
  (DESCRIPTION=(ADDRESS=(PROTOCOL=tcps)(HOST=oracle19c-rac1)(PORT=5500))(Security=(my_wallet_directory=/u01/app/oracle/admin/orcl/xdb_wallet))(Presentation=HTTP)(Session=RAW))
Services Summary...
Service "+ASM" has 1 instance(s).
  Instance "+ASM1", status READY, has 1 handler(s) for this service...
Service "+ASM_DATA" has 1 instance(s).
  Instance "+ASM1", status READY, has 1 handler(s) for this service...
Service "+ASM_OCRVOTE" has 1 instance(s).
  Instance "+ASM1", status READY, has 1 handler(s) for this service...
Service "86b637b62fdf7a65e053f706e80a27ca" has 1 instance(s).
  Instance "orcl1", status READY, has 1 handler(s) for this service...
Service "c8a90ae7cd0a17b8e0538df5a8c0c88c" has 1 instance(s).
  Instance "orcl1", status READY, has 1 handler(s) for this service...
Service "orcl" has 1 instance(s).
  Instance "orcl1", status READY, has 1 handler(s) for this service...
Service "orclXDB" has 1 instance(s).
  Instance "orcl1", status READY, has 1 handler(s) for this service...
Service "pdb1" has 1 instance(s).
  Instance "orcl1", status READY, has 1 handler(s) for this service...
The command completed successfully
tnsnames.ora方式
pdb1 =
  (DESCRIPTION =
    (ADDRESS = (PROTOCOL = TCP)(HOST = oracle19c-rac1)(PORT = 1521))
    (CONNECT_DATA =
      (SERVER = DEDICATED)
      (SERVICE_NAME = pdb1)
    )
  )


  sqlplus pdb1/pdb1@pdb1
  show con_name
tow_task
export TWO_TASK= pdb1
 tow_task连接方式
 普通用户。
 sys加上密码
 sys不加密码方式
 [oracle@oracle19c-rac1:/home/oracle]$ export TWO_TASK=pdb1
[oracle@oracle19c-rac1:/home/oracle]$ sqlplus  sys/oracle as sysdba


SQL*Plus: Release 19.0.0.0.0 - Production on Wed Aug 4 11:24:30 2021
Version 19.11.0.0.0


Copyright (c) 1982, 2020, Oracle.  All rights reserved.


Connected to:
Oracle Database 19c Enterprise Edition Release 19.0.0.0.0 - Production
Version 19.11.0.0.0


SQL> show con_name


CON_NAME
------------------------------
PDB1
SQL> exit
Disconnected from Oracle Database 19c Enterprise Edition Release 19.0.0.0.0 - Production
Version 19.11.0.0.0
[oracle@oracle19c-rac1:/home/oracle]$ sqlplus /  as sysdba


SQL*Plus: Release 19.0.0.0.0 - Production on Wed Aug 4 11:24:49 2021
Version 19.11.0.0.0


Copyright (c) 1982, 2020, Oracle.  All rights reserved.


ERROR:
ORA-01017: invalid username/password; logon denied


Enter user-name: ^C
[oracle@oracle19c-rac1:/home/oracle]$ sqlplus pdb1/pdb1


SQL*Plus: Release 19.0.0.0.0 - Production on Wed Aug 4 11:24:59 2021
Version 19.11.0.0.0


Copyright (c) 1982, 2020, Oracle.  All rights reserved.


Last Successful login time: Wed Aug 04 2021 11:23:35 +08:00


Connected to:
Oracle Database 19c Enterprise Edition Release 19.0.0.0.0 - Production
Version 19.11.0.0.0


SQL> exit
Disconnected from Oracle Database 19c Enterprise Edition Release 19.0.0.0.0 - Production
Version 19.11.0.0.0
[oracle@oracle19c-rac1:/home/oracle]$ sqlplus pdb1/pdb1 as sysdba


SQL*Plus: Release 19.0.0.0.0 - Production on Wed Aug 4 11:25:06 2021
Version 19.11.0.0.0


Copyright (c) 1982, 2020, Oracle.  All rights reserved.


ERROR:
ORA-01017: invalid username/password; logon denied


Enter user-name: ^C

PS:使用no-sys和sys密码的方式是可以登录的,但是 sqlplus / as sysdba是不允许的
8.3.3 datafile
SQL> /


    CON_ID Con_Name   T'space_Na File_Name
---------- ---------- ---------- ----------------------------------------------------------------------------------------------------
         1 CDB$ROOT   SYSAUX     +DATA/ORCL/DATAFILE/sysaux.258.1079636747
         1 CDB$ROOT   SYSTEM     +DATA/ORCL/DATAFILE/system.257.1079636681
         1 CDB$ROOT   TEMP       +DATA/ORCL/TEMPFILE/temp.264.1079636895
         1 CDB$ROOT   UNDOTBS1   +DATA/ORCL/DATAFILE/undotbs1.259.1079636773
         1 CDB$ROOT   UNDOTBS2   +DATA/ORCL/DATAFILE/undotbs2.269.1079639099
         1 CDB$ROOT   USERS      +DATA/ORCL/DATAFILE/users.260.1079636775
         3 PDB1       SYSAUX     +DATA/ORCL/C8A90AE7CD0A17B8E0538DF5A8C0C88C/DATAFILE/sysaux.278.1079646975
         3 PDB1       SYSTEM     +DATA/ORCL/C8A90AE7CD0A17B8E0538DF5A8C0C88C/DATAFILE/system.277.1079646973
         3 PDB1       TEMP       +DATA/ORCL/C8A90AE7CD0A17B8E0538DF5A8C0C88C/TEMPFILE/temp.279.1079647223
         3 PDB1       UNDOTBS1   +DATA/ORCL/C8A90AE7CD0A17B8E0538DF5A8C0C88C/DATAFILE/undotbs1.276.1079646973


10 rows selected.


SQL> l
  1  with Containers as (
  2   select PDB_ID Con_ID, PDB_Name Con_Name from DBA_PDBs
  3   union
  4   select 1 Con_ID, 'CDB$ROOT' Con_Name from Dual)
  5   select
  6   Con_ID,
  7   Con_Name "Con_Name",
  8   Tablespace_Name "T'space_Name",
  9   File_Name "File_Name"
 10   from CDB_Data_Files inner join Containers using (Con_ID)
 11   union
 12   select
 13   Con_ID,
 14   Con_Name "Con_Name",
 15   Tablespace_Name "T'space_Name",
 16   File_Name "File_Name"
 17   from CDB_Temp_Files inner join Containers using (Con_ID)
 18   order by 1, 3
 19*
九 RAC日常管理命令
9.1 集群资源状态
[grid@oracle19c-rac1:/home/grid]$ crsctl stat res -t
--------------------------------------------------------------------------------
Name           Target  State        Server                   State details
--------------------------------------------------------------------------------
Local Resources
--------------------------------------------------------------------------------
ora.LISTENER.lsnr
               ONLINE  ONLINE       oracle19c-rac1           STABLE
               ONLINE  ONLINE       oracle19c-rac2           STABLE
ora.chad
               ONLINE  ONLINE       oracle19c-rac1           STABLE
               ONLINE  ONLINE       oracle19c-rac2           STABLE
ora.net1.network
               ONLINE  ONLINE       oracle19c-rac1           STABLE
               ONLINE  ONLINE       oracle19c-rac2           STABLE
ora.ons
               ONLINE  ONLINE       oracle19c-rac1           STABLE
               ONLINE  ONLINE       oracle19c-rac2           STABLE
ora.proxy_advm
               OFFLINE OFFLINE      oracle19c-rac1           STABLE
               OFFLINE OFFLINE      oracle19c-rac2           STABLE
--------------------------------------------------------------------------------
Cluster Resources
--------------------------------------------------------------------------------
ora.ASMNET1LSNR_ASM.lsnr(ora.asmgroup)
      1        ONLINE  ONLINE       oracle19c-rac1           STABLE
      2        ONLINE  ONLINE       oracle19c-rac2           STABLE
ora.DATA.dg(ora.asmgroup)
      1        ONLINE  ONLINE       oracle19c-rac1           STABLE
      2        ONLINE  ONLINE       oracle19c-rac2           STABLE
ora.LISTENER_SCAN1.lsnr
      1        ONLINE  ONLINE       oracle19c-rac1           STABLE
ora.OCRVOTE.dg(ora.asmgroup)
      1        ONLINE  ONLINE       oracle19c-rac1           STABLE
      2        ONLINE  ONLINE       oracle19c-rac2           STABLE
ora.asm(ora.asmgroup)
      1        ONLINE  ONLINE       oracle19c-rac1           Started,STABLE
      2        ONLINE  ONLINE       oracle19c-rac2           Started,STABLE
ora.asmnet1.asmnetwork(ora.asmgroup)
      1        ONLINE  ONLINE       oracle19c-rac1           STABLE
      2        ONLINE  ONLINE       oracle19c-rac2           STABLE
ora.cvu
      1        ONLINE  ONLINE       oracle19c-rac1           STABLE
ora.oracle19c-rac1.vip
      1        ONLINE  ONLINE       oracle19c-rac1           STABLE
ora.oracle19c-rac2.vip
      1        ONLINE  ONLINE       oracle19c-rac2           STABLE
ora.orcl.db
      1        ONLINE  ONLINE       oracle19c-rac1           Open,HOME=/u01/app/o
                                                             racle/product/19.3.0
                                                             /dbhome_1,STABLE
      2        OFFLINE OFFLINE                               Instance Shutdown,ST
                                                             ABLE
ora.qosmserver
      1        ONLINE  ONLINE       oracle19c-rac1           STABLE
ora.scan1.vip
      1        ONLINE  ONLINE       oracle19c-rac1           STABLE
--------------------------------------------------------------------------------
9.2 集群服务状态
[grid@oracle19c-rac1:/home/grid]$ crsctl check cluster -all
**************************************************************
oracle19c-rac1:
CRS-4537: Cluster Ready Services is online
CRS-4529: Cluster Synchronization Services is online
CRS-4533: Event Manager is online
**************************************************************
oracle19c-rac2:
CRS-4537: Cluster Ready Services is online
CRS-4529: Cluster Synchronization Services is online
CRS-4533: Event Manager is online
**************************************************************
[grid@oracle19c-rac1:/home/grid]$ crsctl check crs
CRS-4638: Oracle High Availability Services is online
CRS-4537: Cluster Ready Services is online
CRS-4529: Cluster Synchronization Services is online
CRS-4533: Event Manager is online
[grid@oracle19c-rac1:/home/grid]$
9.3 数据库状态
[grid@oracle19c-rac1:/home/grid]$ srvctl status database -d orcl
Instance orcl1 is running on node oracle19c-rac1
Instance orcl2 is not running on node oracle19c-rac2
[grid@oracle19c-rac1:/home/grid]$
9.4 监听状态
[grid@oracle19c-rac1:/home/grid]$ lsnrctl status


LSNRCTL for Linux: Version 19.0.0.0.0 - Production on 04-AUG-2021 11:27:21


Copyright (c) 1991, 2021, Oracle.  All rights reserved.


Connecting to (DESCRIPTION=(ADDRESS=(PROTOCOL=IPC)(KEY=LISTENER)))
STATUS of the LISTENER
------------------------
Alias                     LISTENER
Version                   TNSLSNR for Linux: Version 19.0.0.0.0 - Production
Start Date                04-AUG-2021 10:36:15
Uptime                    0 days 0 hr. 51 min. 7 sec
Trace Level               off
Security                  ON: Local OS Authentication
SNMP                      OFF
Listener Parameter File   /u01/app/19.3.0/grid/network/admin/listener.ora
Listener Log File         /u01/app/grid/diag/tnslsnr/oracle19c-rac1/listener/alert/log.xml
Listening Endpoints Summary...
  (DESCRIPTION=(ADDRESS=(PROTOCOL=ipc)(KEY=LISTENER)))
  (DESCRIPTION=(ADDRESS=(PROTOCOL=tcp)(HOST=192.168.245.141)(PORT=1521)))
  (DESCRIPTION=(ADDRESS=(PROTOCOL=tcp)(HOST=192.168.245.143)(PORT=1521)))
  (DESCRIPTION=(ADDRESS=(PROTOCOL=tcps)(HOST=oracle19c-rac1)(PORT=5500))(Security=(my_wallet_directory=/u01/app/oracle/admin/orcl/xdb_wallet))(Presentation=HTTP)(Session=RAW))
Services Summary...
Service "+ASM" has 1 instance(s).
  Instance "+ASM1", status READY, has 1 handler(s) for this service...
Service "+ASM_DATA" has 1 instance(s).
  Instance "+ASM1", status READY, has 1 handler(s) for this service...
Service "+ASM_OCRVOTE" has 1 instance(s).
  Instance "+ASM1", status READY, has 1 handler(s) for this service...
Service "86b637b62fdf7a65e053f706e80a27ca" has 1 instance(s).
  Instance "orcl1", status READY, has 1 handler(s) for this service...
Service "c8a90ae7cd0a17b8e0538df5a8c0c88c" has 1 instance(s).
  Instance "orcl1", status READY, has 1 handler(s) for this service...
Service "orcl" has 1 instance(s).
  Instance "orcl1", status READY, has 1 handler(s) for this service...
Service "orclXDB" has 1 instance(s).
  Instance "orcl1", status READY, has 1 handler(s) for this service...
Service "pdb1" has 1 instance(s).
  Instance "orcl1", status READY, has 1 handler(s) for this service...
The command completed successfully
[grid@oracle19c-rac1:/home/grid]$ srvctl status listener
Listener LISTENER is enabled
Listener LISTENER is running on node(s): oracle19c-rac2,oracle19c-rac1
[grid@oracle19c-rac1:/home/grid]$
9.5 scan状态
[grid@oracle19c-rac1:/home/grid]$ srvctl status scan
SCAN VIP scan1 is enabled
SCAN VIP scan1 is running on node oracle19c-rac1
[grid@oracle19c-rac1:/home/grid]$ srvctl status scan_listener
SCAN Listener LISTENER_SCAN1 is enabled
SCAN listener LISTENER_SCAN1 is running on node oracle19c-rac1
[grid@oracle19c-rac1:/home/grid]$ lsnrctl status LISTENER_SCAN1


LSNRCTL for Linux: Version 19.0.0.0.0 - Production on 04-AUG-2021 11:28:18


Copyright (c) 1991, 2021, Oracle.  All rights reserved.


Connecting to (DESCRIPTION=(ADDRESS=(PROTOCOL=IPC)(KEY=LISTENER_SCAN1)))
STATUS of the LISTENER
------------------------
Alias                     LISTENER_SCAN1
Version                   TNSLSNR for Linux: Version 19.0.0.0.0 - Production
Start Date                04-AUG-2021 10:36:09
Uptime                    0 days 0 hr. 52 min. 10 sec
Trace Level               off
Security                  ON: Local OS Authentication
SNMP                      OFF
Listener Parameter File   /u01/app/19.3.0/grid/network/admin/listener.ora
Listener Log File         /u01/app/grid/diag/tnslsnr/oracle19c-rac1/listener_scan1/alert/log.xml
Listening Endpoints Summary...
  (DESCRIPTION=(ADDRESS=(PROTOCOL=ipc)(KEY=LISTENER_SCAN1)))
  (DESCRIPTION=(ADDRESS=(PROTOCOL=tcp)(HOST=192.168.245.145)(PORT=1521)))
Services Summary...
Service "86b637b62fdf7a65e053f706e80a27ca" has 1 instance(s).
  Instance "orcl1", status READY, has 1 handler(s) for this service...
Service "c8a90ae7cd0a17b8e0538df5a8c0c88c" has 1 instance(s).
  Instance "orcl1", status READY, has 1 handler(s) for this service...
Service "orcl" has 1 instance(s).
  Instance "orcl1", status READY, has 1 handler(s) for this service...
Service "orclXDB" has 1 instance(s).
  Instance "orcl1", status READY, has 1 handler(s) for this service...
Service "pdb1" has 1 instance(s).
  Instance "orcl1", status READY, has 1 handler(s) for this service...
The command completed successfully
[grid@oracle19c-rac1:/home/grid]$
9.6 nodeapps状态
[grid@oracle19c-rac1:/home/grid]$ srvctl status nodeapps
VIP 192.168.245.143 is enabled
VIP 192.168.245.143 is running on node: oracle19c-rac1
VIP 192.168.245.144 is enabled
VIP 192.168.245.144 is running on node: oracle19c-rac2
Network is enabled
Network is running on node: oracle19c-rac1
Network is running on node: oracle19c-rac2
ONS is enabled
ONS daemon is running on node: oracle19c-rac1
ONS daemon is running on node: oracle19c-rac2
[grid@oracle19c-rac1:/home/grid]$
9.7 VIP状态
[grid@oracle19c-rac1:/home/grid]$ srvctl status vip -node oracle19c-rac1
VIP 192.168.245.143 is enabled
VIP 192.168.245.143 is running on node: oracle19c-rac1
[grid@oracle19c-rac1:/home/grid]$ srvctl status vip -node oracle19c-rac2
VIP 192.168.245.144 is enabled
VIP 192.168.245.144 is running on node: oracle19c-rac2
[grid@oracle19c-rac1:/home/grid]$
9.8 数据库配置
[grid@oracle19c-rac1:/home/grid]$ srvctl config database -d orcl
Database unique name: orcl
Database name: orcl
Oracle home: /u01/app/oracle/product/19.3.0/dbhome_1
Oracle user: oracle
Spfile: +DATA/ORCL/PARAMETERFILE/spfile.272.1079640143
Password file: +DATA/ORCL/PASSWORD/pwdorcl.256.1079636555
Domain:
Start options: open
Stop options: immediate
Database role: PRIMARY
Management policy: AUTOMATIC
Server pools:
Disk Groups: DATA
Mount point paths:
Services:
Type: RAC
Start concurrency:
Stop concurrency:
OSDBA group: dba
OSOPER group: oper
Database instances: orcl1,orcl2
Configured nodes: oracle19c-rac1,oracle19c-rac2
CSS critical: no
CPU count: 0
Memory target: 0
Maximum memory: 0
Default network number for database services:
Database is administrator managed
[grid@oracle19c-rac1:/home/grid]$ crsctl status res ora.orcl.db -p |grep -i auto
AUTO_START=restore
MANAGEMENT_POLICY=AUTOMATIC
START_DEPENDENCIES_RTE_INTERNAL=False remote ora.DATA.dg False RAC AUTOMATIC 9.10 VOTEDISK
[grid@oracle19c-rac1:/home/grid]$ crsctl query css votedisk
##  STATE    File Universal Id                File Name Disk group
--  -----    -----------------                --------- ---------
 1. ONLINE   b6fda7690d0e4fcdbfadc303580fb08d (/dev/asm_ocr01) [OCRVOTE]
 2. ONLINE   8e02bf80da2e4fb8bf50d145561261c9 (/dev/asm_ocr02) [OCRVOTE]
 3. ONLINE   bca68836396f4fcdbf307746a22941c5 (/dev/asm_ocr03) [OCRVOTE]
Located 3 voting disk(s).
[grid@oracle19c-rac1:/home/grid]$
9.11 GI版本
[grid@oracle19c-rac1:/home/grid]$ crsctl query crs releaseversion
Oracle High Availability Services release version on the local node is [19.0.0.0.0]
[grid@oracle19c-rac1:/home/grid]$ crsctl query crs activeversion
Oracle Clusterware active version on the cluster is [19.0.0.0.0]
[grid@oracle19c-rac1:/home/grid]$
9.12 ASM
[grid@oracle19c-rac1:/home/grid]$ asmcmd
ASMCMD> lsdg
State    Type    Rebal  Sector  Logical_Sector  Block       AU  Total_MB  Free_MB  Req_mir_free_MB  Usable_file_MB  Offline_disks  Voting_files  Name
MOUNTED  EXTERN  N         512             512   4096  4194304     20480    14492                0           14492              0             N  DATA/
MOUNTED  NORMAL  N         512             512   4096  4194304      6144     5228             2048            1590              0             Y  OCRVOTE/
ASMCMD> lsof
DB_Name  Instance_Name  Path
+ASM     +ASM1          +OCRVOTE.255.1079463727
orcl     orcl1          +DATA/ORCL/86B637B62FE07A65E053F706E80A27CA/DATAFILE/sysaux.266.1079638609
orcl     orcl1          +DATA/ORCL/86B637B62FE07A65E053F706E80A27CA/DATAFILE/system.265.1079638609
orcl     orcl1          +DATA/ORCL/86B637B62FE07A65E053F706E80A27CA/DATAFILE/undotbs1.267.1079638609
orcl     orcl1          +DATA/ORCL/C8A7183AA0841E82E0538DF5A8C0A5A9/TEMPFILE/temp.268.1079638657
orcl     orcl1          +DATA/ORCL/C8A90AE7CD0A17B8E0538DF5A8C0C88C/DATAFILE/sysaux.278.1079646975
orcl     orcl1          +DATA/ORCL/C8A90AE7CD0A17B8E0538DF5A8C0C88C/DATAFILE/system.277.1079646973
orcl     orcl1          +DATA/ORCL/C8A90AE7CD0A17B8E0538DF5A8C0C88C/DATAFILE/undotbs1.276.1079646973
orcl     orcl1          +DATA/ORCL/C8A90AE7CD0A17B8E0538DF5A8C0C88C/TEMPFILE/temp.279.1079647223
orcl     orcl1          +DATA/ORCL/CONTROLFILE/current.261.1079636859
orcl     orcl1          +DATA/ORCL/DATAFILE/sysaux.258.1079636747
orcl     orcl1          +DATA/ORCL/DATAFILE/system.257.1079636681
orcl     orcl1          +DATA/ORCL/DATAFILE/undotbs1.259.1079636773
orcl     orcl1          +DATA/ORCL/DATAFILE/undotbs2.269.1079639099
orcl     orcl1          +DATA/ORCL/DATAFILE/users.260.1079636775
orcl     orcl1          +DATA/ORCL/ONLINELOG/group_1.263.1079636863
orcl     orcl1          +DATA/ORCL/ONLINELOG/group_2.262.1079636863
orcl     orcl1          +DATA/ORCL/ONLINELOG/group_3.270.1079640129
orcl     orcl1          +DATA/ORCL/ONLINELOG/group_4.271.1079640135
orcl     orcl1          +DATA/ORCL/TEMPFILE/temp.264.1079636895
ASMCMD> lsdsk
Path
/dev/asm_data01
/dev/asm_data02
/dev/asm_ocr01
/dev/asm_ocr02
/dev/asm_ocr03
9.13 启动和关闭RAC
启动和关闭RAC
-关闭\启动单个实例
$ srvctl stop\start instance -d racdb -i racdb1


--关闭\启动所有实例
$ srvctl stop\start database -d orcl


--关闭\启动CRS
$ crsctl stop\start crs


--关闭\启动集群服务
$ crsctl stop\start cluster -all
crsctl start\stop crs 是单节管理
crsctl start\stop cluster [-all 所有节点] 可以管理多个节点
crsctl start\stop crs 管理crs 包含进程 OHASD
crsctl start\stop cluster 不包含OHASD进程 要先启动 OHASD进程才可以使用
srvctl stop\start database 启动\停止所有实例及其启用的服务
9.14 节点状态
节点示例状态
SQL> SELECT inst_id
  ,instance_number inst_no
  ,instance_name inst_name
  ,parallel
  ,STATUS
  ,database_status db_status
  ,active_state STATE
  ,host_name host
FROM gv$instance


   INST_ID    INST_NO INST_NAME                                        PARALLEL
---------- ---------- ------------------------------------------------ ---------
STATUS
------------------------------------
DB_STATUS                                           STATE
--------------------------------------------------- ---------------------------
HOST
--------------------------------------------------------------------------------
         1          1 orcl1                                            YES
OPEN
ACTIVE                                              NORMAL
oracle19c-rac1
9.15 切换scan
srvctl relocate scan_listener -i 1 -n oracle19c-rac2
9.16 切换VIP
srvctl config network
 srvctl relocate vip -vip oracle19c-rac2-vip -node oracle19c-rac2
吐血整理,实属不易,原作者更加辛苦,如认真阅读,此文一定对您有帮助,欢迎点赞、在看与转发,写作不易,坚持写作更不易,您的点赞、转发,举手之劳,便是对作者最大的支持,也能让更多的人受益,感谢!
——————————————————————--—--————
公众号:JiekeXu DBA之路
墨天轮:https://www.modb.pro/u/4347
CSDN :https://blog.csdn.net/JiekeXu
腾讯云:https://cloud.tencent.com/developer/user/5645107
————————————————————————----———
2021年7月国产数据库排行榜:openGauss高歌猛进,GBase持续下跌
Oracle 12c 及以上版本补丁更新说明及下载方法(收藏版)
Oracle 19c 19.10DBRU 最新补丁升级看这一篇就够了
Redhat 7.7 安装最新版 MongoDB 5.0.1 手册
ASM 管理的内部工具:KFED、KFOD、AMDU
性能优化|关于数据库历史性能问题的一道面试题
一线运维 DBA 五年经验常用 SQL 大全(二)
ORA-00349|激活 ADG 备库时遇到的问题
Oracle 轻量级实时监控工具 oratop
MySQL OCP 认证考试你知道吗?
Oracle 19C RAC 安装遇到的坑
国产数据库|TiDB 5.0 快速体验
Oracle 19C MAA 搭建指南
Oracle 每日一题系列合集
百花齐放的国产数据库
