MyBatis核心源码深度剖析工作机制和实现原理
目录
- 1 MyBatis源码分析导入
-
- 1.1 为什么要看MyBatis框架的源码
- 1.2 如何深入学习MyBatis源码
- 1.3 源码分析的5大原则
- 2 MyBatis架构体系深入剖析
-
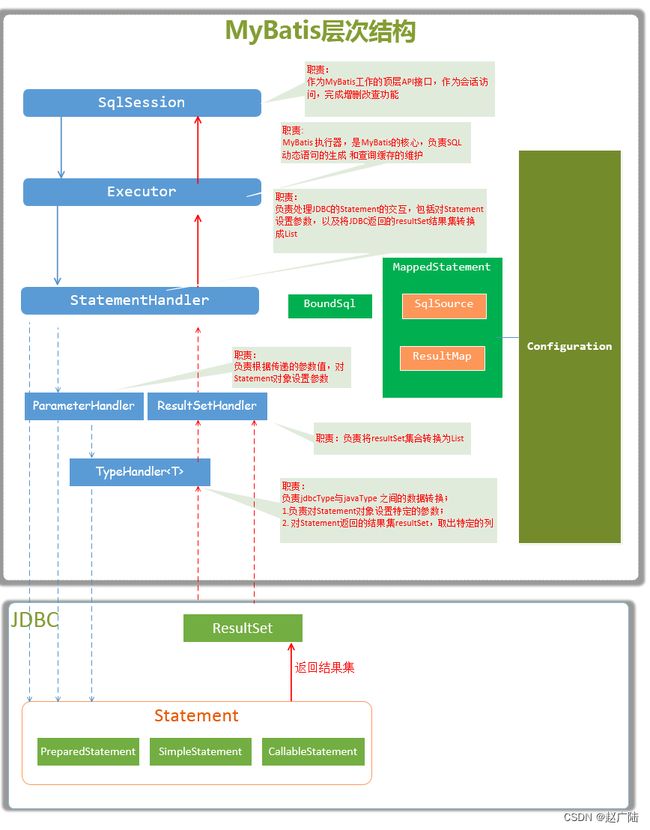
- 2.1 MyBatis的整体架构体系
- 2.2 MyBatis的工作机制和实现原理
-
- 2.2.1 接口层
-
- 2.2.1.1 获取SqlSession流程分析
- 2.2.1.2 SqlSession源码分析
- 2.2.2 数据处理核心层
-
- 2.2.2.1 配置解析(参数映射)
- 2.2.2.2 SQL解析(SqlSource)
- 2.2.2.3 SQL执行(Executor)
- 2.2.3 基础支撑层
- 2.3 MyBatis的核心配置文件解析原理
-
- 2.3.1 解析的目的
- 2.3.2 XML 解析流程
-
- 2.3.2.1 入口
- 2.3.2.2 XMLConfigBuilder
- 2.3.3 核心解析逻辑:
- 2.4 mybatis的mapper映射文件解析原理
-
- 2.4.1 XMLMapperBuilder
- 2.4.2 XMLStatementBuilder
- 2.4.3 XMLIncludeTransformer
- 2.4.4 SqlSourceBuilder创建 SqlSource
- 3 总结
-
- 3.1 单例模式
- 3.2 构造器模式
- 3.3 接口适配器模式
- 3.4 代理模式(动态代理)
- 3.5 装饰器模式
1 MyBatis源码分析导入
1.1 为什么要看MyBatis框架的源码
MyBatis 是一款优秀的持久层框架,也是当前最流行的java持久层框架之一,它内部封装了jdbc,使
开发者只需要关注sql语句本身,而不需要花费精力去处理加载驱动、创建连接、创建statement等繁杂的过程。采用ORM思想解决了实体和数据库映射的问题,对jdbc进行了封装,屏蔽了jdbc api底层访问细节,使我们不用与jdbc api打交道,就可以完成对数据库的持久化操作。
mybatis通过xml或注解的方式将要执行的各种statement配置起来,并通过java对象和statement中
sql的动态参数进行映射生成最终执行的sql语句,最后由mybatis框架执行sql并将结果映射为java对象并
返回。
为了更好地学习和理解mybatis背后的设计思路,作为高级开发人员,有必要深入研究了解优秀框架的源
码,以便更好的借鉴其思想。同时,框架作为设计模式的主要应用场景,通过研究优秀框架的源码,可以更好的领会设计模式的精髓。
通过学习开源框架MyBatis的源码,我们可以深入学习到框架的解析思路和底层的实现原理,掌握源码的
剖析办法,快速增加查看源码的经验;
1)在使用MyBatis框架进行开发时,如果你对其源码有所了解,可以最大化地减少出故障的可能;
2)学习源码分析的最大好处是可以开阔思维,提升架构设计能力,通过看源码,看别人如何设计,然后领悟到这样设计的好处,理解优秀的代码设计思想;
3)互联网大厂对有经验的开发人员的招聘,对架构思想和底层的理解能力考察方面比较重视,学习完有助于提高自己的竞争力;
4)可以在深入的学习、剖析后,可以对框架进行改造,进而自定义MyBatis框架,提升架构能力。
1.2 如何深入学习MyBatis源码
1)查看MyBatis官方文档;
https://mybatis.org/mybatis-3/zh/index.html
2)断点跟进源码,参照主线,一步步分析;
3)手动自定义MyBatis框架,加深对框架源码的理解,掌握源码的学习方法,进而提升自身架构能力;
1.3 源码分析的5大原则
1)紧跟入口
2)看图梳理
3)先粗后细
4)精略结合
5)猜想验证
2 MyBatis架构体系深入剖析
2.1 MyBatis的整体架构体系
2.2 MyBatis的工作机制和实现原理
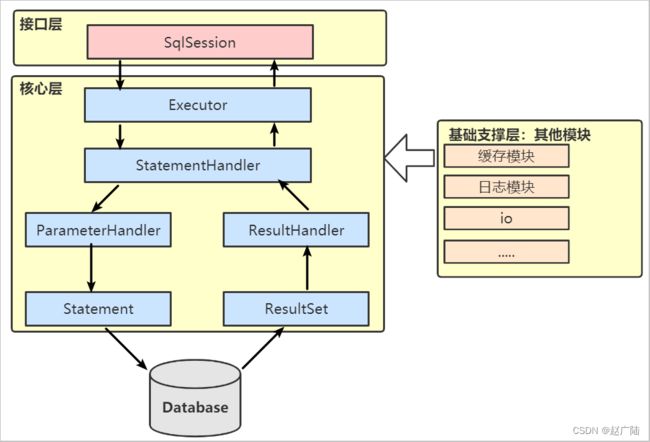
1)接口层
2)数据处理核心层
3)基础支撑层
编码时从下到上进行执行
(1)API接口层:提供给外部使用的接口API,开发人员通过这些本地API来操纵数据库。接口层一接收到调用请求就会调用数据处理层来完成具体的数据处理。
(2)数据处理层:负责具体的SQL查找、SQL解析、SQL执行和执行结果映射处理等。它主要的目的是根据调用的请求完成一次数据库操作。
(3)基础支撑层:负责最基础的功能支撑,包括连接管理、事务管理、配置加载和缓存处理,这些都是共用的东西,将他们抽取出来作为最基础的组件。为上层的数据处理层提供最基础的支撑。
JDBC代码回顾:
/**
* JDBC开发示例代码
*/
public class JDBCTest {
  private static Logger logger = Logger.getLogger(JDBCTest.class);
  public static void main(String[] args) throws Exception {
    // 1、注册驱动
    DriverManager.registerDriver(new com.mysql.jdbc.Driver());
    // 2、建立连接
    Connection con =
DriverManager.getConnection("jdbc:mysql://localhost:3306/mybatis_indepth?
useUnicode=true&characterEncoding=utf-8&serverTimezone=GMT", "root", "root");
    // 3、编写sql,进行预编译
    String sql = " select * from user;";
    PreparedStatement ps = con.prepareStatement(sql);
    // 4、执行查询,得到结果集
    ResultSet rs = ps.executeQuery();
    while (rs.next()) {
      int id = rs.getInt("id");
      String name = rs.getString("name");
      logger.info("====> id=" + id + "\tname=" + name);
   }
    //5、关闭事务
    rs.close();
    ps.close();
    con.close();
 }
}
mybatis代码:
InputStream in;
SqlSessionFactoryBuilder builder;
SqlSessionFactory factory;
SqlSession session;
UserMapper userMapper = null;
@Before
public void init() throws Exception {
  //1.读取配置文件
in = Resources.getResourceAsStream("SqlMapConfig.xml");
  //2.创建SqlSessionFactory工厂
  builder = new SqlSessionFactoryBuilder();
  factory = builder.build(in);
  //3.使用工厂生产SqlSession对象
  session = factory.openSession();
  //4.使用SqlSession创建Dao接口的代理对象
  userMapper = session.getMapper(UserMapper.class);
}
@After
public void after() throws IOException {
  //6.释放资源
  session.close();
  in.close();
}
/**
* 入门案例
*/
@Test
public void testFindById() throws Exception {
  //5.使用代理对象执行方法
  User user = userMapper.findUserById(1);
  System.out.println(user);
}
思考:mybatis为我们做了什么?
mybatis如何获取数据源连接信息?
mybatis如何获取到需要执行的sql语句?
mybatis是如何完成sql执行的?
mybatis如何完成参数映射和结果封装?
2.2.1 接口层
概述:对应 session 模块。
接口层相对简单,其核心是 SqlSession 接口,该接口中定义了 MyBatis 暴露给应用程序调用的
API,也就是上层应用与 MyBatis 交互的桥梁。接口层在接收到调用请求时,会调用核心处理层的相
应模块来完成具体的数据库操作。
作用:
使用SqlSession接口和Mapper接口通知调用哪个sql还有关联参数。
可以实现数据的增/删/改/查接口 配置信息维护接口,进行动态的更改配置
2.2.1.1 获取SqlSession流程分析
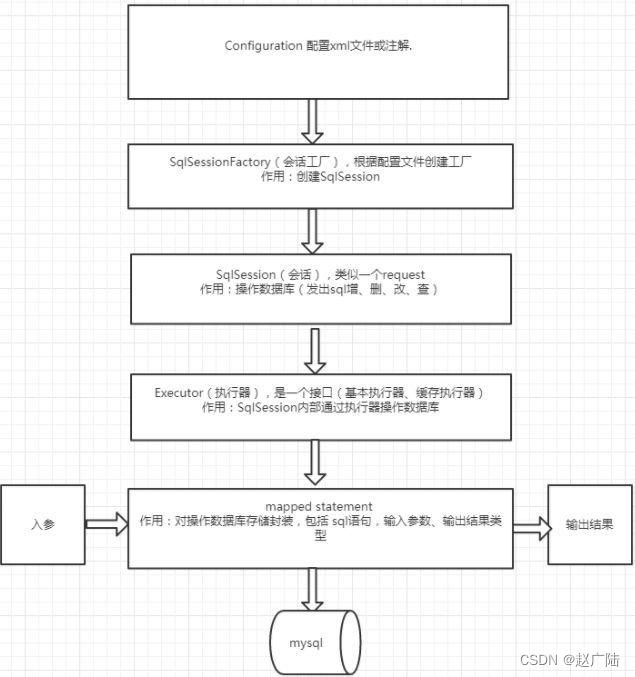
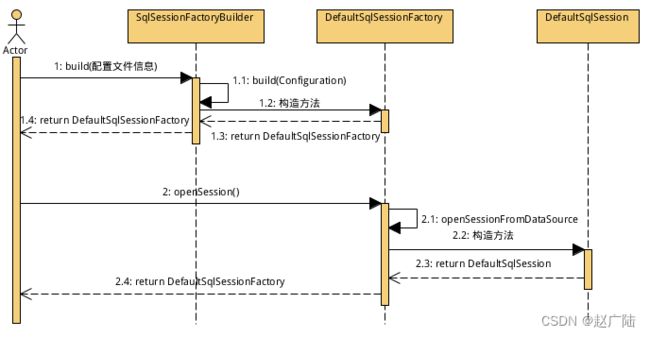
Mybatis解析完配置文件后,会生成一个DefaultSqlSessionFactory对象,调用openSession方法,即可获得一个SqlSession(使用的是默认的DefaultSqlSession对象)。
2.2.1.2 SqlSession源码分析
作用:Mybatis工作的主要顶层API,表示和数据库交互的会话,完成必要数据库增删改查功能
2.2.2 数据处理核心层
在核心处理层中,实现了 MyBatis 的核心处理流程。
其中包括 MyBatis 的初始化以及完成一次数据库操作的涉及的全部流程 。
2.2.2.1 配置解析(参数映射)
概述: 对应builder 和 mapping模块。前者为配置解析过程,后者主要为 SQL 操作解析后的映射。在 MyBatis 初始化过程中,会加载 mybatis-config.xml 配置文件、映射配置文件以及 Mapper 接
口中的注解信息,解析后的配置信息会形成相应的对象并保存到 Configuration 对象中。利用该Configuration 对象创建 SqlSessionFactory对象。待 MyBatis 初始化之后,开发人员可以通
过初始化得到 SqlSessionFactory 创建 SqlSession 对象并完成数据库操作。
Configuration 概述:是一个所有配置信息的容器对象 实战分析:Configuration对象涉及到的配置信息
分析

简单的理解:MyBatis初始化的过程,就是创建 Configuration对象,加载各种配置信息的过程
2.2.2.2 SQL解析(SqlSource)
概述: 对应 scripting 模块。
MyBatis 中的 scripting 模块,会根据用户传入的实参,解析映射文件中定义的动态 SQL 节点,并形成数据库可执行的 SQL 语句。之后会处理 SQL 语句中的占位符,绑定用户传入的实参
负责根据用户传递的parameterObject,动态地生成SQL语句,将信息封装到BoundSql对象中,并
返回。
实战分析: SqlSource 接口继承体系

各个实现类分析:
RawSqlSource 负责处理静态 SQL 语句,它们最终会把处理后的 SQL 封装 StaticSqlSource 进
行返回。StaticSqlSource 处理包含的 SQL 可能含有 “?” 占位符,可以被数据库直接执行。
DynamicSqlSource 负责处理动态 SQL 语句。
ProviderSqlSource 实现 SqlSource 接口,基于方法上的 @ProviderXXX 注解的 SqlSource 实
现类。
2.2.2.3 SQL执行(Executor)
概述:对应 executor 模块
是MyBatis执行器,是MyBatis 调度的核心,负责SQL语句的生成和查询缓存的维护。
SQL 语句的执行涉及多个组件 ,其中比较重要的是 Executor、StatementHandler、ParameterHandler 和 ResultSetHandler 。
Executor 主要负责维护一级缓存和二级缓存,并提供事务管理的相关操作,它会将数据库相关
操作委托给 StatementHandler完成。StatementHandler 首先通过 ParameterHandler 完成 SQL 语句的实参绑定,然后通过java.sql.Statement 对象执行 SQL 语句并得到结果集,最后通过 ResultSetHandler 完成结果集的映射,得到结果对象并返回。
2.2.3 基础支撑层
概述:基础支持层,包含整个 MyBatis 的基础模块,这些模块为核心处理层的功能提供了良好的支
撑。
日志:对应 logging 包概述:Mybatis提供了详细的日志输出信息,还能够集成多种日志框架,其日志模块的主要功能就是集成第三方日志框架。设计模式分析使用的适配器模式分析
缓存机制:对应 cache 包
一级缓存
概述:Session或Statement作用域级别的缓存,默认是Session,BaseExecutor中根据
MappedStatement的Id、SQL、参数值以及rowBound(边界)来构造CacheKey,并使用BaseExccutor中
的localCache来维护此缓存。实战应用场景分析默认开启的缓存
二级缓存
概述:全局的二级缓存,通过CacheExecutor来实现,其委托TransactionalCacheManager来保
存/获取缓存实战应用场景分析缓存的效率以及应用场景注意点:两级缓存与Mybatis以及整个应用是运行在同一个JVM中的,共享同一块内存,如果这两级缓存中的数据量较大,则可能影响系统中其它功能,需要缓存大量数据时,优先考虑使用Redis、Memcache等缓存产品。
数据源/连接池:对应 datasource 包
概述:Mybatis自身提供了相应的数据源实现,也提供了与第三方数据源集成的接口。
分析:主要实现类是PooledDataSource,包含了最大活动连接数、最大空闲连接数、最长取出时间(避免某个线程过度占用)、连接不够时的等待时间。
实战应用:连接池、检测连接状态等,选择性能优秀的数据源组件,对于提供ORM框架以及整个应用的性能都是非常重要的。
事务管理:对应 transaction 包
概述:Mybatis自身对数据库事务进行了抽象,提供了相应的事务接口和简单实现。
注意点:一般地,Mybatis与Spring框架集成,由Spring框架管理事务。
反射:对应 reflection 包
概述:对Java原生的反射进行了很好的封装,提供了简易的API,方便上层调用,并且对反射操作进行了一系列的优化,提高了反射操作的性能。
实战应用
① 缓存了类的元数据(MetaClass)
② 对象的元数据(MetaObject)
IO 模块: 对应 io 包。
资源加载模块,主要是对类加载器进行封装,确定类加载器的使用顺序,并提供了加载类文件以及其他资源文件的功能 。
解析器: 对应 parsing 包
解析器模块,主要提供了两个功能:
1.对 XPath 进行封装,为 MyBatis 初始化时解析 mybatis-config.xml 配置文件以及映射配置
文件提供支持。
2.为处理动态 SQL 语句中的占位符提供支持。
2.3 MyBatis的核心配置文件解析原理
在 MyBatis 初始化过程中,会加载 mybatis-config.xml 配置文件、映射配置文件以及 Mapper 接 口中的注解信息,解析后的配置信息会形成相应的对象并保存到 Configuration 对象中
2.3.1 解析的目的
概述:通过资源类Resources读入“SqlMapConfig.xml”文件 使用SqlSessionFactoryBuilder类生成我们需
要的SqlSessionFactory类。 目的:
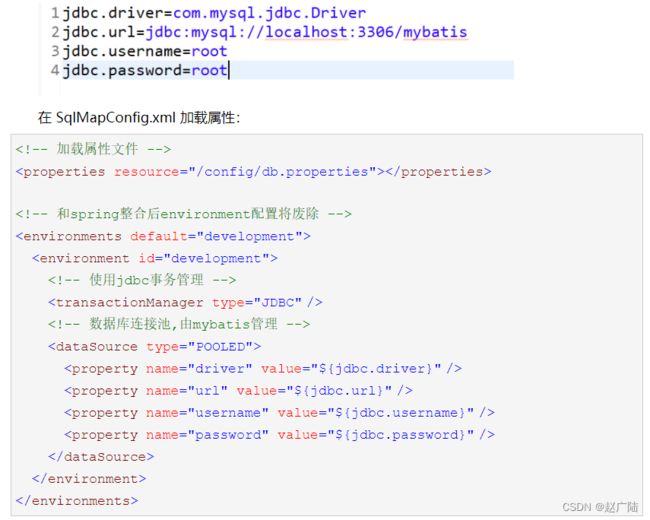
使用“SqlMapConfig.xml”将数据库连接参数单独配置在 db.properties 中,只需要在 SqlMapConfig.xml 中加载该配置文件的属性值。在 SqlMapConfig.xml就不需要对数据库连接参数硬编码。将数据库连接参数只配置在 db.properties 中,原因:方便对参数进行统一管理,其他 xml 可以应用该配置文件。
mybatis解析配置文件最本质的目的是为了获得Configuration对象;然后,利用该 Configuration 对象创建 SqlSessionFactory对象。待 MyBatis 初始化之后,可以通过初始化得到 SqlSessionFactory 创建 SqlSession 对象并完成数据库操作。
2.3.2 XML 解析流程
2.3.2.1 入口
MyBatis 的初始化流程的入口是 SqlSessionFactoryBuilder 的 build 方法:
/**
* 构造 SqlSessionFactory 对象
*
* @param reader Reader 对象
* @param environment 环境
* @param properties Properties 变量
* @return SqlSessionFactory 对象
*/
public SqlSessionFactory build(Reader reader, String environment, Properties
properties) {
  try {
    // <1> 创建 XMLConfigBuilder 对象
    XMLConfigBuilder parser = new XMLConfigBuilder(reader, environment,properties);
    // <2> 执行 XML 解析
    // <3> 创建 DefaultSqlSessionFactory 对象
    return build(parser.parse());
 } catch (Exception e) {
    throw ExceptionFactory.wrapException("Error building SqlSession.", e);
 } finally {
    ErrorContext.instance().reset();
    try {
      reader.close();
   } catch (IOException e) {
      // Intentionally ignore. Prefer previous error.
   }
 }
}
2.3.2.2 XMLConfigBuilder
org.apache.ibatis.builder.xml.XMLConfigBuilder ,继承 BaseBuilder 抽象类,XML 配置构建器;主要负责解析 mybatis-config.xml 配置文件:
//【1.构造设置Properties】
private XMLConfigBuilder(XPathParser parser, String environment, Properties
props) {
// <1> 创建 Configuration 对象
super(new Configuration());
ErrorContext.instance().resource("SQL Mapper Configuration");
// <2> 设置 Configuration 的 variables 属性
this.configuration.setVariables(props);
this.parsed = false;
this.environment = environment;
this.parser = parser;
}
// parse【2. 判断是否解析过】
public Configuration parse() {
// <1.1> 若已解析,抛出 BuilderException 异常
if (parsed) {
throw new BuilderException("Each XMLConfigBuilder can only be used
once.");
}
// <1.2> 标记已解析
parsed = true;
// <2> 解析 XML configuration 节点
parseConfiguration(parser.evalNode("/configuration"));
return configuration;
}
//parseConfiguration 【3. 解析configuration节点】
private void parseConfiguration(XNode root) {
try {
//issue #117 read properties first
// <1> 解析 new Configuration()
配置文件解析的本质就是获得Configuration对象 很多需要的成员变量需要根据 XML 配置文件解析后
来赋值
parser.parse()
该函数就是XML解析的核心 解析全局配置文件,调用parse.evalNode()方法,将指定路径的config配
置文件转换为XNode对象 调用parseConfiguration()方法逐步解析配置文件中的各个节点
build(configuration)
该函数用来创建一个具体的SqlSessionFactory对象。 创建DefaultSqlSessionFactory对象, 并将
configuration赋值给相应的成员变量

2.3.3 核心解析逻辑:
org.apache.ibatis.parsing.XPathParser ,基于 Java XPath 解析器,用于解析 MyBatis mybatis-config.xml 和 **Mapper.xml 等 XML 配置文件。属性如下:
/**
* XML Document 对象
*/
private final Document document;
/**
* 是否校验
*/
private boolean validation;
/**
* XML 实体解析器
*/
private EntityResolver entityResolver;
/**
* 变量 Properties 对象
*/
private Properties variables;
/**
* Java XPath 对象
*/
private XPath xpath;
/**
* 构造 XPathParser 对象
*
* @param xml XML 文件地址
* @param validation 是否校验 XML
* @param variables 变量 Properties 对象
* @param entityResolver XML 实体解析器
*/
public XPathParser(String xml, boolean validation, Properties variables,
EntityResolver entityResolver) {
  commonConstructor(validation, variables, entityResolver);
  this.document = createDocument(new InputSource(new StringReader(xml)));
}
/**
公用的构造方法逻辑
*/
private void commonConstructor(boolean validation, Properties variables,
EntityResolver entityResolver) {
  this.validation = validation;
  this.entityResolver = entityResolver;
  this.variables = variables;
  // 创建 XPathFactory 对象
  XPathFactory factory = XPathFactory.newInstance();
  this.xpath = factory.newXPath();
}
/**
* 创建 Document 对象 --->将 XML 文件解析成 Document 对象
*
* @param inputSource XML 的 InputSource 对象
* @return Document 对象
*/
private Document createDocument(InputSource inputSource) {
  // important: this must only be called AFTER common constructor
  try {
    // 1> 创建 DocumentBuilderFactory 对象
    DocumentBuilderFactory factory = DocumentBuilderFactory.newInstance();
    factory.setValidating(validation); // 设置是否验证 XML
    factory.setNamespaceAware(false);
    factory.setIgnoringComments(true);
    factory.setIgnoringElementContentWhitespace(false);
    factory.setCoalescing(false);
    factory.setExpandEntityReferences(true);
    // 2> 创建 DocumentBuilder 对象
    DocumentBuilder builder = factory.newDocumentBuilder();
    builder.setEntityResolver(entityResolver); // 设置实体解析器
    builder.setErrorHandler(new ErrorHandler() { // 实现都空的
      @Override
      public void error(SAXParseException exception) throws SAXException {
        throw exception;
     }
      @Override
      public void fatalError(SAXParseException exception) throws
SAXException {
        throw exception;
     }
      @Override
      public void warning(SAXParseException exception) throws SAXException
{
     }
   });
    // 3> 解析 XML 文件
    return builder.parse(inputSource);
    } catch (Exception e) {
    throw new BuilderException("Error creating document instance. Cause: "
+ e, e);
 }
}
org.apache.ibatis.builder.xml.XMLMapperEntityResolver ,实现 EntityResolver 接口, MyBatis 自定义 EntityResolver 实现类,用于加载本地的 mybatis-3-config.dtd 和 mybatis-3-mapper.dtd 这两个 DTD 文件。代码如下:
public class XMLMapperEntityResolver implements EntityResolver {
  private static final String IBATIS_CONFIG_SYSTEM = "ibatis-3-config.dtd";
  private static final String IBATIS_MAPPER_SYSTEM = "ibatis-3-mapper.dtd";
  private static final String MYBATIS_CONFIG_SYSTEM = "mybatis-3-config.dtd";
  private static final String MYBATIS_MAPPER_SYSTEM = "mybatis-3-mapper.dtd";
  /**
  * 本地 mybatis-config.dtd 文件
  */
  private static final String MYBATIS_CONFIG_DTD =
"org/apache/ibatis/builder/xml/mybatis-3-config.dtd";
  /**
  * 本地 mybatis-mapper.dtd 文件
  */
  private static final String MYBATIS_MAPPER_DTD =
"org/apache/ibatis/builder/xml/mybatis-3-mapper.dtd";
  /**
  * Converts a public DTD into a local one
  */
  @Override
  public InputSource resolveEntity(String publicId, String systemId) throws
SAXException {
    try {
      if (systemId != null) {
        String lowerCaseSystemId = systemId.toLowerCase(Locale.ENGLISH);
        // 本地 mybatis-config.dtd 文件
        if (lowerCaseSystemId.contains(MYBATIS_CONFIG_SYSTEM) ||
lowerCaseSystemId.contains(IBATIS_CONFIG_SYSTEM)) {
          return getInputSource(MYBATIS_CONFIG_DTD, publicId,
systemId);
        // 本地 mybatis-mapper.dtd 文件
} else if (lowerCaseSystemId.contains(MYBATIS_MAPPER_SYSTEM) ||
lowerCaseSystemId.contains(IBATIS_MAPPER_SYSTEM)) {
          return getInputSource(MYBATIS_MAPPER_DTD, publicId,
systemId);
       }
     }
      return null;
   } catch (Exception e) {
      throw new SAXException(e.toString());
   }
 }
  private InputSource getInputSource(String path, String publicId, String
systemId) {
    InputSource source = null;
    if (path != null) {
      try {
        // 创建 InputSource 对象
        InputStream in = Resources.getResourceAsStream(path);
        source = new InputSource(in);
        // 设置 publicId、systemId 属性
        source.setPublicId(publicId);
        source.setSystemId(systemId);
     } catch (IOException e) {
        // ignore, null is ok
     }
   }
    return source;
 }
}
2.4 mybatis的mapper映射文件解析原理
其实XMLConfigBuilder在解析核心配置文件中mappers节点时,会进一步解析mapper映射文件。
加载 Mapper 映射配置文件这个步骤的主体是 XMLMapperBuilder
mapper文件示意:
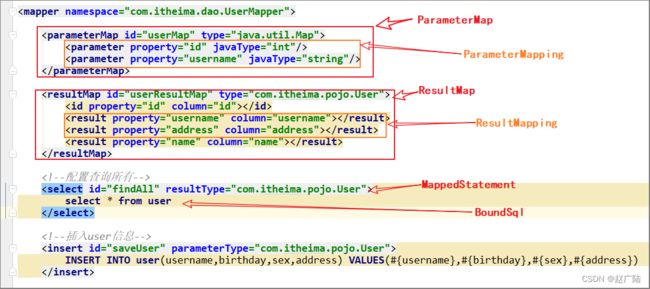
2.4.1 XMLMapperBuilder
概述: 【解析xml文件中的节点】
org.apache.ibatis.builder.xml.XMLMapperBuilder ,继承 BaseBuilder 抽象类,Mapper XML 配置构建器,主要负责解析 Mapper 映射配置文件
配置package,会遍历该包下所有的类
指定mapper文件的路径resource/url/class
具体解析逻辑通过XMLMapperBuilder类来完成,解析xml文件中的节点
#parse() 方法,解析 Mapper XML 配置文件。代码如下:
public void parse() {
// <1> 判断当前 Mapper 是否已经加载过
if (!configuration.isResourceLoaded(resource)) {
// <2> 解析 `#configurationElement(XNode context) 方法,解析
private void configurationElement(XNode context) {
try {
// <1> 获得 namespace 属性
String namespace = context.getStringAttribute("namespace");
if (namespace == null || namespace.equals("")) {
throw new BuilderException("Mapper's namespace cannot be empty");
}
// <1> 设置 namespace 属性
builderAssistant.setCurrentNamespace(namespace);
// <2> 解析 #cacheRefElement(XNode context) 方法,解析
private void cacheRefElement(XNode context) {
  if (context != null) {
    // <1> 获得指向的 namespace 名字,并添加到 configuration 的 cacheRefMap 中
    configuration.addCacheRef(builderAssistant.getCurrentNamespace(),
context.getStringAttribute("namespace"));
    // <2> 创建 CacheRefResolver 对象,并执行解析
    CacheRefResolver cacheRefResolver = new
CacheRefResolver(builderAssistant, context.getStringAttribute("namespace"));
    try {
      cacheRefResolver.resolveCacheRef();
   } catch (IncompleteElementException e) {
      // <3> 解析失败,添加到 configuration 的 incompleteCacheRefs 中
      configuration.addIncompleteCacheRef(cacheRefResolver);
   }
 }
}
#cacheElement(XNode context) 方法,解析 cache /> 标签。代码如下:
// XMLMapperBuilder.java
private void cacheElement(XNode context) throws Exception {
  if (context != null) {
    // <1> 获得负责存储的 Cache 实现类
    String type = context.getStringAttribute("type", "PERPETUAL");
    Class<? extends Cache> typeClass = typeAliasRegistry.resolveAlias(type);
    // <2> 获得负责过期的 Cache 实现类
    String eviction = context.getStringAttribute("eviction", "LRU");
    Class<? extends Cache> evictionClass =
typeAliasRegistry.resolveAlias(eviction);
    // <3> 获得 flushInterval、size、readWrite、blocking 属性
    Long flushInterval = context.getLongAttribute("flushInterval");
    Integer size = context.getIntAttribute("size");
    boolean readWrite = !context.getBooleanAttribute("readOnly", false);
    boolean blocking = context.getBooleanAttribute("blocking", false);
    // <4> 获得 Properties 属性
    Properties props = context.getChildrenAsProperties();
    // <5> 创建 Cache 对象
    builderAssistant.useNewCache(typeClass, evictionClass, flushInterval,
size, readWrite, blocking, props);
 }
}
#resultMapElements(List
// 解析 #buildStatementFromContext(List
private void buildStatementFromContext(List<XNode> list) {
if (configuration.getDatabaseId() != null) {
buildStatementFromContext(list, configuration.getDatabaseId());
}
buildStatementFromContext(list, null);
}
private void buildStatementFromContext(List<XNode> list, String
requiredDatabaseId) {
// <1> 遍历 2.4.2 XMLStatementBuilder
概述: 【解析mapper.xml文件中的crud节点】
org.apache.ibatis.builder.xml.XMLStatementBuilder ,继承 BaseBuilder 抽象类,
Statement XML 配置构建器,主要负责解析 Statement 配置,即 、 标签。开启SQL节点解析,源码开始解析的入口parseStatementNode
#parseStatementNode() 方法,执行 Statement 解析。代码如下:
public void parseStatementNode() {
// <1> 获得 id 属性,编号。
String id = context.getStringAttribute("id");
// <2> 获得 databaseId , 判断 databaseId 是否匹配
String databaseId = context.getStringAttribute("databaseId");
if (!databaseIdMatchesCurrent(id, databaseId, this.requiredDatabaseId)) {
return;
}
// <3> 获得各种属性
Integer fetchSize = context.getIntAttribute("fetchSize");
Integer timeout = context.getIntAttribute("timeout");
String parameterMap = context.getStringAttribute("parameterMap");
String parameterType = context.getStringAttribute("parameterType");
Class<?> parameterTypeClass = resolveClass(parameterType);
String resultMap = context.getStringAttribute("resultMap");
String resultType = context.getStringAttribute("resultType");
String lang = context.getStringAttribute("lang");
// <4> 获得 lang 对应的 LanguageDriver 对象
LanguageDriver langDriver = getLanguageDriver(lang);
// <5> 获得 resultType 对应的类
Class<?> resultTypeClass = resolveClass(resultType);
// <6> 获得 resultSet 对应的枚举值
String resultSetType = context.getStringAttribute("resultSetType");
ResultSetType resultSetTypeEnum = resolveResultSetType(resultSetType);
// <7> 获得 statementType 对应的枚举值
StatementType statementType =
StatementType.valueOf(context.getStringAttribute("statementType",
StatementType.PREPARED.toString()));
// <8> 获得 SQL 对应的 SqlCommandType 枚举值
String nodeName = context.getNode().getNodeName();
SqlCommandType sqlCommandType =
SqlCommandType.valueOf(nodeName.toUpperCase(Locale.ENGLISH));
// <9> 获得各种属性
boolean isSelect = sqlCommandType == SqlCommandType.SELECT;
boolean flushCache = context.getBooleanAttribute("flushCache", !isSelect);
boolean useCache = context.getBooleanAttribute("useCache", isSelect);
boolean resultOrdered = context.getBooleanAttribute("resultOrdered", false);
// Include Fragments before parsing
// <10> 创建 XMLIncludeTransformer 对象,并替换 and were parsed and removed)
// <12> 创建 SqlSource
SqlSource sqlSource = langDriver.createSqlSource(configuration, context,
parameterTypeClass);
// <13> 获得 KeyGenerator 对象
String resultSets = context.getStringAttribute("resultSets");
String keyProperty = context.getStringAttribute("keyProperty");
String keyColumn = context.getStringAttribute("keyColumn");
KeyGenerator keyGenerator;
// <13.1> 优先,从 configuration 中获得 KeyGenerator 对象。如果存在,意味着是
<selectKey /> 标签配置的
String keyStatementId = id + SelectKeyGenerator.SELECT_KEY_SUFFIX;
keyStatementId = builderAssistant.applyCurrentNamespace(keyStatementId,
true);
if (configuration.hasKeyGenerator(keyStatementId)) {
keyGenerator = configuration.getKeyGenerator(keyStatementId);
// <13.2> 其次,根据标签属性的情况,判断是否使用对应的 Jdbc3KeyGenerator 或者
NoKeyGenerator 对象
} else {
keyGenerator = context.getBooleanAttribute("useGeneratedKeys", // 优先,基
于 useGeneratedKeys 属性判断
configuration.isUseGeneratedKeys() &&
SqlCommandType.INSERT.equals(sqlCommandType)) // 其次,基于全局的 useGeneratedKeys
配置 + 是否为插入语句类型
? Jdbc3KeyGenerator.INSTANCE : NoKeyGenerator.INSTANCE;
}
// 创建 MappedStatement 对象
builderAssistant.addMappedStatement(id, sqlSource, statementType,
sqlCommandType,
fetchSize, timeout, parameterMap, parameterTypeClass, resultMap,
resultTypeClass,
resultSetTypeEnum, flushCache, useCache, resultOrdered,
keyGenerator, keyProperty, keyColumn, databaseId, langDriver,
resultSets);
}
#databaseIdMatchesCurrent(String id, String databaseId, String requiredDatabaseId) 方 法,判断 databaseId 是否匹配。代码如下:
private boolean databaseIdMatchesCurrent(String id, String databaseId, String
requiredDatabaseId) {
  // 如果不匹配,则返回 false
  if (requiredDatabaseId != null) {
   return requiredDatabaseId.equals(databaseId);
 }
  // 如果未设置 requiredDatabaseId ,但是 databaseId 存在,说明还是不匹配,则返回
false
  if (databaseId != null) {
   return false;
 }
  // 判断是否已经存在
  id = builderAssistant.applyCurrentNamespace(id, false);
  if (!this.configuration.hasStatement(id, false)) {
   return true;
 }
  MappedStatement previous = this.configuration.getMappedStatement(id, false);
  // 若存在,则判断原有的sqlFragment是否databaseId 为空。因为,当前databaseId为空,这样
两者才能匹配。
  return previous.getDatabaseId() == null;
  }
2.4.3 XMLIncludeTransformer
概述: 【解析节点】
org.apache.ibatis.builder.xml.XMLIncludeTransformer ,XML 标签的转换
器;
解析节点,该过程会将其替换成节点中定义的SQL片段,并将其中的”${xxx}“占位符替换为真实的参
数
#applyIncludes(Node source) 方法,将
public void applyIncludes(Node source) {
// <1> 创建 variablesContext ,并将 configurationVariables 添加到其中
Properties variablesContext = new Properties();
Properties configurationVariables = configuration.getVariables();
if (configurationVariables != null) {
variablesContext.putAll(configurationVariables);
}
// <2> 处理 #applyIncludes(Node source, final Properties variablesContext, boolean included) 方法,使用递归的方式,将
private void applyIncludes(Node source, final Properties variablesContext,
boolean included) {
// <1> 如果是 #findSqlFragment(String refid, Properties variables) 方法,获得对应的
private Node findSqlFragment(String refid, Properties variables) {
// 因为 refid 可能是动态变量,所以进行替换
refid = PropertyParser.parse(refid, variables);
// 获得完整的 refid ,格式为 "${namespace}.${refid}"
refid = builderAssistant.applyCurrentNamespace(refid, true);
try {
// 获得对应的 2.4.4 SqlSourceBuilder创建 SqlSource
org.apache.ibatis.mapping.SqlSource ,SQL 来源接口。代表从 Mapper XML 或方法注解上,读取的一条 SQL 内容。代码如下:
public interface SqlSource {
  /**
  * 根据传入的参数对象,返回 BoundSql 对象
  *
  * @param parameterObject 参数对象
  * @return BoundSql 对象
  */
  BoundSql getBoundSql(Object parameterObject);
}

RawSqlSource 负责处理静态 SQL 语句,它们最终会把处理后的 SQL 封装 StaticSqlSource 进行返
回。使用 #{} 表达式,或者不使用任何表达式的情况,所以它是静态的,仅需要在构造方法中,直
接生成对应的 SQL 。
StaticSqlSource处理包含的 SQL 可能含有 “?” 占位符,可以被数据库直接执行。DynamicSqlSource 负责处理动态 SQL 语句。
使用了 OGNL 表达式,或者使用了 ${} 表达式的 SQL ,所以它是动态的,需要在每次执行#getBoundSql(Object parameterObject) 方法,根据参数,生成对应的 SQL 。ProviderSqlSource 实现 SqlSource 接口,基于方法上的 @ProviderXXX 注解的 SqlSource 实现 类。
org.apache.ibatis.builder.SqlSourceBuilder ,SqlSource 构建器。 负责将 SQL 语句中的 #{} 替换成相应的 ? 占位符,并获取该 ? 占位符对应的 ParameterMapping 对象。
/**
* 执行解析原始 SQL ,成为 SqlSource 对象
*
* @param originalSql 原始 SQL
* @param parameterType 参数类型
* @return SqlSource 对象
*/
public SqlSource parse(String originalSql, Class<?> parameterType, Map<String,
Object> additionalParameters) {
  // <1> 创建 ParameterMappingTokenHandler 对象
  ParameterMappingTokenHandler handler = new
ParameterMappingTokenHandler(configuration, parameterType,
additionalParameters);
  // <2> 创建 GenericTokenParser 对象
  GenericTokenParser parser = new GenericTokenParser("#{", "}", handler);
  // <3> 执行解析
  String sql = parser.parse(originalSql);
  // <4> 创建 StaticSqlSource 对象
  return new StaticSqlSource(configuration, sql,
handler.getParameterMappings());
}
/**
注意:ParameterMappingTokenHandler 是 SqlSourceBuilder 的内部私有静态类。
*/
@Override
public String handleToken(String content) {
  // <1> 构建 ParameterMapping 对象,并添加到 parameterMappings 中
  parameterMappings.add(buildParameterMapping(content));
  // <2> 返回 ? 占位符
  return "?";
}
GenericTokenParser parser = new GenericTokenParser("#{", "}", handler);SqlSourceBuilder构建器就会将#进行预处理,防止sql注入,而$就会字符串拼接进行执行不会进行预处理。
3 总结
个人在看完这些基本的核心代码,感觉mybatis源码底层设计无论是分层,分包,分模块,方法的互相调用,复用,没有一点冗余,设计思路清晰,用到的设计模式
3.1 单例模式
configuration使用单例保证整个程序运行期间都可使用,且不重复创建,放置浪费资源,如果继续创建抛出异常
3.2 构造器模式
在Mybatis的初始化的主要工作是加载并解析mybatis-config.xml的配置文件、映射配置文件以及相关的注解信息。因为使用了建造者模式,BashBuilder抽象类即为建造者接口的角色
public abstract class BaseBuilder {
//需要配置,类型别名注册,类型处理器注册3个东西
protected final Configuration configuration;
protected final TypeAliasRegistry typeAliasRegistry;
protected final TypeHandlerRegistry typeHandlerRegistry;

public BaseBuilder(Configuration configuration) {
this.configuration = configuration;
this.typeAliasRegistry = this.configuration.getTypeAliasRegistry();
this.typeHandlerRegistry = this.configuration.getTypeHandlerRegistry();
}
………………
}
3.3 接口适配器模式
(Excutor 等核心对象,使用缺省适配器模式) 使用extends关键字来继承,只用实现想实现的功能
3.4 代理模式(动态代理)
RoleMapper roleMapper=sqlSession.getMapper(RoleMapper.class); 实现类使用动态字节码技术来创建,在jvm中运行时创建等价于
Proxy.newProxyInstance(Test.class.getClassLoader(),new Class[]{RoleMapper.class}, new MyMapperProxy(sqlSession,RoleMapper.class));
3.5 装饰器模式
在不改变原有类结构和继承的情况下,通过包装原对象去扩展一个新功能
Caching Executor 实现二级缓存,而其他的操作,如同获取连接等操作BaseExecutor已经做了,直接使用BaseExecutor。

