ASP.Net Core 中使用JWT认证(3.1版本,5.0也可以使用)学不会你打我
ASP.Net Core 中使用JWT认证
- JWT简单介绍
- 开始编码
JWT简单介绍
关于JWT网上有很多介绍,这里就不介绍了,本文主要以实现为主。
JWT由3部分构成:
HEADER 、PAYLOAD 、SIGNATURE
HEADER :包含token的元数据,主要是加密算法,和签名的类型,如下面的信息,说明了加密的对象类型是JWT,加密算法是HMAC SHA-256
{"alg":"HS256","typ":"JWT"}
PAYLOAD :主要包含一些声明信息(claim),这些声明是key-value对的数据结构。通常如用户名,角色等信息,过期日期等,因为是未加密的,所以不建议存放敏感信息。
SIGNATURE:jwt要符合jws(Json Web Signature)的标准生成一个最终的签名。把编码后的Header和Payload信息加在一起,然后使用一个强加密算法进行加密。HS256(BASE64(Header).Base64(Payload),secret)
开始编码
首先我们先创建一个ASP.NET Core Web API项目 版本随意。
创建好项目后我们先创建几个文件夹,分别是Model、IdentityService。
然后我们在Model文件夹中创建一个TokenModel的类用来存储签发或者验证时的信息。如下:
using System;
using System.Collections.Generic;
using System.Linq;
using System.Threading.Tasks;
namespace testjwt.Models
{
public class tokenModel
{
/// 然后在 appsettings.Development.json 增加jwt使用到的配置信息(如果是生成环境在appsettings.json添加即可)
"JWTTokenconfig": {
    "Secret": "fsdjfljoiuweihjfskghrfygierwuer9uwekhdkcnh940233+f+s",
    "Issuer": "wkea.cn",
    "Audience": "user",
    "AccessExpiration": 30,
    "RefreshExpiration": 60
  }
然后在startup.cs类中的ConfigureServices方法中读取配置
 public void ConfigureServices(IServiceCollection services)
        {

            services.AddControllers();
            services.AddSwaggerGen(c =>
            {
                c.SwaggerDoc("v1", new OpenApiInfo { Title = "testjwt", Version = "v1" });
            });
            services.Configure<tokenModel>(Configuration.GetSection("JWTTokenconfig"));
            var token = Configuration.GetSection("JWTTokenconfig").Get<tokenModel>();
        }
到目前为止,我们完成了一些基础工作,下面再webapi中注入jwt的验证服务,并在中间件管道中启用authentication中间件。startup类中要引用jwt验证服务的命名空间。注:这两个包要自己NuGet下载下来。
using Microsoft.AspNetCore.Authentication.JwtBearer;
using Microsoft.IdentityModel.Tokens;
然后在ConfigureServices方法中添加如下配置
  services.AddAuthentication(option =>
            {
                option.DefaultAuthenticateScheme = JwtBearerDefaults.AuthenticationScheme;
                option.DefaultChallengeScheme = JwtBearerDefaults.AuthenticationScheme;
            }).AddJwtBearer(option =>
            {
                option.RequireHttpsMetadata = false;
                option.SaveToken = true;
                option.TokenValidationParameters = new TokenValidationParameters
                {
                    ValidateIssuer = false,//是否验证Issuer
                    ValidateAudience = false,//是否验证Audience
                    ValidateIssuerSigningKey = true,//是否验证SigningKey
                    IssuerSigningKey = new SymmetricSecurityKey(Encoding.UTF8.GetBytes(token.Secret)),//拿到SigningKey
                    ValidIssuer = token.Issuer,
                    ValidAudience = token.Audience,
                    ClockSkew = TimeSpan.FromMinutes(0)//设置缓冲时间,token的总有有效时间等于这个时间加上jwt的过期时间,如果不配置默认是5分钟
                };
            });
再在Configure方法中启用验证
   public void Configure(IApplicationBuilder app, IWebHostEnvironment env)
        {
            if (env.IsDevelopment())
            {
                app.UseDeveloperExceptionPage();
                app.UseSwagger();
                app.UseSwaggerUI(c => c.SwaggerEndpoint("/swagger/v1/swagger.json", "testjwt v1"));
            }

            app.UseHttpsRedirection();

            app.UseRouting();

           //开启下面两个配置
            app.UseAuthentication();//认证
            app.UseAuthorization();//授权

            app.UseEndpoints(endpoints =>
            {
                endpoints.MapControllers();
            });
        }
注意,这里必须要把认证和授权都开启,如果只开一个在后面验证时一直都会报一个401错误,而且二者顺序不能倒置。
上面完成了JWT验证的功能。接下来就是实现jwttoken的签发流程了。一般我们的流程是用户输入账号密码我们校验是否正确,再确定是否签发token.
下面我们创建一个用户类Users用来模拟正常的模拟登录时存储用户信息,如下:
using System;
using System.Collections.Generic;
using System.Linq;
using System.Threading.Tasks;

namespace testjwt.Models
{
    public class User
    {
        public string UserName { get; set; }
        public string PWD { get; set; }
    }
}
然后创建一个控制器来让用户请求token
namespace testjwt.Controllers
{
    [Route("api/[controller]/[action]")]
    public class HomeController : Controller
    {

        [HttpGet]
        public string GetToken(User user) {
            return "";
        }
    }
}
目前上面的控制器只实现了基本的逻辑,下面我们要创建签发token的服务,去完成具体的业务。第一步我们先在IdentityServer文件夹下创建对应的服务接口,命名为IAuthenticateService
using System;
using System.Collections.Generic;
using System.Linq;
using System.Threading.Tasks;
using testjwt.Models;

namespace testjwt.identityserver
{
    public interface IAuthenticateService
    {
        bool IsAuthenticated(User request, out string token);
    }
}
然后实现接口
using System;
using System.Collections.Generic;
using System.Linq;
using System.Threading.Tasks;
using testjwt.Models;
using Microsoft.Extensions.Options;
using System.Security.Claims;
using Microsoft.IdentityModel.Tokens;
using System.Text;
using System.IdentityModel.Tokens.Jwt;

namespace testjwt.identityserver
{
    public class AuthenticateService : IAuthenticateService
    {
        public bool IsAuthenticated(User request, out string token)
        {
            throw new NotImplementedException();
        }
    }
}
在Startup的ConfigureServices方法中注册服务
services.AddScoped<IAuthenticateService, AuthenticateService>();
然后在HomeController中注入IAuthenticateService服务,具体如下
using Microsoft.AspNetCore.Authorization;
using Microsoft.AspNetCore.Mvc;
using System;
using System.Collections.Generic;
using System.Linq;
using System.Threading.Tasks;
using testjwt.identityserver;
using testjwt.Models;

namespace testjwt.Controllers
{
    [Route("api/[controller]/[action]")]
    public class HomeController : Controller
    {
        private readonly IAuthenticateService _authenservice;
        public HomeController(IAuthenticateService service) {
            _authenservice = service;
        }
        [HttpGet]
        public string GetToken(User user) {

            ///正常来说这里应该是链接数据库查询用户名密码是否正确,但是这里我们直接模拟一下测试就可以了
            if (user.UserName != "张三" || user.PWD != "123")
            {
                return "用户名或密码错误";
            }
            //签发token
            string token;
            if (_authenservice.IsAuthenticated(user,out token))
            {
                return token;
            }
            return "用户名或密码错误";
        }
    }
}
将User注入到容器中
services.AddScoped<User>();
接下来我们完善一下继承了IAuthenticateService接口的AuthenticateService类,首先先注入tokenmodel,然后实现一下生成token的逻辑
using System;
using System.Collections.Generic;
using System.Linq;
using System.Threading.Tasks;
using testjwt.Models;
using Microsoft.Extensions.Options;
using System.Security.Claims;
using Microsoft.IdentityModel.Tokens;
using System.Text;
using System.IdentityModel.Tokens.Jwt;

namespace testjwt.identityserver
{
    public class AuthenticateService : IAuthenticateService
    {
        public readonly tokenModel _jwtModel;
        public AuthenticateService(IOptions<tokenModel> jwtModel) {
            _jwtModel = jwtModel.Value;
        }
        public bool IsAuthenticated(User user, out string token)
        {

            token = string.Empty;

            var claims = new[] {
                new Claim(ClaimTypes.Name,user.UserName)
            };
            //密钥
            var key = new SymmetricSecurityKey(Encoding.UTF8.GetBytes(_jwtModel.Secret));
            //凭证
            var credentials = new SigningCredentials(key, SecurityAlgorithms.HmacSha256);
            //生成Token
            var jwtToken = new JwtSecurityToken(_jwtModel.Issuer, _jwtModel.Audience, claims,
                expires: DateTime.Now.AddMinutes(_jwtModel.AccessExpiration),
                signingCredentials: credentials);
            token = new JwtSecurityTokenHandler().WriteToken(jwtToken);
            return true;
        }
    }
}
特别注意下tokenmodel的注入是以IOptions的接口类型注入的,在Startpup中我们是通过配置项的方式注册tokenmodel类型的。
以上就已经实现jwttoken验证的基本方法了,接下啦我们再创建一个控制器来测试一下
using Microsoft.AspNetCore.Authorization;
using Microsoft.AspNetCore.Mvc;
using System;
using System.Collections.Generic;
using System.Linq;
using System.Threading.Tasks;

namespace testjwt.Controllers
{
    [Route("api/[controller]/[action]")]
    public class testController : Controller
    {
        [HttpGet]
        [Authorize]
        public string Index()
        {
            return "恭喜你又学会一个新技能!";
        }
    }
}
这里加上了[Authorize]特性就说明要校验token
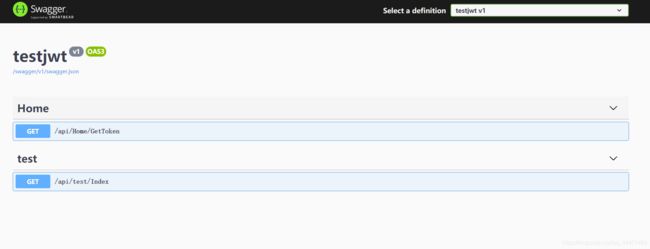
运行项目

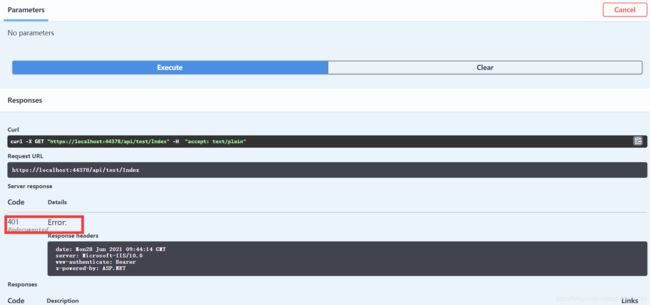
home是获取token的控制器,test是测试的控制器。我们先不获取token然后直接去请求test

发生了401错误,就是token验证失败
接下来我们测试获取token,我们写死的账号密码,张三、123

获取到了token,接下来我们用接口测试工具带上token来测试一下test(别问为什么要用接口测试工具,但凡swagger要是支持在请求头里面写数据我也不会专门下个测试工具。),这里我用的是apipost怎么使用这里就不阐述了。

记得这里选Bearer auth认证,因为我们在配置的时候使用的时这个。然后将生成的token复制过去然后点击发送,这个时候就请求成功了。

ok大功告成!也快下班了,划水快乐。
案例已上传github.
github