【微信开发第二章】SpringBoot实现微信公众号普通消息和模板消息回复
前言
在进行微信公众号业务开发的时候,微信公众号的消息回复是非常重要的一环,而微信公众号消息回复分为:普通消息自动回复和模板消息回复。该篇文章会先使用微信测试工具过一遍流程,再使用代码进行实现,并且每一步都有记录,力争理解的同时各位小伙伴也能够实现功能
文章目录
- 前言
- 1、通过微信测试工具实现模板消息发送
- 2、接受微信公众号的消息
- 3、代码实现普通消息的发送
- 4、公众号模板消息
- 总结
说明:因为开通微信服务号是需要营业执照和300元的,而个人号有些功能又没有,所以是比较不方便的,但是微信官方很贴心的为我们准备了测试公众号,所以我们在测试开发阶段均可以使用测试公众号来调试。
1、通过微信测试工具实现模板消息发送
详情可以看这篇文献:https://blog.csdn.net/weixin_47316183/article/details/125245315
2、接受微信公众号的消息
1、首先要在测试公众号中配置服务器配置

说明:这里必须绑定的是域名,内网肯定是不行的,我这里使用的是内网穿透直接映射到本地端口的,后面有时间会专门写一篇关于如何内网穿透的文章。
2、编写控制器
注意:这个接口是用来验证服务器的,接口路径必须和上面绑定的接口路径一致。
@RestController
@RequestMapping("/api/wechat/message")
public class MessageController {

    private static final String tokenEric = "Eric";

    /**
     * 服务器有效性验证
     * @param request
     * @return
     */
    @GetMapping
    public String verifyToken(HttpServletRequest request) {
        String signature = request.getParameter("signature");
        String timestamp = request.getParameter("timestamp");
        String nonce = request.getParameter("nonce");
        String echostr = request.getParameter("echostr");
        log.info("signature: {} nonce: {} echostr: {} timestamp: {}", signature, nonce, echostr, timestamp);
        if (this.checkSignature(signature, timestamp, nonce)) {
            log.info("token ok");
            return echostr;
        }
        return echostr;
    }

    private boolean checkSignature(String signature, String timestamp, String nonce) {
        String[] str = new String[]{tokenEric, timestamp, nonce};
        //排序
        Arrays.sort(str);
        //拼接字符串
        StringBuffer buffer = new StringBuffer();
        for (int i = 0; i < str.length; i++) {
            buffer.append(str[i]);
        }
        //进行sha1加密
        String temp = SHA1.encode(buffer.toString());
        //与微信提供的signature进行匹对
        return signature.equals(temp);
    }
}
OK,完成之后,我们的校验接口就算是开发完成了。接下来就可以开发消息接收接口了。
3、编写,接收微信服务器发送来的消息
   /**
     * 接收微信服务器发送来的消息
     * @param request
     * @return
     * @throws Exception
     */
    @PostMapping
    public String receiveMessage(HttpServletRequest request) throws Exception {

        WxMpXmlMessage wxMpXmlMessage = WxMpXmlMessage.fromXml(request.getInputStream());
        System.out.println(JSONObject.toJSONString(wxMpXmlMessage));
        return "success";
    }

    private Map<String, String> parseXml(HttpServletRequest request) throws Exception {
        Map<String, String> map = new HashMap<String, String>();
        InputStream inputStream = request.getInputStream();
        SAXReader reader = new SAXReader();
        Document document = reader.read(inputStream);
        Element root = document.getRootElement();
        List<Element> elementList = root.elements();
        for (Element e : elementList) {
            map.put(e.getName(), e.getText());
        }
        inputStream.close();
        inputStream = null;
        return map;
    }
到这里,基本完成一半了,因为已经能够接受到微信服务器发来的消息的,先给大家测试一波。
3、代码实现普通消息的发送
那么既然能够接受到微信服务器发来的消息,同样的,也能够返回消息,这里根据自己的需求来写就好了,我这里的需求是根据关键字查询对应课程信息,大家可以根据我的代码模板来进行修改,这样更方便。
我这里为了大家看的方便直接将修改后的代码放在Controller中了
public String receiveMessage(Map<String, String> param) {
String content = "";
try {
//消息类型
String msgType = param.get("MsgType");
switch(msgType){
case "text" : //普通文本类型,例如用户发送:Java
content = this.search(param);
break;
case "event" : //多类型:关注、取消关注、点击菜单导航
String event = param.get("Event");
String eventKey = param.get("EventKey");
if("subscribe".equals(event)) {//关注公众号
content = this.subscribe(param);
} else if("unsubscribe".equals(event)) {//取消关注公众号
content = this.unsubscribe(param);
} else if("CLICK".equals(event) && "aboutUs".equals(eventKey)){
content = this.aboutUs(param);
} else {
content = "success";
}
break;
default:
content = "success";
}
} catch (Exception e) {
e.printStackTrace();
content = this.text(param, "请重新输入关键字,没有匹配到相关视频课程").toString();
}
return content;
}
}
/**
* 处理关键字搜索事件
* 图文消息个数;当用户发送文本、图片、语音、视频、图文、地理位置这六种消息时,开发者只能回复1条图文消息;其余场景最多可回复8条图文消息
* @param param
* @return
*/
private String search(Map<String, String> param) {
String fromusername = param.get("FromUserName");
String tousername = param.get("ToUserName");
String content = param.get("Content");
//这个判断是为靓仔专属设定的
if("Eric".equals(content)){
StringBuffer text = this.text(param, "这是一位神奇的靓仔!");
return text.toString();
}
//单位为秒,不是毫秒
Long createTime = new Date().getTime() / 1000;
StringBuffer text = new StringBuffer();
//远程调用接口:根据课程名称查询课程信息
List<Course> courseList = courseFeignClient.findByKeyword(content);
if(CollectionUtils.isEmpty(courseList)) {
//如果集合等于null,说明该关键字不存在对应课程,提升用户没有匹配到相关视频课程
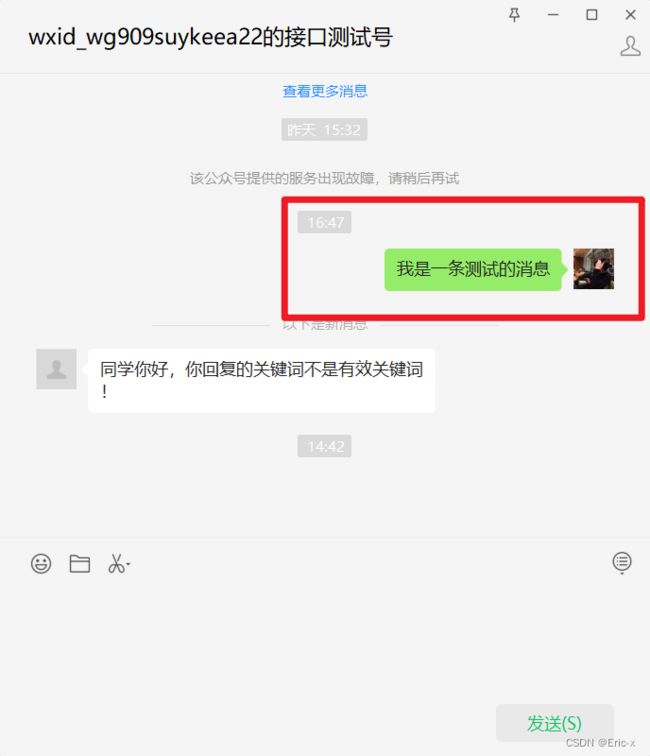
text = this.text(param, "同学你好,你回复的关键词不是有效关键词!");
} else {
//一次只能返回一个
Random random = new Random();
int num = random.nextInt(courseList.size());
Course course = courseList.get(num);
StringBuffer articles = new StringBuffer();
articles.append("- "
);
articles.append("<![CDATA["</span><span class="token operator">+</span>course<span class="token punctuation">.</span><span class="token function">getTitle</span><span class="token punctuation">(</span><span class="token punctuation">)</span><span class="token operator">+</span><span class="token string">"]]> ");
articles.append("+course.getTitle()+"]]> ");
articles.append("+course.getCover()+"]]> ");
articles.append("+course.getId()+"]]> ");
articles.append("");
text.append("" );
text.append("+fromusername+"]]> ");
text.append("+tousername+"]]> ");
text.append("+createTime+"]]> ");
text.append("" );
text.append(articles);
text.append("");
text.append("");
}
return text.toString();
}
这是按照微信官方要求格式来封装的,感兴趣的朋友可以查看官方文档:https://developers.weixin.qq.com/doc/offiaccount/Basic_Information/Access_Overview.html
测试
1、重启项目
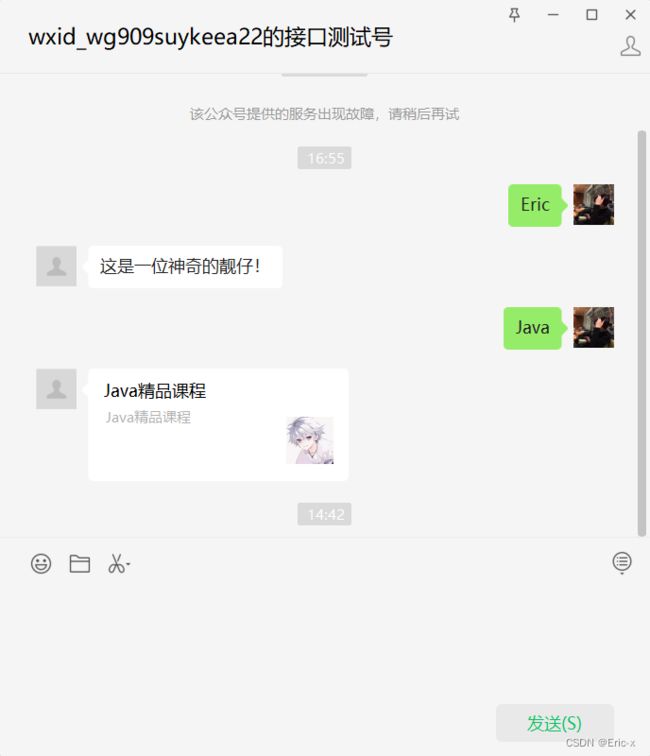
2、给微信测试服务号发送消息

可以看到成功实现啦~
当然,在实际开发中,可能这个自动回复直接使用微信管理后台设置了,而我们代码实现回复更多的是模板回复,请大家耐心往下看
4、公众号模板消息
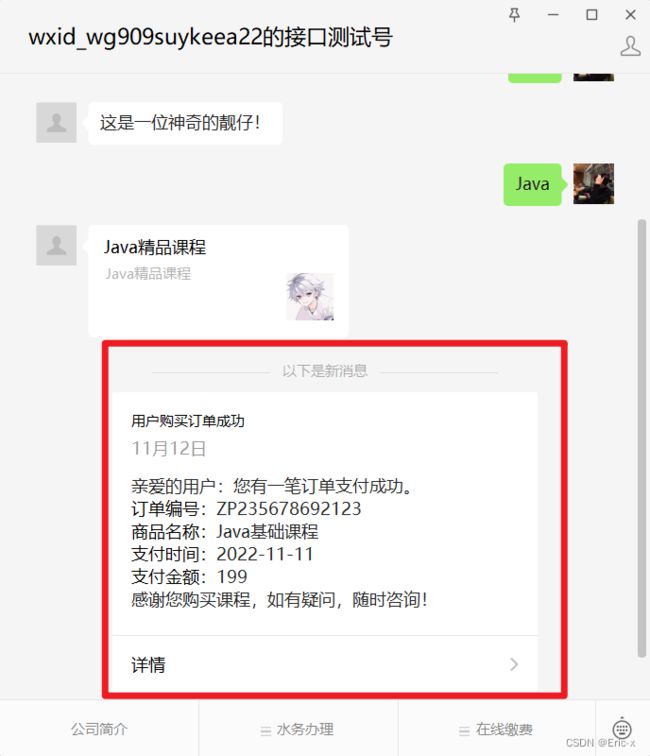
先说下实现目标:购买课程支付成功后微信自动推送支付成功消息
官方文档参考链接:https://developers.weixin.qq.com/doc/offiaccount/Message_Management/Template_Message_Interface.html
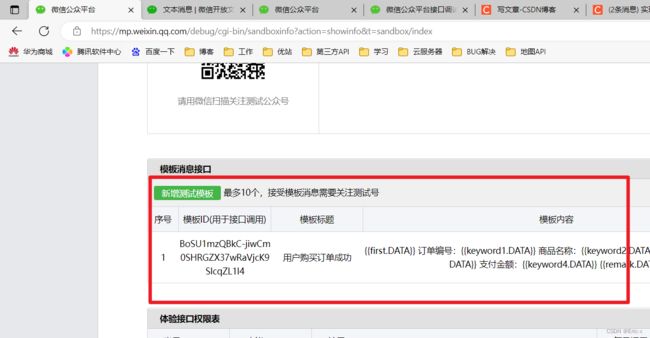
1、先在测试公众号添加消息模板

这里怕有些小伙伴不熟悉,我把我的模板贴上~
{{first.DATA}}
订单编号:{{keyword1.DATA}}
商品名称:{{keyword2.DATA}}
支付时间:{{keyword3.DATA}}
支付金额:{{keyword4.DATA}}
{{remark.DATA}}
2、编写Service接口
需要说明的是,发送消息是需要指定用户的,而在微信公众号中openId就是用户的唯一标识
void pushPayMessage(Long orderId);
3、实现ServiceImpl实现类
//TODO 暂时写成固定值测试,后续完善
@SneakyThrows
@Override
public void pushPayMessage(long orderId) {
    String openid = "o1RCX6uM7uSm8-SS-eTRf13EEQ";
    WxMpTemplateMessage templateMessage = WxMpTemplateMessage.builder()
            .toUser(openid)//要推送的用户openid
            .templateId("BoSU1mzQBkC-jiwCm0SHRGZX37wRaVjcK9SlcqZL1l4")//模板id
            .url("https://zhult.com/#/pay/"+orderId)
            .build();
    //3,如果是正式版发送消息,,这里需要配置你的信息
    templateMessage.addData(new WxMpTemplateData("first", "亲爱的用户:您有一笔订单支付成功。", "#272727"));
    templateMessage.addData(new WxMpTemplateData("keyword1", "ZP235678692123", "#272727"));
    templateMessage.addData(new WxMpTemplateData("keyword2", "Java基础课程", "#272727"));
    templateMessage.addData(new WxMpTemplateData("keyword3", "2022-11-11", "#272727"));
    templateMessage.addData(new WxMpTemplateData("keyword4", "199", "#272727"));
    templateMessage.addData(new WxMpTemplateData("remark", "感谢您购买课程,如有疑问,随时咨询!", "#272727"));
    String msg = wxMpService.getTemplateMsgService().sendTemplateMsg(templateMessage);
    System.out.println("模板信息发送成功:" + msg);
}
4、编写Controller
/**
  * 发送模板消息
  * @return
  * @throws WxErrorException
  */
 @GetMapping("/pushPayMessage")
 public Result pushPayMessage() throws WxErrorException {
     messageService.pushPayMessage(1L);
     return Result.ok().message("获取模板消息成功");
 }
5、测试:因为使用的是get请求,所以我们可以直接使用浏览器测试

测试成功~
总结
怎么样,是不是特别简单呢,完结撒花~
【微信开发第一章】SpringBoot实现微信公众号创建菜单,同步菜单功能:https://blog.csdn.net/weixin_47316183/article/details/127821095?spm=1001.2014.3001.5502
【微信开发第二章】SpringBoot实现微信公众号普通消息和模板消息回复:https://blog.csdn.net/weixin_47316183/article/details/127821653?spm=1001.2014.3001.5502


