fastai图像分割
Fastai is an open source deep learning library that adds higher level functionalities to PyTorch and makes it easier to achieve state-of-the-art results with little coding.
Fastai是一个开源的深度学习库,它为PyTorch添加了更高级别的功能,并且使您无需编写任何代码即可更轻松地获得最新的结果。
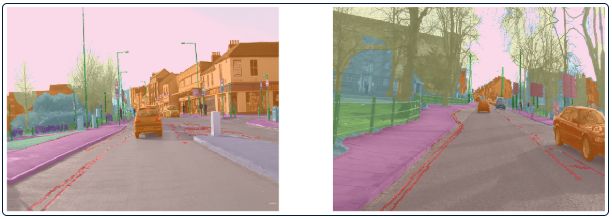
The vision module is really handy when we need to quickly create an image dataset, apply data augmentations, resize, crop or even overlay a segmentation mask (Figure 1). However, all this simplification comes with a cost. Most of these higher level APIs for computer vision are optimized to RGB images, and these image libraries don’t support multispectral or multichannel images.
当我们需要快速创建图像数据集,应用数据扩充,调整大小,裁剪甚至覆盖分割蒙版时,视觉模块非常方便(图1)。 然而,所有这些简化都是有代价的。 这些用于计算机视觉的高级API中的大多数已针对RGB图像进行了优化,并且这些图像库不支持多光谱或多通道图像。
Figure 1- Fastai’s example of mask overlay on a segmentation task (source: https://www.fast.ai/images/fastai_paper/show_batch_seg.png) 图1- Fastai在分割任务上遮罩的示例(来源: https : //www.fast.ai/images/fastai_paper/show_batch_seg.png )In recent years, due to an increase in data accessibility, Earth Observation researchers have been paying a lot of attention on deep learning techniques, like image recognition, image segmentation, object detection, among others. [1]. The problem is that satellite imagery, usually composed by many different spectral bands (wavelengths), doesn’t fit in most vision libraries used by the deep learning community. For that reason, I have been working directly with PyTorch to create the dataset (here) and train the “home-made” U-Net architecture (here).
近年来,由于数据可访问性的增加,地球观测研究人员一直对诸如图像识别,图像分割,对象检测等深度学习技术给予了极大的关注。 [1]。 问题在于,通常由许多不同的光谱带(波长)组成的卫星图像不适合深度学习社区使用的大多数视觉库。 因此,我一直直接与PyTorch合作创建数据集( 此处 )并训练“自制的” U-Net体系结构( 此处 )。
With the upcoming of Fastai-v2 (promised to be released in next weeks)[2], I would like to test if it was possible to use it’s Data Block structure to create a multispectral image dataset to train a U-Net model. That’s more advanced than my previous stories as we have to create some custom subclasses, but I tried to make it as simple as possible. The notebook with all the code is available in the GitHub project (notebook here).
随着Fastai-v2的发布(有望在下周发布)[2],我想测试是否有可能使用其数据块结构来创建多光谱图像数据集来训练U-Net模型。 因为我们必须创建一些自定义子类,所以它比我以前的故事要高级,但是我尝试使其尽可能简单。 包含所有代码的笔记本可在GitHub项目中找到 ( 此处的笔记本)。
Before we start, it’s necessary to install fastai2 library, following the installation guide at https://dev.fast.ai.
在开始之前,有必要按照https://dev.fast.ai上的安装指南安装fastai2库。
第1步-准备数据 (Step 1 — Preparing the data)
To continue, we will need some training patches as multispectral images. That could be a Kaggle dataset, as the 38-cloud dataset, used in this story, or a completely new one. In the story Creating training patches for Deep Learning Image Segmentation of Satellite (Sentinel 2) Imagery using the Google Earth Engine (GEE), I show how to create training patches from Google Earth Engine and consume them as NumPy arrays.
要继续,我们将需要一些训练补丁作为多光谱图像。 可能是此故事中使用的Kaggle数据集(如38云数据集),还是全新的数据集。 在“ 使用Google Earth Engine(GEE)创建用于深度学习卫星(Sentinel 2)图像分割的训练补丁”的故事中,我展示了如何从Google Earth Engine创建训练补丁并将其作为NumPy数组使用。
For this tutorial, I made it available in the GitHub repository (https://github.com/cordmaur/Fastai2-Medium), under /data folder, a few sample patches from Orós reservoir in Brazil. Data is saved as NumPy’s arrays and separated in two folders /data/images for the multispectral patches and /data/labels for the target masks.
对于本教程,我在/data文件夹下的GitHub存储库( https://github.com/cordmaur/Fastai2-Medium )中提供了该存储库,其中有一些来自巴西Orós油藏的示例补丁。 数据保存为NumPy的数组,并在两个文件夹/data/images中作为多光谱斑块,在/data/labels为目标蒙版。
Checking number of files - images:40      masks:40
Checking shapes - image: (13, 366, 366) mask: (366, 366)
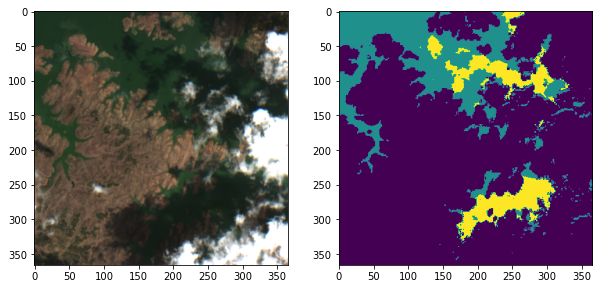
As we can see from the output, the images were cropped in 366x366 pixels and the training patches have 13 channels. These are the 12 Sentinel-2 bands, in order, and I have added an additional band to indicate “no data” flag. Channels have been put in the first axis, as it is the standard for PyTorch and Fastai, differently from other image libraries. Mask values are 0-No water, 1-Water and 2-Water Shadow. We will check an image sample using Matplotlib. For this, we need to move the channels axes to the last position using Numpy.transpose and select the corresponding Red, Green and Blue axis.
从输出中可以看到,图像被裁剪为366x366像素,训练块具有13个通道。 按顺序,这是12个Sentinel-2频段,我添加了一个附加频段来指示“无数据”标志。 通道已放置在第一轴上,因为它是PyTorch和Fastai的标准,与其他图像库不同。 遮罩值为0-无水,1-水和2-水阴影。 我们将使用Matplotlib检查图像样本。 为此,我们需要使用Numpy.transpose将通道轴移动到最后一个位置,并选择相应的红色,绿色和蓝色轴。
Code output 代码输出 步骤2 — TensorImage类 (Step 2 — Subclassing the TensorImage class)
Now that we have checked or images, we need a way of opening it in Fastai. As Fastai uses the Python Imaging Library (PIL), it is not able to handle multispectral images like these. We will, then, inherit a new class called MSTensorImage from the original TensorImage that is capable of opening .npy extensions and showing it visually. Let’s get to the code.
现在我们已经检查或图像,我们需要一种在Fastai中打开它的方法。 由于Fastai使用Python Imaging Library(PIL),因此无法处理此类多光谱图像。 然后,我们将从原始TensorImage继承一个名为MSTensorImage的新类,该类能够打开.npy扩展名并以可视方式显示它。 让我们看一下代码。
First, we define a function that opens Numpy arrays and returns it as a given class (open_npy function).
首先,我们定义一个打开Numpy数组并将其作为给定类open_npy函数( open_npy函数)。
Then, we define the MSTensorImage class with a create method that receives the filename (or the numpy array, or a tensor), the desired channels (if we wouldn’t want to load all 13 channels) and a flag indicating whether the channels are in the first axis or not.
然后,我们使用create方法定义MSTensorImage类,该方法接收文件名(或numpy数组或张量),所需的通道(如果我们不想加载所有13个通道)和一个标志,指示该通道是否为是否在第一轴上。
At last, we define a show method to correctly display this image. We can pass to the show method different channels to create false color composites and Matplotlib axes for multiple display. In the following example, we can see that the image was correctly loaded and displayed.
最后,我们定义了show方法以正确显示此图像。 我们可以将不同的通道传递给show方法,以创建假彩色合成和Matplotlib轴以进行多次显示。 在下面的示例中,我们可以看到图像已正确加载并显示。
Code output 代码输出步骤3 — TensorMask类 (Step 3 — TensorMask class)
To handle the mask, instead of creating a new class, as we did previously, we will use the TensorMask class already defined in Fastai2. The only difference, in this case, is that the TensorMask, doesn’t know how to open .npy extensions. In this case, we will create it passing the result of our newly defined open_npy function, like so.
为了处理蒙版,而不是像以前那样创建一个新类,我们将使用TensorMask已经定义的TensorMask类。 在这种情况下,唯一的区别是TensorMask不知道如何打开.npy扩展名。 在这种情况下,我们将通过新定义的open_npy函数的结果来创建它,就像这样。
步骤4 —创建一个数据块 (Step 4 — Create a DataBlock)
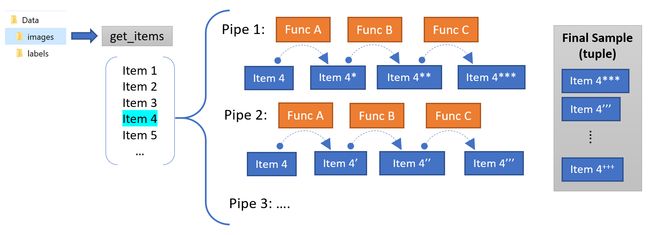
The DataBlock is an abstraction to provide transformations to your source data to fit your model. Remember that in order to train a neural net, we have to provide the model a set of inputs (Xs) and corresponding targets (Ys). The cost and the optimization functions will take care of the rest. More complex architectures could have multiple Xs as inputs and even multiple targets, so the DataBlock accepts multiple pipelines (Figure 2).
DataBlock是一种抽象,用于提供对源数据的转换以适合您的模型。 请记住,为了训练神经网络,我们必须为模型提供一组输入(Xs)和相应的目标(Ys)。 成本和优化功能将处理其余的工作。 更复杂的体系结构可能有多个X作为输入,甚至有多个目标,因此DataBlock接受多个管道(图2)。
In our case, that is the most common, we need to create a DataBlock that provides only two blocks, Xs and Ys. For each block we can create a TransformBlock (that’s like a processing pipe) that manipulates each group (Xs or Ys) until they reach the desired format for loading into the model.
在我们的情况下,这是最常见的情况,我们需要创建一个仅提供两个块Xs和Ys的DataBlock 。 对于每个块,我们可以创建一个TransformBlock (就像一个处理管道),该块可以操纵每个组(X或Y),直到它们达到所需的格式以加载到模型中为止。
To create a DataBlock, besides the TransformBlocks, we have to provide a function responsible to get the items, given a source. In our example, as the files are already saved in disk, the get_items function will just read the directory and return the file_names. The list of files will be the starting point of our transformations pipes.
要创建一个DataBlock ,除了TransformBlocks之外,我们还必须提供一个负责获取给定源的项的函数。 在我们的示例中,由于文件已经保存在磁盘中,因此get_items函数将仅读取目录并返回file_names。 文件列表将是我们转换管道的起点。
If the mask is created from the same original file (for example, if the mask was the 14th channel), the X transformation pipeline would be responsible to exclude this channel and the Y transformation pipeline would be responsible to extract this information from the original image. As we have the files saved separately, we will provide a new function called get_lbl_fn that will receive the name of the image file and then return the name of the corresponding target file. Now that we have some understanding of the DataBlock, let’s go to the code.
如果遮罩是从相同的原始文件创建的(例如,如果遮罩是第14个通道),则X转换管道将负责排除该通道,而Y转换管道将负责从原始图像中提取此信息。 。 由于我们分别保存了文件,因此我们将提供一个名为get_lbl_fn的新函数,该函数将接收图像文件的名称,然后返回相应目标文件的名称。 现在我们对DataBlock有了一些了解,让我们看一下代码。
The last command, DataBlock.summary, will check if everything is working fine and give us a data sample:
最后一个命令DataBlock.summary将检查一切是否正常,并提供一个数据样本:
Setting-up type transforms pipelines
Collecting items from Data\images
Found 40 items
2 datasets of sizes 36,4
Setting up Pipeline: partial
Setting up Pipeline: get_lbl_fn -> partial
Building one sample
  Pipeline: partial
    starting from
      Data\images\Oros_1_19.npy
    applying partial gives
      MSTensorImage of size 13x366x366
  Pipeline: get_lbl_fn -> partial
    starting from
      Data\images\Oros_1_19.npy
    applying get_lbl_fn gives
      Data\labels\Oros_1_19.npy
    applying partial gives
      TensorMask of size 366x366
Final sample: (MSTensorImage: torch.Size([13, 366, 366]), TensorMask([[0., 0., 0.,  ..., 0., 0., 0.],
        [0., 0., 0.,  ..., 0., 0., 0.],
        [0., 0., 0.,  ..., 0., 0., 0.],
        ...,
        [0., 0., 0.,  ..., 0., 0., 0.],
        [0., 0., 0.,  ..., 0., 0., 0.],
        [0., 0., 0.,  ..., 0., 0., 0.]]))
Setting up after_item: Pipeline: AddMaskCodes -> ToTensor
Setting up before_batch: Pipeline:
Setting up after_batch: Pipeline:
Building one batch
Applying item_tfms to the first sample:
  Pipeline: AddMaskCodes -> ToTensor
    starting from
      (MSTensorImage of size 13x366x366, TensorMask of size 366x366)
    applying AddMaskCodes gives
      (MSTensorImage of size 13x366x366, TensorMask of size 366x366)
    applying ToTensor gives
      (MSTensorImage of size 13x366x366, TensorMask of size 366x366)
Adding the next 3 samples
No before_batch transform to apply
Collating items in a batch
No batch_tfms to apply
As we can see in the results, the final sample, after processing all the transformations, is composed of a tuple with 2 items (X, Y). In our case the (MSTensorImage, TensorMask).
正如我们在结果中看到的,在处理所有转换后,最终样本由具有2个项(X,Y)的元组组成。 在我们的例子中( MSTensorImage , TensorMask )。
最终—数据集和数据加载器 (Final — Dataset and Dataloader)
Once we are done creating the DataBlock the creation of a DataSet or a DataLoader are very straightforward. The datasets will be splitted, considering the splitter function (in our case, a random splitter with 10% for validation), into training and validation datasets, and the data can be accessed directly by subscripting:
创建完DataBlock ,创建DataSet或DataLoader过程非常简单。 考虑拆分器功能(在本例中为10%用于验证的随机拆分器),将数据集拆分为训练和验证数据集,可通过下标直接访问数据:
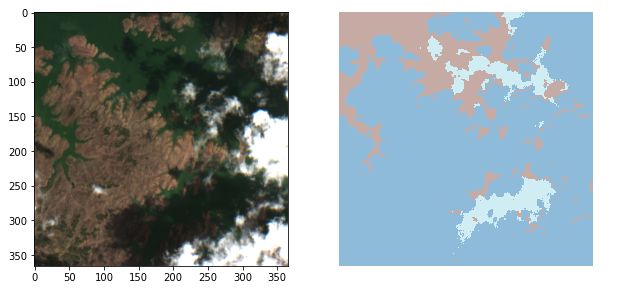
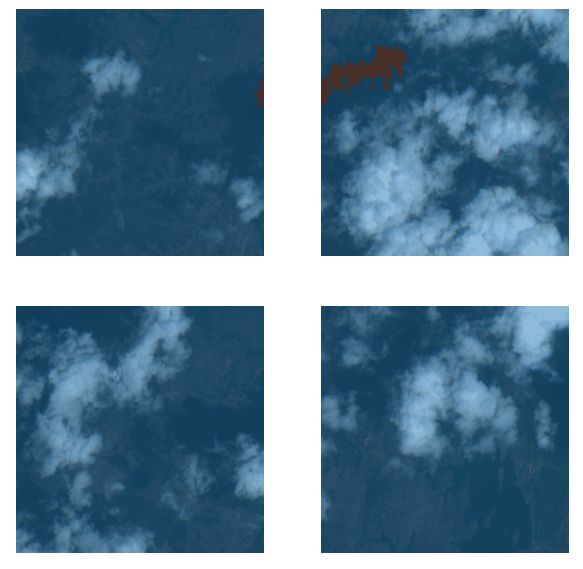
The same is valid for DataLoaders. Additionally the show_batch method automatically understands that we are performing a segmentation task (because of the TensorMask class) and overlays Xs and Ys:
这对于DataLoaders也是有效的。 另外, show_batch方法自动了解我们正在执行分段任务(由于TensorMask类),并覆盖Xs和Ys:
结论 (Conclusion)
In today’s story we saw the basic concepts and how to use the Fastai 2’s DataBlock to prepare the multispectral satellite data to fit a deep learning model. The subclassing of the TensorImage class and the use of the open_npy function were enough to handle the multiple channels. As one can note, the basic functionalities of Fastai to create a dataloader and show a batch sample were successfully preserved.
在今天的故事中,我们看到了基本概念以及如何使用Fastai 2的DataBlock准备多光谱卫星数据以适合深度学习模型。 TensorImage类的子类化以及使用open_npy函数足以处理多个通道。 可以注意到,Fastai创建数据加载器并显示批处理样本的基本功能已成功保留。
The fact of using Fastai 2 for these Earth Observation tasks is really handy, as differently from Fastai 1 and other high level APIs, Fastai 2’s built-in vision architectures accepts input channels as a parameter. But that’s a subject for a next story.
将Fastai 2用于这些地球观测任务确实很方便,因为与Fastai 1和其他高级API不同,Fastai 2的内置视觉体系结构接受输入通道作为参数。 但这是下一个故事的主题。
The notebook and sample data to follow this “how-to” is available at the GitHub repository https://github.com/cordmaur/Fastai2-Medium.
可以在GitHub存储库https://github.com/cordmaur/Fastai2-Medium中获得遵循此“操作方法”的笔记本和示例数据。
See you in the next story.
下个故事见。
翻译自: https://towardsdatascience.com/how-to-create-a-datablock-for-multispectral-satellite-image-segmentation-with-the-fastai-v2-bc5e82f4eb5
fastai图像分割
