学习笔记:情感分析
一、项目目标
(一)将Twitter数据集可视化,制作出直方图、词云等;
(二)掌握LSTM算法原理;
(三)学会利用NLTK语料库进行数据清洗;
(四)可以用深度学习进行预测分析。
二、实验原理
(一)NLTK语料库
NLTK,全称Natural Language Toolkit,自然语言处理工具包,是NLP研究领域常用的一个Python库,由宾夕法尼亚大学的Steven Bird和Edward Loper在Python的基础上开发的一个模块,至今已有超过十万行的代码。这是一个开源项目,包含数据集、Python模块、教程等;NLTK可以搜索文本、计数词汇等,具有简易性、一致性、可扩展性和模块化等优点。本项目中用到了wordnet和stopwords两个语料库。
- Wordnet
WordNet是由Princeton 大学的心理学家,语言学家和计算机工程师联合设计的一种基于认知语言学的英语词典。它不是光把单词以字母顺序排列,而且按照单词的意义组成一个“单词的网络”。它是一个覆盖范围宽广的英语词汇语义网。名词,动词,形容词和副词各自被组织成一个同义词的网络,每个同义词集合都代表一个基本的语义概念,并且这些集合之间也由各种关系连接。WordNet包含描述概念含义,一义多词,Wordnet目前主要针对英文处理,想要使用它处理中文就需要构建中文的wordnet,把现有的知识加入该结构,其实也不需要从零做起,比如 类别归属,同义,反义,通用的有“同义词词林”字典可供使用,在很多的专业领域,也有概念的类别及关系定义(如各种医学词典),只是格式有所不同。另外, 还可以通过翻译,使用英文的WordNet的一部分数据,翻译过程中的问题主要是词汇的多义性,不过有些专有名词,歧义不大。
- stopwords
人类语言包含很多功能词。与其他词相比,功能词没有什么实际含义。最普遍的功能词是限定词(“the”、“a”、“an”、“that”、和“those”),这些词帮助在文本中描述名词和表达概念,如地点或数量。介词如:“over”,“under”,“above” 等表示两个词的相对位置。 这些功能词的两个特征促使在搜索引擎的文本处理过程中对其特殊对待。第一,这些功能词极其普遍。记录这些词在每一个文档中的数量需要很大的磁盘空间。第二,由于它们的普遍性和功能,这些词很少单独表达文档相关程度的信息。如果在检索过程中考虑每一个词而不是短语,这些功能词基本没有什么帮助。 在信息检索中,这些功能词的另一个名称是:停用词(stopword)。称它们为停用词是因为在文本处理过程中如果遇到它们,则立即停止处理,将其扔掉。将这些词扔掉减少了索引量,增加了检索效率,并且通常都会提高检索的效果。停用词主要包括英文字符、数字、数学字符、标点符号及使用频率特高的单汉字等。
为节省存储空间和提高搜索效率,搜索引擎在索引页面或处理搜索请求时会自动忽略某些字或词,这些字或词即被称为Stop Words(停用词)。通常意义上,Stop Words大致为如下两类:
- 这些词应用十分广泛,在Internet上随处可见,比如“Web”一词几乎在每个网站上均会出现,对这样的词搜索引擎无 法保证能够给出真正相关的搜索结果,难以帮助缩小搜索范围,同时还会降低搜索的效率;
- 这类就更多了,包括了语气助词、副词、介词、连接词等,通常自身 并无明确的意义,只有将其放入一个完整的句子中才有一定作用,如常见的“的”、“在”之类。
举个例子来说,像“IT技术点评”,虽然其中的“IT”从我们的本意上是指“Information Technology”,事实上这种缩写也能够为大多数人接受,但对搜索引擎来说,此“IT”不过是“it”,即“它”的意思,这在英文中是一个极其常见 同时意思又相当含混的词,在大多数情况下将被忽略。我们在IT技术点评中保留“IT”更多地面向“人”而非搜索引擎,以求用户能明了IT技术点评网站涉及的内容限于信息技术,虽然从SEO的角度这未必是最佳的处理方式。
(二)LSTM网络
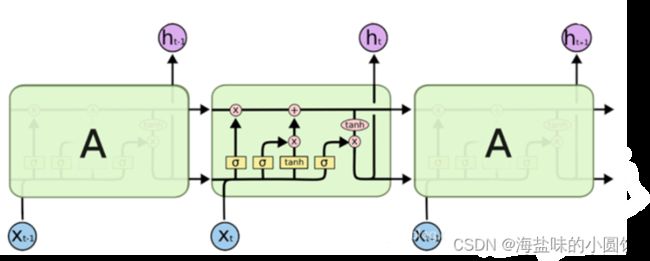
LSTM,是为了解决长期以来问题而专门设计出来的,所有的RNN都具有一种重复神经网络模块的链式形式。在标准RNN中,这个重复的结构模块只有一个非常简单的结构,例如一个tanh层。LSTM 同样是这样的结构,但是重复的模块拥有一个不同的结构。不同于单一神经网络层,这里是有四个,以一种非常特殊的方式进行交互。
图 1LSTM结构
LSTM的关键在于细胞的状态整个(绿色的图表示的是一个cell),和穿过细胞的那条水平线。细胞状态类似于传送带。直接在整个链上运行,只有一些少量的线性交互。信息在上面流传保持不变会很容易。
图 2LSTM内部结构
三、实验及分析
(一)数据集
本项目使用sentiment140数据集。它包含使用twitter api提取的1,600,000条推文。这些推文已添加注释(0 =否定,4 =肯定),可用于检测情绪。
它包含以下6个字段:
target:推特的极性(0 =负极,2 =中性,4 =正)
ids:推特的id(2087)
date:推特的日期(UTC 2009__年__5__月__16__日星期六__23:58:44)
flag:查询(lyx)。如果没有查询,则此值为NO_QUERY。
user:发推的用户(robotickilldozr)
text:推特的文字(Lyx__很酷)
(二)数据准备与处理
import zipfile
zipName = "twitter_dataset.zip"
with zipfile.ZipFile('./twitter_dataset.zip') as z:
z.extractall()
# 数据集中总共有6列。
dataset = pd.read_csv('./twitter_dataset.csv', encoding='ISO-8859-1',
names=['Sentiment', 'Id', 'Date', 'Flag', 'User', 'Tweet'])
print("Total tweets in the dataset: %.2f Million"%(dataset.shape[0]/1000000.0))
# 使用info方法获取有关数据集的更多信息。
dataset.info()
(三)特征分析(查看每个列并确定其中有用的列)
1.绘制推文情绪的条形图
数据集如何在正面和负面情绪值之间分配?绘制一个推文情绪的条形图,负面为红色,正面推文为绿色。
class_count = dataset['Sentiment'].value_counts() # Returned in descending order [4, 0]
plt.figure(figsize = (12, 8))
plt.xticks([4, 0], ['Positive', 'Negative'])
plt.xticks([4, 0])
plt.bar(x = class_count.keys(),
height = class_count.values,
color = ['g', 'r'])
plt.xlabel("Tweet sentiment")
plt.ylabel("Tweet count")
plt.title("Count of tweets for each sentiment")
plt.show()
如图3数据集均匀分布在正(4)和负(0)推文之间:
图 3正面负面情绪分配
2.日期
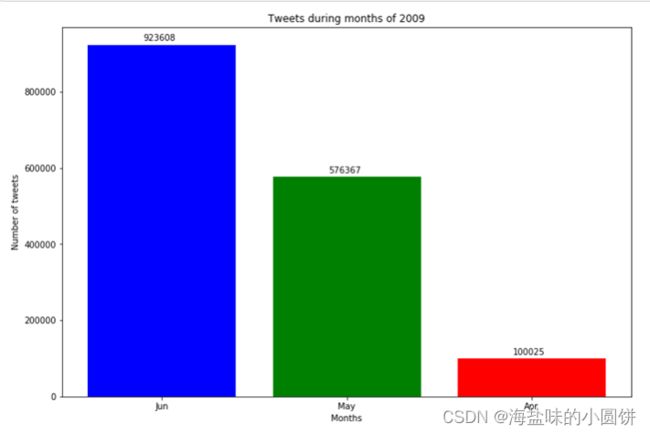
如果我希望根据日期查看推文,日期是一个重要功能。我将从每条推文中提取月份,然后绘制每个月的推文数量。
dataset['Month'] = dataset['Date'].apply(lambda date: date.split(' ')[1])
months_count = dataset['Month'].value_counts()
plt.figure(figsize = (12, 8))
plt.bar(['Jun', 'May', 'Apr'], months_count.values, color = ['b', 'g', 'r'])
for i, v in enumerate(months_count.values):
plt.text(i - 0.1, v + 10000, str(v))
plt.xlabel('Months')
plt.ylabel('Number of tweets')
plt.title('Tweets during months of 2009')
plt.show()
如图4,我们可以看到,2009年6月的推文数量最多。
图 4推文发布数量前3月份
(四)词云
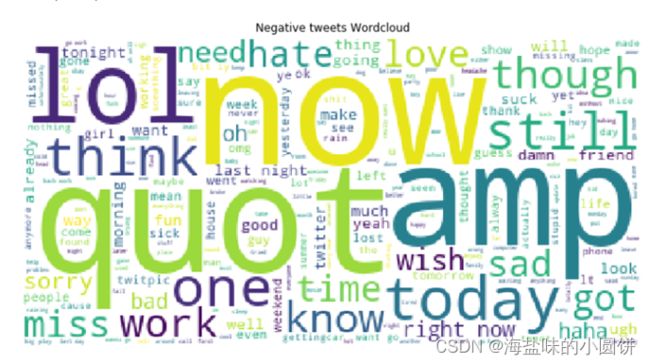
推文中有很多元素,有用户名,网址,表情符号,额外的点,感叹号和许多其他符号。
我们可以根据他们的情绪结合所有推文,并创建他们各自的wordclouds。
- 正面词汇词云
positive_tweets = ' '.join(dataset[dataset['Sentiment'] == 4]['Tweet'].str.lower())
negative_tweets = ' '.join(dataset[dataset['Sentiment'] == 0]['Tweet'].str.lower())
wordcloud = WordCloud(stopwords = STOPWORDS, background_color = "white", max_words = 1000).generate(positive_tweets)
plt.figure(figsize = (12, 8))
plt.imshow(wordcloud)
plt.axis("off")
plt.title("Positive tweets Wordcloud")
图 5正面词汇词云
- 负面词汇词云
wordcloud = WordCloud(stopwords = STOPWORDS, background_color = "white", max_words = 1000).generate(negative_tweets)
plt.figure(figsize = (12, 8))
plt.imshow(wordcloud);
plt.axis("off")
plt.title("Negative tweets Wordcloud")
图 6负面词汇词云
(五)数据清洗
from termcolor import colored
from sklearn.model_selection import train_test_split
# 定义列名变量
COLUMNS = ['Sentiment', 'Id', 'Date', 'Flag', 'User', 'Tweet']
# 读取数据集
dataset = pd.read_csv('./twitter_dataset.csv', names=COLUMNS, encoding='latin-1')
print(colored("Columns: {}".format(', '.join(COLUMNS)), "yellow"))
# 去除额外的列
print(colored("Useful columns: Sentiment and Tweet", "yellow"))
print(colored("Removing other columns", "red"))
dataset.drop(['Id', 'Date', 'Flag', 'User'], axis = 1, inplace = True)
print(colored("Columns removed", "red"))
(六)拆分数据集并保存
#Train test split
print(colored("Splitting train and test dataset into 80:20", "yellow"))
X_train, X_test, y_train, y_test = train_test_split(dataset['Tweet'], dataset['Sentiment'], test_size = 0.20, random_state = 100)
train_dataset = pd.DataFrame({
'Tweet': X_train,
'Sentiment': y_train
})
print(colored("Train data distribution:", "yellow"))
print(train_dataset['Sentiment'].value_counts())
test_dataset = pd.DataFrame({
'Tweet': X_test,
'Sentiment': y_test
})
print(colored("Test data distribution:", "yellow"))
print(test_dataset['Sentiment'].value_counts())
print(colored("Split complete", "yellow"))
(七)自然语言数据预处理
import re
import nltk
import numpy as np
import pandas as pd
import ssl
try:
_create_unverified_https_context = ssl._create_unverified_context
except AttributeError:
pass
else:
ssl._create_default_https_context = _create_unverified_https_context
from nltk.corpus import stopwords
from termcolor import colored
from nltk.stem import PorterStemmer
from nltk.stem import WordNetLemmatizer
print("Loading data")
train_data = pd.read_csv('./train.csv')
test_data = pd.read_csv('./test.csv')
# 设置停词
STOPWORDS = set(stopwords.words('english'))
STOPWORDS.remove("not")
# 扩展推文的功能
def expand_tweet(tweet):
expanded_tweet = []
for word in tweet:
if re.search("n't", word):
expanded_tweet.append(word.split("n't")[0])
expanded_tweet.append("not")
else:
expanded_tweet.append(word)
return expanded_tweet
# 处理推文的函数
def clean_tweet(data, wordNetLemmatizer, porterStemmer):
data['Clean_tweet'] = data['Tweet']
print(colored("Removing user handles starting with @", "yellow"))
data['Clean_tweet'] = data['Clean_tweet'].str.replace("@[\w]*","")
print(colored("Removing numbers and special characters", "yellow"))
data['Clean_tweet'] = data['Clean_tweet'].str.replace("[^a-zA-Z' ]","")
print(colored("Removing urls", "yellow"))
data['Clean_tweet'] = data['Clean_tweet'].replace(re.compile(r"((www\.[^\s]+)|(https?://[^\s]+))"), "")
print(colored("Removing single characters", "yellow"))
data['Clean_tweet'] = data['Clean_tweet'].replace(re.compile(r"(^| ).( |$)"), " ")
print(colored("Tokenizing", "yellow"))
data['Clean_tweet'] = data['Clean_tweet'].str.split()
print(colored("Removing stopwords", "yellow"))
data['Clean_tweet'] = data['Clean_tweet'].apply(lambda tweet: [word for word in tweet if word not in STOPWORDS])
print(colored("Expanding not words", "yellow"))
data['Clean_tweet'] = data['Clean_tweet'].apply(lambda tweet: expand_tweet(tweet))
print(colored("Lemmatizing the words", "yellow"))
data['Clean_tweet'] = data['Clean_tweet'].apply(lambda tweet: [wordNetLemmatizer.lemmatize(word) for word in tweet])
print(colored("Stemming the words", "yellow"))
data['Clean_tweet'] = data['Clean_tweet'].apply(lambda tweet: [porterStemmer.stem(word) for word in tweet])
print(colored("Combining words back to tweets", "yellow"))
data['Clean_tweet'] = data['Clean_tweet'].apply(lambda tweet: ' '.join(tweet))
return data
# 定义处理方法
wordNetLemmatizer = WordNetLemmatizer()
porterStemmer = PorterStemmer()
# 推文的预处理以及文件保持
print(colored("Processing train data", "green"))
train_data = clean_tweet(train_data, wordNetLemmatizer, porterStemmer)
train_data.to_csv('./clean_train.csv', index=False)
print(colored("Train data processed and saved to data/clean_train.csv", "green"))
print(colored("Processing test data", "green"))
test_data = clean_tweet(test_data, wordNetLemmatizer, porterStemmer)
test_data.to_csv('./clean_test.csv', index=False)
print(colored("Test data processed and saved to data/clean_test.csv", "green"))
(八)深度学习进行预测分析
1.分词
# 载入数据
print(colored("Loading train and test data", "yellow"))
#由于数据量过大我们抽取部分数据进行测试
train_data = pd.read_csv('./clean_train.csv').sample(12800)
test_data = pd.read_csv('./clean_test.csv').sample(3200)
print(colored("Data loaded", "yellow"))
# Tokenization
print(colored("Tokenizing and padding data", "yellow"))
tokenizer = Tokenizer(num_words = 2000, split = ' ')
tokenizer.fit_on_texts(train_data['Clean_tweet'].astype(str).values)
train_tweets = tokenizer.texts_to_sequences(train_data['Clean_tweet'].astype(str).values)
max_len = max([len(i) for i in train_tweets])
train_tweets = pad_sequences(train_tweets, maxlen = max_len)
test_tweets = tokenizer.texts_to_sequences(test_data['Clean_tweet'].astype(str).values)
test_tweets = pad_sequences(test_tweets, maxlen = max_len)
print(colored("Tokenizing and padding complete", "yellow"))
2.利用深度学习进行自然语言情感分析
# 构建模型
print(colored("Creating the LSTM model", "yellow"))
#定义一个网络容器
model = Sequential()
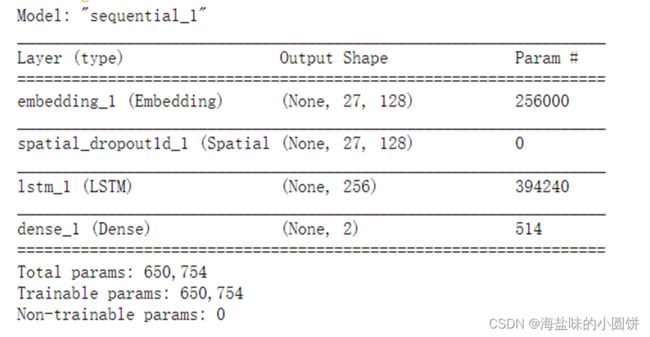
#降维:输入(input_length,2000)输出(input_length,128)
model.add(Embedding(2000, 128, input_length = train_tweets.shape[1]))
#随机失活 随机将百分之四十的值变为0
model.add(SpatialDropout1D(0.4))
#短时神经网络 输出256*1
model.add(LSTM(256, dropout = 0.2))
#全连接层输出未2*1激活函数softmax
model.add(Dense(2, activation = 'softmax'))
#超参数设置loss损失函数 optimizer学习率adam自适应学习率算法
model.compile(loss = 'categorical_crossentropy', optimizer = 'adam', metrics = ['accuracy'])
model.summary()
# 训练模型
print(colored("Training the LSTM model", "green"))
history = model.fit(train_tweets, pd.get_dummies(train_data['Sentiment']).values, epochs = 10, batch_size = 128, validation_split = 0.2)
print(colored(history, "green"))
# 测试模型
print(colored("Testing the LSTM model", "green"))
score, accuracy = model.evaluate(test_tweets, pd.get_dummies(test_data['Sentiment']).values, batch_size = 128)
print("Test accuracy: {}".format(accuracy))
四、实验结果
LSTM模型结构输出,全连接层输出2*1激活函数softmax;
图 7LSTM模型结构输出
训练集的准确率可以达到0.8539;
图 8训练数据
测试集的准确率可达0.7113;
图 9测试数据
五、总结
项目过程中遇到的一些问题:
(一)首先是数据集的下载,网上找了很多数据都不匹配,最后在天池阿里云中下载(数据集-阿里云天池);
(二)其次是NLTK语料库的下载,报图10的错误,根据原作者提供的思路更改网页权限(图11),还是未能解决。在大量的参考资料之后得出了以下可行办法:
- 进入cmd,在python中执行:
>>>import nltk
>>>nltk.downloads()
enter进入会出现图12的情况,将sever index更改为http://www.nltk.org/nltk_data/(如图13),即可下载到本地;
- 直接下载
链接:nltk_data/packages/corpora at gh-pages · nltk/nltk_data · GitHub;
图 10NLTK在线下载报错
图 11添加了nltk官网网页权限
图表 12nltkDownloader报错
图表 13server index更改后
(三)stopwords和wordnet存放路径错误
每个人的存放路径可能不相同,放于它提示的文件路径下即可。如图14。
图 14报错提示
六、引用
(1)知识图谱之WordNet_xieyan0811的博客-CSDN博客_wordnet知识库
(2)基于pytorch的文本分类(使用Sentiment140数据集)_ajiujiujiu的博客-CSDN博客
(3)nltk安装Wordnet出错[nltk_data] Error loading wordnet: <urlopen error [Errno 111]_LawsonAbs的博客-CSDN博客


