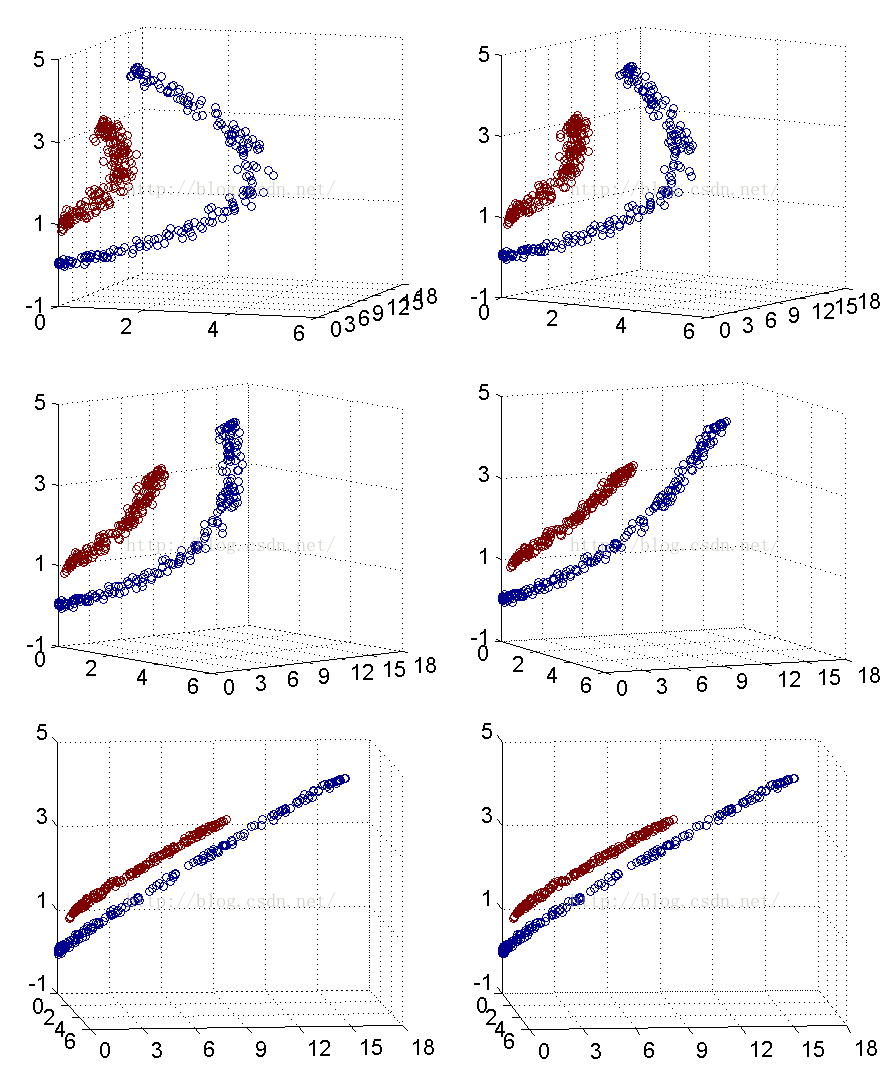
深度学习算法2-SVM的原理
1.SVM概述
在机器学习领域,支持向量机SVM(Support Vector Machine)是一个有监督的学习模型,通常用来进行模式识别、分类(异常值检测)以及回归分析。
其具有以下特征:
(1)SVM可以表示为凸优化问题,因此可以利用已知的有效算法发现目标函数的全局最小值。而其他分类方法都采用一种基于贪心学习的策略来搜索假设空间,这种方法一般只能获得局部最优解。
(2) SVM通过最大化决策边界的边缘来实现控制模型的能力。尽管如此,用户必须提供其他参数,如使用核函数类型和引入松弛变量等。
(3)SVM一般只能用在二类问题,对于多类问题效果不好。
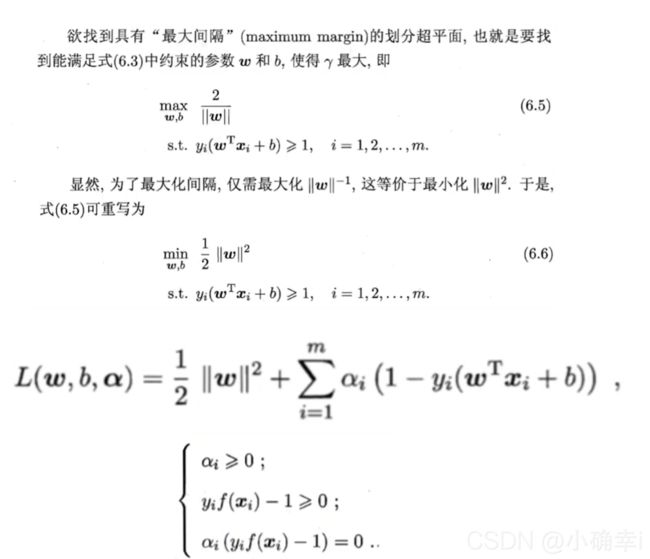
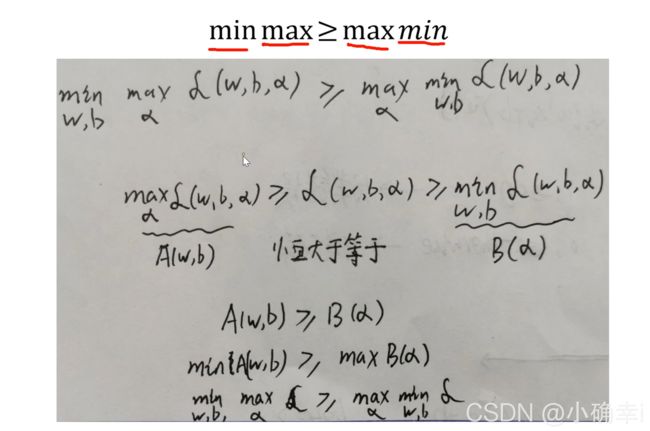
要求上述6.6的式子,需要使用拉格朗日乘子法
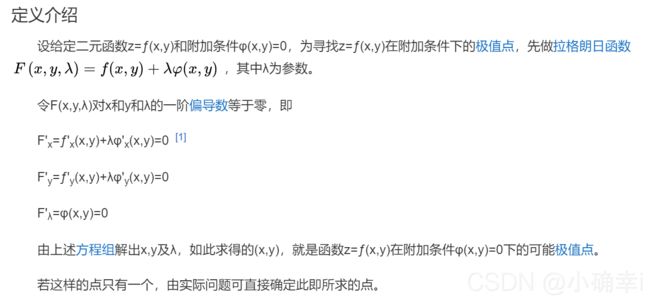
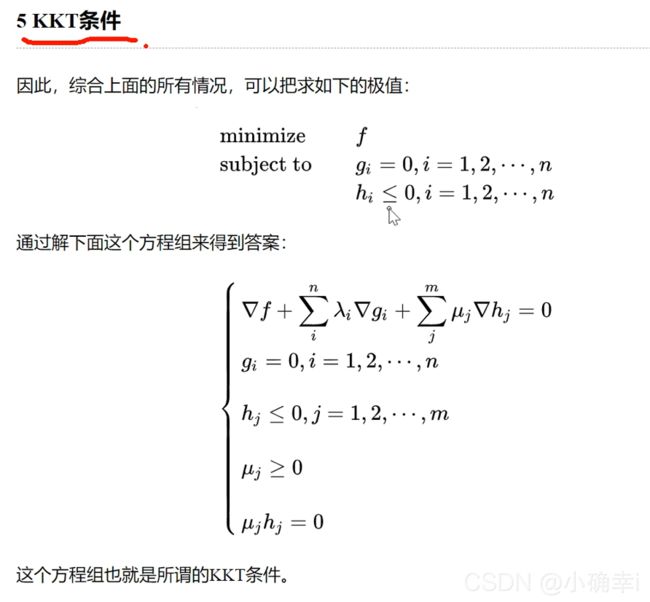
2.复习拉格朗日乘子法
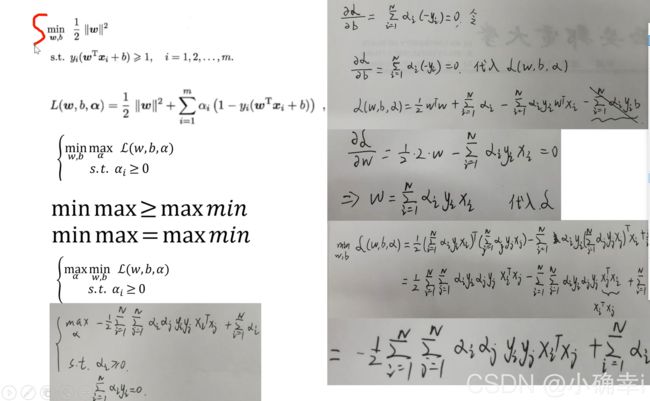
3.把原问题转化为对偶问题进行解决
ps: 对偶问题的证明
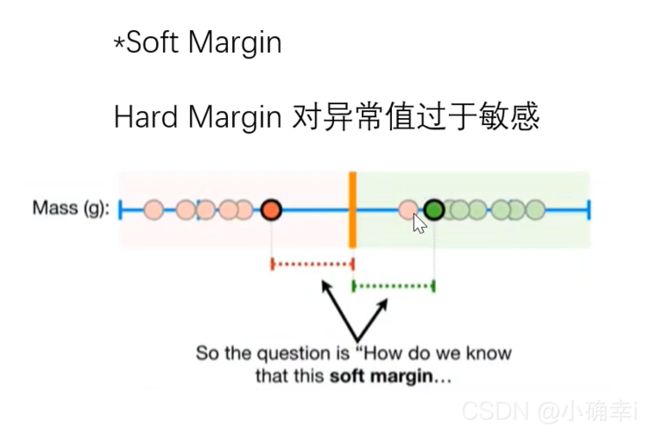
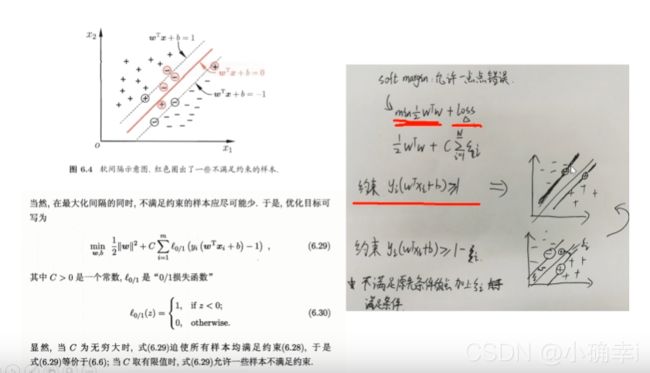
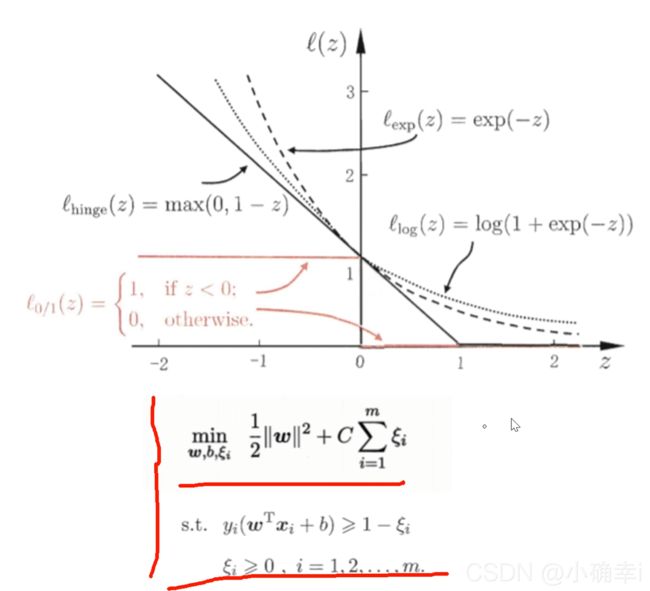
4.SoftMargin
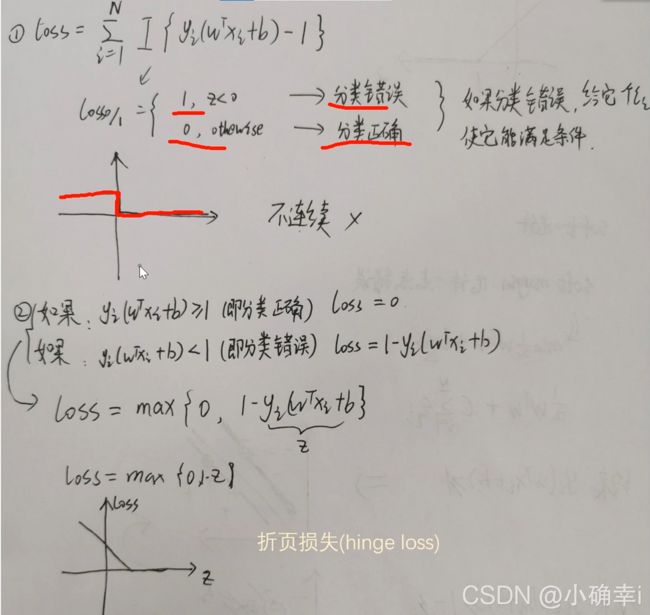
loss损失函数
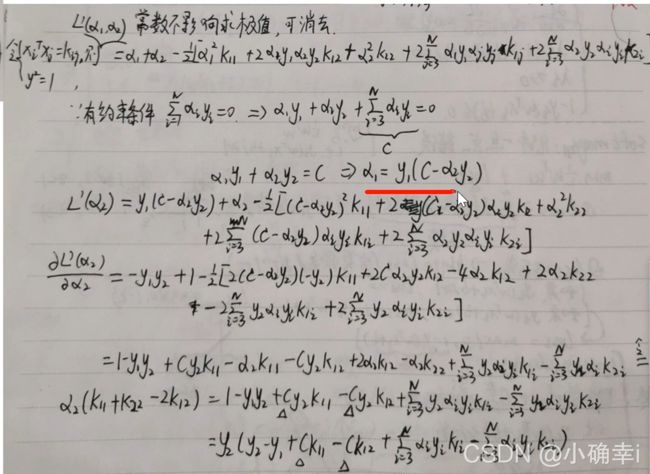
5.SMO算法
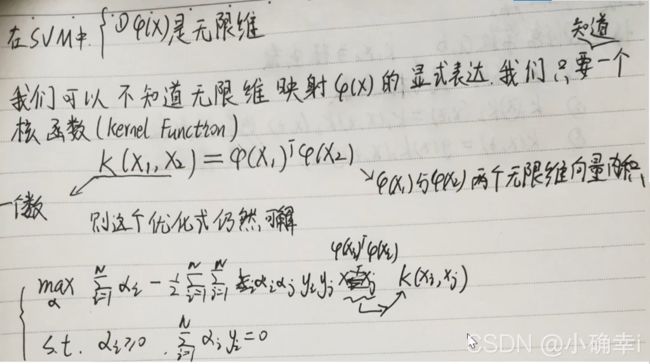
6.核函数
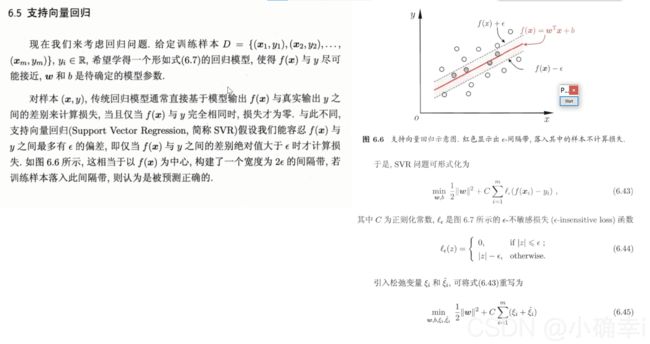
7.SVM回归
代码截图:
from sklearn import svm
import numpy as np
import matplotlib.pyplot as plt

# 准备训练样本
x = [[1, 8], [3, 20], [1, 15], [3, 35], [5, 35], [4, 40], [7, 80], [6, 49]]
y = [1, 1, -1, -1, 1, -1, -1, 1]

# 开始训练
clf = svm.SVC()  # 默认参数:kernel='rbf'
clf.fit(x, y)

# print("预测...")
# res=clf.predict([[2,2]])  # 两个方括号表面传入的参数是矩阵而不是list

# 根据训练出的模型绘制样本点
for i in x:
    res = clf.predict(np.array(i).reshape(1, -1))
    if res > 0:
        plt.scatter(i[0], i[1], c='r', marker='*')
    else:
        plt.scatter(i[0], i[1], c='g', marker='*')

# 生成随机实验数据(15行2列)
rdm_arr = np.random.randint(1, 15, size=(15, 2))
# 回执实验数据点
for i in rdm_arr:
    res = clf.predict(np.array(i).reshape(1, -1))
    if res > 0:
        plt.scatter(i[0], i[1], c='r', marker='.')
    else:
        plt.scatter(i[0], i[1], c='g', marker='.')
# 显示绘图结果
plt.show()
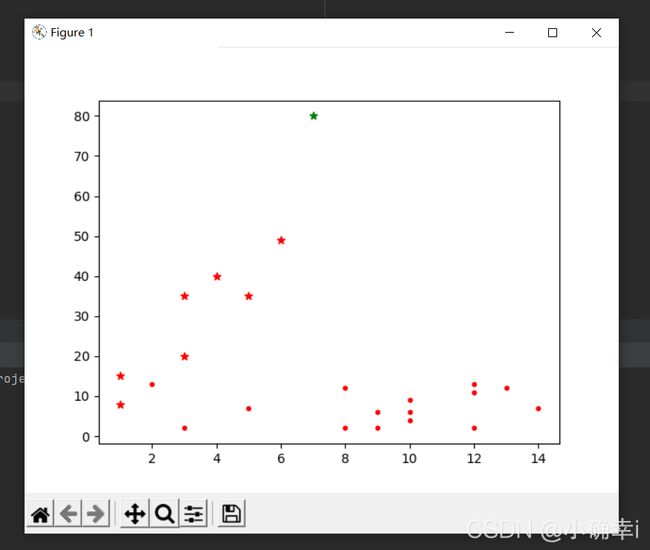
代码结果:
在上面的代码中提到了kernel='rbf',这个参数是SVM的核心:核函数
重新整理后的代码如下:
from sklearn import svm
import numpy as np
import matplotlib.pyplot as plt

# 设置子图数量
fig, axes = plt.subplots(nrows=2, ncols=2, figsize=(7, 7))
ax0, ax1, ax2, ax3 = axes.flatten()

# 准备训练样本
x = [[1, 8], [3, 20], [1, 15], [3, 35], [5, 35], [4, 40], [7, 80], [6, 49]]
y = [1, 1, -1, -1, 1, -1, -1, 1]
'''
    说明1:
       核函数(这里简单介绍了sklearn中svm的四个核函数,还有precomputed及自定义的)

    LinearSVC:主要用于线性可分的情形。参数少,速度快,对于一般数据,分类效果已经很理想
    RBF:主要用于线性不可分的情形。参数多,分类结果非常依赖于参数
    polynomial:多项式函数,degree 表示多项式的程度-----支持非线性分类
    Sigmoid:在生物学中常见的S型的函数,也称为S型生长曲线

    说明2:根据设置的参数不同,得出的分类结果及显示结果也会不同

'''
# 设置子图的标题
titles = ['LinearSVC (linear kernel)',
          'SVC with polynomial (degree 3) kernel',
          'SVC with RBF kernel',  # 这个是默认的
          'SVC with Sigmoid kernel']
# 生成随机试验数据(15行2列)
rdm_arr = np.random.randint(1, 15, size=(15, 2))


def drawPoint(ax, clf, tn):
    # 绘制样本点
    for i in x:
        ax.set_title(titles[tn])
        res = clf.predict(np.array(i).reshape(1, -1))
        if res > 0:
            ax.scatter(i[0], i[1], c='r', marker='*')
        else:
            ax.scatter(i[0], i[1], c='g', marker='*')
    # 绘制实验点
    for i in rdm_arr:
        res = clf.predict(np.array(i).reshape(1, -1))
        if res > 0:
            ax.scatter(i[0], i[1], c='r', marker='.')
        else:
            ax.scatter(i[0], i[1], c='g', marker='.')


if __name__ == "__main__":
    # 选择核函数
    for n in range(0, 4):
        if n == 0:
            clf = svm.SVC(kernel='linear').fit(x, y)
            drawPoint(ax0, clf, 0)
        elif n == 1:
            clf = svm.SVC(kernel='poly', degree=3).fit(x, y)
            drawPoint(ax1, clf, 1)
        elif n == 2:
            clf = svm.SVC(kernel='rbf').fit(x, y)
            drawPoint(ax2, clf, 2)
        else:
            clf = svm.SVC(kernel='sigmoid').fit(x, y)
            drawPoint(ax3, clf, 3)
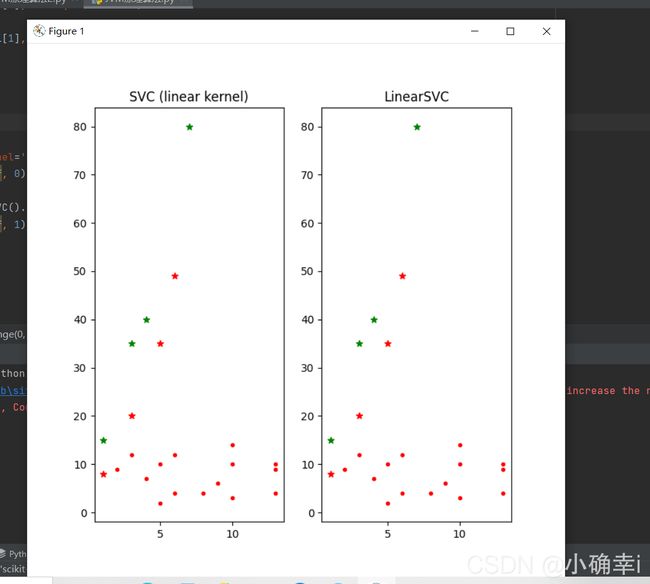
plt.show()由于样本数据的关系,四个核函数得出的结果一致。在实际操作中,应该选择效果最好的核函数分析。
在svm模块中还有一个较为简单的线性分类函数:LinearSVC(),其不支持kernel参数,因为设计思想就是线性分类。如果确定数据
可以进行线性划分,可以选择此函数。跟kernel='linear'用法对比如下:
from sklearn import svm
import numpy as np
import matplotlib.pyplot as plt

# 设置子图数量
fig, axes = plt.subplots(nrows=1, ncols=2, figsize=(7, 7))
ax0, ax1 = axes.flatten()

# 准备训练样本
x = [[1, 8], [3, 20], [1, 15], [3, 35], [5, 35], [4, 40], [7, 80], [6, 49]]
y = [1, 1, -1, -1, 1, -1, -1, 1]

# 设置子图的标题
titles = ['SVC (linear kernel)',
          'LinearSVC']

# 生成随机试验数据(15行2列)
rdm_arr = np.random.randint(1, 15, size=(15, 2))


# 画图函数
def drawPoint(ax, clf, tn):
    # 绘制样本点
    for i in x:
        ax.set_title(titles[tn])
        res = clf.predict(np.array(i).reshape(1, -1))
        if res > 0:
            ax.scatter(i[0], i[1], c='r', marker='*')
        else:
            ax.scatter(i[0], i[1], c='g', marker='*')
    # 绘制实验点
    for i in rdm_arr:
        res = clf.predict(np.array(i).reshape(1, -1))
        if res > 0:
            ax.scatter(i[0], i[1], c='r', marker='.')
        else:
            ax.scatter(i[0], i[1], c='g', marker='.')


if __name__ == "__main__":
    # 选择核函数
    for n in range(0, 2):
        if n == 0:
            clf = svm.SVC(kernel='linear').fit(x, y)
            drawPoint(ax0, clf, 0)
        else:
            clf = svm.LinearSVC().fit(x, y)
            drawPoint(ax1, clf, 1)
    plt.show()
最大间隔分类器Maximum Margin Classifier:
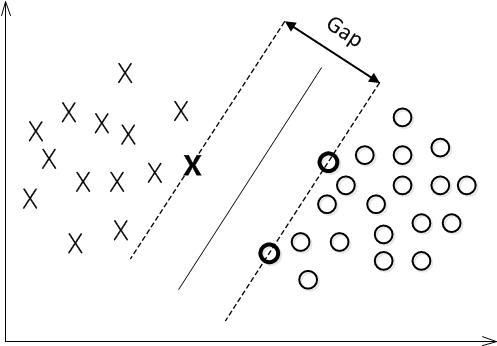
简称MMH, 对一个数据点进行分类,当超平面离数据点的“间隔”越大,分类的确信度(confidence)也越大。所以,为了使得分类的确信度尽量高,需要让所选择的超平面能够最大化这个“间隔”值。这个间隔就是下图中的Gap的一半。
用以生成支持向量的点,如上图XO,被称为支持向量点,因此SVM有一个优点,就是即使有大量的数据,但是支持向量点是固定的,因此即使再次训练大量数据,这个超平面也可能不会变化。
非线性分类:
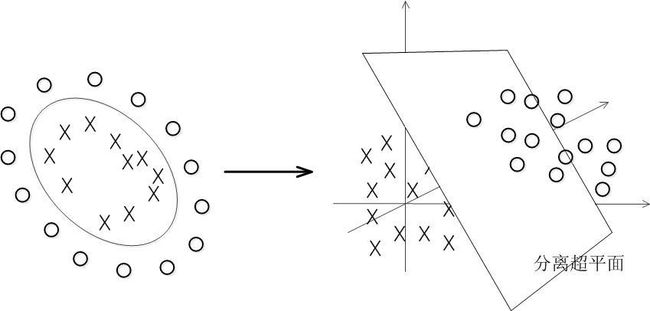
解决方法是将数据放到高维度上再进行分割,如下图:
当f(x)=x时,这组数据是个直线,如上半部分,但是当我把这组数据变为f(x)=x^2时,这组数据就变成了下半部分的样子,也就可以被红线所分割。
核函数Kernel:
我们会经常遇到线性不可分的样例,此时,我们的常用做法是把样例特征映射到高维空间中去。但进一步,如果凡是遇到线性不可分的样例,一律映射到高维空间,那么这个维度大小是会高到可怕的,而且内积方式复杂度太大。此时,核函数就隆重登场了,核函数的价值在于它虽然也是讲特征进行从低维到高维的转换,但核函数绝就绝在它事先在低维上进行计算,而将实质上的分类效果表现在了高维上,也就如上文所说的避免了直接在高维空间中的复杂计算。
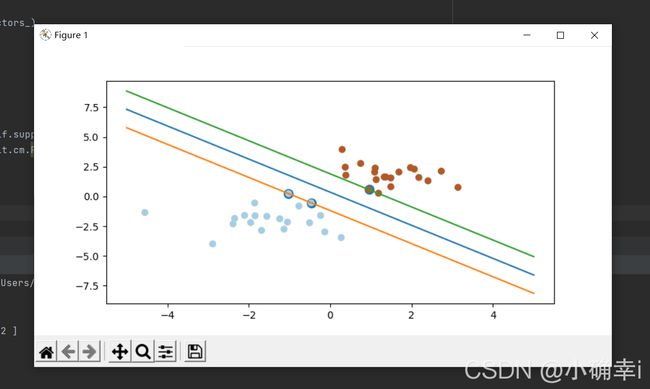
代码:
from sklearn import svm
import numpy as np
import matplotlib.pyplot as plt

np.random.seed(0)
x = np.r_[np.random.randn(20, 2) - [2, 2], np.random.randn(20, 2) + [2, 2]]  # 正态分布来产生数字,20行2列*2
y = [0] * 20 + [1] * 20  # 20个class0,20个class1

clf = svm.SVC(kernel='linear')
clf.fit(x, y)

w = clf.coef_[0]  # 获取w
a = -w[0] / w[1]  # 斜率
# 画图划线
xx = np.linspace(-5, 5)  # (-5,5)之间x的值
yy = a * xx - (clf.intercept_[0]) / w[1]  # xx带入y,截距

# 画出与点相切的线
b = clf.support_vectors_[0]
yy_down = a * xx + (b[1] - a * b[0])
b = clf.support_vectors_[-1]
yy_up = a * xx + (b[1] - a * b[0])

print("W:", w)
print("a:", a)

print("support_vectors_:", clf.support_vectors_)
print("clf.coef_:", clf.coef_)

plt.figure(figsize=(8, 4))
plt.plot(xx, yy)
plt.plot(xx, yy_down)
plt.plot(xx, yy_up)
plt.scatter(clf.support_vectors_[:, 0], clf.support_vectors_[:, 1], s=80)
plt.scatter(x[:, 0], x[:, 1], c=y, cmap=plt.cm.Paired)  # [:,0]列切片,第0列

plt.axis('tight')

plt.show()
代码结果:
参考:(10条消息) 机器学习:Python中如何使用支持向量机(SVM)算法_一梦南柯-CSDN博客
https://www.jb51.net/article/131580.htm


