Paper Reading - 2、PatchCore: Towards Total Recall in Industrial Anomaly Detection
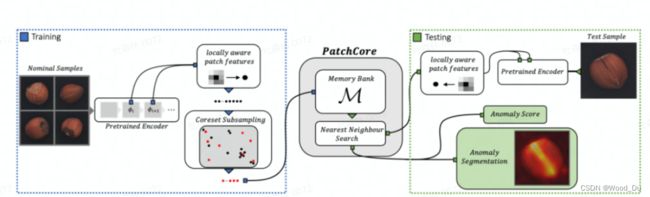
PatchCore 模型架构:
Patch: 所谓补丁,指的是像素;
Embedding: 所谓嵌入,指的是将网络提取的不同特征组合到一块;

训练流程:无神经网络参数更新,不需要训练,不需要更新参数 requires_grad==false,只需要使用预训练模型提取特征,构建 Memory Bank 相当于使用正常数据进行模型训练、构建。

推理流程:提取Patch特征,再Faiss搜索。
Pretrained Encoder: 使用预训练模型(wide_resnet50_2) backbone 提取图像特征, 采用[2, 3]层特征作为图像特征,具有较强的底层特征(轮廓、边缘、颜色、纹理和形状特征),更能够反映图像内容。不采用最后几层原因:深层特征偏向于分类任务,具有更强的语义信息。
Locally aware patch features:提取图像的 Patch特征,这个特征带有周围数据的信息。特征值的集合构建 PatchCore memory bank。
for feature in features:
    m = torch.nn. AvgPool2d(3, 1, 1)
    embeddings.append(m(feature)) # 特征值:以(h,w)为中心的邻居点集得到,论文中说使用adaptive average pooling. 实验使用AvgPool2d,指标更高。
# embedding_concat:特征连接,参考 https://github.com/xiahaifeng1995/PaDiM-Anomaly-Detection-Localization-master
embedding = embedding_concat(embeddings[0], embeddings[1])
# reshape: 维度变换
self.embedding_list.extend(reshape_embedding(np.array(embedding)))
1、PatchCore与PaDiM对比: patchcore 使用高效的patch-feature memory bank, 在测试时所有patch都可以访问该内存库。 PaDiM 是针对每个 patch 的马氏距离度量。 相比之下, PatchCore对图像对齐的依赖性降低。
2、特征提取:特征表示为何不选择网络特征层次的最后一级:(1)会丢失更多的局部正常样本信息;(2)深层特征具有更强的语义信息,偏向于分类任务。
3、patch特征:可以理解为 训练图片上所有的点,以该点为中心的邻居点集得到的特征值,特征值的集合就是 PatchCore memory bank。
以( h , w ) 为中心,以p 为直径的正方形包围住的点;

围绕这些点计算的特征图上的点为:

一张图像的Patch特征集合:

正常训练集图像的Patch特征集合:

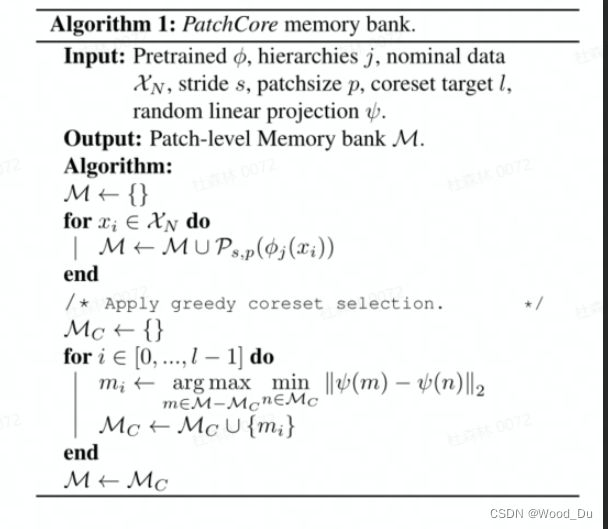
Coreset-reduced patch-feature memory bank:Coreset Subsampling 核心集二次抽样:稀疏采样 目的是Reduce memory bank,加快算法运行速度。
# Memory Bank:将收集到的正常图像 Patch 特征放入 MemoryBank
total_embeddings = np.array(self.embedding_list)
# Random projection  随机投影
self.randomprojector = SparseRandomProjection(n_components='auto', eps=0.9) # 'auto' => Johnson-Lindenstrauss lemma
self.randomprojector.fit(total_embeddings)
# Coreset Subsampling 核心集二次抽样:稀疏采样 Reduce memory bank
# 参考 https://github.com/google/active-learning/blob/master/sampling_methods/kcenter_greedy.py
selector = kCenterGreedy(total_embeddings,0,0)
selected_idx = selector.select_batch(model=self.randomprojector, already_selected=[], N=int(total_embeddings.shape[0]*args.coreset_sampling_ratio))
self.embedding_coreset = total_embeddings[selected_idx]
NP-Hard问题,建议使用迭代贪婪近似。

Anomaly Detection with PatchCore:
features = self(x)
embeddings = []
for feature in features:
    m = torch.nn.AvgPool2d(3, 1, 1)
    embeddings.append(m(feature))
embedding_ = embedding_concat(embeddings[0], embeddings[1])
embedding_test = np.array(reshape_embedding(np.array(embedding_)))
score_patches, _ = self.index.search(embedding_test , k=args.n_neighbors)
anomaly_map = score_patches[:,0].reshape((28,28))
N_b = score_patches[np.argmax(score_patches[:,0])]
# 论文解释:
'''
To obtain s, we use a scaling w on s∗ to account for the behaviour of neighbouring patches:
    If the memory bank features closest to the anomaly candidate mtest,∗, m∗,
    is itself relatively far from neighbouring samples and thereby an already rare nominal occurence,
    we increase the anomaly score
    如果内存库特征最接近异常候选 m^test,* , m^*, 本身距离近邻样本相对较远,因此是少见的正常发生,使用权重增加异常分数。
    相当于计算了一个softmax
'''
w = (1 - (np.max(np.exp(N_b))/np.sum(np.exp(N_b))))
score = w*max(score_patches[:,0]) # Image-level score
gt_np = gt.cpu().numpy()[0,0].astype(int)
# 将结果放大:匹配原始输入分辨率
anomaly_map_resized = cv2.resize(anomaly_map, (args.input_size, args.input_size))
# 高斯平滑
anomaly_map_resized_blur = gaussian_filter(anomaly_map_resized, sigma=4)
提取Patch特征:
![]()
计算异常值分数:集合P(Xtest) 到M的距离。公式arg min ||m_test - m|| 表示点m_test到集合M的距离,然后找到最远的点m_test, *。


复现:
环境问题:
# 原有环境:存在问题:roc_auc_score 不高,且在coreset_sampling_ratio=0.1,
# 文件较大(100M)时候报错:Faiss assertion 'err == CUBLAS_STATUS_SUCCESS' failed in void faiss::gpu::runMatrixMult(faiss::gpu::Tensor&, bool, faiss::gpu::Tensor&, bool, faiss::gpu::Tensor&, bool, float, float, cublasHandle_t, cudaStream_t) [with AT = float; BT = float; cublasHandle_t = cublasContext*; cudaStream_t = CUstream_st*] at /project/faiss/faiss/gpu/utils/MatrixMult-inl.cuh:265; details: cublas failed (13): (512, 1536) x (16385, 1536)' = (512, 16385) gemm params m 16385 n 512 k 1536 trA T trB N lda 1536 ldb 1536 ldc 16385
pytorch-lightning==1.2.0
torch==1.9.0+cu111
faiss-gpu==1.7.1.post3

# 尝试解决:重新安装faiss-gpu; 结果:roc_auc_score在0.001,0.01的指标变得正常,在0.1(coreset_sampling_ratio越大)时候,稀疏采样(selector.select_batch)越慢 ,
conda install -c pytorch faiss-gpu cudatoolkit=11.0
常用的自定义数据格式:
data:
├── test
│   ├── good
│   └── ng
└── train
    └── good
Resource:
Paper: https://arxiv.org/abs/2106.08265
Code: https://github.com/hcw-00/PatchCore_anomaly_detection
论文解读:https://blog.csdn.net/fuyouzhiyi/article/details/124725323
https://www.zywvvd.com/notes/study/deep-learning/anomaly-detection/patchcore/patchcore/