DGraphDTA神经网络架构源码分析 2021SC@SDUSC
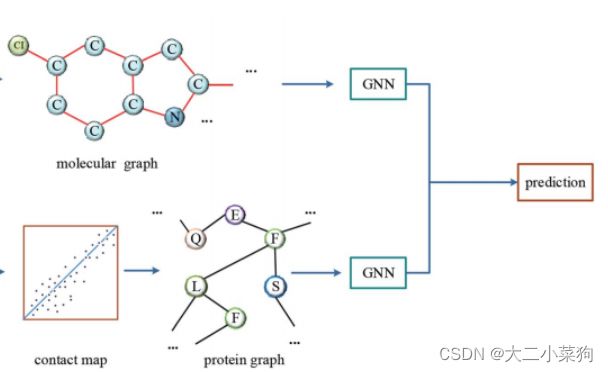
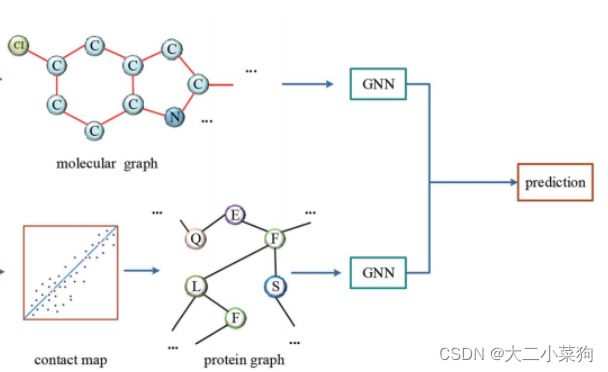
2021SC@SDUSC 在此前的文章已经对此部分的流程进行了解读,本文将基于目前已经获取到分子图与蛋白质图,从代码的层面分析DGraphDTA任务中神经网络的结构以及运作流程。
网络结构完整代码:
# GCN based model
class GNNNet(torch.nn.Module):

#初始化网络结构
    def __init__(self, n_output=1, num_features_pro=54, num_features_mol=78, output_dim=128, dropout=0.2):
        super(GNNNet, self).__init__()

        #设置分子gnn的网络结构
        print('GNNNet Loaded')
        self.n_output = n_output#设置最终的输出为1维,亲和力值

        self.mol_conv1 = GCNConv(num_features_mol, num_features_mol) #input 78 output 78
        self.mol_conv2 = GCNConv(num_features_mol, num_features_mol * 2) #input 78 output 156
        self.mol_conv3 = GCNConv(num_features_mol * 2, num_features_mol * 4) #input 156 output 312
        self.mol_fc_g1 = torch.nn.Linear(num_features_mol * 4, 1024) #线性层 input 312 output 1024
        self.mol_fc_g2 = torch.nn.Linear(1024, output_dim) #input 1024 output 128

        #设置蛋白质gnn的网络结构
        # self.pro_conv1 = GCNConv(embed_dim, embed_dim)
        self.pro_conv1 = GCNConv(num_features_pro, num_features_pro) #54 54
        self.pro_conv2 = GCNConv(num_features_pro, num_features_pro * 2) #54 54*2
        self.pro_conv3 = GCNConv(num_features_pro * 2, num_features_pro * 4) #54*2 54*4
        # self.pro_conv4 = GCNConv(embed_dim * 4, embed_dim * 8)
        self.pro_fc_g1 = torch.nn.Linear(num_features_pro * 4, 1024)
        self.pro_fc_g2 = torch.nn.Linear(1024, output_dim) #128

        #设置激活函数relu与dropout防止过拟合
        self.relu = nn.ReLU()
        self.dropout = nn.Dropout(dropout)


        # combined layers 设置全连接层
        self.fc1 = nn.Linear(2 * output_dim, 1024)
        self.fc2 = nn.Linear(1024, 512)
        self.out = nn.Linear(512, self.n_output)

        #思考:初始化部分仅仅定义了分子图、蛋白质图以及最后的全连接层,如何将三者结合成为DTA任务的运行结构应该是在forward中进行定义

#设置前向传播方式 (参数为网络的输入)
    def forward(self, data_mol, data_pro):
        # get graph input 拆分获得分子的信息
        mol_x, mol_edge_index, mol_batch = data_mol.x, data_mol.edge_index, data_mol.batch
        # get protein input 拆分获取蛋白质的信息
        target_x, target_edge_index, target_batch = data_pro.x, data_pro.edge_index, data_pro.batch

        # target_seq=data_pro.target

        # print('size')
        # print('mol_x', mol_x.size(), 'edge_index', mol_edge_index.size(), 'batch', mol_batch.size())
        # print('target_x', target_x.size(), 'target_edge_index', target_batch.size(), 'batch', target_batch.size())

        #x将作为分子每一层处理完毕之后的产物
        #将参数中输入的分子送入mol_conv1并经过一个激活函数
        x = self.mol_conv1(mol_x, mol_edge_index)
        x = self.relu(x)

        #经过第二层gnn并经过relu完成数据的非线性变换
        # mol_edge_index, _ = dropout_adj(mol_edge_index, training=self.training)
        x = self.mol_conv2(x, mol_edge_index)
        x = self.relu(x)

        #同理,第三层(额外添加了一个池化操作以减少参数量)
        # mol_edge_index, _ = dropout_adj(mol_edge_index, training=self.training)
        x = self.mol_conv3(x, mol_edge_index)
        x = self.relu(x)
        x = gep(x, mol_batch)  # global pooling全局池化


        # flatten
        x = self.relu(self.mol_fc_g1(x)) #经过全连接层mol_fc_g1,relu激活
        x = self.dropout(x) #经过dropout防止过拟合
        x = self.mol_fc_g2(x) #再次经过全连接mol_fc_g2
        x = self.dropout(x) #再次dropout得到最终结果

        #蛋白质部分与上述分子部分同理,不再注释
        xt = self.pro_conv1(target_x, target_edge_index)
        xt = self.relu(xt)

        # target_edge_index, _ = dropout_adj(target_edge_index, training=self.training)
        xt = self.pro_conv2(xt, target_edge_index)
        xt = self.relu(xt)

        # target_edge_index, _ = dropout_adj(target_edge_index, training=self.training)
        xt = self.pro_conv3(xt, target_edge_index)
        xt = self.relu(xt)

        # xt = self.pro_conv4(xt, target_edge_index)
        # xt = self.relu(xt)
        xt = gep(xt, target_batch)  # global pooling

        # flatten
        xt = self.relu(self.pro_fc_g1(xt))
        xt = self.dropout(xt)
        xt = self.pro_fc_g2(xt)
        xt = self.dropout(xt)


        #全连接层
        # print(x.size(), xt.size())
        # concat 将上述分别经过了各种gnn的分子和蛋白质得到的特征进行拼接(参数1代表拼接完还是一条向量,否则是矩阵
        xc = torch.cat((x, xt), 1)
        # add some dense layers
        xc = self.fc1(xc) #经过全连接层
        xc = self.relu(xc) #经过激活
        xc = self.dropout(xc) #dropout防止过拟合
        xc = self.fc2(xc) #重复操作
        xc = self.relu(xc)
        xc = self.dropout(xc)
        out = self.out(xc) #得到最终预测值
        return out
逐段分析:
首先是网络初始化函数部分,初始化模型所需参数为:最终输出维度n_output,蛋白质输入特征维度num_features_pro,分子输入特征维度num_features_mol,两者(分子 and 蛋白质)图网络提取特征维度,以及dropout率
 def __init__(self, n_output=1, num_features_pro=54, num_features_mol=78, output_dim=128, dropout=0.2):
        super(GNNNet, self).__init__()
分子图网络初始化,结构为三层GCN加两层线性全连接层
self.n_output = n_output#设置最终的输出为1维,亲和力值

self.mol_conv1 = GCNConv(num_features_mol, num_features_mol) #input 78 output 78
self.mol_conv2 = GCNConv(num_features_mol, num_features_mol * 2) #input 78 output 156
self.mol_conv3 = GCNConv(num_features_mol * 2, num_features_mol * 4) #input 156 output 312
self.mol_fc_g1 = torch.nn.Linear(num_features_mol * 4, 1024) #线性层 input 312 output 1024
self.mol_fc_g2 = torch.nn.Linear(1024, output_dim) #input 1024 output 128
蛋白质图网络初始化,与分子图基本一致(不同点仅在于输入维度)
#设置蛋白质gnn的网络结构
# self.pro_conv1 = GCNConv(embed_dim, embed_dim)
self.pro_conv1 = GCNConv(num_features_pro, num_features_pro) #54 54
self.pro_conv2 = GCNConv(num_features_pro, num_features_pro * 2) #54 54*2
self.pro_conv3 = GCNConv(num_features_pro * 2, num_features_pro * 4) #54*2 54*4
# self.pro_conv4 = GCNConv(embed_dim * 4, embed_dim * 8)
self.pro_fc_g1 = torch.nn.Linear(num_features_pro * 4, 1024)
self.pro_fc_g2 = torch.nn.Linear(1024, output_dim) #128
初始化网络中所用的激活函数为relu与dropout值
#设置激活函数relu与dropout防止过拟合
self.relu = nn.ReLU()
self.dropout = nn.Dropout(dropout)
初始化全连接层
# combined layers 设置全连接层
self.fc1 = nn.Linear(2 * output_dim, 1024)
self.fc2 = nn.Linear(1024, 512)
self.out = nn.Linear(512, self.n_output)
上述初始化部分仅仅定义了分子图、蛋白质图以及最后的全连接层,如何将三者结合成为DTA任务的运行结构会在下面的forward中进行实现。
设置前向传播的方式,输入的参数为分子与蛋白质图数据
def forward(self, data_mol, data_pro):
对输入的参数进行拆分后赋值作为网络的输入
# get graph input 拆分获得分子的信息
mol_x, mol_edge_index, mol_batch = data_mol.x, data_mol.edge_index, data_mol.batch
# get protein input 拆分获取蛋白质的信息
target_x, target_edge_index, target_batch = data_pro.x, data_pro.edge_index, data_pro.batch
将拆分出来的分子图数据经过分子gnn处理(详细过程见下图注释),最终提取的特征存在变量x中
#x将作为分子每一层处理完毕之后的产物
#将参数中输入的分子送入mol_conv1并经过一个激活函数
x = self.mol_conv1(mol_x, mol_edge_index)
x = self.relu(x)

#经过第二层gnn并经过relu完成数据的非线性变换
# mol_edge_index, _ = dropout_adj(mol_edge_index, training=self.training)
x = self.mol_conv2(x, mol_edge_index)
x = self.relu(x)

#同理,第三层(额外添加了一个池化操作以减少参数量)
# mol_edge_index, _ = dropout_adj(mol_edge_index, training=self.training)
x = self.mol_conv3(x, mol_edge_index)
x = self.relu(x)
x = gep(x, mol_batch)  # global pooling全局池化


# flatten
x = self.relu(self.mol_fc_g1(x)) #经过全连接层mol_fc_g1,relu激活
x = self.dropout(x) #经过dropout防止过拟合
x = self.mol_fc_g2(x) #再次经过全连接mol_fc_g2
x = self.dropout(x) #再次dropout得到最终结果
同理,将拆分出来的蛋白质图数据经过蛋白质gnn处理(详细过程见下图注释),最终提取的特征存在变量xt中
#蛋白质部分与上述分子部分同理,不再注释
xt = self.pro_conv1(target_x, target_edge_index)
xt = self.relu(xt)

# target_edge_index, _ = dropout_adj(target_edge_index, training=self.training)
xt = self.pro_conv2(xt, target_edge_index)
xt = self.relu(xt)

# target_edge_index, _ = dropout_adj(target_edge_index, training=self.training)
xt = self.pro_conv3(xt, target_edge_index)
xt = self.relu(xt)

# xt = self.pro_conv4(xt, target_edge_index)
# xt = self.relu(xt)
xt = gep(xt, target_batch)  # global pooling

# flatten
xt = self.relu(self.pro_fc_g1(xt))
xt = self.dropout(xt)
xt = self.pro_fc_g2(xt)
xt = self.dropout(xt)
将x和xt拼接后送入全连接层进行预测,最后返回值为预测值out,完成前向传播
#全连接层
# concat 将上述分别经过了各种gnn的分子和蛋白质得到的特征进行拼接(参数1代表拼接完还是一条向量,否则拼接为矩阵
xc = torch.cat((x, xt), 1)
# add some dense layers
xc = self.fc1(xc) #经过全连接层
xc = self.relu(xc) #经过激活
xc = self.dropout(xc) #dropout防止过拟合
xc = self.fc2(xc) #重复操作
xc = self.relu(xc)
xc = self.dropout(xc)
out = self.out(xc) #得到最终预测值
return out
至此,DGraphDTA任务网络结构源码分析结束。
