opencv-python学习【6】阈值处理
文章目录
- 相关函数
-
- 1. cv2.threshold
-
- 示例1:固定阈值
- 示例2:Otsu 最优阈值
- 2. cv2.adaptiveThreshold
-
- 计算说明:
- 示例:
将图像内像素值高于一定值或低于一定值的像素点处理为固定值的过程称为阈值处理。对于色彩均衡或色彩不均衡的图像,有不同的阈值处理方法。
相关函数
1. cv2.threshold
该方式适用于色彩均衡的图像,直接使用一个阈值就能完成对图像的阈值化处理,阈值一般设置为 127。
retval, dst = cv2.threshold(src, thresh, maxval, type)
- retval:返回的阈值
- dst:返回的结果图像
- src:输入的原始图像
- thresh:要设定的阈值
- type:阈值分割的类型
- maxval:当 type 为
cv2.THRESH_BINARY或cv2.THRESH_BINARY_INV是对应的最大值
type 参数种类:
| 类型 | 定义 | 说明 |
|---|---|---|
cv2.THRESH_BINARY二值化阈值处理 |
d s t ( x , y ) = { m a x v a l , s t r ( x , y ) > t h r e s h 0 , o t h e r dst(x,y)=\left\{ \begin{matrix}maxval,&str(x,y)>thresh\\0,&other\end{matrix}\right. dst(x,y)={maxval,0,str(x,y)>threshother | 大于阈值 thresh 的像素值修改为最大值 maxval,其余像素值修改为 0 |
cv2.THRESH_BINARY_INV反二值化阈值处理 |
d s t ( x , y ) = { 0 , s t r ( x , y ) > t h r e s h m a x v a l , o t h e r dst(x,y)=\left\{ \begin{matrix}0,&str(x,y)>thresh\\maxval,&other\end{matrix}\right. dst(x,y)={0,maxval,str(x,y)>threshother | 大于阈值 thresh 的像素值修改为 0,其余像素值修改为 最大值 maxval |
cv2.THRESH_TRUNC截断阈值化处理 |
d s t ( x , y ) = { t h r e s h , s t r ( x , y ) > t h r e s h s r c ( x , y ) , o t h e r dst(x,y)=\left\{ \begin{matrix}thresh,&str(x,y)>thresh\\src(x,y),&other\end{matrix}\right. dst(x,y)={thresh,src(x,y),str(x,y)>threshother | 大于阈值 thresh 的像素值修改为该阈值,其余像素值不变 |
cv2.THRESH_TOZERO低阈值零处理 |
d s t ( x , y ) = { s r c ( x , y ) , s t r ( x , y ) > t h r e s h 0 , o t h e r dst(x,y)=\left\{ \begin{matrix}src(x,y),&str(x,y)>thresh\\0,&other\end{matrix}\right. dst(x,y)={src(x,y),0,str(x,y)>threshother | 大于阈值 thresh 的像素值不变,其余像素值修改为 0 |
cv2.THRESH_TOZERO_INV超阈值零处理 |
d s t ( x , y ) = { 0 , s t r ( x , y ) > t h r e s h s r c ( x , y ) , o t h e r dst(x,y)=\left\{ \begin{matrix}0,&str(x,y)>thresh\\src(x,y),&other\end{matrix}\right. dst(x,y)={0,src(x,y),str(x,y)>threshother | 大于阈值 thresh 的像素值修改为 0,其余像素值不变 |
cv2.THRESH_OTSU |
使用 Otsu 算法时的可选阈值参数 | 上述类型的阈值都是固定的,添加这个参数后函数自动寻找最优阈值 |
示例1:固定阈值
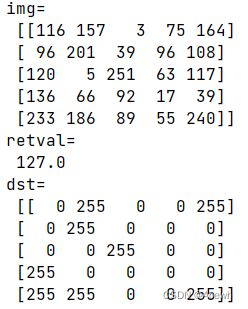
以 type=cv2.THRESH_BINARY 为例,其余函数用法一致
import cv2
import numpy as np

img = np.random.randint(0,256,(5,5),dtype=np.uint8)
retval,dst = cv2.threshold(src=img,thresh=127,maxval=255,type=cv2.THRESH_BINARY)

print('img=\n',img)
print('retval=\n',retval)
print('dst=\n',dst)
运行结果如下:

示例2:Otsu 最优阈值
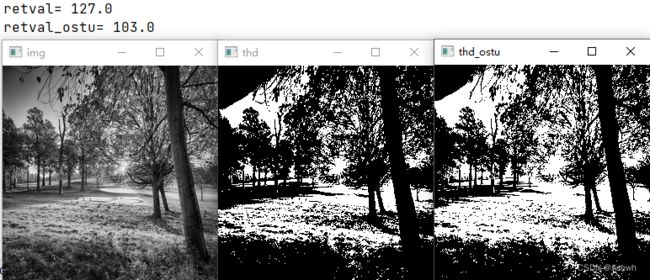
当图像的灰度分布不均衡时,如果阈值还是127时,处理后的结果很有可能非常差,这时候就需要我们重新选择阈值,如果一个个去尝试,工作量将十分巨大。Ostu 方法可以根据当前图像给出最优的类间分割阈值,它会遍历所有可能阈值,从而找出最优阈值。此时使用 cv2.threshold 要注意一下几点:
- 阈值 thresh 要设置为 0
- type 要改为
cv2.THRESH_BINARY+cv2.THRESH_OTSU - 返回的 retval 将是最优阈值
import cv2

img = cv2.imread('photo.jpg',0)
retval,thd = cv2.threshold(src=img,thresh=127,maxval=255,type=cv2.THRESH_BINARY)
retval_ostu,thd_ostu = cv2.threshold(src=img,thresh=127,maxval=255,type=cv2.THRESH_BINARY+cv2.THRESH_OTSU)

print('retval=',retval)
print('retval_ostu=',retval_ostu)

cv2.imshow('img',img)
cv2.imshow('thd',thd)
cv2.imshow('thd_ostu',thd_ostu)
cv2.waitKey()
cv2.destroyAllWindows()
运行结果如下,可以看到返回的阈值不同,Otsu 方式效果更好:

2. cv2.adaptiveThreshold
对于色彩不均衡的图像,如果只使用一个阈值,就无法得到清晰有效的阈值分割结果图像。这时候就需要采用自适应阈值处理方式。在进行阈值处理时,该方式通过计算每个像素点周围邻域区域的加权平均值获得阈值,并使用该阈值对当前像素点进行处理。该方法能够更好地处理明暗差异较大的图像。
dst = cv2.adaptiveThreshold(src, maxValue, adaptiveMethod, thresholdType, blockSize, C)
- dst:返回的结果图像
- src:输入的原始图像
- maxValue:最大值
- adaptiveMethod:自适应方法,以下方式二选一
cv2.ADAPTIVE_THRESH_MEAN_Ccv2.ADAPTIVE_THRESH_GAUSSIAN_C
- thresholdType:阈值处理方式,以下方式二选一
cv2.THRESH_BINARYcv2.THRESH_BINARY_INV
- blockSize:块大小。表示一个像素在计算其阈值时所使用的邻域尺寸,一般为 3x3、5x5、7x7
- C:常量
计算说明:
上面提到自适应阈值处理采用了加权平均值获得阈值,而 adaptiveMethod 参数在计算邻域的加权平均值时采用的方式不同:
cv2.ADAPTIVE_THRESH_MEAN_C:领域所有像素点的权重一样cv2.ADAPTIVE_THRESH_GAUSSIAN_C:与领域各个像素点到中心点的距离有关,通过高斯方程计算得到各个点的权重
之后该邻域的加权平均值减去常量 C 得到最后的结果。
注意:
该方法处理运行时需要输入灰度图图像格式。
示例:
对一幅图分别采取 cv2.threshold 的二值化阈值模式、自适应阈值处理的两种自适应方法进行处理。
import cv2

img = cv2.imread('photo.jpg',0)
retval,thd = cv2.threshold(
    src=img,
    thresh=127,
    maxval=255,
    type=cv2.THRESH_BINARY)

thdMEAN = cv2.adaptiveThreshold(
    src=img,
    maxValue=255,
    adaptiveMethod=cv2.ADAPTIVE_THRESH_MEAN_C,
    thresholdType=cv2.THRESH_BINARY,
    blockSize=5,
    C=2)
thdGAU = cv2.adaptiveThreshold(
    src=img,
    maxValue=255,
    adaptiveMethod=cv2.ADAPTIVE_THRESH_GAUSSIAN_C,
    thresholdType=cv2.THRESH_BINARY,
    blockSize=5,
    C=2)

cv2.imshow('img',img)
cv2.imshow('thd',thd)
cv2.imshow('thdMEAN',thdMEAN)
cv2.imshow('thdGAU',thdGAU)
cv2.waitKey()
cv2.destroyAllWindows()
