人脸识别有趣应用2——自动增大眼睛效果
目录
- 前言
- 原理
- Python源码实现
前言
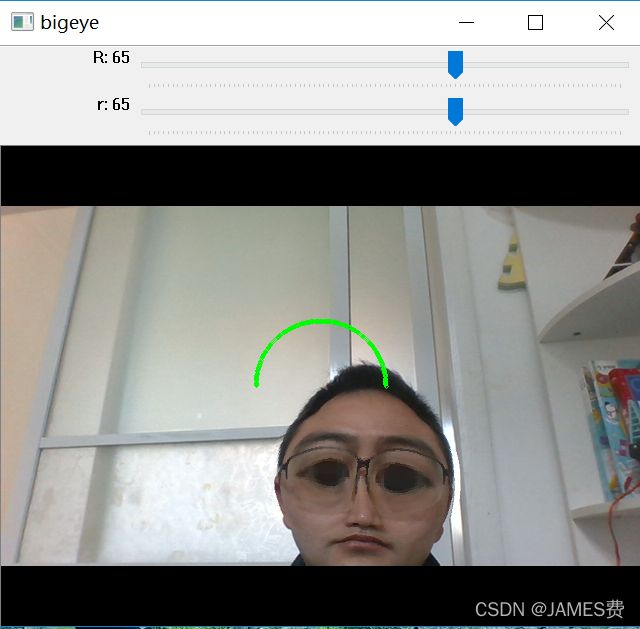
人脸识别出五官后,可以增加一些形变的算法,对人脸进行“整形”,比如利用凸面镜的滤镜效果,来使得眼睛增大,起到美颜或者夸张艺术效果,效果如下(下面有点夸张了勿喷,可适当调节滤镜范围):

原理
整个流程是,利用人脸识别算法库(如face_recognition),识别出人脸的两只眼睛的中心坐标,并利用类似局部“凸透镜效果算法”,即:(相当于图像一片区域通过凸透镜所看到的视觉效果。 本质是一种插值算法,就是沿着图像区域的中心(透镜中心)将像素径向放大,离中心近的物体得权重大,并且向边缘处挤压(边缘近的像素被压缩),同事在边缘处需要连续,这样图像看起来会自然些),从眼睛中心位置进行逐个像素变形,这里我使用了椭圆型的滤镜(直觉上感觉眼睛接近椭圆用椭圆比较自然点),区别于网上的圆形滤镜,核心代码如下:
def bigeye(src_img,eye,r=20,R=30):
    H=src_img.shape[0]#y
    W=src_img.shape[1]#x
    new_img=src_img.copy()
    #print(new_img.shape)
    center_x=eye[0]
    center_y=eye[1]
    for i in range(W):
        for j in range(H):
            distance=((i-center_x)*(i-center_x)+(j-center_y)*(j-center_y))
            new_dist=math.sqrt(distance)

            if (i-center_x)**2/(R**2)+(j-center_y)**2/(r**2)<1:
                u=int(np.floor(new_dist*(i-center_x)/syd(center_x,center_y,R,r,i,j)+center_x))
                v=int(np.floor(new_dist*(j-center_y)/syd(center_x,center_y,R,r,i,j)+center_y))
                #u=int(int(i-center_x)/2*(new_dist/r)+center_x)
                #v=int(int(i-center_y)/2*(new_dist/r)+center_y)
                if 0<u<W and 0<v<H:
                    new_img[j,i,:]=src_img[v,u,:]
    new_img=sydd(new_img,int(W/2),int(H/2),R,r)
    return new_img
同时利用opencv的ui建两个滑块,用于调节椭圆参数,这样就可以通过调节椭圆的大小半径对眼睛区域进行必要的“椭圆放大”。可以通过调节找到合适的参数,在实际的应用中就不会向本篇图片那么夸张了。
完整的代码如下:
Python源码实现
# -*- coding: utf-8 -*-
"""
Created on Tue Apr  5 22:19:08 2022

@author: JAMES FEI
Copyright (C) 2022 FEI PANFENG, All rights reserved.
THIS SOFTEWARE, INCLUDING DOCUMENTATION,IS PROTECTED BY COPYRIGHT CONTROLLED
BY FEI PANFENG ALL RIGHTS ARE RESERVED.

"""
import face_recognition
import cv2
import numpy as np
import math

video_capture = cv2.VideoCapture(0)

#img=cv2.imread('55.JPG')

def syd(cx,cy,a,b,i,j):
    """
    计算椭圆半径
    """
    p=np.arctan2((i-cx),-(j-cy))
    if b<=0:
        b=1
    t=np.arctan(np.tan(p)*a/b)
    x=a*np.cos(t)
    y=b*np.sin(t)
    r=np.sqrt(x**2+y**2)
    return r

def sydd(img,cx,cy,a,b):
    """
    计算椭圆半径
    """
    for i in range(180):
        t=2*np.pi/359
        x=int(a*np.cos(t*i)+cx)
        y=int(-b*np.sin(t*i)+cy)
        cv2.circle(img, (x,y), 2, (0,255,0), 1)

    return img


def bigeye(src_img,eye,r=20,R=30):
    H=src_img.shape[0]#y
    W=src_img.shape[1]#x
    new_img=src_img.copy()
    #print(new_img.shape)
    center_x=eye[0]
    center_y=eye[1]
    for i in range(W):
        for j in range(H):
            distance=((i-center_x)*(i-center_x)+(j-center_y)*(j-center_y))
            new_dist=math.sqrt(distance)

            if (i-center_x)**2/(R**2)+(j-center_y)**2/(r**2)<1:
                u=int(np.floor(new_dist*(i-center_x)/syd(center_x,center_y,R,r,i,j)+center_x))
                v=int(np.floor(new_dist*(j-center_y)/syd(center_x,center_y,R,r,i,j)+center_y))
                #u=int(int(i-center_x)/2*(new_dist/r)+center_x)
                #v=int(int(i-center_y)/2*(new_dist/r)+center_y)
                if 0<u<W and 0<v<H:
                    new_img[j,i,:]=src_img[v,u,:]
    new_img=sydd(new_img,int(W/2),int(H/2),R,r)
    return new_img
def nothing(x):
    pass
cv2.namedWindow('bigeye')
cv2.createTrackbar('R', 'bigeye', 10, 100, nothing)
cv2.createTrackbar('r', 'bigeye', 5, 100, nothing)


while True:


    r = cv2.getTrackbarPos('r', 'bigeye')
    R = cv2.getTrackbarPos('R', 'bigeye')
    if r<=0:
        r=1
    if R<=0:
        R=1


    #frame=img.copy()
    ret, frame = video_capture.read()

    #small_frame = cv2.resize(frame, (0, 0), fx=1/4, fy=1/4)


    rgb_frame = frame[:, :, ::-1]

    face_landmarks_list = face_recognition.face_landmarks(rgb_frame)
    output=frame

    for face_landmarks in face_landmarks_list:

        lef_center_x=0
        lef_center_y=0
        for point in face_landmarks["left_eye"]:
                lef_center_x+=point[0]
                lef_center_y+=point[1]
        lef_center_x=int(lef_center_x/len(face_landmarks["left_eye"]))
        lef_center_y=int(lef_center_y/len(face_landmarks["left_eye"]))
        #cv2.circle(frame, (lef_center_x,lef_center_y), 30, (0,0,0), -1)

        if lef_center_x and lef_center_y:
            output=bigeye(output,(lef_center_x,lef_center_y),r=r,R=R)


        rig_center_x=0
        rig_center_y=0

        for point in face_landmarks["right_eye"]:
                rig_center_x+=point[0]
                rig_center_y+=point[1]
        rig_center_x=int(rig_center_x/len(face_landmarks["left_eye"]))
        rig_center_y=int(rig_center_y/len(face_landmarks["left_eye"]))

        #cv2.circle(frame, (rig_center_x,rig_center_y), 30, (0,0,0), -1)
        if rig_center_x and rig_center_y:
            output=bigeye(output,(rig_center_x,rig_center_y),r=r,R=R)


    cv2.imshow('bigeye', output)


    # 按Q退出
    if cv2.waitKey(1) & 0xFF == ord('q'):
        break

video_capture.release()
cv2.destroyAllWindows()