【目标检测】swin-transformer训练自己的数据集
文章目录
- 1. 数据集的制作
-
- 1.1. Labelme制作数据集
- 1.2 COCO数据集格式
- 2. 配置swin-transformer
- 3. 训练自己的数据集
- 4. 训练
- 5.参考链接
1. 数据集的制作
1.1. Labelme制作数据集
pip install labelme
然后在桌面搜索框中找到labelme,然后打开,或者直接在命令行中输入labelme进行打开
安装labelme过程中出现的一些问题:
https://blog.csdn.net/qq_44747572/article/details/127584015?spm=1001.2014.3001.5501
标注步骤:
- 勾选 File->Automatically:这样切换到下一张图时就会将标签文件自动保存在Change Save Dir设定的文件夹。
- Open Dir:选择图片所在的文件夹 JPEGimages
- File-> Change Output Dir:选择保存标签文件所在的目录 Annotations
- Edit -> Create Rectangle:选中,开始画矩形框
- 删除框:需要先点击左侧 Edit Polygon,然后点击要删的框,再点击del键
快捷键:
1.2 COCO数据集格式
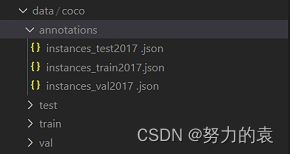
coco数据集目录结构
如下图所示,其中train2017、test2017、val2017文件夹中保存的是用于训练、测试、验证的图片,而annotations文件夹保存的是这些图片对应的标注信息,分别存在instance_test2017、instance_test2017、instance_val2017三个json文件中。


labelme标注的数据转换成coco格式:
- 确定已经使用labelme标注好图像和得到json文件(同一文件夹下)
- 创建上面所述四个文件夹(annotations、train、val、test)
- label2coco
# -*- coding:utf-8 -*-

import argparse
import json
import matplotlib.pyplot as plt
import skimage.io as io
# import cv2
from labelme import utils
import numpy as np
import glob
import PIL.Image


class MyEncoder(json.JSONEncoder):
    def default(self, obj):
        if isinstance(obj, np.integer):
            return int(obj)
        elif isinstance(obj, np.floating):
            return float(obj)
        elif isinstance(obj, np.ndarray):
            return obj.tolist()
        else:
            return super(MyEncoder, self).default(obj)


class labelme2coco(object):
    def __init__(self, labelme_json=[], save_json_path='./tran.json'):
        self.labelme_json = labelme_json
        self.save_json_path = save_json_path
        self.images = []
        self.categories = []
        self.annotations = []
        # self.data_coco = {}
        self.label = []
        self.annID = 1
        self.height = 0
        self.width = 0

    self.save_json()

def data_transfer(self):

    for num, json_file in enumerate(self.labelme_json):
        with open(json_file, 'r') as fp:
            data = json.load(fp)  # 加载json文件
            self.images.append(self.image(data, num))
            for shapes in data['shapes']:
                label = shapes['label']
                if label not in self.label:
                    self.categories.append(self.categorie(label))
                    self.label.append(label)
                points = shapes['points']  # 这里的point是用rectangle标注得到的,只有两个点,需要转成四个点
                points.append([points[0][0], points[1][1]])
                points.append([points[1][0], points[0][1]])
                self.annotations.append(self.annotation(points, label, num))
                self.annID += 1

def image(self, data, num):
    image = {}
    img = utils.img_b64_to_arr(data['imageData'])  # 解析原图片数据
    # img=io.imread(data['imagePath']) # 通过图片路径打开图片
    # img = cv2.imread(data['imagePath'], 0)
    height, width = img.shape[:2]
    img = None
    image['height'] = height
    image['width'] = width
    image['id'] = num + 1
    image['file_name'] = data['imagePath'].split('/')[-1]

    self.height = height
    self.width = width

    return image

def categorie(self, label):
    categorie = {}
    categorie['supercategory'] = label
    categorie['id'] = len(self.label) + 1  # 0 默认为背景
    categorie['name'] = label
    return categorie

def annotation(self, points, label, num):
    annotation = {}
    annotation['segmentation'] = [list(np.asarray(points).flatten())]
    annotation['iscrowd'] = 0
    annotation['image_id'] = num + 1
    # annotation['bbox'] = str(self.getbbox(points)) # 使用list保存json文件时报错(不知道为什么)
    # list(map(int,a[1:-1].split(','))) a=annotation['bbox'] 使用该方式转成list
    annotation['bbox'] = list(map(float, self.getbbox(points)))
    annotation['area'] = annotation['bbox'][2] * annotation['bbox'][3]
    # annotation['category_id'] = self.getcatid(label)
    annotation['category_id'] = self.getcatid(label)  # 注意,源代码默认为1
    annotation['id'] = self.annID
    return annotation

def getcatid(self, label):
    for categorie in self.categories:
        if label == categorie['name']:
            return categorie['id']
    return 1

def getbbox(self, points):
    # img = np.zeros([self.height,self.width],np.uint8)
    # cv2.polylines(img, [np.asarray(points)], True, 1, lineType=cv2.LINE_AA)  # 画边界线
    # cv2.fillPoly(img, [np.asarray(points)], 1)  # 画多边形 内部像素值为1
    polygons = points

    mask = self.polygons_to_mask([self.height, self.width], polygons)
    return self.mask2box(mask)

def mask2box(self, mask):
    '''从mask反算出其边框
    mask:[h,w]  0、1组成的图片
    1对应对象,只需计算1对应的行列号(左上角行列号,右下角行列号,就可以算出其边框)
    '''
    # np.where(mask==1)
    index = np.argwhere(mask == 1)
    rows = index[:, 0]
    clos = index[:, 1]
    # 解析左上角行列号
    left_top_r = np.min(rows)  # y
    left_top_c = np.min(clos)  # x

    # 解析右下角行列号
    right_bottom_r = np.max(rows)
    right_bottom_c = np.max(clos)

    # return [(left_top_r,left_top_c),(right_bottom_r,right_bottom_c)]
    # return [(left_top_c, left_top_r), (right_bottom_c, right_bottom_r)]
    # return [left_top_c, left_top_r, right_bottom_c, right_bottom_r]  # [x1,y1,x2,y2]
    return [left_top_c, left_top_r, right_bottom_c - left_top_c,
            right_bottom_r - left_top_r]  # [x1,y1,w,h] 对应COCO的bbox格式

def polygons_to_mask(self, img_shape, polygons):
    mask = np.zeros(img_shape, dtype=np.uint8)
    mask = PIL.Image.fromarray(mask)
    xy = list(map(tuple, polygons))
    PIL.ImageDraw.Draw(mask).polygon(xy=xy, outline=1, fill=1)
    mask = np.array(mask, dtype=bool)
    return mask

def data2coco(self):
    data_coco = {}
    data_coco['images'] = self.images
    data_coco['categories'] = self.categories
    data_coco['annotations'] = self.annotations
    return data_coco

def save_json(self):
    self.data_transfer()
    self.data_coco = self.data2coco()
    # 保存json文件
    json.dump(self.data_coco, open(self.save_json_path, 'w'), indent=4, cls=MyEncoder)  # indent=4 更加美观显示


labelme_json = glob.glob(r'D:\Users\80080947\Desktop\yxLocalWork\ObjectDetection\data\Annotations/*.json')
# labelme_json=['./1.json']

labelme2coco(labelme_json, r'D:\Users\80080947\Desktop\yxLocalWork\ObjectDetection\data\Json\instances_train.json')
2. 配置swin-transformer
-
下载swin-transformer代码
git clone https://github.com/SwinTransformer/Swin-Transformer-Object-Detection.git cd Swin-Transformer-Object-Detection pip install -r requirements.txt python setup.py develop -
环境配置(结合后面的看,这个会出现apex安装的问题)
mmcv-full的安装: 要注意版本的对应,可在下面进行版本的选择,进行安装。# 命令行输入 可以查看torch和cuda的版本 python -c 'import torch;print(torch.__version__);print(torch.version.cuda)'查看链接: https://mmcv.readthedocs.io/en/latest/get_started/installation.html

#需要注意的是pytorch版本、cuda版本与mmcv版本需搭配,否则会出错。
#我是cuda10.2 pytorch1.7.0 python3.7 mmcv-full 1.3.1
pip install mmcv-full==1.3.1 -f https://download.openmmlab.com/mmcv/dist/cu102/torch1.7/index.html
测试代码:https://blog.csdn.net/qq_44747572/article/details/127604916?spm=1001.2014.3001.5501
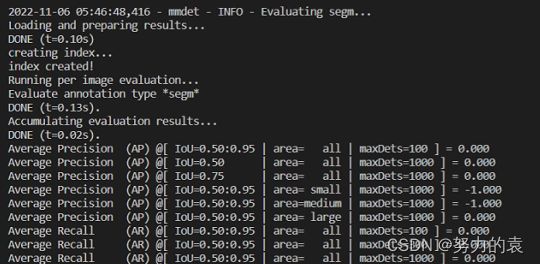
测试结果:

3. 训练自己的数据集
-
tools
train基本不需要改 -
config
- base
- datasets:数据处理及加载
- models:基础模型结构
- schedules:优化器的配置
- default_runtime:其他配置
- swin
与base同级有实现好的网络,这主要采用swin
- base
-
workdir:生成训练结果
-
修改的地方
-
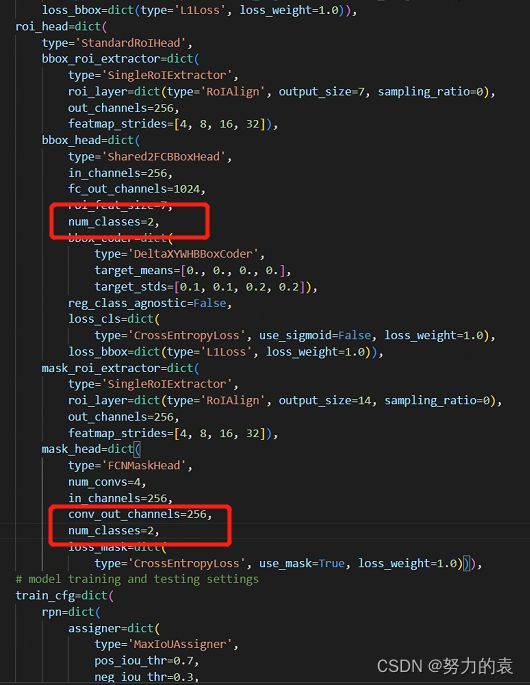
类别
- /configs/base/models/mask_rcnn_swin_fpn.py
- /mmdet/datasets/coco.py
-
权重文件
- /configs/base/default_runtime.py
-
图片大小(太大会导致难以训练)
- /configs/swin/mask_rcnn_swin_tiny_patch4_window7_mstrain_480-800_adamw_3x_coco.py
- /configs/base/datasets/coco_instance.py
-
数据集路径配置
- /configs/base/datasets/coco_instance.py
-
batch size设置
- /configs/base/datasets/coco_instance.py
- 类别
# /configs/_base_/models/mask_rcnn_swin_fpn.py
#num_classes=80,#类别
num_classes=2,  # 训练的类别是2
-
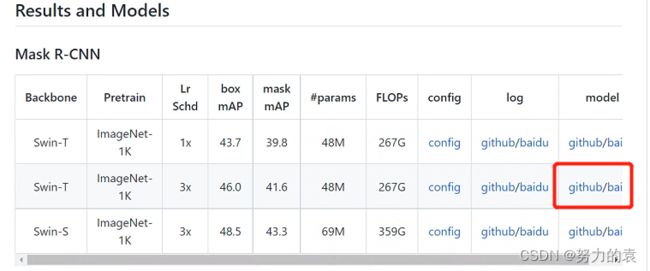
配置权重信息
# 修改 configs/base/default_runtime.py 中的 interval,loadfrom # interval:dict(interval=1) # 表示多少个 epoch 验证一次,然后保存一次权重信息 # loadfrom:表示加载哪一个训练好(预训练)的权重,可以直接写绝对路径如: # load_from = r"/media/yuanxingWorkSpace/studyProject/ObjectDetection/Swin-Transformer-Object-Detection/checkpoints/mask_rcnn_swin_tiny_patch4_window7.pth" -
修改训练图片尺寸大小
# 如果显存够的话可以不改(基本都运行不起来),文件位置为:configs/swin/mask_rcnn_swin_tiny_patch4_window7_mstrain_480-800_adamw_3x_coco.py # 修改所有的 img_scale 为 :img_scale = [(224, 224)] 或者 img_scale = [(256, 256)] 或者 480,512等。 # 同时 configs/base/datasets/coco_instance.py 中的 img_scale 也要改成 img_scale = [(224, 224)] 或者其他值 # 注意:值应该为32的倍数,大小根据显存或者显卡的性能自行调整 -
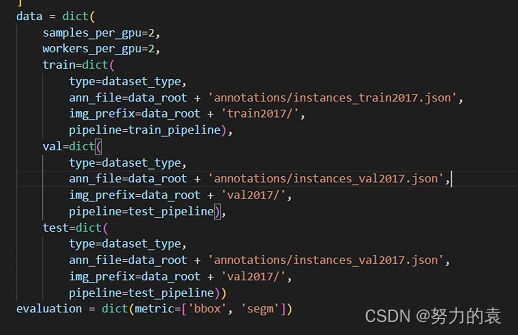
配置数据集路径
# configs/base/datasets/coco_instance.py # 修改data_root文件的最上面指定了数据集的路径,因此在项目下新建 data/coco目录,下面四个子目录 annotations和test2017,train2017,val2017。 -
修改该文件下的 train val test 的路径为自己新建的路径
configs/base/datasets/coco_instance.py -
修改 batch size 和 线程数
路径:configs/base/datasets/coco_instance.py ,根据自己的显存和CPU来设置 -
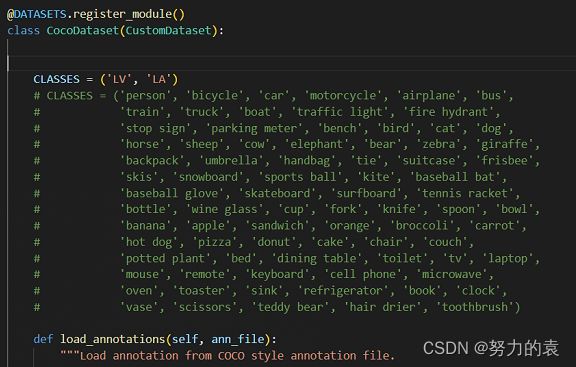
修改分类数组
mmdet/datasets/coco.py # CLASSES中填写自己的分类: CLASSES = ('LV', 'LA') -
修改最大epoch
configs/swin/mask_rcnn_swin_tiny_patch4_window7_mstrain_480-800_adamw_3x_coco.py
修改72行:runner = dict(type=‘EpochBasedRunnerAmp’, max_epochs=36)#最大epochs
-
4. 训练
在终端输入
python tools/train.py configs\swin\mask_rcnn_swin_tiny_patch4_window7_mstrain_480-800_adamw_3x_coco.py
报错1:ImportError: cannot import name 'OrderedDict' from 'typing' (/home/yuanxing/anaconda3/envs/ObjectDetection/lib/python3.7/typing.py)
原因:是由于python版本为3.7.1
解决:(ObjectDetection) yuanxing@psdz:/media/yuanxingWorkSpace/studyProject/ObjectDetection/Swin-Transformer-Object-Detection$ conda install python=3.7.2
报错2:ImportError: /home/yuanxing/anaconda3/envs/ObjectDetection/lib/python3.7/site-packages/mmcv/_ext.cpython-37m-x86_64-linux-gnu.so: undefined symbol: _ZN6caffe28TypeMeta21_typeMetaDataInstanceIdEEPKNS_6detail12TypeMetaDataEv
原因:可能会在安装 mmcv-full 后升级您的 pytorch 版本
解决:
(ObjectDetection) yuanxing@psdz:/media/yuanxingWorkSpace/studyProject/ObjectDetection$ python -c 'import torch;print(torch.__version__);print(torch.version.cuda)'
1.13.0+cu117
11.7
发现版本不对,卸载torch和torchvision,再次查看版本,发现版本回到了torch1.7.0和cuda10.2
因此根据版本对应原则卸载mmcv-full,然后再下载
pip install mmcv-full==1.3.1 -f https://download.openmmlab.com/mmcv/dist/cu102/torch1.7/index.html
报错3:路径不对:
全部修改成绝对路径
python tools/train.py /media/yuanxingWorkSpace/studyProject/ObjectDetection/Swin-Transformer-Object-Detection/configs/swin/mask_rcnn_swin_tiny_patch4_window7_mstrain_480-800_adamw_3x_coco.py
报错4:NameError: name 'apex' is not defined
安装成功后
AttributeError: module 'torch.distributed' has no attribute '_all_gather_base'
又报错,应该是torch的版本问题
由于NameError: name 'apex' is not defined没办法解决,打算重新装下环境
# 创建环境
conda create --name ObjectDetection python==3.7.0
# 安装torch 1.8.0的版本
conda install pytorch==1.8.0 torchvision==0.9.0 torchaudio==0.8.0 cudatoolkit=10.2 -c pytorch
# 安装mmdetection
cd Swin-Transformer-Object-Detection-master
pip install -r requirements.txt -i https://pypi.douban.com/simple/
python setup.py develop
# 安装 mmcv (cuda与torch版本号可自行修改)
# 查看相对应版本
# https://mmcv.readthedocs.io/en/latest/get_started/installation.html
python -c 'import torch;print(torch.__version__);print(torch.version.cuda)'
pip install mmcv-full==1.3.1 -f https://download.openmmlab.com/mmcv/dist/cu102/torch1.8/index.html
# 安装apex
git clone https://github.com/NVIDIA/apex.git
cd apex
pip install -r requirements.txt -i https://pypi.tuna.tsinghua.edu.cn/simple
pip install -v --no-cache-dir --global-option="--cpp_ext" --global-option="--cuda_ext" . # 报错
python setup.py install --cpp_ext # 可行
# 运行报错
pip uninstall apex  #成功,但是import apex.amp会报错
# 再进行配置
pip install -v --disable-pip-version-check --no-cache-dir ./
5.参考链接
https://blog.csdn.net/u014061630/article/details/88756644
https://blog.csdn.net/qq_45720073/article/details/125772205
https://blog.csdn.net/hasque2019/article/details/121899614
https://blog.csdn.net/weixin_38429450/article/details/112759862
https://blog.csdn.net/ViatorSun/article/details/124562686
https://segmentfault.com/a/1190000041521916
https://blog.csdn.net/qq_41964545/article/details/115868473
https://blog.csdn.net/weixin_42766091/article/details/112157014
https://blog.csdn.net/qq_41888086/article/details/125647024
https://github.com/nvidia/apex#linux


