麒麟系统中Qt Creator调用protobuf库时,版本冲突解决方法
场景描述
1.用protoc 3将编写的proto文件生成对应***.pb.h和***.pb.cc文件
2.在Qt Creator中通过导入外部库的方式导入protobuf的库(动态、静态都可以)
3.代码编译通过,运行时提示protobuf版本冲突
问题现象
12:39:32: Starting /mnt/hgfs/VMshare/TestCode/****/build-***-Desktop_Qt_5_14_1_GCC_64bit-Debug/*** ...
[libprotobuf FATAL google/protobuf/stubs/common.cc:87] This program was compiled against version 2.6.1 of the Protocol Buffer runtime library, which is not compatible with the installed version (3.11.4). Contact the program author for an update. If you compiled the program yourself, make sure that your headers are from the same version of Protocol Buffers as your link-time library. (Version verification failed in "/build/mir-yHFhjH/mir-0.26.3+16.04.20170605/obj-x86_64-linux-gnu/src/protobuf/mir_protobuf.pb.cc".)
terminate called after throwing an instance of 'google::protobuf::FatalException'
what(): This program was compiled against version 2.6.1 of the Protocol Buffer runtime library, which is not compatible with the installed version (3.11.4). Contact the program author for an update. If you compiled the program yourself, make sure that your headers are from the same version of Protocol Buffers as your link-time library. (Version verification failed in "/build/mir-yHFhjH/mir-0.26.3+16.04.20170605/obj-x86_64-linux-gnu/src/protobuf/mir_protobuf.pb.cc".)
12:39:33: 程序异常结束。
12:39:33: The process was ended forcefully.
12:39:33: /mnt/hgfs/VMshare/TestCode/****/build-***-Desktop_Qt_5_14_1_GCC_64bit-Debug/*** crashed.
环境介绍
麒麟系统4.02(对应于ubuntu16.04)
qt 5.14.1 (系统自带qt4.8.7,可以通过qtchooser更默认版本)
protobuf 3.11.4
通过一个lib封装所有protobuf相关的操作,以及.proto文件转换生成的cxx文件。
一个app调用lib提供的功能。
错误出现在app启动阶段。
/************************/
最简单的解决办法:
用静态库替换动态库
replace
LIB += -lprotobuf
with
LIBS += /usr/local/lib/libprotobuf.a
参考:https://stackoverflow.com/questions/43454885/conflict-protobuf-versions
/***********************/
其他尝试的方法,仅供参考,上面换静态的方法应该就能解决问题了。
解决过程
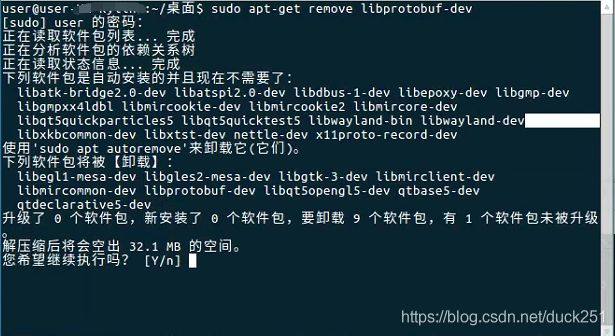
1.卸载Ubuntu自带的protobuf;
-
# sudo apt-get remove libprotobuf-dev
# which protoc
// 运行完“which protoc”会显示一个protoc的路径,如果没有显示则下面这条命令不必执行
# rm /usr/local/bin/protoc
// 具体路径以“which protoc”显示的为准

到此,低版本的protobuf卸载完成。
2.安装特定版本的protobuf,在此以安装protobuf3.6.0为例;
前提:确保以下几个库都有安装
# sudo apt-get install autoconf automake libtool curl make g++ unzip编译protobuf源码并安装;
(--prefix指定来安装目录到/usr/lib。然后进行编译和安装,缺省会安装/usr/local/lib,但是有些ubuntu系统默认不能ld这路径,需要去配置)
./autogen.sh
./configure --prefix=/usr
make
make check
sudo make install
sudo ldconfig # refresh shared library cache.
3.重装QT Creator
进入qt的安装目录下卸载
一般ubuntu软件是安装在opt目录下,如果不在就需要找找了
进入安装目录下
sudo ./MaintenanceToolhttps://blog.csdn.net/weixin_41012767/article/details/89399108
其他解决方法:
用管理员权限运行QtCreator,软件安装路径无影响,建议安装到/opt/目录下
方法1,默认安装QT至/home/***(用户)/ 目录下,运行QT Creator时,用管理员权限运行
sudo ./qtcreator方法2,将QT安装在 /opt/ 目录下,安装过程中会提示输入管理员密码(变相的提升QT Creator的权限)
参考文档
1.qt版本的切换
(1)通过qtchooser
https://blog.csdn.net/YuXiaoNiu/article/details/104451133?utm_medium=distribute.pc_relevant_t0.none-task-blog-BlogCommendFromBaidu-1.control&depth_1-utm_source=distribute.pc_relevant_t0.none-task-blog-BlogCommendFromBaidu-1.control
(2)修改配置文件
https://blog.csdn.net/zhuiqiuzhuoyue583/article/details/103143616
2.protobuf版本冲突解决方法
https://blog.csdn.net/MajorChou/article/details/86671801
