Python+Opencv识别银行卡
shi y识别银行卡的具体思路是用银行卡上的每一个”被识别出来的数字“跟”0-9十个模板数字“进行模式匹配,最终得到每一个数字的识别结果。
首先对模板数字进行处理

上图是0-9的图形模板,但这是一整张图片,所以首先要做的是把这个图片中的每一个数字抠出来,效果就像是这样:

首先读入模板图片,将其转换成灰度图再转换成二值化的图像。
model_09 = cv2.imread("./img/model.png")
model_09_gray = cv2.cvtColor(model_09, cv2.COLOR_BGR2GRAY)
retval, model_09_dst = cv2.threshold(model_09_gray, 100, 255, cv2.THRESH_BINARY_INV)
接下来的工作是“把每个数字框起来”,实现这个需要两步,第一步是寻找轮廓,第二步是把上一步找到的轮廓用矩形框选。
首先对之前二值化的图像使用findContours方法寻找轮廓,其中contours存放的是轮廓信息,他的本质是一个列表,里面放着被识别出来的10个数字的轮廓,每个轮廓的格式是np.array。
使用一个函数就找到了所有数字的轮廓这很优美,但问题是contours列表中存放的数字轮廓并不是从左到右排序的,而是从右向左,虽然可以用一个逆序就能对掉顺序,但是为了保险起见,我们要根据每一个轮廓中第一个点的x坐标对整个列表排序。
想法很美好,但问题是contours是列表,而其中的轮廓元素是np.array格式,这时候需要首先把轮廓array转换成list,然后放入一个新的list里,然后使用sorted根据这个新的list中的每一个元素的x左边进行排序,之后便得到了从左到右排列的轮廓。
contours, hierarchy	 = cv2.findContours(model_09_dst.copy(), cv2.RETR_EXTERNAL, cv2.CHAIN_APPROX_SIMPLE)

for i in contours:
    temp.append(i.tolist())

temp = sorted(temp, key = lambda x:x[0][0])
contours = []
for i in temp:
    contours.append(np.array(i))

cv2.drawContours(model_09, contours, 0, (0,0,255), 10)
cv2.imshow("display", model_09)
进行第二部,对每一个轮廓进行ROI提取,然后拉伸到一个固定的大小(银行卡中提取的每一个数字也要缩放到同样的大小,方便进行模板匹配),存在一个列表里。
numble_img_list = []
for i in contours:
    x, y, w, h = cv2.boundingRect(i)
    numble_img_list.append(model_09_dst[y:y+h, x:x+w])

#保存十张模版照片
for count, i in enumerate(numble_img_list):
    numble_img_list[count] = cv2.resize(i, (90, 50))
对银行卡处理

如图是我们需要处理的银行卡。
首先根据直觉,我们呢要把这个银行卡二值化。
card = cv2.imread("./img/card.png")
card_gray = cv2.cvtColor(card, cv2.COLOR_BGR2GRAY)
retval, card_dst = cv2.threshold(card_gray, 100, 255, cv2.THRESH_BINARY)
然后对二值化图像用拉普拉斯算子提取边界,这里的cv2.CV_64F,是允许特征值是负数,这样做是避免出现0截取导致一些边界丢失。最终的图像中不允许有负数像素值的存在,所以要用convertScaleAbs提取绝对值(越小的负数特征值表示边缘梯度越大,正负只是方向,所以用绝对值)。
#拉普拉斯提取轮廓
card_laplacian = cv2.Laplacian(card_dst, cv2.CV_64F)
card_laplacian = cv2.convertScaleAbs(card_laplacian)
拉普拉斯提取的轮廓:

接下来对图片进行闭运算,目的是扩大前景,使白色区域尽可能连成片。
# 进行闭运算操作
kernel = np.ones((50, 50),np.uint8)
card_close = cv2.morphologyEx(card_laplacian, cv2.MORPH_CLOSE,  kernel)
效果如下:
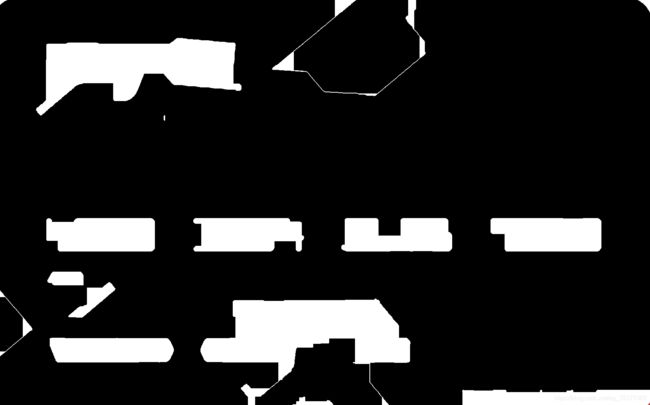
可以看到我们需要识别的卡号部分已经四个数字四个数字连成了一片。

接下来还是上面提取模板数字的那一套,先提取轮廓,然后对轮廓画外接矩形,但是可以看到除了需要识别的卡号部分,还有一些无关的区域也被识别了,这时候可以根据不同矩形的长宽比不同来区分哪个是我们感兴趣的卡号部分。

通过限制每个矩形的宽度/高度的值是不是在3到3.5之间,我们可以找到我们感兴趣的四个矩形区域。
contours, hierarchy	 = cv2.findContours(card_close.copy(), cv2.RETR_EXTERNAL, cv2.CHAIN_APPROX_SIMPLE)


contours_and_imgFor4Words = []

for i in contours:      #这里的i是4个一组的轮廓
    x, y, w, h = cv2.boundingRect(i)

    cv2.rectangle(card, (x, y), (x + w, y + h), (0, 0, 255), 5)
    # 把模版的9个数字的图片保存在列表里
    if w / h > 3 and w/h < 3.5:
        contours_and_imgFor4Words.append([i.tolist(), card_dst[y-10:y + h+10, x-10:x + w+10]])
提取的其中一个区域:
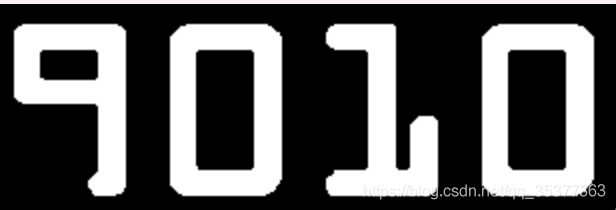
有没有看到这个很眼熟,没错,现在要做的就是用处理模板数字同样的方法,把这四个数字拆分开,然后拉伸成跟模板数字同样的大小,使用模板匹配进行相似度分析。
两个for循环每个被识别到的数字图像。
singal_number_img = []
#四个循环处理每一个四字照片
for aimg in imgs_for_4words:  #i 是四字照片
    contours, hierarchy = cv2.findContours(aimg.copy(), cv2.RETR_EXTERNAL, cv2.CHAIN_APPROX_SIMPLE)

    temp = []
    for i in contours:
        temp.append(i.tolist())

    temp = sorted(temp, key=lambda x: x[0][0])
    contours = []
    for i in temp:
        contours.append(np.array(i))

    for i in contours:
        x, y, w, h = cv2.boundingRect(i)
        # 把模版的9个数字的图片保存在列表里
        singal_number_img.append(cv2.resize(aimg[y:y + h, x:x + w], (90, 50)))
这里用到的匹配方法是cv2.TM_SQDIFF_NORMED,最好使用归一化的方法,而这个方法是越接近0相似度越高,我们就找到对比分数最低的索引,就是识别出来的数字。
model_10 = get10model()   #获取十张模版的照片
card_num = ""

for aimg in singal_number_img:
    scores = []
    for amodel in model_10:
        res = cv2.matchTemplate(aimg, amodel, cv2.TM_SQDIFF_NORMED)
        scores.append(res[0][0])
    card_num += str(scores.index(min(scores)))

print("卡号是:" + card_num)
源代码:
import cv2
import numpy as np

def imgShow(img):
    cv2.imshow("display", img)
    cv2.waitKey(0)

def get10model():
    model_09 = cv2.imread("./img/model.png")
    model_09_gray = cv2.cvtColor(model_09, cv2.COLOR_BGR2GRAY)
    retval, model_09_dst = cv2.threshold(model_09_gray, 100, 255, cv2.THRESH_BINARY_INV)

    '''
    findContours
    第二个参数
    RETR_LIST 从解释的角度来看,这中应是最简单的。它只是提取所有的轮廓,而不去创建任何父子关系。
    RETR_EXTERNAL 如果你选择这种模式的话,只会返回最外边的的轮廓,所有的子轮廓都会被忽略掉。
    RETR_CCOMP 在这种模式下会返回所有的轮廓并将轮廓分为两级组织结构。
    RETR_TREE 这种模式下会返回所有轮廓,并且创建一个完整的组织结构列表。它甚至会告诉你谁是爷爷,爸爸,儿子,孙子等。

    findContours()第三个参数什么意思呢?如果设为cv2.CHAIN_APPROX_NONE,,表示边界所有点都会被储存;而如果设为cv2.CHAIN_APPROX_SIMPLE 会压缩轮廓,将轮廓上冗余点去掉,比如说四边形就会只储存四个角点。
    '''
    #imgShow(model_09_dst)
    #这里的轮廓很奇怪,9的下标是0,0的是9
    contours, hierarchy	 = cv2.findContours(model_09_dst.copy(), cv2.RETR_EXTERNAL, cv2.CHAIN_APPROX_SIMPLE)
    #以下两个for循环把各个轮廓按照像素从左到右的形式排序(先转换成list格式,在转换成array格式的)
    temp = []
    for i in contours:
        temp.append(i.tolist())

    temp = sorted(temp, key = lambda x:x[0][0])
    contours = []
    for i in temp:
        contours.append(np.array(i))

    #有多少个轮廓
    #print(np.array(contours).shape)
    # cv2.circle(model_09, (54, 43), 60, (0,0,255), 1)
    # print(contours[0])
    cv2.drawContours(model_09, contours, 0, (0,0,255), 10)
    imgShow(model_09)

    numble_img_list = [] #存放数字图像的列表

    for i in contours:
        x, y, w, h = cv2.boundingRect(i)
        #print(x, y, w, h)
        #print(y, y+h, x, x+w)
        #cv2.rectangle(model_09, (x, y), (x + w, y + h), (255, 0, 0), 5)
        #把模版的9个数字的图片保存在列表里
        numble_img_list.append(model_09_dst[y:y+h, x:x+w])
        #print(model_09_dst[y:y + h, x:x + w].shape)

    #保存十张模版照片
    # count = 0
    # for count, i in enumerate(numble_img_list):
    #     cv2.imwrite("%d.png"%count, i)
    for count, i in enumerate(numble_img_list):
        numble_img_list[count] = cv2.resize(i, (90, 50))

    return numble_img_list    #返回十张图的图片


card = cv2.imread("./img/card.png")
card_gray = cv2.cvtColor(card, cv2.COLOR_BGR2GRAY)
retval, card_dst = cv2.threshold(card_gray, 100, 255, cv2.THRESH_BINARY)

#拉普拉斯提取轮廓
card_laplacian = cv2.Laplacian(card_dst, cv2.CV_64F)
card_laplacian = cv2.convertScaleAbs(card_laplacian)

# 进行闭运算操作
kernel = np.ones((50, 50),np.uint8)
card_close = cv2.morphologyEx(card_laplacian, cv2.MORPH_CLOSE,  kernel)

# imgShow(card_close)


contours, hierarchy	 = cv2.findContours(card_close.copy(), cv2.RETR_EXTERNAL, cv2.CHAIN_APPROX_SIMPLE)
# cv2.drawContours(card, contours, -1, (0,0,255), 10)
#
# imgShow(card)

contours_and_imgFor4Words = []

for i in contours:      #这里的i是4个一组的轮廓
    x, y, w, h = cv2.boundingRect(i)

    cv2.rectangle(card, (x, y), (x + w, y + h), (0, 0, 255), 5)
    # 把模版的9个数字的图片保存在列表里
    #print("比例:", w / h)
    if w / h > 3 and w/h < 3.5:
        contours_and_imgFor4Words.append([i.tolist(), card_dst[y-10:y + h+10, x-10:x + w+10]])

imgShow(contours_and_imgFor4Words[0][1])
#给四个 四字块 按照从左到右排序
contours_and_imgFor4Words = sorted(contours_and_imgFor4Words, key = lambda x:x[0][0][0]) #这样做的目的是为了从左到右排序照片

#把四字照片放在一起
imgs_for_4words = []
for i in contours_and_imgFor4Words:
    imgs_for_4words.append(i[1])

singal_number_img = []
#四个循环处理每一个四字照片
for aimg in imgs_for_4words:  #i 是四字照片
    contours, hierarchy = cv2.findContours(aimg.copy(), cv2.RETR_EXTERNAL, cv2.CHAIN_APPROX_SIMPLE)

    temp = []
    for i in contours:
        temp.append(i.tolist())

    temp = sorted(temp, key=lambda x: x[0][0])
    contours = []
    for i in temp:
        contours.append(np.array(i))

    for i in contours:
        x, y, w, h = cv2.boundingRect(i)
        # cv2.rectangle(model_09, (x, y), (x + w, y + h), (255, 0, 0), 5)
        # 把模版的9个数字的图片保存在列表里
        singal_number_img.append(cv2.resize(aimg[y:y + h, x:x + w], (90, 50)))

# for count, i in enumerate(singal_number_img):
#     cv2.imwrite("./card/%d.png"%count, i)

model_10 = get10model()   #获取十张模版的照片
card_num = ""

for aimg in singal_number_img:
    scores = []
    for amodel in model_10:
        res = cv2.matchTemplate(aimg, amodel, cv2.TM_SQDIFF_NORMED)
        scores.append(res[0][0])
    card_num += str(scores.index(min(scores)))

print("卡号是:" + card_num)