Deepsort源码详解及个人理解
Deepsort源码分析
这里的代码来自源码地址
这里可以理解成一个两阶段的MOT过程,先检测后跟踪。这里检测部分使用的是YOLOv5,deepsort主要起到匹配目标的作用。
首先从一幅图看一下deepsort算法的整个流程:
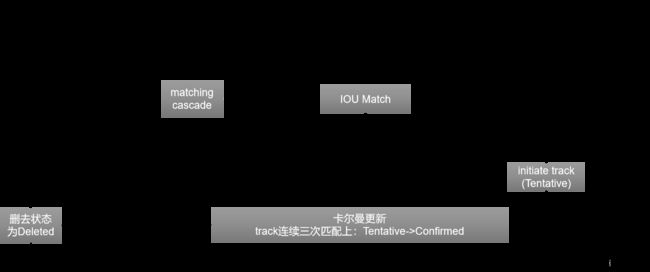
上图为deepsort主要流程。从最左侧开始,假设当前是第t帧,用一个reid提取网络对目标检测算法得到的检测目标提取reid特征。然后对状态为confirmed跟踪对象和检测对象进行级联匹配,得到reid特征匹配结果,将未匹配上的属性time_since_update值为1以及状态为unconfirmed的跟踪对象与未匹配上的检测对象进行IOU匹配。得到最终的匹配结果,匹配成功的对象进行卡尔曼更新得到最终的bbox。(这个流程图是参考https://zhuanlan.zhihu.com/p/97449724改进的)
下面通过分析源码来进一步理解deepsort算法!
主要类介绍
-
Track类
- 属性:
-
mean
-
covariance:这两个都是卡尔曼滤波中需要的参数
-
track_id:跟踪对象的id号
-
hits:就是该对象已经进行了多少次预测了,也就是kf.predict()
-
age:第一次出现到现在一共多少帧
-
time_since_update :上一次更新距离现在多少帧,在匹配上之后会置为0
-
state:该跟踪对象的状态
- Tentative:检测到新目标的时候状态设为Tentative,当其匹配上的次数不超过_n_init时都是该状态
- Confirmed:当匹配上的次数超过_n_init且未匹配上的次数小于max_age时
- Deleted:未匹配上(也就是距离上一次更新)的次数超过max_age,或者处于Tentative时的跟踪对象未匹配上就直接变成Deleted
- 跟踪状态的转换关系及条件:

-
features:一个跟踪对象的所有feature。
-
max_age:一个跟踪对象丢失多少帧后会被删去(删去之后将不再进行特征匹配)
-
n_init:连续n_init帧被检测到,状态就被设为confirmed
-
- 方法:
- to_tlwh:
- to_tlbr:这两个方法都是改变bbox坐标格式
- predict:对该跟踪对象进行坐标预测
- update:对该跟踪对象进行坐标更新
- mark_missed:把跟踪对象状态标记为Deleted
- is_tentative:把跟踪对象状态标记为Tentative
- is_confirmed:把跟踪对象状态标记为Confirmed
- is_deleted:把跟踪对象状态标记为Deleted
- 属性:
-
Tracker类
-
属性
-
metric: NearestNeighborDistanceMetric(“cosine”, max_cosine_distance, nn_budget)评价两个特征相似度的度量标准
-
max_age:一个跟踪对象丢失多少帧后会被删去(删去之后将不再进行特征匹配)也是级联特征匹配中的最大深度,比如说该值设为10,我现在是第12帧,那么第一帧的数据就不在进行特征匹配了。
-
n_init:连续n_init帧被检测到,状态就被设为confirmed
-
max_iou_distance:在做IOU匹配的时候用到的阈值
-
kf:卡尔曼滤波器
-
_next_id:记录下一个跟踪对象的id号
-
tracks:保存跟踪对象的列表
-
-
方法:
- predict:对所有跟踪对象进行坐标预测
- update:特征匹配,更新所有跟踪对象的状态。
- _match:进行级联特征匹配
- _initiate_track:初始化一个新的跟踪对象
-
-
Deepsort类:
跟踪算法核心。把跟踪的所有步骤都封装在其中了。
-
参数:
- model_path:传入特征提取模型,就是一个网络模型
- max_dist:NearestNeighborDistanceMetric参数值
- min_confidence:过滤检测bbox框的分数值
- nms_max_overlap:非最大值抑制中的参数
- max_iou_distance:NearestNeighborDistanceMetric(“cosine”, max_cosine_distance, nn_budget)参数值
- max_age:最大生存时间
- n_init:连续几帧检测到才创建对象
- nn_budget:NearestNeighborDistanceMetric参数值
- use_cuda:是否使用GPU
-
属性:
- min_confidence:过滤检测bbox框的分数值
- nms_max_overlap:非最大值抑制中的参数
- extractor:特征提取器
- tracker:一个traker类对象
-
方法:
- update
- _xywh_to_tlwh:把bbox框的坐标格式从x,y,w,h转为左上x,左上y,w,h
- _xywh_to_xyxy:把bbox框的坐标格式从x,y,w,h转为左上x,y,右下x,y
- _tlwh_to_xyxy:把bbox框的坐标格式从左上x,左上y,w,h转为左上x,y,右下x,y。
- _xyxy_to_tlwh:上一个方法的逆过程
- _get_features:提取bbox框特征
-
-
NearestNeighborDistanceMetric类
- 属性:
- metric:“_nn_euclidean_distance"或"_nn_cosine_distance"两个可选,使用欧式距离或者余弦距离
- matching_threshold:匹配阈值,这个在后面的判断cost_matrix中哪些需要去除是需要用到
- budget:一个对象最多存储多少个features(samples中)
- samples(字典):每一个对象以及其特征对应一个键值对,列表存储目前状态为confirmed对象的特征,每一帧都会更新。
- 方法:
- def partial_fit(self, features, targets, active_targets),每一帧匹配完成后需要对其中的sample进行更新
- def distance(self, features, targets),计算代价矩阵。
- 属性:
过程分析:
-
首先初始化Deepsort类
deepsort = DeepSort(cfg.DEEPSORT.REID_CKPT,
                    max_dist=cfg.DEEPSORT.MAX_DIST, min_confidence=cfg.DEEPSORT.MIN_CONFIDENCE,
                    nms_max_overlap=cfg.DEEPSORT.NMS_MAX_OVERLAP, max_iou_distance=cfg.DEEPSORT.MAX_IOU_DISTANCE,
                    max_age=cfg.DEEPSORT.MAX_AGE, n_init=cfg.DEEPSORT.N_INIT, nn_budget=cfg.DEEPSORT.NN_BUDGET,
                    use_cuda=True)
这些参数都在deep_sort/configs/deep_sort.yaml中进行定义
DEEPSORT: REID_CKPT: "deep_sort/deep_sort/deep/checkpoint/ckpt.t7" MAX_DIST: 0.2 MIN_CONFIDENCE: 0.3 NMS_MAX_OVERLAP: 0.5 MAX_IOU_DISTANCE: 0.7 MAX_AGE: 70 N_INIT: 3 NN_BUDGET: 100 -
加载检测模型以及读取输入数据:
model = torch.load(weights, map_location=device)['model'].float()  # load to FP32
model.to(device).eval()
if half:
    model.half()  # to FP16,把float32转为float16

# Set Dataloader
vid_path, vid_writer = None, None
if webcam:
    view_img = True
    cudnn.benchmark = True  # set True to speed up constant image size inference
    dataset = LoadStreams(source, img_size=imgsz)
else:
    view_img = True
    save_img = True
    dataset = LoadImages(source, img_size=imgsz)
这里加载模型就不多说了,主要看一下数据初始化的过程,这里source代表的是要跟踪的文件路径,可以是图片,也可以是视频。主要说一下LoadImages()这个类。这个类是我们使用本地视频或者图片时进行数据处理的类。首先看一下类的初始化:
class LoadImages:  # for inference
    def __init__(self, path, img_size=640):#我们的输入路径source
        p = str(Path(path))  # os-agnostic
        p = os.path.abspath(p)  # 获取绝对路径
        if '*' in p:#这里表示我们可以传入多个视频或者文件夹。
            files = sorted(glob.glob(p))  # glob
        elif os.path.isdir(p):#如果我们传入的是一个里面是图片的文件夹。
            files = sorted(glob.glob(os.path.join(p, '*.*'))) #例如我们传入的路径是:"E:pos/jpg/",这里就是以列表的形式返回其中所有的图片,并进行排序,但是这里的排序需要注意,比如我们的图片是1.jpg,2.jpg……10.jpg,11.jpg,这样排序之后就会变成1.jpg,10.jpg,11.jpg,2.jpg所以最好的方式是前面用0补齐,或者在排序的时候加上key
        elif os.path.isfile(p):#如果传的是视频就直接进行处理
            files = [p]  # files
        else:
            raise Exception('ERROR: %s does not exist' % p)

        images = [x for x in files if os.path.splitext(x)[-1].lower() in img_formats]#判断我们传入的图片格式是否符合要求,在文件最上方的img_formats限制了传入格式
        videos = [x for x in files if os.path.splitext(x)[-1].lower() in vid_formats]#同上句,主要对视频格式进行限制
        ni, nv = len(images), len(videos)#获取视频或图片的数量

        self.img_size = img_size#640
        self.files = images + videos#把要跟踪的视频和图片文件存在同一个列表中
        self.nf = ni + nv  # 计算要跟踪的图片和视频总数
        self.video_flag = [False] * ni + [True] * nv#这里用一个列表表示对应的files列表中哪一个索引号对应的是图片,哪一个索引号对应的是视频。True表示视频
        self.mode = 'images'
        if any(videos):#判断是否有视频
            self.new_video(videos[0])  # new video
        else:
            self.cap = None#都是图片的话就不需要self.cap
        assert self.nf > 0, 'No images or videos found in %s. Supported formats are:\nimages: %s\nvideos: %s' % \
                            (p, img_formats, vid_formats)
第24行,self.new_video(videos[0])是对视频进行处理,代码如下
def new_video(self, path): self.frame = 0 self.cap = cv2.VideoCapture(path)#通俗点理解就是打开这个视频文件,把他读取成帧 self.nframes = int(self.cap.get(cv2.CAP_PROP_FRAME_COUNT))#一共多少帧 -
开始处理每一帧或每一张图片的数据。
for frame_idx, (path, img, im0s, vid_cap) in enumerate(dataset):#这里是每一帧视频,path, img, img0, self.cap主要分析一下这个读取数据的过程,这里因为dataset这个对象中有如下两个方法才可以进行迭代,代码如下
def __iter__(self):
    self.count = 0
    return self

def __next__(self):
    if self.count == self.nf:
        raise StopIteration
    path = self.files[self.count]

    if self.video_flag[self.count]:
        # Read video
        self.mode = 'video'
        ret_val, img0 = self.cap.read()#按帧读取该视频
        if not ret_val:#当一个视频读完了才进入这个if
            self.count += 1
            self.cap.release()
            if self.count == self.nf:  # last video,这里的意思是所有需要读的都读完了
                raise StopIteration
            else:
                path = self.files[self.count]
                self.new_video(path)
                ret_val, img0 = self.cap.read()

        self.frame += 1
        print('video %g/%g (%g/%g) %s: ' % (self.count + 1, self.nf, self.frame, self.nframes, path), end='')

    else:
        # Read image
        self.count += 1
        img0 = cv2.imread(path)  # BGR
        assert img0 is not None, 'Image Not Found ' + path
        print('image %g/%g %s: ' % (self.count, self.nf, path), end='')

    # Padded resize
    img = letterbox(img0, new_shape=self.img_size)[0]#给图片换了个尺寸。
    # Convert
    img = img[:, :, ::-1].transpose(2, 0, 1)  # BGR to RGB, to 3x416x416
    #ascontiguousarray函数将一个内存不连续存储的数组转换为内存连续存储的数组,使得运行速度更快
    img = np.ascontiguousarray(img)

    # cv2.imwrite(path + '.letterbox.jpg', 255 * img.transpose((1, 2, 0))[:, :, ::-1])  # save letterbox image
    return path, img, img0, self.cap
由此可知,img0是原图,img是对原图进行尺寸变换而且把通道改成了RGB(cv2.imread()读出的图片是BGR)。
-
获取到检测目标之后需要进行一个NMS处理,然后开始对剩下的结果进行跟踪,核心部分是
deepsort.update(xywhs,confss,im0)这一行代码执行完之后返回的就是跟踪出来的结果,所以重点要看这里面的过程-
参数:
- xywhs:检测器检测之后经过NMS的结果,用bbox框中心点坐标和bbox框的宽高进行表示
- confss:每个bbox框的置信度
- im0:原图
-
特征提取过程features = self._get_features(bbox_xywh, ori_img)
-
def _get_features(self, bbox_xywh, ori_img):
    im_crops = []
    for box in bbox_xywh:
        x1,y1,x2,y2 = self._xywh_to_xyxy(box)#把bbox坐标转成左上右下表示
        im = ori_img[y1:y2,x1:x2]#在原图中截取对应的目标框
        im_crops.append(im)#用一个列表存储一帧里面所有目标框
	if im_crops:
        features = self.extractor(im_crops)#对每一个框进行特征提取
    else:
        features = np.array([])
    return features
使用Extractor类进行特征提取,看一下代码不难发现其实就是对把每个bbox输入CNN然后进行特征提取。获取最终特征进行保存。
-
-
由于第一帧的处理相对特殊,所以单独说一下第一帧的步骤,也有助于后面的理解
-
self.tracker.predict()对每一个tracker对象中的列表tracks中的每个track对象进行卡尔曼预测。
-
self.tracker.update(detections)经过其中的级联特征匹配:由于是第一帧,所以这里只有unmatched_detections列表中有内容,其他两个都是空的。
matches, unmatched_tracks, unmatched_detections = \
    self._match(detections)#级联特征匹配
然后初始化跟踪对象:此时状态都为Tentative,然后就开始进行下一帧
for detection_idx in unmatched_detections:
    self._initiate_track(detections[detection_idx])
self.tracks = [t for t in self.tracks if not t.is_deleted()
def _initiate_track(self, detection): mean, covariance = self.kf.initiate(detection.to_xyah()) self.tracks.append(Track( mean, covariance, self._next_id, self.n_init, self.max_age, detection.feature)) self._next_id += 1
-
-
这里我用的是默认值n_init为3,所以前两帧不会有输出结果,因为跟踪对象状态为Tentative,只有连续三帧都能够匹配上才会变为Confirmed,才会有输出结果。总体的过程和下述过程类似
-
从第四帧开始(此时可能已经有两状态的跟踪对象:Tentative,Confirmed):接下来需要预测tracker
self.tracker.predict()tracker.predict():
def predict(self):
    """Propagate track state distributions one time step forward.

    This function should be called once every time step, before `update`.
    """
    for track in self.tracks:
        track.predict(self.kf)
track.predict():
def predict(self, kf):
    """Propagate the state distribution to the current time step using a
    Kalman filter prediction step.

    Parameters
    ----------
    kf : kalman_filter.KalmanFilter
        The Kalman filter.

    """
    self.mean, self.covariance = kf.predict(self.mean, self.covariance)#进行卡尔曼滤波得到该对象的预测坐标
    self.age += 1#预测的帧数加1
    self.time_since_update += 1#距离上次更新加1
最终是要把目前已有的track对象进行predict
-
self.tracker.update(detections)对跟踪对象进行更新。
首先会进行级联特征匹配,先理解一下级联特征匹配的过程。
matches, unmatched_tracks, unmatched_detections = \
    self._match(detections)#级联特征匹配
这里是函数的入口,通过级联匹配找到该帧中所有匹配上的目标,以及未匹配上的跟踪对象,未匹配上的检测对象
在看_match函数之前先理解一下其中的方法:
	def gated_metric(tracks, dets, track_indices, detection_indices):
        features = np.array([dets[i].feature for i in detection_indices])#所有检测对象的特征
        targets = np.array([tracks[i].track_id for i in track_indices])#跟踪对象的id
        cost_matrix = self.metric.distance(features, targets)#这里得到的代价矩阵就是每个track对象和现在det对象的代价值
        #self.metric 是NearestNeighborDistanceMetric("cosine", max_cosine_distance, nn_budget)对象
        # 这里返回的是使用余弦距离计算出来的代价矩阵
        cost_matrix = linear_assignment.gate_cost_matrix(
            self.kf, cost_matrix, tracks, dets, track_indices,
            detection_indices)#判断距离关系,使用马氏距离,大于阈值的都把代价变成无穷。

        return cost_matrix
该方法的作用就是返回一个代价矩阵,每一个状态为confirmed的跟踪对象和该帧中的检测对象的一个代价
其中的self.metric.distance():
def distance(self, features, targets):
    #features是所有检测框的特征,每个元素是一个对象
    cost_matrix = np.zeros((len(targets), len(features)))
    for i, target in enumerate(targets):
        cost_matrix[i, :] = self._metric(self.samples[target], features)#算余弦距离,这里的samples就是目前所有confirmed对象的特征。这里其实是找到了每个confirmed对象和相似度最高的那个检测对象的代价,比如有5个跟踪对象,4个检测对象,那么这里返回的矩阵就是5*4,其中元素i,j表示第i个跟踪对象和第j个检测对象之间的代价。所以这里每次多一行,一行就表示该track对象和每个det的最小代价
    return cost_matrix
def _nn_cosine_distance(x, y): distances = _cosine_distance(x, y) return distances.min(axis=0)#取每列的最小值,一列就是一个det对象和各个track对象的代价,这样相当于计算出了每个det对象跟这个track对象所有特征计算出来的最小代价值,也就是表示每个det对象和track对象的最小代价。def _cosine_distance(a, b, data_is_normalized=False): if not data_is_normalized: a = np.asarray(a) / np.linalg.norm(a, axis=1, keepdims=True)#分母表示每个行向量求二范数 b = np.asarray(b) / np.linalg.norm(b, axis=1, keepdims=True) #其实画个图也很好理解,这里上面的步骤是把行向量化为单位向量,然后再进行np.dot求出来的就是行向量两两之间的一个余弦距离。 return 1. - np.dot(a, b.T)#因为这里是代价矩阵,所以代价越大,相似性越低。如上三块代码就计算出了每个跟踪对象和检测对象的相似度(取相似度最高的)简单解释一下。如下图,是我运行代码时的一个结果,这就表示传入_nn_cosine_distance的track对象一共有3个特征,一共有9个检测对象,这里每个特征都是1*512。由此可以得到一个3*9的矩阵,然后再取每一列的最小值,返回的就是一个向量了。

在得到余弦代价矩阵之后,要经过一个方法来对距离进行一个度量,跟踪对象的bbox和检测对象的bbox距离超过阈值的话,就把代价设为无穷大。
cost_matrix = linear_assignment.gate_cost_matrix(
    self.kf, cost_matrix, tracks, dets, track_indices,
    detection_indices)#判断距离关系,使用马氏距离,大于阈值的都把代价变成无穷。
def gate_cost_matrix( kf, cost_matrix, tracks, detections, track_indices, detection_indices, gated_cost=INFTY_COST, only_position=False):#INFTY_COST=1e+5 gating_dim = 2 if only_position else 4 gating_threshold = kalman_filter.chi2inv95[gating_dim] measurements = np.asarray( [detections[i].to_xyah() for i in detection_indices]) for row, track_idx in enumerate(track_indices): track = tracks[track_idx] gating_distance = kf.gating_distance( track.mean, track.covariance, measurements, only_position)#算出的马氏距离 cost_matrix[row, gating_distance > gating_threshold] = gated_cost return cost_matrix搞懂gated_metric方法之后(简单说来就是这个方法可以让我们返回一个状态为confirmed的跟踪对象和检测对象的一个代价矩阵)就可以继续往下看。
confirmed_tracks = [
    i for i, t in enumerate(self.tracks) if t.is_confirmed()]#获取状态位confirmed跟踪对象
unconfirmed_tracks = [
    i for i, t in enumerate(self.tracks) if not t.is_confirmed()]#获取状态非confirmed的对象,例如Tentative,Deleted

# Associate confirmed tracks using appearance features.
matches_a, unmatched_tracks_a, unmatched_detections = \
    linear_assignment.matching_cascade(
        gated_metric, self.metric.matching_threshold, self.max_age,
        self.tracks, detections, confirmed_tracks)#对检测出来的对象和状态位confirmed的跟踪对象进行特征匹配
def matching_cascade( distance_metric, max_distance, cascade_depth, tracks, detections, track_indices=None, detection_indices=None): #track_indices传入的是状态为confirmed跟踪对象,整体来看这个方法就是对检测结果和状态位confirmed跟踪对象进行匹配。 #detection_indices传过来的时候就是None if track_indices is None: track_indices = list(range(len(tracks)))#跟踪对象索引 if detection_indices is None: detection_indices = list(range(len(detections)))#检测对象索引 unmatched_detections = detection_indices#初始化为匹配上的检测框 matches = [] for level in range(cascade_depth): if len(unmatched_detections) == 0: # 当所有的检测框都匹配上之后结束匹配 break track_indices_l = [ k for k in track_indices if tracks[k].time_since_update == 1 + level ]#比较好理解,从后往前匹配,首先找到time_since_update为1的也就是上一帧刚更新过的那些跟踪对象,可以理解为先匹配连续轨迹然后匹配有间断但为达到max_age的对象。 if len(track_indices_l) == 0: # Nothing to match at this level continue matches_l, _, unmatched_detections = \ min_cost_matching( distance_metric, max_distance, tracks, detections, track_indices_l, unmatched_detections) matches += matches_l unmatched_tracks = list(set(track_indices) - set(k for k, _ in matches)) return matches, unmatched_tracks, unmatched_detections主要是上面这个matching_cascade()方法。这里的匹配过程是根据更新的先后顺序来进行特征匹配,越近更新的就更早的进行匹配,也就是可以更容易得到匹配对象。
def min_cost_matching(
        distance_metric, max_distance, tracks, detections, track_indices=None,
        detection_indices=None):

    if track_indices is None:
        track_indices = np.arange(len(tracks))
    if detection_indices is None:
        detection_indices = np.arange(len(detections))

    if len(detection_indices) == 0 or len(track_indices) == 0:
        return [], track_indices, detection_indices  # Nothing to match.

    cost_matrix = distance_metric(
        tracks, detections, track_indices, detection_indices)#这个方法是traker.py中_match方法下定义的一个方法。这个方法返回代价矩阵,其中的内容就是每个跟踪对象和每个检测对象的代价
    cost_matrix[cost_matrix > max_distance] = max_distance + 1e-5#余弦距离大于阈值的也都变成,代价越大,相似度越小,代价大于0.2的,也就是相似度小于0.8的,下面71行用到了
    row_indices, col_indices = linear_assignment(cost_matrix)

    matches, unmatched_tracks, unmatched_detections = [], [], []
    for col, detection_idx in enumerate(detection_indices):
        if col not in col_indices:
            unmatched_detections.append(detection_idx)
    for row, track_idx in enumerate(track_indices):
        if row not in row_indices:
            unmatched_tracks.append(track_idx)
    for row, col in zip(row_indices, col_indices):#这个循环是把那些虽然在最优解中,但是超过阈值的去掉
        track_idx = track_indices[row]
        detection_idx = detection_indices[col]
        if cost_matrix[row, col] > max_distance:
            unmatched_tracks.append(track_idx)
            unmatched_detections.append(detection_idx)
        else:
            matches.append((track_idx, detection_idx))
    return matches, unmatched_tracks, unmatched_detections
其中的min_cost_matching方法可以得到KM匹配算法之后的匹配结果(这个结果需要进行修正,代价超过0.2的都算做未匹配)
下面是我运行时查看KM之前的代价矩阵情况
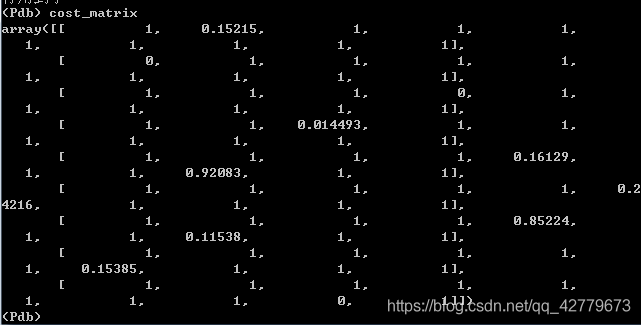
然后得到了confirmed的匹配结果
iou_track_candidates = unconfirmed_tracks + [
    k for k in unmatched_tracks_a if
    self.tracks[k].time_since_update == 1]#不是confirmed加上未匹配上的track中刚更新过的。
unmatched_tracks_a = [
    k for k in unmatched_tracks_a if
    self.tracks[k].time_since_update != 1]#未匹配上的且不是刚更新的
matches_b, unmatched_tracks_b, unmatched_detections = \
    linear_assignment.min_cost_matching(
        iou_matching.iou_cost, self.max_iou_distance, self.tracks,
        detections, iou_track_candidates, unmatched_detections)
之后再把非confirmed的跟踪对象和上一帧刚更新过但是未匹配上的那些跟踪对象加入同一个iou_track_candidates列表,与未匹配上的检测对象进行IOU匹配。
def iou_cost(tracks, detections, track_indices=None,
             detection_indices=None):
    """An intersection over union distance metric.

    Parameters
    ----------
    tracks : List[deep_sort.track.Track]
        A list of tracks.
    detections : List[deep_sort.detection.Detection]
        A list of detections.
    track_indices : Optional[List[int]]
        A list of indices to tracks that should be matched. Defaults to
        all `tracks`.
    detection_indices : Optional[List[int]]
        A list of indices to detections that should be matched. Defaults
        to all `detections`.

    Returns
    -------
    ndarray
        Returns a cost matrix of shape
        len(track_indices), len(detection_indices) where entry (i, j) is
        `1 - iou(tracks[track_indices[i]], detections[detection_indices[j]])`.

    """
    if track_indices is None:
        track_indices = np.arange(len(tracks))
    if detection_indices is None:
        detection_indices = np.arange(len(detections))

    cost_matrix = np.zeros((len(track_indices), len(detection_indices)))
    for row, track_idx in enumerate(track_indices):
        if tracks[track_idx].time_since_update > 1:#把不是刚更新的都设为无穷大,这对删除了的直接没戏了,除非所有的都匹配完了才会有结果。
            cost_matrix[row, :] = linear_assignment.INFTY_COST
            continue

        bbox = tracks[track_idx].to_tlwh()
        candidates = np.asarray([detections[i].tlwh for i in detection_indices])
        cost_matrix[row, :] = 1. - iou(bbox, candidates)
    return cost_matrix
后面的步骤跟上面都是一样的。上面的搞懂之后,就可以看_match方法了:直接顺一遍应该很顺
def _match(self, detections):
    '''

    Args:
        detections:传入的参数就是经过一系列筛选得到的bbox
    Returns:
    '''
    def gated_metric(tracks, dets, track_indices, detection_indices):
        features = np.array([dets[i].feature for i in detection_indices])#所有检测对象的特征
        targets = np.array([tracks[i].track_id for i in track_indices])#跟踪对象的id
        cost_matrix = self.metric.distance(features, targets)#这里得到的代价矩阵就是每个track对象和现在det对象的代价值
        #self.metric 是NearestNeighborDistanceMetric("cosine", max_cosine_distance, nn_budget)对象
        # 这里返回的是使用余弦距离计算出来的代价矩阵
        cost_matrix = linear_assignment.gate_cost_matrix(
            self.kf, cost_matrix, tracks, dets, track_indices,
            detection_indices)#判断距离关系,使用马氏距离,大于阈值的都把代价变成无穷。

        return cost_matrix

    # Split track set into confirmed and unconfirmed tracks.
    confirmed_tracks = [
        i for i, t in enumerate(self.tracks) if t.is_confirmed()]#获取状态位confirmed跟踪对象
    unconfirmed_tracks = [
        i for i, t in enumerate(self.tracks) if not t.is_confirmed()]#获取状态非confirmed的对象,例如Tentative,Deleted

    # Associate confirmed tracks using appearance features.
    matches_a, unmatched_tracks_a, unmatched_detections = \
        linear_assignment.matching_cascade(
            gated_metric, self.metric.matching_threshold, self.max_age,
            self.tracks, detections, confirmed_tracks)#对检测出来的对象和状态位confirmed的跟踪对象进行特征匹配

    # Associate remaining tracks together with unconfirmed tracks using IOU.剩下的用IOU进行匹配
    iou_track_candidates = unconfirmed_tracks + [
        k for k in unmatched_tracks_a if
        self.tracks[k].time_since_update == 1]#不是confirmed加上未匹配上的track中刚更新过的。
    unmatched_tracks_a = [
        k for k in unmatched_tracks_a if
        self.tracks[k].time_since_update != 1]#未匹配上的且不是刚更新的
    matches_b, unmatched_tracks_b, unmatched_detections = \
        linear_assignment.min_cost_matching(
            iou_matching.iou_cost, self.max_iou_distance, self.tracks,
            detections, iou_track_candidates, unmatched_detections)

    matches = matches_a + matches_b
    unmatched_tracks = list(set(unmatched_tracks_a + unmatched_tracks_b))
    return matches, unmatched_tracks, unmatched_detections
得到了最终的matches,unmatched_tracks,unmatched_detections
对其分别进行处理:
for track_idx, detection_idx in matches:
    self.tracks[track_idx].update(
        self.kf, detections[detection_idx])
for track_idx in unmatched_tracks:
    self.tracks[track_idx].mark_missed()#如果是Tentative状态下未匹配上就直接删了,或者大于最大值了
for detection_idx in unmatched_detections:
    self._initiate_track(detections[detection_idx])
self.tracks = [t for t in self.tracks if not t.is_deleted()]
这些操作也不难理解,主要是这个未匹配上的跟踪对象,
def mark_missed(self):
    """Mark this track as missed (no association at the current time step).
    """

    if self.state == TrackState.Tentative:#
        self.state = TrackState.Deleted
    elif self.time_since_update > self._max_age:
        self.state = TrackState.Deleted
如果状态为Tentative,则直接转为Deleted,如果为Confirmed且超过max_age也变为confirmed
且self.track更新为非deleted对象。
# Update distance metric.
active_targets = [t.track_id for t in self.tracks if t.is_confirmed()]#状态为confirmed的trackid
features, targets = [], []
for track in self.tracks:
    if not track.is_confirmed():
        continue
    features += track.features
    targets += [track.track_id for _ in track.features]
    track.features = []
self.metric.partial_fit(
    np.asarray(features), np.asarray(targets), active_targets)
下面这个metric.partial_fit()
def partial_fit(self, features, targets, active_targets):
    """Update the distance metric with new data.

    Parameters
    ----------
    features : ndarray
        An NxM matrix of N features of dimensionality M.
    targets : ndarray
        An integer array of associated target identities.
    active_targets : List[int]
        A list of targets that are currently present in the scene.

    """
    #该方法的作用就是调整存储特征的字典使其中存储的特征都是状态为confirmed的对象的
    #activate_targets:状态为confirmed的跟踪对象。
    #targets和features是目前所有状态为confirmed的跟踪对象的id和特征
    for feature, target in zip(features, targets):
        self.samples.setdefault(target, []).append(feature)#setdefalut方法就是如果这个字典中有这个target这个键就返回其键值,没有的话就新建这个键并且返回逗号后面的值最为键值
        if self.budget is not None:
            self.samples[target] = self.samples[target][-self.budget:]#只取最新的特征,比如一个跟踪对象出现在1-200帧,只有100-200会被保存
    self.samples = {k: self.samples[k] for k in active_targets}
只加入状态为confirmed那些对象的特征,Tentative不加
-
用一个图来总结一下deepsort中最关键的两个步骤:

图片参考:https://zhuanlan.zhihu.com/p/80764724改进。