基于pycharm的opencv (python)-----信用卡实战
1、环境配置
参考:https://blog.csdn.net/liuxianfei0810/article/details/108863896
2、材料
1)模板

2)被检测图片

3、思路
1)模板
(1)目的:得到该数字在模板上对应的模板
(2)模板本身是BGR图像,画出轮廓需要二值图,先用BGR转化为二值图,使用threshold(阈值)来来转换成二值图像
(3)用findContours找轮廓,findContours方法的参数的格式必须是:二值图像深度复制的副本、mode轮廓检测模式一般选择RETR_EXTERNAL,而method表示轮廓逼近方法:一般选择CHAIN_APPROX_SIMPLE(只保留各个轮廓的部分顶点或者转折点,足够用来描绘出轮廓!)
(4)使用drawContours画出轮廓排序的思想是:通过boundingRect方法获取到包含了每个轮廓的矩形的左上坐标,因为模板图像本身是按照从小到大的顺序排列,因此,通过比较个轮廓矩形的左上坐标的横坐标即可得到个轮廓的排序的列表refCnts。
(5)通过定义一个digits字典来通过对refCnts列表的for循环来将数字0123456789与refCnts中的边框在ref图像中的像素点区域
2)被识别图像处理
(1)转化为灰度图
(2)初始化卷积核
(9, 3)是指的矩阵的宽w和高h, 9是因为想让横向的信息多保留
KectKernel为:
[[1 1 1 1 1 1 1 1 1]
[1 1 1 1 1 1 1 1 1]
[1 1 1 1 1 1 1 1 1]]
形状(3, 9)
(3)礼帽,突出更明亮的区域(以突出细节区域),得到的是噪音图像
(4)目的是四个数字构成的一个个块提取出来
先闭操作,阈值, 再次闭操作为了使得分组的图像中的空洞位置同样被白色填充,这样做的好处提升外轮廓定位的准确率
(5)按照常规步骤画图轮廓,遍历根据轮廓的宽高比以及宽高来选出数字块的图,根据X坐标的大小排序。
对每个数字块进行预处理,找出每个数字块里的数字的轮廓,排序,改变图片数字的大小跟模板数字的大小一样大,进行模板匹配,得分。在图片上画出识别的数字以及框框。
4、函数解释
3.1 argparse与vars
使用argparse模块创建一个ArgumentParser解析对象,可以理解成一个容器,将包含将命令行解析为Python数据类型所需的所有信息。
parse_args()是将之前add_argument()定义的参数进行赋值,并返回相关的namespace。
实例化 : aparse=argparse.ArgumentParser()
添加参数 :aparse.add_argument(‘a’,help=‘test’)
解析参数:a=aparse.parse_args()
参考:https://blog.csdn.net/chengmo123/article/details/103609449
parser = argparse.ArgumentParser()
# # 括号少了会报错AttributeError: 'str' object has no attribute 'prefix_chars'
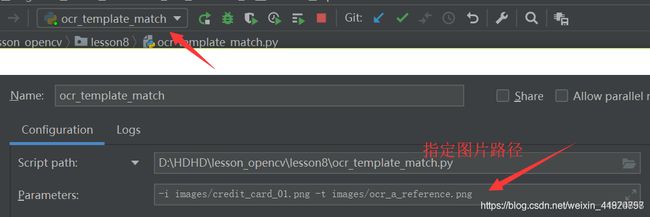
parser.add_argument("-i", "--image", required=True, help="path to input image")
# -i可以理解为标签,--image既可以是标签又是属性
parser.add_argument("-t", "--template", required=True, help="path to template OCR-A image")
args = vars(parser.parse_args()) # print(args["image"])
# args为字典{'image': 'images/credit_card_01.png', 'template': 'images/ocr_a_reference.png'}
args = parser.parse_args() # print(args.image)
# Namespace(image='images/credit_card_01.png', template='images/ocr_a_reference.png')
# -t 和 --train两种情况,在bat文件和pycharm配置种注意区分前面的两个--还是一个-
pycharm下可以通过argparse模块完成参数设置,即生成全局变量
3.2 zip与zip*
zip() 函数用于将可迭代的对象(直观理解就是能用for循环进行迭代的对象就是可迭代对象。比如:字符串,列表,元祖,字典,集合等等,都是可迭代对象。)作为参数,将对象中对应的元素打包成一个个元组,然后返回由这些元组组成的列表。
如果各个迭代器的元素个数不一致,则返回列表长度与最短的对象相同,利用 * 号操作符,可以将元组解压为列表。(个人理解,将两组元素,分别各成元元组组合成一个列表)
zip 方法在 Python 2 和 Python 3 中的不同:在 Python 3.x 中为了减少内存,zip()
返回的是一个对象。如需展示列表,需手动 list() 转换。
a = [(1, 2), (2, 3), (3, 4)]
# 类似这些都是可以迭代的元祖,字符串等等。a = ((1, 2), (2, 3), (3, 4)), a="abc"
b = [(5, 6), (7, 8), (9, 9)]
print(zip(a, b)) # 3.3 sorted
#基础用法
#传进去一个可迭代的数据,返回一个新的列表,按照从小到大排序,注意,是新的列表!
a = [1, 4, 6, 8, 9, 3, 5]
b = "aghdb"
sorted(a)  # print(a)不变,返回sorted(g)变; [1, 3, 4, 5, 6, 8, 9]
sorted(b)  # 返回['a', 'b', 'd', 'g', 'h']
sorted(a, reverse=True)  # 逆序排序; [9, 8, 6, 5, 4, 3, 1]
高级用法
列表里面的每一个元素都为二维元组,key参数传入了一个lambda函数表达式,其x就代表列表里的每一个元素,然后分别利用索引返回元素内的第一个和第二个元素,这就代表了sorted()函数根据哪一个元素进行排列。reverse参数起逆排的作用,默认为False,从小到大顺序。
c = [("a", 1), ("e", 2), ("c", 4)]
print(sorted(c, key=lambda x: x[0]))
print(sorted(c, key=lambda x: x[1]))
print(sorted(c, key=lambda x: x[0], reverse=True))
3.4 enumerate
enumerate()是python的内置函数、适用于python2.x和python3.x
enumerate在字典上是枚举、列举的意思
enumerate参数为可遍历/可迭代的对象(如列表、字符串)
enumerate多用于在for循环中得到计数,利用它可以同时获得索引和值,即需要index和value值的时候可以使用enumerate
enumerate()返回的是一个enumerate对象
>>> lst = [1,2,3,4,5,6]
>>> for index,value in enumerate(lst):
  print ('%s,%s' % (index,value))

0,1
1,2
2,3
3,4
4,5
5,6
#指定索引从3开始
>>> for index,value in enumerate(lst,3):
print ('%s,%s' % (index,value))

3,1
4,2
5,3
6,4
7,5
8,6
3.5 items()
D.items()
Python 字典 items() 方法,以列表形式返回可遍历的(键, 值) 元组数组,(并非直接的列表,若要返回列表值还需调用list函数)。
D = {'Google': 'www.google.com', 'Runoob': 'www.runoob.com', 'taobao': 'www.taobao.com'}
print(D.items())
print(list(D.items()))
# 遍历字典列表
for key, value in D.items():
    print(key, value)
# dict_items([('Google', 'www.google.com'), ('Runoob', 'www.runoob.com'), ('taobao', 'www.taobao.com')])
# [('Google', 'www.google.com'), ('Runoob', 'www.runoob.com'), ('taobao', 'www.taobao.com')]
# Google www.google.com   Runoob www.runoob.com  taobao www.taobao.com
3.6 join()
join()方法——用于将序列中的元素以指定的字符连接生成一个新的字符串
join()方法语法:str.join(sequence),sequence为要连接的元素序列。
str = "-"
seq = ("a", "b", "c") # 字符串序列
# c = [1, 2, 3] 数字不行,变成# c = ["1", "2", "3"]
print(str.join(seq))  # 输出结果为a-b-c
# print("-".join(seq))  直接这样写也行
# print(“”.join(seq))  输出结果为abc
3.7 extend()用法
extend() 函数用于在列表末尾一次性追加另一个序列中的多个值(用新列表扩展原来的列表)。
extend()方法语法:list.extend(seq)
a = [1, "a", "ad", "fd"]
b = ["d", "d", "d"]

a.extend(b)  # 注意这个函数没有返回值,直接在a上面变化。
print(a)

a1 = []
a1.extend(a)
print(a1)
3.8 cv2.putText()
在图片上写东西
各参数依次是:图片,添加的文字,左上角坐标,字体,字体大小,颜色,字体粗细
cv2.putText(img, 'MyPic:', (50,150), cv2.FONT_HERSHEY_COMPLEX, 5, (0, 255, 255), 12)
5、代码
# 导入工具包
from imutils import contours
import numpy as np
import argparse
import cv2
import matplotlib.pyplot as plt
# import myutils

#设置参数,pycharm 通过argparse模块完成参数设置
ap = argparse.ArgumentParser()
# # 括号少了会报错AttributeError: 'str' object has no attribute 'prefix_chars'
ap.add_argument("-i", "--image", required=True,
	help="path to input image")
# -i可以理解为标签,--image既可以是标签又是属性
# # print(args["image"])
ap.add_argument("-t", "--template", required=True,
	help="path to template OCR-A image")
args = vars(ap.parse_args())
# print(args["image"])
# args为字典{'image': 'images/credit_card_01.png', 'template': 'images/ocr_a_reference.png'}
# Namespace(image='images/credit_card_01.png', template='images/ocr_a_reference.png')
# -t 和 --train两种情况,在bat文件和pycharm配置种注意区分前面的两个--还是一个-

# 指定信用卡类型
FIRST_NUMBER = {
    "3": "American Express",
    "4": "Visa",
    "5": "MasterCard",
    "6": "Discover Card"
}

# 这是myutils文件中的内容
def sort_contours(cnts, method="left-to-right"):
    reverse = False
    i = 0

    if method == "right-to-left" or method == "bottom-to-top":
        reverse = True

    if method == "top-to-bottom" or method == "bottom-to-top":
        i = 1
    boundingBoxes = [cv2.boundingRect(c) for c in cnts] #用一个最小的矩形,把找到的形状包起来x,y,h,w
    (cnts, boundingBoxes) = list(zip(*sorted(zip(cnts, boundingBoxes),
                                        key=lambda b: b[1][i], reverse=reverse)))

    return cnts, boundingBoxes
def resize(image, width=None, height=None, inter=cv2.INTER_AREA):
    dim = None
    (h, w) = image.shape[:2]
    if width is None and height is None:
        return image
    if width is None:
        r = height / float(h)
        dim = (int(w * r), height)
    else:
        r = width / float(w)
        dim = (width, int(h * r))
    resized = cv2.resize(image, dim, interpolation=inter)
    return resized

# 定义绘图
def cv_show(name, img):
    cv2.imshow(name, img)
    cv2.waitKey(0)
    cv2.destroyAllWindows()

# 预处理模板
template_bgr= cv2.imread(args["template"])
#cv_show('template_bgr', template_bgr)
# 灰度图
template_gray = cv2.cvtColor(template_bgr, cv2.COLOR_BGR2GRAY)
#cv_show('template_gray', template_gray )
# 二值图
#threshold最后输出是两个,只需要输出图,所以加[1]
template_binary = cv2.threshold(template_gray, 10, 255, cv2.THRESH_BINARY_INV)[1]
#cv_show('template_binary', template_binary)

#计算轮廓
#cv2.findContours()函数接受的参数为二值图,即黑白的(不是灰度图),cv2.RETR_EXTERNAL只检测外轮廓,cv2.CHAIN_APPROX_SIMPLE只保留终点坐标
#返回的list中每个元素都是图像中的一个轮廓
binary, template_conts, hierarchy = cv2.findContours(template_binary.copy(), cv2.RETR_EXTERNAL, cv2.CHAIN_APPROX_SIMPLE)
cv2.drawContours(template_bgr, template_conts, -1, (0,0,255), 3)
#cv_show('template_bgr', template_bgr)
refCnts = sort_contours(template_conts, method="left-to-right")[0] #排序,从左到右,从上到下
digits = {}

#遍历每一个轮廓
for (i, c) in enumerate(template_conts):
    # 计算外接矩形并且resize成合适大小
    (x, y, w, h) = cv2.boundingRect(c)
    roi = template_binary[y:y + h, x:x + w]
    roi = cv2.resize(roi, (57, 88))

    # 每一个数字对应每一个模板
    digits[i] = roi
   # cv_show('digits[i]',digits[i])


#信用卡预处理
image = cv2.imread(args["image"])
#cv_show('image',image)
#print(image.shape)
image = resize(image, width=30)
gray = cv2.cvtColor(image, cv2.COLOR_BGR2GRAY)
#cv_show = ('gray', gray)


# 初始化卷积核
# 考虑到自己想要识别的区域的长宽,比如“5412”这四个字的整体区域,因此选择了一个9*3的卷积核。
rectKernel = cv2.getStructuringElement(cv2.MORPH_RECT, (9,3))
sqKernel = cv2.getStructuringElement(cv2.MORPH_RECT, (5, 5))

# 礼帽操作(原图 - 开运算(先腐蚀后膨胀))突出更明亮的区域(以突出细节区域),得到的是噪音图像
tophat = cv2.morphologyEx(gray, cv2.MORPH_TOPHAT, rectKernel)
#cv_show('tophat', tophat)

gradX = cv2.Sobel(tophat, ddepth = cv2.CV_32F, dx=1, dy=0, ksize=-1)  #ksize=-1相当于用3*3的
#cv_show('gradX', gradX)
gradX = np.absolute(gradX)

(minVal, maxVal) = (np.min(gradX), np.max(gradX))
gradX = (255 * ((gradX - minVal) / (maxVal - minVal)))
gradX = gradX.astype("uint8")

# 查看礼帽操作的图像
#print(gradX.shape)
#cv_show('gradX', gradX)

#将数字构成的四个组块提取出来
#通过闭操作(先膨胀,后腐蚀)
gradX = cv2.morphologyEx(gradX, cv2.MORPH_CLOSE, rectKernel)
#cv_show('gradX', gradX)
#THRESH_OTSU会自动寻找合适的阈值,适合双峰,需把阈值参数设置为0
thresh = cv2.threshold(gradX, 0, 255,
                       cv2.THRESH_BINARY | cv2.THRESH_OTSU)[1]
#cv_show('thresh', thresh)

#再次闭操作,将为了使得分组的图像中的空洞位置同样被白色填充,这样做的好处提升外轮廓定位的准确率
thresh = cv2.morphologyEx(thresh, cv2.MORPH_CLOSE, sqKernel)
cv_show('thresh', thresh)

#计算图像轮廓
thresh_, threshCnts, hierarchy = cv2.findContours(thresh.copy(), cv2.RETR_EXTERNAL, cv2.CHAIN_APPROX_SIMPLE)
cnts = threshCnts
cur_img = image.copy()
cv2.drawContours(cur_img, cnts, -1, (0, 0, 255), 3)
cv_show('cur_img', cur_img)
locs = []

#遍历轮廓
for (i, c) in enumerate(cnts):
    # 计算轮廓
    (x, y, w, h) = cv2.boundingRect(c)
    ar = w / float(h)
    # 选择合适的区域,根据实际任务来,这里的基本都是四个数字一组
    if ar > 2.5 and ar < 4.0:

        if (w > 40 and w < 55) and (h > 10 and h < 20):
            #框框符合的留下来
            locs.append(x, y, w, h)

# 符合轮廓从左到右排序
locs = sorted(locs, key=lambda x:x[0])
output = []

# 遍历每个轮廓中的数字
for (i, (gX, gY, gW, gH)) in enumerate(locs):
# initialize the list of group digits
    groupOutput = []

    #根据坐标提取每一组
    group = gray[gY - 5:gY + gH + 5, gX - 5:gX + gW + 5]
    cv_show('group', group)
    # 预处理
    group = cv2.threshold(group, 0, 255,
        cv2.THRESH_BINARY | cv2.THRESH_OTSU)[1]
    cv_show('group', group)
    #计算每一组的轮廓
    group_, digitCnts, hierarchy = cv2.findContours(group.copy(), cv2.RETR_EXTERNAL,
                                                    cv2.CHAIN_APPROX_SIMPLE)
    digitCnts = contours.sort_contours(digitCnts,
        method="left-to-right")

    #计算每一组中的每一个数值
    for c in digitCnts:
        # 找到当前数值的轮廓,resize 成合适的大小
        (x, y, w, h) = cv2.boundingRect(c)
        roi = group[y : y + h, x : x + w]
        roi = cv2.resize(roi, (57, 88))
        cv_show('roi', roi)

        #计算匹配得分
        scores = []

        # 在模板中计算每一个得分
        for (digit, digitROI) in digits.items():
            #模板匹配
            result = cv2.matchTemplate(roi, digitROI,
                                       cv2.TM_CCOEFF)
            (_, score, _, _) = cv2.minMaxLoc(result)
            scores.append(score)

        # 得到最合适的数字
        groupOutput.append(str(np.argmax(scores)))

    # 画出来
    cv2.rectangle(image, (gX - 5, gY - 5),
                  (gX + gW + 5,  gY + gH + 5), (0, 0, 255), 1)
    cv2.putText(image, "".join(groupOutput), (gX, gY - 15),
                cv2.FONT_HERSHEY_SIMPLEX, 0.65, (0, 0, 255), 2)

    #得到结果
    output.extend(groupOutput)

# 打印结果
print("Credit Card Type: {}".format(FIRST_NUMBER[output[0]]))
print("Credit Card #: {}".format("".join(output)))
cv2.imshow("Image", image)
cv2.waitKey(0)
参考:https://blog.csdn.net/liuxianfei0810/article/details/108863896
https://blog.csdn.net/weixin_41874898/article/details/99624454
https://blog.csdn.net/m0_38052500/article/details/106897589
https://www.bilibili.com/video/BV1oJ411D71z