yolov5facce-landmarks(98点)
关于如何使用自己数据集来训练yolo5vface,主要包括两部分:(1) 数据集标签信息的理解与标签信息格式转换;(2) 基于yolov5face源代码进行后续的代码修改。
主要代码修改部分可直接参考长方形混凝土瞬间移动师-yolov5-face学习笔记
本文仅作为个人的一种记录~~
需要修改好的源码可直接下方留邮箱~
一 数据集
1.首先可根据自己的数据集的标签信息理解/理清每个标签数据的含义(可通过看readme、可视化等等~)
2.理清标注信息后,使用yolov5face源码中data/train2yolo.py进行数据格式的转换。
本文参考的是JD_WFLW合并得到的数据集的label进行label格式转换~
import os.path
import sys
import torch
import torch.utils.data as data
import cv2
import numpy as np


class WiderFaceDetection(data.Dataset):
    def __init__(self, data_path, preproc=None):
        self.preproc = preproc
        self.imgs_path = []
        self.words = []
        txt_path = os.path.join(data_path, "labels.txt")
        f = open(txt_path, 'r')
        lines = f.readlines()
        isFirst = True
        labels = []
        for line in lines[:20]:
            line = line.strip().split()
            label = line[1:201]  # type(line):, len(line):201
            label = [float(x) for x in label]
            imgname = line[0]  # 图片名,如:'jd_train_9.jpg'
            self.imgs_path.append(os.path.join(data_path, "images", imgname))  # 图像路径
            labels.append(label)

        # self.words.append(labels)
        self.words = labels

    def __len__(self):
        return len(self.imgs_path)

    def __getitem__(self, index):
        img = cv2.imread(self.imgs_path[index])
        height, width, _ = img.shape

        labels = self.words[index]
        # annotations = np.zeros((0, 15))
        annotations = np.zeros((0, 201))
        if len(labels) == 0:
            return annotations
        annotation = np.zeros((1, 201))     # 1行201列
        # bbox,原label.txt中的后4位是bbox相关坐标信息?

        # labels[-4] = (labels[-4] + labels[-2]) / 2 # 中心点坐标x
        # labels[-3] = (labels[-3] + labels[-1]) / 2 # 中心点坐标y
        # labels[-2] = (labels[-2] - labels[-4]) / 2 # w
        # labels[-1] = (labels[-1] - labels[-3]) / 2 # h

        annotation[0, 0] = labels[-4]  # x1       # annotation[0, 0]:第0行,第0列,即第一个数据
        annotation[0, 1] = labels[-3]  # y1
        annotation[0, 2] = labels[-2]  # x2
        annotation[0, 3] = labels[-1]  # y2
        print("===============")
        # landmarks,1~196之间的是landmarks相关信息

        # for idx, label in enumerate(labels):
        for nx in range(196):
            annotation[0, 4+nx] = labels[nx]

        if annotation[0, 4] < 0:
            annotation[0, 200] = -1
        else:
            annotation[0, 200] = 1

        annotations = np.append(annotations, annotation, axis=0)
        target = np.array(annotations)
        if self.preproc is not None:
            img, target = self.preproc(img, target)

        return torch.from_numpy(img), target


def detection_collate(batch):
    """Custom collate fn for dealing with batches of images that have a different
    number of associated object annotations (bounding boxes).

    Arguments:
        batch: (tuple) A tuple of tensor images and lists of annotations

    Return:
        A tuple containing:
            1) (tensor) batch of images stacked on their 0 dim
            2) (list of tensors) annotations for a given image are stacked on 0 dim
    """
    targets = []
    imgs = []
    for _, sample in enumerate(batch):
        for _, tup in enumerate(sample):
            if torch.is_tensor(tup):
                imgs.append(tup)
            elif isinstance(tup, type(np.empty(0))):
                annos = torch.from_numpy(tup).float()
                targets.append(annos)

    return torch.stack(imgs, 0), targets


if __name__ == '__main__':

    original_path = 'path'
    save_path = 'path'

    aa = WiderFaceDetection(original_path)
    # print(aa)
    # print(type(aa))
    # tmp = torch.utils.data.DataLoader(aa, batch_size=1)
    # for i, (input, target) in enumerate(tmp):
    #     print("当前批样例的input为:{}".format(input.size()))
    #     print("当前样例的target为:{}".format(target))

    for i in range(len(aa.imgs_path)):
        print(i, aa.imgs_path[i])
        img = cv2.imread(aa.imgs_path[i])

        # 保存image与label
        base_img = os.path.basename(aa.imgs_path[i])
        base_txt = os.path.basename(aa.imgs_path[i])[:-4] + ".txt"
        save_img_path = os.path.join(save_path, base_img)
        save_txt_path = os.path.join(save_path, base_txt)

        with open(save_txt_path, "w") as f:
            height, width, _ = img.shape
            # print("height为:{} || width为:{}".format(height, width))
            labels = aa.words[i]
            annotations = np.zeros((0, 200))
            if len(labels) == 0:
                continue

            # for idx, label in enumerate(labels):
            annotation = np.zeros((1, 200))

            # 注意:lables[-4],labels[-3]为原标签中的bbox左上角坐标;labels[-2],labels[-1]为原标签中的bbox的右下角坐标
            labels[-4] = max(0, labels[-4])
            labels[-3] = max(0, labels[-3])
            labels[-2] = labels[-2] - labels[-4]
            labels[-1] = labels[-1] - labels[-3]
            labels[-2] = min(width - 1, labels[-2])
            labels[-1] = min(height - 1, labels[-1])

            annotation[0, 0] = (labels[-4] + labels[-2] / 2) / width    # cx
            annotation[0, 1] = (labels[-3] + labels[-1] / 2) / height    # cy
            annotation[0, 2] = labels[-2] / width    # w
            annotation[0, 3] = labels[-1] / height    # h
            # annotation[0, 0] = (labels[0] + labels[2] / 2) / width  # cx
            # annotation[0, 1] = (labels[1] + labels[3] / 2) / height  # cy
            # annotation[0, 2] = labels[2] / width  # w
            # annotation[0, 3] = labels[3] / height  # h

            for nx in range(196):
                if nx % 2 ==0:
                    annotation[0, 4 + nx] = labels[nx] / width
                else:
                    annotation[0, 4 + nx] = labels[nx] / height
            str_label = "0"
            for i in range(len(annotation[0])):
                # str_label = str_label + " " + str(annotation[0][i])
                str_label = str_label + " " + str(annotation[0][i])
            # str_label = str_label.replace('[', '').replace(']', '')
            # str_label = str_label.replace(',', '') + '\n'
            f.write(str_label)
        cv2.imwrite(save_img_path, img)
二 代码修改
该部分主要是将yolov5face原有的5个关键点修改为98个关键点(其实其它个数的关键数据的匹配也类似,比如68)
此部分主要参考的是长方形混凝土瞬间移动师-yoloV5-face学习笔记。
具体详细代码解释、逻辑分析直接跳转以上链接即可,本文仅记录自己98 landmarks的修改部分。
1.yolo.py Detect模块
由:
self.no = nc + 5 + 10 # number of outputs per anchor
改写为:
self.no = nc + 5 + 196 # number of outputs per anchor
差别就是landmarks的个数。 5 * 2 = 10; 98 * 2 = 196。
Detect中forward函数内部也需要进行修改。
y = y + torch.cat((x[i][:, :, :, :, 0:5].sigmoid(), torch.cat((x[i][:, :, :, :, 5:201], x[i][:, :, :, :, 201:201+self.nc].sigmoid()), 4)), 4)
为了简介,其他地方修改类似~~【把原来跟5 landmarks相关的值改为当前98 landmarks相关的值即可。】
2.face_datasets.py改写
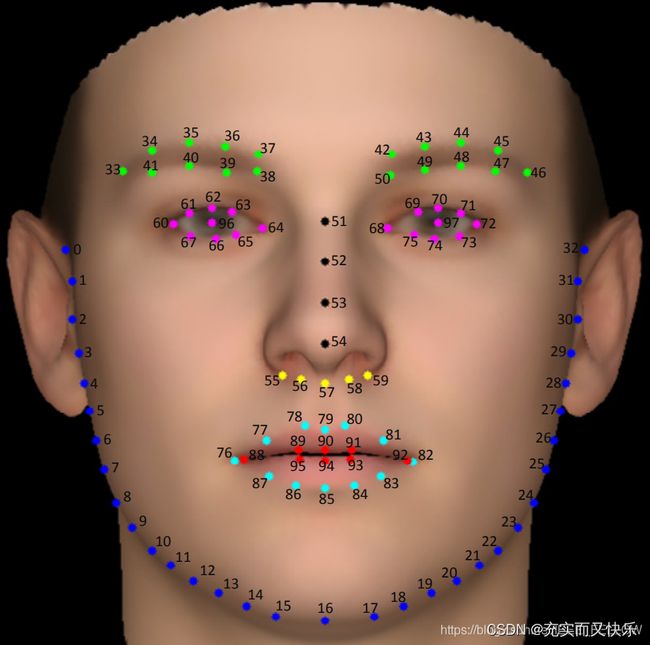
关键点镜像的修改,此处如果不进行修改,可能会造成在最后模型检测时候出现关键点标注错误的问题。
 # 鼻下:55~59,包括55与59;
                    noseLower_left = [55, 56]
                    noseLower_right = [59, 58]

                    for noseLower_i in range(len(noseLower_left)):
                        noseLower_tmp = np.copy(labels[:, [2 * noseLower_left[noseLower_i] + 5, 2 * noseLower_left[noseLower_i] + 6]])
                        labels[:, [2 * noseLower_left[noseLower_i] + 5, 2 * noseLower_left[noseLower_i] + 6]] = labels[:, [2 * noseLower_right[noseLower_i] + 5, 2 * noseLower_right[noseLower_i] + 6]]
                        labels[:, [2 * noseLower_right[noseLower_i] + 5, 2 * noseLower_right[noseLower_i] + 6]] = noseLower_tmp

                    # 唇部:76~95,包括76与95。
                    lip_left = [76, 77, 78, 87, 86, 88, 89, 95]
                    lip_right = [82, 81, 80, 83, 84, 92, 91, 93]

                    for lip_i in range(len(lip_left)):
                        lip_tmp = np.copy(labels[:, [2 * lip_left[lip_i]] + 5, 2 * lip_left[lip_i] + 6])
                        labels[:, [2 * lip_left[lip_i] + 5, 2 * lip_left[lip_i] + 6]] = labels[:, [2 * lip_right[lip_i] + 5, 2 * lip_right[lip_i] + 6]]
                        labels[:, [2 * lip_right[lip_i] + 5, 2 * lip_right[lip_i] + 6]] = lip_tmp

                    # 眼睛:60~75,包括60与75;左眼中心点:96;右眼中心点:97。
                    eye_left = [60, 61, 62, 63, 64, 65, 66, 67, 96]
                    eye_right = [72, 71, 70, 69, 68, 75, 74, 73, 97]

                    for eye_i in range(len(eye_left)):
                        eye_tmp = np.copy(labels[:, [2 * eye_left[eye_i] + 5, 2 * eye_left[eye_i] + 6]])    # 复制左边的landmarks,得到新变量存放
                        labels[:, [2 * eye_left[eye_i] + 5, 2* eye_left[eye_i] + 6]] = labels[:, [2 * eye_right[eye_i] + 5, 2 * eye_right[eye_i] + 6]]  # 将右边对应的镜像赋值给左侧对应的landmarks
                        labels[:, [2 * eye_right[eye_i] + 5, 2 * eye_right[eye_i] + 6]] = eye_tmp   # 再将新变量中存放的左边镜像赋值给右边镜像中

                    # 眉毛:33~50,包括33与50;公式:n * 2 + 5
                    brow_left = [33, 34, 35, 36, 37, 38, 39, 40, 41]
                    brow_right = [46, 45, 44, 43, 42, 50, 49, 48, 47]

                    for brow_i in range(len(brow_left)):
                        brow_tmp = np.copy(labels[:, [2 * brow_left[brow_i] + 5, 2 * brow_left[brow_i] + 6]])
                        labels[:, [2 * brow_left[brow_i] + 5, 2 * brow_left[brow_i] + 6]] = labels[:, [2 * brow_right[brow_i] + 5, 2 * brow_right[brow_i] + 6]]
                        labels[:, [2 * brow_right[brow_i] + 5, 2 * brow_right[brow_i] + 6]] = brow_tmp

                    # 面部轮廓:0~32,包括0与32;下巴中心为16。
                    face_left = [0, 1, 2, 3, 4, 5, 6, 7, 8, 9, 10, 11, 12, 13, 14, 15]
                    face_right = [32, 31, 30, 29, 28, 27, 26, 25, 24, 23, 22, 21, 20, 19, 18, 17]

                    for face_i in range(len(face_left)):
                        face_tmp = np.copy(labels[:, [2 * face_left[face_i] + 5, 2 * face_left[face_i] + 6]])
                        labels[:, [2 * face_left[face_i] + 5, 2 * face_left[face_i] + 6]] = labels[:, [2 * face_right[face_i] + 5, 2 * face_right[face_i] + 6]]
                        labels[:, [2 * face_right[face_i] + 5, 2 * face_right[face_i] + 6]] = face_tmp
参考资料
1.https://blog.csdn.net/m0_58348465/article/details/121423964?spm=1001.2014.3001.5502(代码);
2.https://blog.csdn.net/IEEE_FELLOW/article/details/112194563?spm=1001.2014.3001.5506(数据)。