vue3项目,vite+vue3+ts+pinia(10)-elementplus布局
项目创建好,接下来引入Container 布局容器,
- 在src下新建layout文件夹, layoutName.vue
<template>
  <el-container>
    <el-aside width="200px">
      aside
    </el-aside>
    <el-container>
      <el-header>Header</el-header>
      <el-main> <router-view /> </el-main>
    </el-container>
  </el-container>
</template>

<script lang="ts" setup>
</script>

<style scoped>
.el-container{
  height: 100vh;
}
</style>
- router=> index.ts
import { createRouter, createWebHashHistory, RouteRecordRaw } from 'vue-router'
import AppLayout from '@/layout/layoutName.vue'

const routes: RouteRecordRaw [] = [
  {
    path: '/',
    component: AppLayout,
    children: [
      {
        path: '/',
        name: 'home',
        component: () => import('@/views/home/indexName.vue')
      }
    ]
  },
  {
    path: '/login',
    name: 'login',
    component: () => import('../views/login/indexName.vue')
  }
]

const router = createRouter({
  history: createWebHashHistory(),
  routes
})

export default router
- styles => common.css 目录下
*{
margin: 0;
padding: 0;
} - 注意要main.ts 文件下, 要注释 // import ‘./style.css’,不然 他们会居中
- 终端: npm run dev
- 接下来是看菜单: Menu 菜单, 在elementplus中搜索,
- 在layout文件中新建 components文件夹,再建 layoutAside.vue ,从网友中复制过来
<template>
  <el-menu
    active-text-color="#ffd04b"
    background-color="#304156"
    class="el-menu-vertical-demo"
    default-active="2"
    text-color="#fff"
  >
    <el-sub-menu index="1">
      <template #title>
        <el-icon><location /></el-icon>
        <span>Navigator One</span>
      </template>
      <el-menu-item-group title="Group One">
        <el-menu-item index="1-1">
          item one
        </el-menu-item>
        <el-menu-item index="1-2">
          item two
        </el-menu-item>
      </el-menu-item-group>
      <el-menu-item-group title="Group Two">
        <el-menu-item index="1-3">
          item three
        </el-menu-item>
      </el-menu-item-group>
      <el-sub-menu index="1-4">
        <template #title>
          item four
        </template>
        <el-menu-item index="1-4-1">
          item one
        </el-menu-item>
      </el-sub-menu>
    </el-sub-menu>
    <el-menu-item index="2">
      <el-icon><icon-menu /></el-icon>
      <span>Navigator Two</span>
    </el-menu-item>
    <el-menu-item
      index="3"
      disabled
    >
      <el-icon><document /></el-icon>
      <span>Navigator Three</span>
    </el-menu-item>
    <el-menu-item index="4">
      <el-icon><setting /></el-icon>
      <span>Navigator Four</span>
    </el-menu-item>
  </el-menu>
</template>

<script setup lang='ts'>

</script>

<style scoped>

</style>
- 在layoutName.vue 中
<template>
  <el-container>
    <el-aside width="200px">
      <Aside />
    </el-aside>
    <el-container>
      <el-header>Header</el-header>
      <el-main> <router-view /> </el-main>
    </el-container>
  </el-container>
</template>

<script lang="ts" setup>
import Aside from './components/layoutAside.vue'
</script>

<style scoped>
.el-container{
  height: 100vh;
}
.el-aside{
  background-color: #304156;
  color:#333;
}
</style>
- 终端运行发现, 图标不生效(icon), 在elementplus 中找icon, 发现要安装,根据自己情况安装一下
# NPM
$ npm install @element-plus/icons-vue
# Yarn
$ yarn add @element-plus/icons-vue
# pnpm
$ pnpm install @element-plus/icons-vue
- 在src => plugins => element-plus-icon.ts, 新建的(element-plus-icon.ts), 这用于插件
import { App } from 'vue'
import * as ElementPlusIconsVue from '@element-plus/icons-vue'

export default {
  install (app: App) {
    for (const [key, component] of Object.entries(ElementPlusIconsVue)) {
      app.component(key, component)
    }
  }
}
- 在main.ts 中注册icon ,
import { createApp } from 'vue'
import App from './App.vue'
// 引入element icon
import elementIcon from './plugins/element-plus-icon'

const app = createApp(App)
app.use(elementIcon)
...
- 接下是对router和layoutAside, 改进
- 在src => views 目录下新product 文件夹, 如图
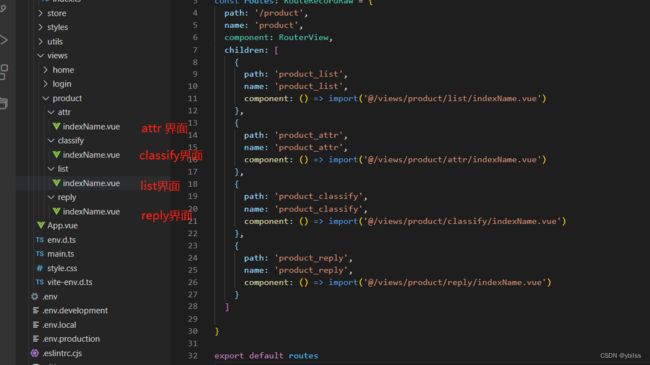
- 在route目录下, 新建modules目录, 再建 product.ts
import { RouteRecordRaw, RouterView } from 'vue-router'

const routes: RouteRecordRaw = {
  path: 'product',
  name: 'product',
  component: RouterView,
  children: [
    {
      path: 'product_list',
      name: 'product_list',
      component: () => import('@/views/product/list/indexName.vue')
    },
    {
      path: 'product_attr',
      name: 'product_attr',
      component: () => import('@/views/product/attr/indexName.vue')
    },
    {
      path: 'product_classify',
      name: 'product_classify',
      component: () => import('@/views/product/classify/indexName.vue')
    },
    {
      path: 'product_reply',
      name: 'product_reply',
      component: () => import('@/views/product/reply/indexName.vue')
    }
  ]

}

export default routes
- 在router目录index.ts中, 导入进来,引用它
import product from './modules/product'

const routes: RouteRecordRaw [] = [
  {
    path: '/',
    component: AppLayout,
    children: [
      {
        path: '/',
        name: 'home',
        component: () => import('@/views/home/indexName.vue')
      },
      product
    ]
  },
  ...
]
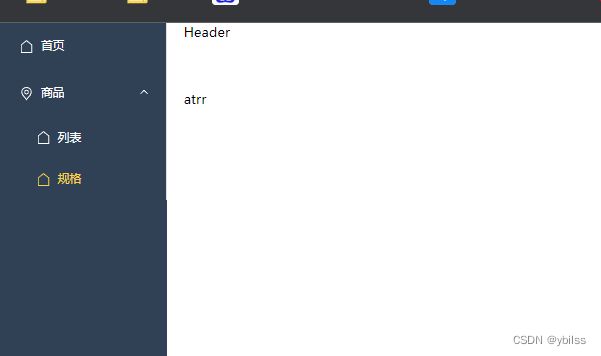
- router 和 界面创建好了, 剩下就是layoutAside.vue了
<template>
  <el-menu
    active-text-color="#ffd04b"
    background-color="#304156"
    class="el-menu-vertical-demo"
    default-active="2"
    text-color="#fff"
    router
  >
    <el-menu-item index="/">
      <el-icon><House /></el-icon>
      <span>首页</span>
    </el-menu-item>

    <el-sub-menu index="1">
      <template #title>
        <el-icon><location /></el-icon>
        <span>商品</span>
      </template>
      <el-menu-item index="/product/product_list">
        <el-icon><House /></el-icon>
        <span>列表</span>
      </el-menu-item>
      <el-menu-item index="/product/product_attr">
        <el-icon><House /></el-icon>
        <span>规格</span>
      </el-menu-item>
    </el-sub-menu>
  </el-menu>
</template>

<script setup lang='ts'>

</script>

<style scoped>
.em-menu{
  border-right: none;
}

</style>
- 终端运行: npm run dev, 就ok