使用mmsegmentation训练自己的数据集
目录
- 一、mmsegmentation 源码下载
- 二、放置自己的数据集
- 三、创建自己的数据集类型
- 四、修改源码
- 五、训练
- 六、预测
一、mmsegmentation 源码下载
https://github.com/open-mmlab/mmsegmentation
二、放置自己的数据集
- 在项目根目录创建 dataset 文件夹
- 在 dataset 文件夹下分别创建 JPEGImages,SegmentationClass, ImageSets/Segmentation 文件夹
- 将 jpg 图片放入 JPEGImages 文件夹
- 将 png 图片放入 SegmentationClass 文件夹
- 将 train.txt 和 val.txt 放入 ImageSets/Segmentation 文件夹
三、创建自己的数据集类型
- 创建 mmseg/datasets/test.py 并写入如下内容:
from .builder import DATASETS
from .custom import CustomDataset

@DATASETS.register_module()
class TestDataset(CustomDataset):
   # 根据自己的数据集进行修改
   CLASSES = ('background','T-shirt','bag','belt','blazer','blouse','coat','dress')
   # 预测的时候每一个分割区域展示的颜色,可随便设置,数量和上面对应就好
   PALETTE = [[0, 0 , 0], [215, 0 , 255], [255, 0, 0], [0, 255, 0], [0, 0, 255],
              [0, 215, 255], [215, 255, 0], [128, 128, 128]]

   def __init__(self, **kwargs):
       super(TestDataset, self).__init__(**kwargs)
- 修改 mmseg/datasets/init.py
加上 from .test import TestDataset
在 __all__ 中加上 'TestDataset'
四、修改源码
- 在项目根目录创建 config/deeplabv3plus 文件夹
- 将 configs/deeplabv3plus/deeplabv3plus_r50-d8_512x512_20k_voc12aug.py(可自行选择)复制到 config/deeplabv3plus 文件夹中并做如下修改:
# 全部修改成绝对路径更不容易出问题
_base_ = [
   'D:/segmentation/config/deeplabv3plus/deeplabv3plus_r50-d8.py',
   'D:/segmentation/config/deeplabv3plus/my_dataset.py',
   'D:/segmentation/config/deeplabv3plus/default_runtime.py',
   'D:/segmentation/config/deeplabv3plus/schedule_20k.py'
]
# num_classes 根据自己的数据集进行修改
model = dict(
   decode_head=dict(num_classes=8), auxiliary_head=dict(num_classes=8))
- 将 configs/base/models/deeplabv3plus_r50-d8.py(这个文件要和第2步选择的文件保持一致)复制到 config/deeplabv3plus 文件夹中并做如下修改:
# 如果电脑只有一个GPU,就把原来的 SyncBN 改为 BN(这个文件只需改这一处)
norm_cfg = dict(type='BN', requires_grad=True)
model = dict(
   type='EncoderDecoder',
   pretrained='open-mmlab://resnet50_v1c',
   backbone=dict(
       type='ResNetV1c',
       depth=50,
       num_stages=4,
       out_indices=(0, 1, 2, 3),
       dilations=(1, 1, 2, 4),
       strides=(1, 2, 1, 1),
       norm_cfg=norm_cfg,
       norm_eval=False,
       style='pytorch',
       contract_dilation=True),
   decode_head=dict(
       type='DepthwiseSeparableASPPHead',
       in_channels=2048,
       in_index=3,
       channels=512,
       dilations=(1, 12, 24, 36),
       c1_in_channels=256,
       c1_channels=48,
       dropout_ratio=0.1,
       num_classes=19,
       norm_cfg=norm_cfg,
       align_corners=False,
       loss_decode=dict(
           type='CrossEntropyLoss', use_sigmoid=False, loss_weight=1.0)),
   auxiliary_head=dict(
       type='FCNHead',
       in_channels=1024,
       in_index=2,
       channels=256,
       num_convs=1,
       concat_input=False,
       dropout_ratio=0.1,
       num_classes=19,
       norm_cfg=norm_cfg,
       align_corners=False,
       loss_decode=dict(
           type='CrossEntropyLoss', use_sigmoid=False, loss_weight=0.4)),
   # model training and testing settings
   train_cfg=dict(),
   test_cfg=dict(mode='whole'))
- 创建 config/deeplabv3plus/dataset.py 并写入如下内容:
# 自己定义的数据集类型名称
dataset_type = 'TestDataset'
# 自己的数据集路径
data_root = 'D:/segmentation/dataset'

img_norm_cfg = dict(
   mean=[123.675, 116.28, 103.53], std=[58.395, 57.12, 57.375], to_rgb=True)
# crop_size 根据自己数据集图片大小进行修改
crop_size = (400, 600)
train_pipeline = [
   dict(type='LoadImageFromFile'),
   dict(type='LoadAnnotations'),
   # img_scale 根据自己数据集图片大小进行修改
   dict(type='Resize', img_scale=(400, 600), ratio_range=(0.5, 2.0)),
   dict(type='RandomCrop', crop_size=crop_size, cat_max_ratio=0.75),
   dict(type='RandomFlip', prob=0.5),
   dict(type='PhotoMetricDistortion'),
   dict(type='Normalize', **img_norm_cfg),
   dict(type='Pad', size=crop_size, pad_val=0, seg_pad_val=255),
   dict(type='DefaultFormatBundle'),
   dict(type='Collect', keys=['img', 'gt_semantic_seg']),
]
test_pipeline = [
   dict(type='LoadImageFromFile'),
   dict(
       type='MultiScaleFlipAug',
       # img_scale 根据自己数据集图片大小进行修改
       img_scale=(400, 600),
       # img_ratios=[0.5, 0.75, 1.0, 1.25, 1.5, 1.75],
       flip=False,
       transforms=[
           dict(type='Resize', keep_ratio=True),
           dict(type='RandomFlip'),
           dict(type='Normalize', **img_norm_cfg),
           dict(type='ImageToTensor', keys=['img']),
           dict(type='Collect', keys=['img']),
       ])
]
data = dict(
   # samples_per_gpu 和 workers_per_gpu 看自己电脑情况修改
   samples_per_gpu=2,
   workers_per_gpu=4,
   train=dict(
       type=dataset_type,
       data_root=data_root,
       # 数据集如果是按上面那样放置的话,这里就不用修改了
       img_dir='JPEGImages',
       ann_dir='SegmentationClass',
       split='ImageSets/Segmentation/train.txt',
       pipeline=train_pipeline),
   val=dict(
       type=dataset_type,
       data_root=data_root,
       # 数据集如果是按上面那样放置的话,这里就不用修改了
       img_dir='JPEGImages',
       ann_dir='SegmentationClass',
       split='ImageSets/Segmentation/val.txt',
       pipeline=test_pipeline),
   test=dict(
       type=dataset_type,
       data_root=data_root,
       # 数据集如果是按上面那样放置的话,这里就不用修改了
       img_dir='JPEGImages',
       ann_dir='SegmentationClass',
       split='ImageSets/Segmentation/val.txt',
       pipeline=test_pipeline))
- 将 configs/base/schedules/schedule_20k.py 复制到 config/deeplabv3plus 下,代码如下:
# optimizer
optimizer = dict(type='SGD', lr=0.01, momentum=0.9, weight_decay=0.0005)
optimizer_config = dict()
# learning policy
lr_config = dict(policy='poly', power=0.9, min_lr=1e-4, by_epoch=False)
# runtime settings
# max_iters 训练总次数
runner = dict(type='IterBasedRunner', max_iters=30000)
# 间隔多少次生成一个权重文件
checkpoint_config = dict(by_epoch=False, interval=5000)
# 间隔多少次进行一次评估
evaluation = dict(interval=5000, metric='mIoU', pre_eval=True)
- 将 configs/base/default_runtime.py 复制到 config/deeplabv3plus 下,代码如下(不用修改):
# yapf:disable
log_config = dict(
   interval=50,
   hooks=[
       dict(type='TextLoggerHook', by_epoch=False),
       # dict(type='TensorboardLoggerHook')
       # dict(type='PaviLoggerHook') # for internal services
   ])
# yapf:enable
dist_params = dict(backend='nccl')
log_level = 'INFO'
load_from = None
resume_from = None
workflow = [('train', 1)]
cudnn_benchmark = True
上面操作都完成之后,打开 Anaconda Powershell Prompt ,进入相应虚拟环境执行 pip install -v -e . ,否则自定义数据集类型不会注册到mmcv中,训练会报错
五、训练
- 找到 tools/train.py , 可在文件中直接修改 config 和 work-dir 参数, 如下:
# config前加上--,让其变为可选参数,以免执行命令时报错
parser.add_argument('--config', default='D:/segmentation/config/deeplabv3plus/deeplabv3plus_r50-d8_512x512_20k_voc12aug.py', help='train config file path')
parser.add_argument('--work-dir', default='D:/segmentation/log', help='the dir to save logs and models')
- 在项目根目录创建一个 log 文件夹,用于存放日志和权重
- 执行 python tools/train.py 即可开始训练
六、预测
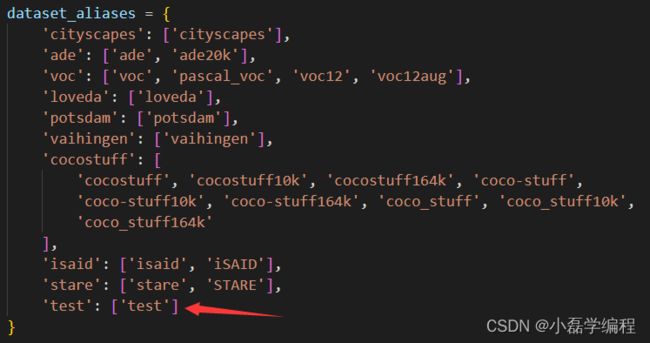
- 想要看到预测分割结果还需要在 mmseg/core/evaluation/class_names.py 添加如下内容(两个函数和一个映射关系):
def test_classes():
   return ['background','T-shirt','bag','belt','blazer','blouse','coat','dress']

def test_palette():
   return [
 		  [0, 0 , 0], [215, 0 , 255], [255, 0, 0], [0, 255, 0],
 		  [0, 0, 255], [0, 215, 255], [215, 255, 0], [128, 128, 128]
   ]
- 修改 demo/image_demo.py , 代码如下:
# 将要预测的图片路径
parser.add_argument('--img', default='D:/segmentation/demo/test.jpg', help='Image file')
# 网络配置文件路径
parser.add_argument('--config', default='D:/segmentation/config/deeplabv3plus/deeplabv3plus_r50-d8_512x512_20k_voc12aug.py', help='Config file')
# 训练好的权重文件路径
parser.add_argument('--checkpoint', default='D:/segmentation/log/latest.pth', help='Checkpoint file')
# 默认为None,预测完不保存图片
# 设置一个路径,预测完可将预测结果保存下来
parser.add_argument('--out-file', default='D:/segmentation/demo/res.png', help='Path to output file')
- 执行 python demo/image_demo.py 即可开始预测

