MMDetection(三):公开数据集上测试和训练模型
MMDetection(三):公开数据集上测试和训练模型
- 1. 准备数据集
- 2. 测试数据集
-
- 2.1 举例
- 2.2 网络摄像头演示
- 2.3 测试图像和视频的同步接口
- 3. 训练模型
-
- 3.1 使用单个GPU进行训练
- 3.2 使用多个GPU进行训练
- 4. 数据分析工具
-
- 4.1 分析日志
- 5. 压缩模型
1. 准备数据集
建议将数据集根符号链接到$MMDETECTION/data。
如果您的文件夹结构不同,则可能需要更改配置文件中的相应路径。

2. 测试数据集
- 我们提供测试脚本以评估整个数据集(COCO,PASCAL VOC等),还提供一些高级api,以便更轻松地集成到其他项目。
- 名词解析:
{CONFIG_FILE}:代表着 config/里面文件的位置,比如configs/mask_rcnn_r50_fpn_1x.py。
{CHECKPOINT_FILE}:代表着模型权重所在的位置。比如checkpoints/faster_rcnn_r50_fpn_1x_20181010-3d1b3351.pth。
{RESULT_FILE}:代表着测试生成的文件的位置。
{EVAL_METRICS}:所选用的测试方式,EVAL_METRICS 下面有解析。
{GPU_NUM}:GPU数量,比如 --gpu 2代表用两个GPU进行训练或者测试。 - 可以使用以下命令测试数据集:
# single-gpu testing 单GPU测试
python tools/test.py ${CONFIG_FILE} ${CHECKPOINT_FILE} [--out ${RESULT_FILE}] [--eval ${EVAL_METRICS}] [--show]

# multi-gpu testing 多GPU测试
./tools/dist_test.sh ${CONFIG_FILE} ${CHECKPOINT_FILE} ${GPU_NUM} [--out ${RESULT_FILE}] [--eval ${EVAL_METRICS}]
- 可选参数:
RESULT_FILE:输出结果的文件名采用pickle格式。如果未指定,结果将不会保存到文件中。
EVAL_METRICS(–eval):要根据结果评估的项目。允许的值是: proposal_fast,proposal,bbox,segm,keypoints。
–show:如果指定,检测结果将绘制在图像上并显示在新窗口中。它仅适用于单个GPU测试。
2.1 举例
假设已经将模型权重下载到checkpoints/。
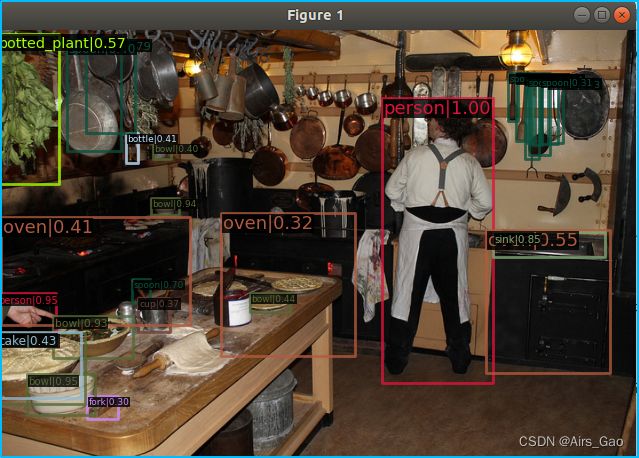
- 测试Faster R-CNN并显示结果。
python tools/test.py configs/faster_rcnn/faster_rcnn_r50_fpn_1x_coco.py checkpoints/faster_rcnn_r50_fpn_1x_coco_20200130-047c8118.pth --show

# 生成测试结果,.json和.pkl文件,加--eval bbox生成框的信息,用于目标检测。
python tools/test.py configs/faster_rcnn/faster_rcnn_r50_fpn_1x_coco.py checkpoints/faster_rcnn_r50_fpn_1x_coco_20200130-047c8118.pth --eval bbox --show
- 测试Mask R-CNN并评估bbox和mask AP。
python tools/test.py configs/mask_rcnn_r50_fpn_1x.py \
    checkpoints/mask_rcnn_r50_fpn_1x_20181010-069fa190.pth \
    --out results.pkl --eval bbox segm
- 使用8个GPU测试Mask R-CNN,并评估bbox和mask AP。
python tools/dist_test.sh configs/mask_rcnn_r50_fpn_1x.py \
    checkpoints/mask_rcnn_r50_fpn_1x_20181010-069fa190.pth \
    8 --out results.pkl --eval bbox segm
2.2 网络摄像头演示
我们提供了一个网络摄像头演示来说明结果。
python demo/webcam_demo.py ${CONFIG_FILE} ${CHECKPOINT_FILE} [--device ${GPU_ID}] [--camera-id ${CAMERA-ID}] [--score-thr ${SCORE_THR}]
例子:
python demo/webcam_demo.py configs/faster_rcnn_r50_fpn_1x.py \
    checkpoints/faster_rcnn_r50_fpn_1x_20181010-3d1b3351.pth
2.3 测试图像和视频的同步接口
本演示可以在demo / inference_demo.ipynb中找到。
- 测试图片
from mmdet.apis import init_detector, inference_detector, show_result_pyplot
import mmcv

config_file = 'configs/faster_rcnn/faster_rcnn_r50_fpn_1x_coco.py'
checkpoint_file = 'checkpoints/faster_rcnn_r50_fpn_1x_coco_20200130-047c8118.pth'
# build the model from a config file and a checkpoint file
model = init_detector(config_file, checkpoint_file, device='cuda:0')
# test a single image and show the results
img = 'demo/demo.jpg'  # or img = mmcv.imread(img), which will only load it once
result = inference_detector(model, img)
# visualize the results in a new window
show_result_pyplot(model, img, result)
# or save the visualization results to image files
show_result_pyplot(model, img, result, out_file='result.jpg')
- 测试视频
from mmdet.apis import init_detector, inference_detector, show_result_pyplot
import mmcv

config_file = 'configs/ssd/ssd300_coco.py'
checkpoint_file = 'checkpoints/ssd300_coco_20210803_015428-d231a06e.pth'
# build the model from a config file and a checkpoint file
model = init_detector(config_file, checkpoint_file, device='cuda:0')
# test a video and show the results
video = mmcv.VideoReader('demo/demo.mp4')
for frame in video:
    result = inference_detector(model, frame)
    show_result_pyplot(model, frame, result, wait_time=1)
3. 训练模型
- MMDetection 分别使用,1.实施分布式并行运算MMDistributedDataParallel,2.非分布式运算MMDataParallel。
- 所有输出(日志文件和检查点)将保存到工作目录,该目录work_dir在config文件中指定。
- 配置文件中的默认学习率(lr=0.02)是8个GPU和2 img / gpu(批大小= 8 * 2 = 16)。根据线性缩放规则,如果您使用不同的GPU或每个GPU的有多少张图像,则需要按批大小设置学习率,例如,对于4GPU* 2 img / gpu=8,lr =8/16 * 0.02 = 0.01 ;对于16GPU* 4 img / gpu=64,lr =64/16 *0.02 = 0.08 。
3.1 使用单个GPU进行训练
python tools/train.py ${CONFIG_FILE}
例子:
python tools/train.py configs/ssd/ssd300_coco.py
如果要在命令中指定工作目录,则可以添加参数。–work_dir${YOUR_WORK_DIR}
3.2 使用多个GPU进行训练
bash ./tools/dist_train.sh ${CONFIG_FILE} ${GPU_NUM} [optional arguments]
例子(4个GPU一起训练):
bash ./tools/dist_train.sh ./configs/ssd/ssd300_coco.py 4
可选参数为:
- –validate(强烈建议):在训练过程中,每隔k个代执行一次评估(默认值为1,可以像这样修改)。
- –work_dir ${WORK_DIR}:覆盖配置文件中指定的工作目录。
- –resume_from ${CHECKPOINT_FILE}:从先前的检查点文件恢复。
resume_from和之间的差异load_from: resume_from加载模型权重和优化器状态,并且纪元也从指定的检查点继承。它通常用于恢复意外中断的训练过程。 load_from仅加载模型权重,并且训练时期从0开始。通常用于微调。
4. 数据分析工具
4.1 分析日志
绘制给定训练日志文件(log.json)的损耗(loss)/ mAP曲线。
- 首先运行以安装依赖项。
pip install seaborn
- 绘制曲线通用代码:
python tools/analysis_tools/analyze_logs.py plot_curve [LOG.JSON][--keys ${KEYS}] [--title ${TITLE}] [--legend ${LEGEND}] [--backend ${BACKEND}] [--style ${STYLE}] [--out ${OUT_FILE}]
- 例子1:绘制一些运行的分类损失。
python tools/analysis_tools/analyze_logs.py plot_curve work_dirs/ssd300_coco/20220823_104638.log.json --keys loss_cls --legend loss_cls
- 例子2:绘制一些运行的分类和回归损失,并将该图保存为pdf。
python tools/analysis_tools/analyze_logs.py plot_curve work_dirs/ssd300_coco/20220823_104638.log.json --keys loss_cls loss_reg --out losses.pdf
- 例子3:绘制一些运行的bbox mAP。
python tools/analysis_tools/analyze_logs.py plot_curve work_dirs/ssd300_coco/20220823_104638.log.json --keys bbox_mAP --legend run
- 例子4: 比较同一图中两次运行的bbox mAP。
python tools/analysis_tools/analyze_logs.py plot_curve log1.json log2.json --keys bbox_mAP --legend run1 run2
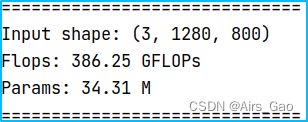
- 获取FLOP和参数
python tools/analysis_tools/get_flops.py ${CONFIG_FILE} [--shape ${INPUT_SHAPE}]
例如:
python tools/analysis_tools/get_flops.py configs/ssd/ssd300_coco.py
5. 压缩模型
在将模型上载到AWS之前,您可能需要(1)将模型权重转换为CPU张量,(2)删除优化器状态,(3)计算检查点文件的哈希并将哈希ID附加到文件名中。
代码为:
python tools/model_converters/publish_model.py ${INPUT_FILENAME} ${OUTPUT_FILENAME}
例子:
python tools/model_converters/publish_model.py work_dirs/ssd300_coco/latest.pth ssd300_test.pth


