ONNX、 ONNXMLTools与ONNXRuntime
ONNX、 ONNXMLTools与ONNXRuntime
- 简介
-
- ONNX
- ONNXMLTools
- ONNXRuntime
- 常见部署工具介绍
- Pytorch导出ONNX
- 模型部署 ONNX or Caffe
- 部署坑点及解决办法
- ONNXRuntime用法
- 调试ONNX模型
简介
ONNX
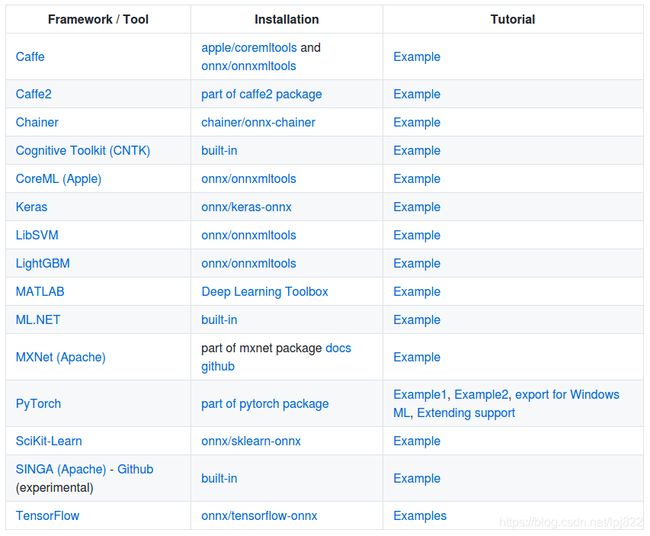
ONNX是微软与Facebook和AWS共同开发的深度学习和传统机器学习模型的开放格式。许多框架(包括 TensorFlow、PyTorch、SciKit-Learn、Keras、Chainer、MXNet、MATLAB 和 SparkML)中的模型都可以导出或转换为标准 ONNX 格式。 模型采用 ONNX 格式后,可在各种平台和设备上运行。支持的框架如下图:

ONNXMLTools
ONNXMLTools可以将各种机器学习框架的模型转换为ONNX格式的模型,目前支持:
- Keras (a wrapper of keras2onnx converter)
- Tensorflow (a wrapper of tf2onnx converter)
- scikit-learn (a wrapper of skl2onnx converter)
- Apple Core ML
- Spark ML (experimental)
- LightGBM
- libsvm
- XGBoost
- H2O
- CatBoost
ONNXRuntime
ONNXRuntime是微软推出适用于Linux,Windows和Mac上ONNX格式的机器学习模型的高性能推理引擎。ONNXRuntime似乎最新版都支持训练功能了,用户可以非常方便的运行ONNX模型。ONNXRuntime支持多种运行后端包括CPU,GPU,TensorRT,DML等。ONNXRuntime是专为ONNX打造的框架,虽然我们大多数人把ONNX只是当成工具人,但微软可不这样想,ONNX统一所有框架的IR表示应该是终极理想。
常见部署工具介绍
| 工具名称 | CPU | GPU | Python | C++ | 备注 |
|---|---|---|---|---|---|
| TensorRT | 不支持 | 支持 | 支持 | 支持 | GPU上性能最好 |
| TVM | 支持 | 支持 | 支持 | 支持 | 之前试用的时候感觉对ONNX的支持并不是特别好,需要比较多的自己改源码 |
| NCNN | 支持 | 支持 | 不支持 | 支持 | 腾讯出品移动端推理优化工具,特点是对ARM CPU以及手机芯片优化做得比较好 |
| ONNXRuntime | 支持 | 支持 | 支持 | 支持 | 支持各种后端(比如TensorRT/OpenVINO等),感觉百搭,但不知道性能如何 |
| OpenVINO | 支持 | 支持 | 支持 | 支持 | 针对英特尔硬件的推理优化工具,如果是英特尔CPU,可能就用这个比较好 |
Pytorch导出ONNX
Pytorch提供了一个ONNX模型导出的专用接口,只需要配置好相关的模型和参数就可以完成自动导出ONNX模型的操作了。
- 代码实现一般是这样:
import torch device = torch.device("cuda" if torch.cuda.is_available() else "cpu") model = torch.load("test.pth") # pytorch模型加载 batch_size = 1 #批处理大小 input_shape = (3, 244, 224) #输入数据,改成自己的输入shape # #set the model to inference mode model.eval() x = torch.randn(batch_size, *input_shape) # 生成张量 x = x.to(device) export_onnx_file = "test.onnx" # 目的ONNX文件名 torch.onnx.export(model x, export_onnx_file, opset_version=10, do_constant_folding=True, # 是否执行常量折叠优化 input_names=["input"], # 输入名 output_names=["output"], # 输出名 dynamic_axes={"input":{0:"batch_size"}, # 批处理变量 "output":{0:"batch_size"}}) - 自定义OP问题
以2020年的YOLOV5为例,在模型的BackBone部分自定义了一个Focus OP,这个OP的代码实现为:class Focus(nn.Module): # Focus wh information into c-space def __init__(self, c1, c2, k=1, s=1, p=None, g=1, act=True): # ch_in, ch_out, kernel, stride, padding, groups super(Focus, self).__init__() self.conv = Conv(c1 * 4, c2, k, s, p, g, act) # self.contract = Contract(gain=2) def forward(self, x): # x(b,c,w,h) -> y(b,4c,w/2,h/2) return self.conv(torch.cat([x[..., ::2, ::2], x[..., 1::2, ::2], x[..., ::2, 1::2], x[..., 1::2, 1::2]], 1)) # return self.conv(self.contract(x))
这个操作就是一个stride slice然后再concat的操作,类似于PixelShuffle的逆向过程。这个OP在使用Pytorch导出ONNX的过程中被拆成了很多更小的操作,这个时候Focus OP的问题就是推理的效率可能比较低并且拆成的小OP各个推理框架的支持程度不一致。要解决这种问题,要么直接在前向推理框架实现一个自定义的Focus OP。要么将这个OP使用其它的操作来近似代替,比如这里可以使用一个stride为2的卷积OP来代替Focus结构,注意代替之后有可能准确率会下降,需要做精度和部署友好性的平衡。
综上,自定义的OP在导出ONNX进行部署时,除了考虑ONNX模型的执行效率问题,还要考虑框架是否支持的问题。如果想快速迭代产品,建议尽量以一些经典结构为基础,尽量少引入自定义OP。
-
后处理问题
使用Pytorch导出ONNX模型时,所有的Aten操作都会被ONNX记录下来(具体记录什么内容请参考文章开头链接推文的介绍),成为一个DAG。然后ONNX会根据这个DAG的输出节点来反推这个DAG中有哪些节点是有用的,这样获得的就是最终的ONNX模型。
而对其它的一些逻辑运算符比如if是无能为力的(意思是不能记录if的多个子图),而后处理过程中根据置信度阈值来筛选目标框是常规操作。如果我们在导出ONNX模型时是随机输入或者没有指定目标的图片就会导致这个ONNX记录下来的DAG可能有缺失。为了部署的友好性和降低转换过程中的风险,后处理过程最好由读者自己完成,我们只需要导出模型的Backbone和Neck部分为ONNX。 -
胶水OP问题
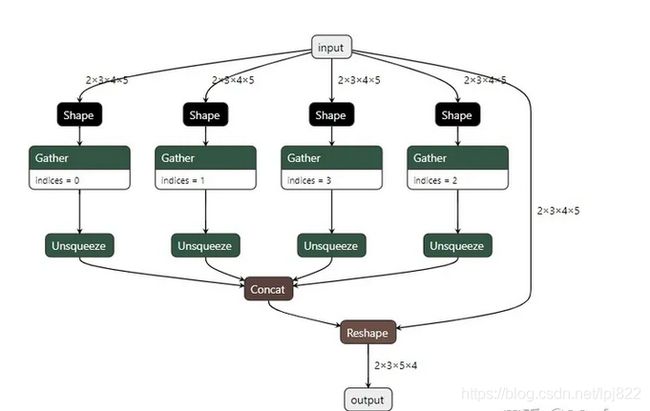
在导出ONNX模型的过程中,经常会带来一些胶水OP,比如Gather, Shape等等。import torch class JustReshape(torch.nn.Module): def __init__(self): super(JustReshape, self).__init__() def forward(self, x): return x.view((x.shape[0], x.shape[1], x.shape[3], x.shape[2])) net = JustReshape() model_name = '../model/just_reshape.onnx' dummy_input = torch.randn(2, 3, 4, 5) torch.onnx.export(net, dummy_input, model_name, input_names=['input'], output_names=['output'])导出的ONNX模型可视化如下:
 这个时候的做法一般就是过一遍onnx-simplifer,可以去除这些胶水OP获得一个简化后的模型。
 综上,我们在导出ONNX模型的一般流程就是,去掉后处理,尽量不引入自定义OP,然后导出ONNX模型,并过一遍大老师的https://github.com/daquexian/onnx-simplifier,这样就可以获得一个精简的易于部署的ONNX模型。从ONNX官方仓库提供的模型来看,似乎微软真的想用ONNX来统一所有框架的所有操作。但理想很丰满,现实很骨干,各种训练框架的数据排布,OP实现不一致,人为后处理不一致,各种推理框架支持度不一致,推理芯片SDK的OP支持度不一致都让这个ONNX(万能格式)遭遇了困难,所以在基于ONNX做一些部署业务的时候,也要有清晰的判断并选取风险最小的方法。
模型部署 ONNX or Caffe
把Pytorch模型通过TensorRT部署到GPU上,一般就是Pytorch->Caffe->TensorRT以及Pytorch->ONNX->TensorRT(当然Pytorch也是支持直接转换到TensorRT,这里不关心)。一般来说Caffe是过去,而ONNX是将来。
很多国产推理芯片比如海思NNIE,高通SNPE它们首先支持的都是Caffe这种模型格式,这可能是因为年代的原因,也有可能是因为这些推理SDK实现的时候OP都非常粗粒度。比如它对卷积做定制的优化,有NC4HW4,有Im2Col+gemm,有Winograd等等非常多方法,后面还考虑到量化,半精度等等,然后通过给它喂Caffe模型它就知道要对这个网络里面对应的卷积层进行硬件加速了。所以这些芯片支持的网络是有限的,比如我们要在Hisi35xx中部署一个含有upsample层的Pytorch模型是比较麻烦的,可能不太聪明的工程说我们要把这个模型回退给训练人员改成支持的上采样方式进行训练,而聪明的工程师可能说直接把upsample的参数填到反卷积层的参数就可以了。无论是哪种方式都是比较麻烦的,所以Caffe的缺点就是灵活度太差。其实基于Caffe进行部署的方式仍然在工业界发力,ONNX是趋势,但是ONNX现在还没有完全取代Caffe。
ONNX还有一个缺点就是OP的细粒度太细,执行效率低,不过ONNX已经推出了多种化方法可以将OP的细粒度变粗,提高模型执行效率。目前在众多经典算法上,ONNX已经支持得非常好了。
目前越来越多的厂商推出的端侧推理芯片开始支持ONNX,比如地平线的BPU,华为的Ascend310相关的工具链都开始接入ONNX,所以个人认为ONNX是推理框架模型转换的未来,不过仍需时间考验,毕竟谁也不希望因为框架OP对齐的原因导出一个超级复杂的ONNX模型,还是简化不了的那种,导致部署难度很大。
部署坑点及解决办法
-
框架OP实现不一致问题
- pytorch推理时将prelu转成relu实现,如果我们将处理好之后的ONNX通过TensorRT进行部署的话,我们会发现TensorRT不支持PReLU这个OP,这个时候解决办法要么是TensorRT自定义PReLU插件,但是这种方法会打破TensorRT中conv+bn+relu的op fusion,速度会变慢,并且如果要做量化部署似乎是不可行的。所以这个时候一般会采用另外一种解决办法,使用relu和scale op来组合成PReLU。
- 当从Mxnet转换模型到ONNX时,如果模型是带有PReLU OP的(在人脸识别网络很常见),就是一个大坑了。主要有两个问题,当从mxnet转为ONNX时,PReLU的slope参数维度可能会导致onnxruntime推理时失败。这个错误产生的原因可能是MxNet的版本问题(https://github.com/apache/incubator-mxnet/issues/17821),这个时候的解决办法就是:修改PRelu层的slope参数的shape,不仅包括type参数,对应的slope值也要修改来和shape对应。另一个问题也是TensorRT的问题,同上。
-
tf2onnx工具将TensorFlow模型转为ONNX模型
当我们使用tf2onnx工具将TensorFlow模型转为ONNX模型时,模型的输入batch维度没有被设置,我们需要自行添加。解决代码如下:# 为onnx模型增加batch维度 def set_model_input_batch(self, index=0, name=None, batch_size=4): model_input = None if name is not None: for ipt in self.model.graph.input: if ipt.name == name: model_input = ipt else: model_input = self.model.graph.input[index] if model_input: tensor_dim = model_input.type.tensor_type.shape.dim tensor_dim[0].ClearField("dim_param") tensor_dim[0].dim_value = batch_size else: print('get model input failed, check index or name') -
基于ONNX和TensorRT部署风格迁移模型
当我们基于ONNX和TensorRT部署风格迁移模型,里面有Instance Norm OP的时候,可能会发现结果不准确,这个问题在这里被提出:https://forums.developer.nvidia.com/t/inference-result-inaccurate-with-conv-and-instancenormalization-under-certain-conditions/111617。经过debug发现这个问题出在这里:https://github.com/onnx/onnx-tensorrt/blob/5dca8737851118f6ab8a33ea1f7bcb7c9f06caf5/builtin_op_importers.cpp#L1557。因为TensorRT中instancenorm op里面的eps只支持>=1e-4的,所以要么注释掉这个限制条件,要么直接在ONNX模型中修改instancenorm op的eps属性,代码实现如下:# 给ONNX模型中的目标节点设置指定属性 # 调用方式为:set_node_attribute(in_node, "epsilon", 1e-5) # 其中in_node就是所有的instancenorm op。 def set_node_attribute(self, target_node, attr_name, attr_value): flag = False for attr in target_node.attribute: if (attr.name == attr_name): if attr.type == 1: attr.f = attr_value elif attr.type == 2: attr.i = attr_value elif attr.type == 3: attr.s = attr_value elif attr.type == 4: attr.t = attr_value elif attr.type == 5: attr.g = attr_value # NOTE: For repeated composite types, we should use something like # del attr.xxx[:] # attr.xxx.extend([n1, n2, n3]) elif attr.type == 6: attr.floats[:] = attr_value elif attr.type == 7: attr.ints[:] = attr_value elif attr.type == 8: attr.strings[:] = attr_value else: print("unsupported attribute data type with attribute name") return False flag = True if not flag: # attribute not in original node print("Warning: you are appending a new attribute to the node!") target_node.attribute.append(helper.make_attribute(attr_name, attr_value)) flag = True return flag -
Pytorch里面的[]索引操作或者其它需要判断的情况
当我们使用了Pytorch里面的[]索引操作或者其它需要判断的情况,ONNX模型会多出一些if OP,这个时候这个if OP的输入已经是一个确定的True,因为我们已经介绍过为False那部分的子图会被丢掉。这个时候建议过一遍最新的onnx-simplifier或者手动删除所有的if OP,代码实现如下:# 通过op的类型获取onnx模型的计算节点 def get_nodes_by_optype(self, typename): nodes = [] for node in self.model.graph.node: if node.op_type == typename: nodes.append(node) return nodes # 移除ONNX模型中的目标节点 def remove_node(self, target_node): ''' 删除只有一个输入和输出的节点 ''' node_input = target_node.input[0] node_output = target_node.output[0] # 将后继节点的输入设置为目标节点的前置节点 for node in self.model.graph.node: for i, n in enumerate(node.input): if n == node_output: node.input[i] = node_input target_names = set(target_node.input) & set([weight.name for weight in self.model.graph.initializer]) self.remove_weights(target_names) target_names.add(node_output) self.remove_inputs(target_names) self.remove_value_infos(target_names) self.model.graph.node.remove(target_node)
ONNXRuntime用法
import numpy as np
import onnx
import onnxruntime as ort

image = cv2.imread("image.jpg")
image = np.expand_dims(image, axis=0)

onnx_model = onnx.load_model("resnet18.onnx")
sess = ort.InferenceSession(onnx_model.SerializeToString())
sess.set_providers(['CPUExecutionProvider'])
input_name = sess.get_inputs()[0].name
output_name = sess.get_outputs()[0].name

output = sess.run([output_name], {input_name : image_data})
prob = np.squeeze(output[0])
print("predicting label:", np.argmax(prob))
这里展示了一个使用ONNXRuntime推理ResNet18网络模型的例子,可以看到ONNXRuntime在推理一个ONNX模型时大概分为Session构造,模型加载与初始化和运行阶段(和静态图框架类似)。ONNXRuntime框架是使用C++开发,同时封装了Python接口易于用户使用。
调试ONNX模型
假设我们通过Pytorch导出了一个ONNX模型,在和Pytorch有相同输入的情况下输出结果却不正确。这个时候我们要定位问题肯定需要获取ONNX模型指定OP的特征值进行对比,但是ONNX模型的输出在导出模型的时候已经固定了,这个时候应该怎么做?
首先,我们需要通过名字获取ONNX模型中的计算节点,实现如下:
# 通过名字获取onnx模型中的计算节点
    def get_node_by_name(self, name):
        for node in self.model.graph.node:
            if node.name == name:
                return node
然后把这个我们想看的节点扩展到ONNX的输出节点列表里面去,实现如下:
# 将target_node添加到ONNX模型中作为输出节点
    def add_extra_output(self, target_node, output_name):
        target_output = target_node.output[0]
        extra_shape = []
        for vi in self.model.graph.value_info:
            if vi.name == target_output:
                extra_elem_type = vi.type.tensor_type.elem_type
                for s in vi.type.tensor_type.shape.dim:
                    extra_shape.append(s.dim_value)
        extra_output = helper.make_tensor_value_info(
                                output_name,
                                extra_elem_type,
                                extra_shape
                            )
        identity_node = helper.make_node('Identity', inputs=[target_output], outputs=[output_name], name=output_name)
        self.model.graph.node.append(identity_node)
        self.model.graph.output.append(extra_output)
然后修改一下onnxruntime推理程序中的输出节点为我们指定的节点就可以拿到指定节点的推理结果了,和Pytorch对比一下我们就可以知道是哪一层出错了。
这里介绍的是如何查看ONNX在确定输入的情况下如何拿到推理结果,如果我们想要获取ONNX模型中某个节点的信息又可以怎么做呢?这个就结合上一次推文讲的ONNX的结构来看就比较容易了。例如查看某个指定节点的属性代码实现如下:
def show_node_attributes(node):
    print("="*10, "attributes of node: ", node.name, "="*10)
    for attr in node.attribute:
        print(attr.name)
    print("="*60)
查看指定节点的输入节点的名字实现如下:
def show_node_inputs(node):
    # Generally, the first input is the truely input
    # and the rest input is weight initializer
    print("="*10, "inputs of node: ", node.name, "="*10)
    for input_name in node.input:
        print(input_name)  # type of input_name is str
    print("="*60)