cuda学习4
第4.1课 卷积操作
用共享内存的方法进行矩阵的卷积操作,卷积核为[1,1,1; 1,-8,1; 1,1,1]
为了避免一个block的边界点无法计算卷积的值,有以下两种方法:
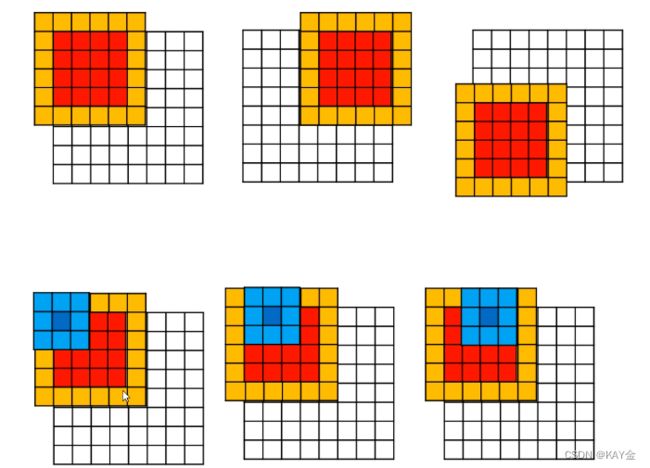
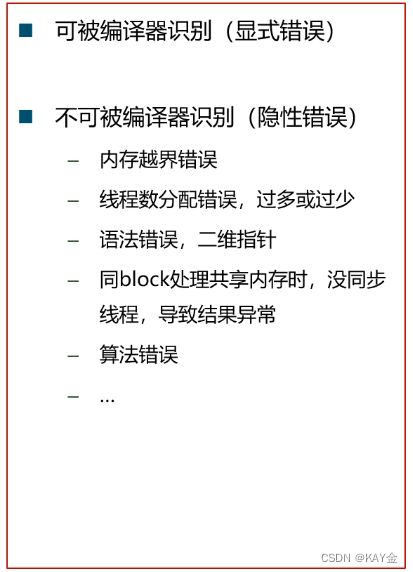
1、设置n*n大小的block,把对应坐标的矩阵数据读取到共享内存里,然后其中的(n-2)*(n-2)个线程进行卷积运算
2、设置n*n大小的block,分两次读取矩阵,把(n+2)*(n+2)的矩阵数据读取到内存里,然后进行卷积计算。
当计算红色部分的卷积值时,会用到整个橙色部分的元素值,所以需要一个6*6的block,以便将每个元素值放入共享内存,但是在计算时,只计算了4*4个线程,其余20个线程闲置。
ps:卷积的计算我明白,但是为什么要把这个8*8的矩阵分成四个4*4矩阵来分别进行运算呢?
解题:
第一步:初始化参数,定义卷积核。
__constant__ 是GPU上的常量内存,速度比较快。
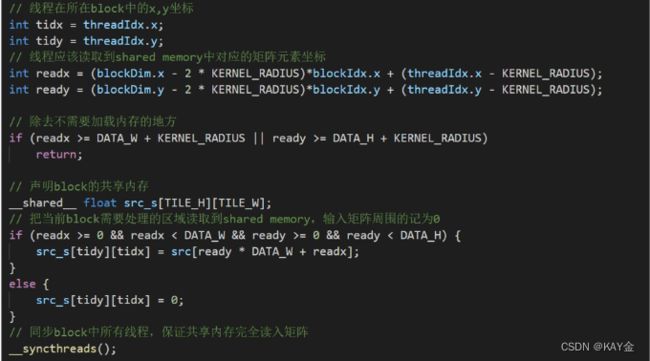
第二步:创建共享内存,将输入矩阵写入共享内存。
也就是将这整个橙色部分,写到共享内存中。但是需要注意的是,这里线程的ID并不是矩阵元素的ID,需要在代码里做一个变换。
这个变化过程我看不懂!!!
代码:
#include "cuda_runtime.h"
#include "device_launch_parameters.h"

#include
#include
#include
#include

using namespace std;

// 调用CUDA函数并检查是否出现错误
#define CUDA_CALL(x) {\
	const cudaError_t a = (x);\
	if (a != cudaSuccess) { \
		fprintf(stderr, "\nCUDA Error: %s (err_num=%d)\nfile %s, line %d\n", cudaGetErrorString(a), a, __FILE__, __LINE__);\
		cudaDeviceReset(); exit(1);\
	} \
}

// 调用核函数并检查是否出现错误
__host__ void cuda_error_check(const char* kernelName) {
	if (cudaPeekAtLastError() != cudaSuccess) {
		printf("\n%s %s\n", kernelName, cudaGetErrorString(cudaGetLastError()));
		cudaDeviceReset();
		exit(1);
	}
}

// 设置参数
const int TILE_W = 32;			// block的x维大小
const int TILE_H = 32;			// block的y维大小
const int DATA_W = 320;			// 输入矩阵的x维大小
const int DATA_H = 640;			// 输入矩阵的y维大小
const int KERNEL_RADIUS = 1;	// 卷积核的半径

// 卷积核写入GPU常量内存中
__constant__ int KERNEL[2 * KERNEL_RADIUS + 1][2 * KERNEL_RADIUS + 1] =
{ 1, 1, 1,
1, -8, 1,
1, 1, 1 };

// 通过共享内存,进行卷积运算
__global__ void convolution(float *dst, float *src){
	// 线程在所在block中的x,y坐标
	int tidx = threadIdx.x;
	int tidy = threadIdx.y;
	// 线程应该读取到shared memory中对应的矩阵元素坐标
	int readx = (blockDim.x - 2 * KERNEL_RADIUS)*blockIdx.x + (threadIdx.x - KERNEL_RADIUS);
	int ready = (blockDim.y - 2 * KERNEL_RADIUS)*blockIdx.y + (threadIdx.y - KERNEL_RADIUS);

	// 除去不需要加载内存的地方
	if (readx >= DATA_W + KERNEL_RADIUS || ready >= DATA_H + KERNEL_RADIUS)
		return;

	// 声明block的共享内存
	__shared__ float src_s[TILE_H][TILE_W];
	// 把当前block需要处理的区域读取到shared memory,输入矩阵周围的记为0
	if (readx >= 0 && readx < DATA_W && ready >= 0 && ready < DATA_H) {
		src_s[tidy][tidx] = src[ready * DATA_W + readx];
	}
	else {
		src_s[tidy][tidx] = 0;
	}
	// 同步block中所有线程,保证共享内存完全读入矩阵
	__syncthreads();

	// 卷积计算
	float output = 0;
	int kernel_w = 2 * KERNEL_RADIUS + 1;
	if (tidx < blockDim.x - 2 * KERNEL_RADIUS && readx < DATA_W - KERNEL_RADIUS &&
		tidy < blockDim.y - 2 * KERNEL_RADIUS && ready < DATA_H - KERNEL_RADIUS) {
		for (int i = 0; i < kernel_w; i++) {
			for (int j = 0; j < kernel_w; j++) {
				output += src_s[tidy + j][tidx + i] * KERNEL[j][i];
			}
		}
		// 写入dst对应坐标
		dst[(ready + KERNEL_RADIUS) * DATA_W + (readx + KERNEL_RADIUS)] = output;
	}
}

int main() {

	const int INPUTSIZE = DATA_H * DATA_W;

	printf("---------- initilizing ----------\n");
	clock_t tt = clock();

	// CPU输入输出矩阵的声明
	float* h_src = (float*)malloc(INPUTSIZE * sizeof(float));
	float* h_dst = (float*)malloc(INPUTSIZE * sizeof(float));

	// 输入矩阵中元素全部设为1
	for (int i = 0; i < DATA_W; i++) {
		for (int j = 0; j < DATA_H; j++) {
			h_src[i + j * DATA_W] = (float)1;
		}
	}

	// 将输入矩阵输出
	ofstream ofs("input_output.txt");
	for (int j = 0; j < DATA_H; j++) {
		for (int i = 0; i < DATA_W; i++) {
			ofs << setw(5) << h_src[i + j * DATA_W];
		}
		ofs << '\n';
	}
	ofs << '\n';

	// 设定使用第一个GPU
	CUDA_CALL(cudaSetDevice(0));

	// GPU输入输出矩阵的声明
	float* d_src = 0;
	float* d_dst = 0;

	// 初始化
	CUDA_CALL(cudaMalloc(&d_src, INPUTSIZE * sizeof(float)));
	CUDA_CALL(cudaMalloc(&d_dst, INPUTSIZE * sizeof(float)));

	CUDA_CALL(cudaMemcpy(d_src, h_src, INPUTSIZE * sizeof(float), cudaMemcpyHostToDevice));
	CUDA_CALL(cudaMemcpy(d_dst, h_dst, INPUTSIZE * sizeof(float), cudaMemcpyHostToDevice));

	// 输出内存初始化所需时间
	printf("Initializaion time(ms) : %f\n", ((float)clock() - tt) / CLOCKS_PER_SEC);

	printf("---------- calculating ----------\n");

	// 设定核函数中grid和block的参数
	dim3 gridDim = { (DATA_W + (TILE_W - 2*KERNEL_RADIUS - 1)) / (TILE_W - 2 * KERNEL_RADIUS),
		(DATA_H + (TILE_H - 2 * KERNEL_RADIUS - 1)) / (TILE_H - 2 * KERNEL_RADIUS) };
	dim3 blockDim = { TILE_W, TILE_H };

	// 调用核函数并计时
	cudaEvent_t start, stop;
	cudaEventCreate(&start);
	cudaEventCreate(&stop);
	cudaEventRecord(start, 0);
	convolution << > > (d_dst, d_src);

	// 检查核函数调用是否出现错误
	cuda_error_check("convolution_shared_memory");

	// CPU等待GPU完成核函数的计算
	CUDA_CALL(cudaDeviceSynchronize());

	// 输出核函数调用时长
	cudaEventRecord(stop, 0);
	cudaEventSynchronize(stop);
	float elapsedTime;
	cudaEventElapsedTime(&elapsedTime, start, stop);
	printf("Kernel time(ms) : %f\n", elapsedTime);

	cudaEventDestroy(start);
	cudaEventDestroy(stop);

	// CPU获取GPU核函数计算结果
	CUDA_CALL(cudaMemcpy(h_dst, d_dst, INPUTSIZE * sizeof(float), cudaMemcpyDeviceToHost));

	// 输出卷积后的结构
	for (int j = 0; j < DATA_H; j++) {
		for (int i = 0; i < DATA_W; i++) {
			ofs << setw(5) << h_dst[i + j * DATA_W];
		}
		ofs << '\n';
	}
	ofs.close();

	// 释放GPU内存
	cudaFree(d_src);
	cudaFree(d_dst);
	//cudaFree(KERNEL);

	// 释放CPU内存
	free(h_src);
	free(h_dst);

	// 清空重置GPU
	CUDA_CALL(cudaDeviceReset());

	printf("Total calculation time(ms) : %f\n", ((float)clock() - tt) / CLOCKS_PER_SEC);

}
第4.2课 CUDA程序常见错误
4.2.1 CUDA的易错点
1.内存越界错误
简单的addKernel|核函数,定义数组长度为arraySize=5, CPU和GPU分配内存都是5个int,但是可以越界处理GPU指针后面的部分,编译器不会报错,但是可能会修改GPU中其他核函数中变量的值,造成难以发现的bug。
错误代码实例:
2.线程分配错误,过多或过少
错误代码实例1:
线程数分配过多,一个block中含1024*1024个thread,编译器会自行分配到多个block在多个SM中运行核函数,所以不会报错,但是,若核函数中使用了共享内存则会报错,因为所有thread都要在同一个SM中才能共用共享内存,而一个SM中的SP能处理的thread是有限的,一般是512或1024个thread。
可以使用`cudaGetDeviceProperties`查看GPU每个block所能处理的最大thread。`cudaDevicrProp`是一个结构体, 能储存GPU的信息。
使用实例:
错误代码实例2:
线程数分配过少,本来应该使用2个block,每个block含32个thread,但是这里使用了整数除法,只分配了1个含32个thread的block,即有一个位置没有做加法运算,这是许多人会犯的错误。
我们可以使用下面的写法避免犯此类错误:
先加上被除数-1,再除以被除数。
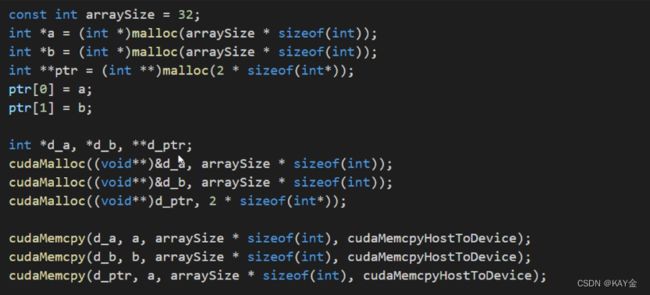
3.语法错误,二维指针
错误代码实例:
上面的代码看似没有问题,但是cudaMalloc分配内存时,其实是把CPU中的内存的指针的地址存入一个表中,这里d_ptr的确是指针的地址,所以编译器认为类型是对的,但其实这里还是应该使用d_ ptr的地址(即,&d_ptr)。
4.2.2 CUDA错误信息输出,精准定位错误
在代码中加入cuda程序状态的检查,可以快速定位到错误的位置,并输出错误类型。
cuda有一个处理错误的类:cudaError_t,很多cudaAPI函数返回值都是这个类型。若返回值是cudaSuccess,则程序正常,否则表示出现了错误,可以用cudaGetLastError函数来获取cuda最后出的错误类型,并利用cudaGetErrorString来获取错误详情。
实例:
用goto跳转出去清理显存。
但是,使用if和cudaSuccess判断,需要满足多层条件才进行核函数的运行时,需要嵌套很多if判断,使代码变得复杂且不容易修改调整。
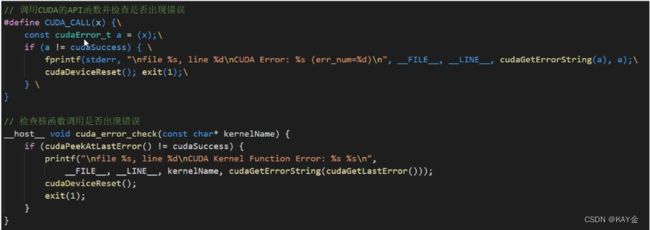
所以一般使用宏定义,简化这一检查进程,发生错误直接清理GPU,报出错误信息,出错的代码在哪个代码文件的哪一行。
前者我懂,弄成宏定义我却不懂了!!!还有这个玄妙神奇的输出,令人迷茫!!
#include "cuda_runtime.h"
#include "device_launch_parameters.h"

#include
#include

using namespace std;

// 调用CUDA的API函数并检查是否出现错误
#define CUDA_CALL(x) {\
	const cudaError_t cudaStatus = (x);\
	if (cudaStatus != cudaSuccess) { \
		fprintf(stderr, "\nfile %s, line %d\nCUDA Error: %s (err_num=%d)\n", __FILE__, __LINE__, cudaGetErrorString(cudaStatus), cudaStatus);\
		cudaDeviceReset(); exit(1);\
	} \
}

// 检查核函数调用是否出现错误
__host__ void cuda_error_check(const char* kernelName) {
    if (cudaPeekAtLastError() != cudaSuccess) {
        printf("\nfile %s, line %d\nCUDA Kernel Function Error: %s %s\n",
            __FILE__, __LINE__, kernelName, cudaGetErrorString(cudaGetLastError()));
        cudaDeviceReset();
        exit(1);
    }
}

void addWithCuda(int *c, const int *a, const int *b, unsigned int size);

__global__ void addKernel(int *c, const int *a, const int *b)
{
    int i = threadIdx.x;
    c[i] = a[i] + b[i];
}

int main()
{
    const int arraySize = 5;
    const int a[arraySize] = { 1, 2, 3, 4, 5 };
    const int b[arraySize] = { 10, 20, 30, 40, 50 };
    int c[arraySize] = { 0 };

    // Add vectors in parallel.
    cudaError_t cudaStatus;

    addWithCuda(c, a, b, arraySize);

    printf("{1,2,3,4,5} + {10,20,30,40,50} = {%d,%d,%d,%d,%d}\n",
        c[0], c[1], c[2], c[3], c[4]);

    // cudaDeviceReset must be called before exiting in order for profiling and
    // tracing tools such as Nsight and Visual Profiler to show complete traces.
    cudaStatus = cudaDeviceReset();
    if (cudaStatus != cudaSuccess) {
        fprintf(stderr, "cudaDeviceReset failed!");
        return 1;
    }

    return 0;
}

// Helper function for using CUDA to add vectors in parallel.
void addWithCuda(int *c, const int *a, const int *b, unsigned int size)
{
    int *dev_a = 0;
    int *dev_b = 0;
    int *dev_c = 0;

    // Choose which GPU to run on, change this on a multi-GPU system.
    CUDA_CALL(cudaSetDevice(1));

    // Allocate GPU buffers for three vectors (two input, one output)    .
    CUDA_CALL(cudaMalloc((void**)&dev_c, size * sizeof(int)));
    CUDA_CALL(cudaMalloc((void**)&dev_a, size * sizeof(int)));
    CUDA_CALL(cudaMalloc((void**)&dev_b, size * sizeof(int)));

    // Copy input vectors from host memory to GPU buffers.
    CUDA_CALL(cudaMemcpy(dev_a, a, size * sizeof(int), cudaMemcpyHostToDevice));
    CUDA_CALL(cudaMemcpy(dev_b, b, size * sizeof(int), cudaMemcpyHostToDevice));

    // Launch a kernel on the GPU with one thread for each element.
    addKernel<<<1, size>>>(dev_c, dev_a, dev_b);
    cuda_error_check("addKernel");

    // cudaDeviceSynchronize waits for the kernel to finish, and returns
    // any errors encountered during the launch.
    CUDA_CALL(cudaDeviceSynchronize());

    // Copy output vector from GPU buffer to host memory.
    CUDA_CALL(cudaMemcpy(c, dev_c, size * sizeof(int), cudaMemcpyDeviceToHost));

Error:
    cudaFree(dev_c);
    cudaFree(dev_a);
    cudaFree(dev_b);

}
4.2.3 CUDA时间计时,找出程序性能瓶颈
两种计时方法:CPU计时和GPU计时。
CPU计时需加入头文件time.h,然后使用clock_t对象进行计时,可以在调用核函数之前,记录一个时间戳,然后在核函数调用完,同步后,再记录一个时间戳,这样两个时间戳的间隔就是核函数的运行时长。但是考虑到CPU和GPU通信所耗费的时长,这样的记录其实是不准确的。
而使用GPU计时时,使用事件计时法。事件是指一个GPU任务,比如在核函数运行之前,记录一个事件start,再在核函数运行之后安排一个事件end,这样GPU运行顺序就是:start-核函数-end。并且事件的时间戳记录在GPU端,比CPU计时法要准确。
上图中的cudaEventSynchronize(stop)就是在等待stop事件的结束。记得最后还需要销毁这两个事件。
4.2.4 CUDA可视化调试和性能分析工具,轻松Debug和分析程序性能
传统的命令行调试和性能分析工具:
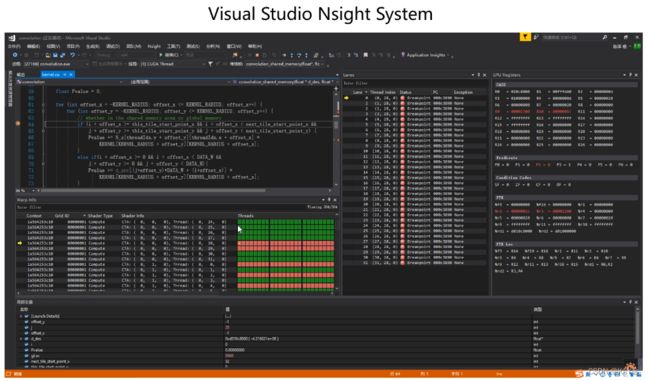
更好的可视化调试和性能分析工具:
按理来说,菜单栏上有一个Nsight选项,下断点后点击该选项就可以调试了,但是我的VS2022在下载Nsight后并没有出现这个菜单选项!!!!无大语了救救!!!
