(一)VGGNet卷积神经网络简介及Tensorflow搭建可视化网络
基础知识:卷积神经网络CNN详解
VGG训练的程序:(三)基于Tensorflow设计VGGNet网络训练CIFAR-10数据集
1 小序
(1) VGG(Visual Geometry Group)是牛津大学工程科学院(Department of Engineering Science, University of Oxford)视觉组和Google DeepMind公司研究员参加2014 ILSVRC(The ImageNet Large Scale Visual Recognition Challenge)比赛时用设计的深度卷积神经网络,提交的网络称为VGGNet,同年参加比赛的网络有GoogleNet,图像分类GoogleNet第一,VGG第二.
(2) VGGNet研究了卷积神经网络的深度与性能(特征提取)间的关系,并搭建了16和19层深的卷积神经网络,证明了神经网络的深度能一定程度上影响网络的最终性能(特征提取),是错误率大幅下降,且该网络模型迁移学习效果很好,迁移到其他图片数据上泛化能力较强.
2 VGG解析
2.1 VGG网络结构
2.1.0 不同卷积层数表
| ConvNet Configuration | ||||||
|---|---|---|---|---|---|---|
| 层数分类 | A | A-LRN | B | C | D | E |
| 网络层数 | 11 weight layers | 11 weight layers | 13 weight layers | 16 weight layers | 16 weight layers | 19 weight layers |
| 输入层 | input(224x224 RGB image) | |||||
| 第一组卷积层 | conv3-64 | conv3-64 LRN |
conv3-64 conv3-64 |
conv3-64 conv3-64 |
conv3-64 conv3-64 |
conv3-64 conv3-64 |
| 池化层 | maxpool | |||||
| 第二组卷积层 | conv3-128 | conv3-128 | conv3-128 conv3-128 |
conv3-128 conv3-128 |
conv3-128 conv3-128 |
conv3-128 conv3-128 |
| 池化层 | maxpool | |||||
| 第三组卷积层 | conv3-256 conv3-256 |
conv3-256 conv3-256 |
conv3-256 conv3-256 |
conv3-256 conv3-256 conv1-256 |
conv3-256 conv3-256 conv3-256 |
conv3-256 conv3-256 conv3-256 conv3-256 |
| 池化层 | maxpool | |||||
| 第四组卷积层 | conv3-512 conv3-512 |
conv3-512 conv3-512 |
conv3-512 conv3-512 |
conv3-512 conv3-512 conv1-512 |
conv3-512 conv3-512 conv3-512 |
conv3-512 conv3-512 conv3-512 conv1-512 |
| 池化层 | maxpool | |||||
| 第五组卷积层 | conv3-512 conv3-512 |
conv3-512 conv3-512 |
conv3-512 conv3-512 |
conv3-512 conv3-512 conv1-512 |
conv3-512 conv3-512 conv3-512 |
conv3-512 conv3-512 conv3-512 conv1-512 |
| 池化层 | maxpool | |||||
| 全连接层 | FC-4096 | |||||
| 全连接层 | FC-4096 | |||||
| 全连接层 | FC-4096 | |||||
| 分类层 | soft-max | |||||
2.1.2 表格内容说明
(1) 字母A~E表示卷积神经网络的深度,从11层递增至16层;
(2) 卷积层参数描述:conv(卷积核尺寸)-(通道数),如conv3-64表示卷积核尺寸为 3 × 3 3\times3 3×3,64个通道,即图像深度为64;
(3) ReLU未在表中表示;
(4) 16 weight layers是16个权重层,即16个权重操作;
2.1.3 不同卷积参数数量
| 网络 | A,A-LRN | B | C | D | E |
|---|---|---|---|---|---|
| 网络参数量(单位:百万) | 133 | 133 | 134 | 138 | 144 |
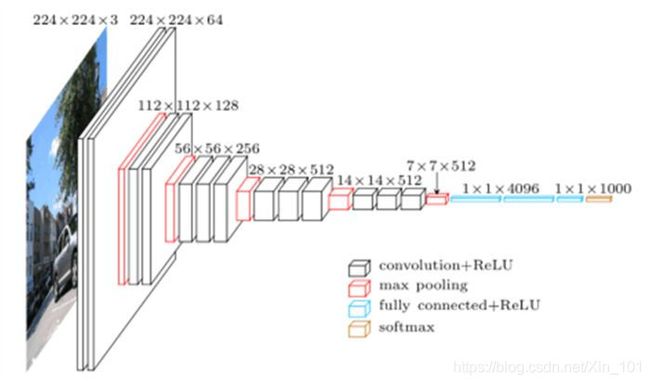
2.2 VGG-16模型
VGG-16处理图像结构:

3 VGGNet程序框架及解析
3.1 Tensorflow程序框架
声明框架中用的数据是假数据,本文是搭建框架,训练请参见博文:
(三)基于Tensorflow设计VGGNet网络训练CIFAR-10数据集
为分析方便,假定输入图形数据为RGB图像,通道数为3,尺寸为224 × \times × 224,原始图像数据维度:(224, 224, 3),并且使用0填充进行处理数据,每层数据维度在下面程序会有注解,按照图2.1所示的结构,设计网络.
| 序号 | 参数 | 描述 |
|---|---|---|
| 1 | width | 224 |
| 2 | height | 224 |
| 3 | channels | 3 |
VGGNet.py
import tensorflow as tf
import numpy as np
import matplotlib.pyplot as plt
import time
import cifar10_input
import tarfile
from six.moves import urllib
import os
import sys


# 图路径
LOG_DIR = "./logs/standard16"

# 批量数据大小
batch_size = 512
# 每轮训练数据的组数,每组为一batchsize
s_times = 20
# 学习率
learning_rate = 0.0001

# Xavier初始化方法
# 卷积权重(核)初始化
def init_conv_weights(shape, name):
	weights = tf.get_variable(name=name, shape=shape, dtype=tf.float32,  initializer=tf.contrib.layers.xavier_initializer_conv2d())
	return weights

# 全连接权重初始化
def init_fc_weights(shape, name):
	weights = tf.get_variable(name=name, shape=shape, dtype=tf.float32, initializer=tf.contrib.layers.xavier_initializer())
	return weights

# 偏置初始化
def init_biases(shape, name):
	biases = tf.Variable(tf.random_normal(shape),name=name, dtype=tf.float32)
	return biases

# 卷积
# 参数:输入张量,卷积核,偏置,卷积核在高和宽维度上移动的步长
# 卷积核:使用全0填充,padding='SAME'
def conv2d(input_tensor, weights, biases, s_h, s_w):
	conv = tf.nn.conv2d(input_tensor, weights, [1, s_h, s_w, 1], padding='SAME')
	return tf.nn.relu(conv + biases)
# 池化
# 参数:输入张量,池化核高和宽,池化核在高,宽维度上移动步长
# 池化窗口:使用全0填充,padding='SAME'
def max_pool(input_tensor, k_h, k_w, s_h, s_w):
	return tf.nn.max_pool(input_tensor, ksize=[1, k_h, k_w, 1], strides=[1, s_h, s_w, 1], padding='SAME')
# 全链接
# 参数:输入张量,全连接权重,偏置
def fullc(input_tensor, weights, biases):
	return tf.nn.relu_layer(input_tensor, weights, biases)
# 使用tensorboard对网络结构进行可视化的效果较好
# 输入占位节点
# images 输入图像
with tf.name_scope("source_data"):
	images = tf.placeholder(tf.float32, [batch_size, 224 ,224 ,3])
	# 图像标签
	labels = tf.placeholder(tf.int32, [batch_size])
	# 正则
	keep_prob = tf.placeholder(tf.float32)

# 第一组卷积
# input shape (batch_size, 224, 224, 3)
# output shape (batch_size, 224, 224, 64)
with tf.name_scope('conv_gp_1'):
	# conv3-64
	cw_1 = init_conv_weights([3, 3, 3, 64], name='conv_w1')
	cb_1 = init_biases([64], name='conv_b1')
	conv_1 = conv2d(images, cw_1, cb_1, 1, 1)
	# conv3-64
	cw_2 = init_conv_weights([3, 3, 64, 64], name='conv_w2')
	cb_2 = init_biases([64], name='conv_b2')
	conv_2 = conv2d(conv_1, cw_2, cb_2, 1, 1)

# 最大池化 窗口尺寸2x2,步长2
# input shape (batch_size, 224, 224, 64)
# output shape (batch_size, 112, 112, 64)
with tf.name_scope("pool_1"):
	pool_1 = max_pool(conv_2, 2, 2, 2, 2)

# 第二组卷积
# input shape (batch_size, 112, 112, 64)
# output shape (batch_size, 112, 112, 128)
with tf.name_scope('conv_gp2'):
	# conv3-128
	cw_3 = init_conv_weights([3, 3, 64, 128], name='conv_w3')
	cb_3 = init_biases([128], name='conv_b3')
	conv_3 = conv2d(pool_1, cw_3, cb_3, 1, 1)
	# conv3-128
	cw_4 = init_conv_weights([3, 3, 128, 128], name='conv_w4')
	cb_4 = init_biases([128], name='conv_b4')
	conv_4 = conv2d(conv_3, cw_4, cb_4, 1, 1)


# 最大池化 窗口尺寸2x2,步长2
# input shape (batch_size, 112, 112, 128)
# output shape (batch_size, 56, 56, 128)
with tf.name_scope("pool_2"):
	pool_2 = max_pool(conv_4, 2, 2, 2, 2)

# 第三组卷积
# input shape (batch_size, 56, 56, 128)
# output shape (batch_size, 56, 56, 256)
with tf.name_scope('conv_gp_3'):
	# conv3-256
	cw_5 = init_conv_weights([3, 3, 128, 256], name='conv_w5')
	cb_5 = init_biases([256], name='conv_b5')
	conv_5 = conv2d(pool_2, cw_5, cb_5, 1, 1)
	# conv3-256
	cw_6 = init_conv_weights([3, 3, 256, 256], name='conv_w6')
	cb_6 = init_biases([256], name='conv_b6')
	conv_6 = conv2d(conv_5, cw_6, cb_6, 1, 1)
	# conv3-256
	cw_7 = init_conv_weights([3, 3, 256, 256], name='conv_w7')
	cb_7 = init_biases([256], name='conv_b7')
	conv_7 = conv2d(conv_6, cw_7, cb_7, 1, 1)

# 最大池化 窗口尺寸2x2,步长2
# input shape (batch_size, 56, 56, 256)
# output shape (batch_size, 28, 28, 256)
with tf.name_scope("pool_3"):
	pool_3 = max_pool(conv_7, 2, 2, 2, 2)


# 第四组卷积
# input shape (batch_size, 28, 28, 256)
# output shape (batch_size, 28, 28, 512)
with tf.name_scope('conv_gp_4'):
	# conv3-512
	cw_8 = init_conv_weights([3, 3, 256, 512], name='conv_w8')
	cb_8 = init_biases([512], name='conv_b8')
	conv_8 = conv2d(pool_3, cw_8, cb_8, 1, 1)
	# conv3-512
	cw_9 = init_conv_weights([3, 3, 512, 512], name='conv_w9')
	cb_9 = init_biases([512], name='conv_b9')
	conv_9 = conv2d(conv_8, cw_9, cb_9, 1, 1)
	# conv3-512
	cw_10 = init_conv_weights([3, 3, 512, 512], name='conv_w10')
	cb_10 = init_biases([512], name='conv_b10')
	conv_10 = conv2d(conv_9, cw_10, cb_10, 1, 1)


# 最大池化 窗口尺寸2x2,步长2
# input shape (batch_size, 28, 28, 512)
# output shape (batch_size, 14, 14, 512)
with tf.name_scope("pool_4"):
	pool_4 = max_pool(conv_10, 2, 2, 2, 2)


# 第五组卷积 conv3-256 conv3-256
# input shape (batch_size, 14, 14, 512)
# output shape (batch_size, 14, 14, 512)
with tf.name_scope('conv_gp_5'):
	# conv3-512
	cw_11 = init_conv_weights([3, 3, 512, 512], name='conv_w11')
	cb_11 = init_biases([512], name='conv_b11')
	conv_11 = conv2d(pool_4, cw_11, cb_11, 1, 1)
	# conv3-512
	cw_12 = init_conv_weights([3, 3, 512, 512], name='conv_w12')
	cb_12 = init_biases([512], name='conv_b12')
	conv_12 = conv2d(conv_11, cw_12, cb_12, 1, 1)
	# conv3-512
	cw_13 = init_conv_weights([3, 3, 512, 512], name='conv_w13')
	cb_13 = init_biases([512], name='conv_b13')
	conv_13 = conv2d(conv_12, cw_13, cb_13, 1, 1)


# 最大池化 窗口尺寸2x2,步长2
# input shape (batch_size, 14, 14, 512)
# output shape (batch_size, 7, 7, 512)
with tf.name_scope("pool_5"):
	pool_5 = max_pool(conv_13, 2, 2, 2, 2)

# 转换数据shape
# input shape (batch_size, 7, 7, 512)
# reshape_conv14 (batch_size, 25088)
reshape_conv13 = tf.reshape(pool_5, [batch_size, -1])
# n_in = 25088
n_in = reshape_conv13.get_shape()[-1].value


# 第一个全连接层
with tf.name_scope('fullc_1'):
	# (n_in, 4096) = (25088, 4096)
	fw14 = init_fc_weights([n_in, 4096], name='fullc_w14')
	# (4096, )
	fb14 = init_biases([4096], name='fullc_b14')
	# (batch_size, 25088) x (25088, 4096)
	# (batch_size, 4096)
	activation1 = fullc(reshape_conv13, fw14, fb14)
# dropout正则
drop_act1 = tf.nn.dropout(activation1, keep_prob)
# 第二个全连接层
with tf.name_scope('fullc_2'):
	# (4096, 4096)
	fw15 = init_fc_weights([4096, 4096], name='fullc_w15')
	# (4096, )
	fb15 = init_biases([4096], name='fullc_b15')
	# (batch_size, 4096) x (4096, 4096)
	# (batch_size, 4096)
	activation2 = fullc(drop_act1, fw15, fb15)
# dropout正则
drop_act2 = tf.nn.dropout(activation2, keep_prob)

# 第三个全连接层
with tf.name_scope('fullc_3'):
	# (4096, 1000)
	fw16 = init_fc_weights([4096, 1000], name='fullc_w16')
	# (1000, )
	fb16 = init_biases([1000], name='full_b16')
	# [batch_size, 4096] x [4096, 1000]
	# [batch_size, 1000]
	logits = tf.add(tf.matmul(drop_act2, fw16), fb16)
	output = tf.nn.softmax(logits)
# 交叉熵
with tf.name_scope("cross_entropy"):
	cross_entropy = tf.nn.sparse_softmax_cross_entropy_with_logits(logits=logits, labels=labels)
	cost = tf.reduce_mean(cross_entropy,name='Train_Cost')
	tf.summary.scalar("cross_entropy", cost)
# 优化交叉熵
with tf.name_scope("train"):
	optimizer = tf.train.AdamOptimizer(learning_rate).minimize(cost)
# 准确率
# with tf.name_scope("accuracy"):
# # 用来评估测试数据的准确率 # 数据labels没有使用one-hot编码格式,labels是int32
#  	def accuracy(labels, output):
#  		labels = tf.to_int64(labels)
#  		pred_result = tf.equal(labels, tf.argmax(output, 1))
#  		accu = tf.reduce_mean(tf.cast(pred_result, tf.float32))
#  		return accu
 # train_images = 处理后的输入图像
 # train_labels = 处理后的输入图像标签
# 训练
def training(max_steps, s_times, keeprob, display):
	with tf.Session() as sess:
		# 保存图
		write = tf.summary.FileWriter(LOG_DIR, sess.graph)
		init_op = tf.global_variables_initializer()
		sess.run(init_op)
		# 协程:单线程实现并发
		coord = tf.train.Coordinator()
		# 使用线程及队列,加速数据处理
		threads = tf.train.start_queue_runners(coord=coord)
		# 训练周期
		for i in range(max_steps):
			# 小组优化
			for j in range(s_times):
				start = time.time()
				batch_images, batch_labels = sess.run([train_images, train_labels])
				opt = sess.run(optimizer, feed_dict={images:batch_images, labels:batch_labels, keep_prob:keeprob})
				every_batch_time = time.time() - start
			c = sess.run(cost, feed_dict={images:batch_images, labels:batch_labels, keep_prob:keeprob})
			# 保存训练模型路径
			ckpt_dir = './vgg_models/vggmodel.ckpt'
			# 保存训练模型
			saver = tf.train.Saver()
			saver.save(sess,save_path=ckpt_dir,global_step=i)
			# 定步长输出训练结果
			if i % display == 0:
				samples_per_sec = float(batch_size) / every_batch_time
				print("Epoch {}: {} samples/sec, {} sec/batch, Cost : {}".format(i+display, samples_per_sec, every_batch_time, c))
		# 线程阻塞
		coord.request_stop()
		# 等待子线程执行完毕
		coord.join(threads)
if __name__ == "__main__":

	training(5000, 5, 0.7, 10)
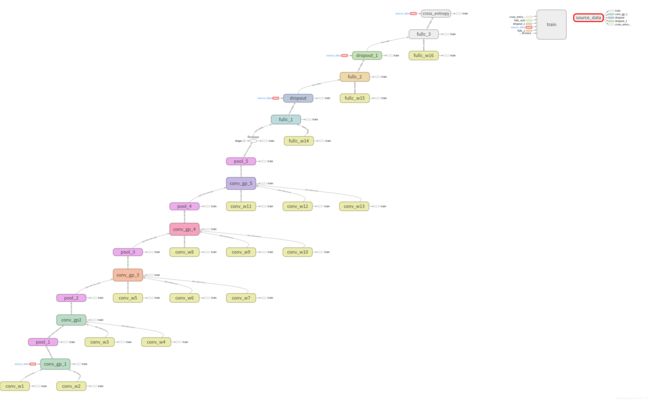
3.2 VGGNet16网络图
结构图清晰显示VGG的层级,如下图:

- 解析
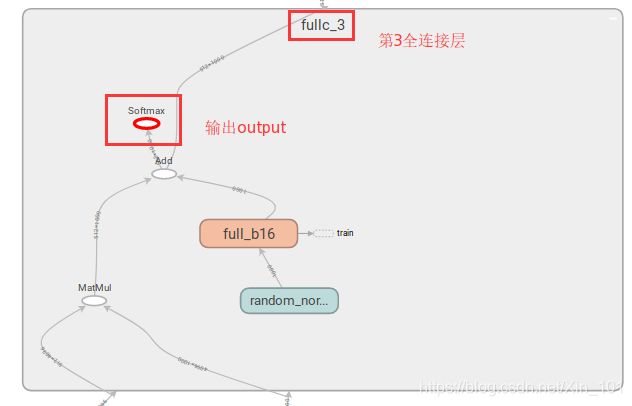
(1) 图3.1展示了VGGNet16的结构,最下面是第一组卷积层,输入为source_data,最上面是交叉熵计算,输出结果output在全连接层3(fullc_3)中,如图3.2所示,softmax即为输出output.

(2) 图中3.1的每条线上的数字即为每层的计算结果;
(3) 上述VGG结构,滑动窗口(卷积窗口和池化窗口)均使用全0填充,因此,卷积层计算的图像尺寸结果不会改变,只改变层深;池化层改变计算图像的尺寸,不改变图像深度;
3.3 参数数量
不计batch_size
| 序号 | 层 | 维度 | 参数数量 | 计算 |
|---|---|---|---|---|
| 1 | conv3-64 | (, 224, 224, 64) | 1792 | 3x3x3x64+64 |
| 2 | conv3-64 | (, 224, 224, 64) | 36928 | 3x3x64x64+64 |
| 3 | pool_1 | (, 112, 112, 64) | 0 | 0 |
| 4 | conv3-128 | (, 112, 112, 128) | 73856 | 3x3x64x128+128 |
| 5 | conv3-128 | (, 112, 112, 128) | 147584 | 3x3x128x128+128 |
| 6 | pool_2 | (, 56, 56, 128) | 0 | 0 |
| 7 | conv3-256 | (, 56, 56, 256) | 295168 | 3x3x128x256+256 |
| 8 | conv3-256 | (, 56, 56, 256) | 590080 | 3x3x256x256+256 |
| 9 | conv3-256 | (, 56, 56, 256) | 590080 | 3x3x256x256+256 |
| 10 | pool_3 | (, 28, 28, 256) | 0 | 0 |
| 11 | conv3-512 | (, 28, 28, 512) | 1180160 | 3x3x256x512+512 |
| 12 | conv3-512 | (, 28, 28, 512) | 2359808 | 3x3x512x512+512 |
| 13 | conv3-512 | (, 28, 28, 512) | 2359808 | 3x3x512x512+512 |
| 14 | pool_4 | (, 14, 14, 512) | 0 | 0 |
| 15 | conv3-512 | (, 14, 14, 512) | 2359808 | 3x3x512x512+512 |
| 16 | conv3-512 | (, 14, 14, 512) | 2359808 | 3x3x512x512+512 |
| 17 | conv3-512 | (, 14, 14, 512) | 2359808 | 3x3x512x512+512 |
| 18 | pool_5 | (, 7, 7, 512) | 0 | 0 |
| 19 | fullc_1 | (, 4096) | 102764544 | 25088x4096+4096 |
| 20 | fullc_2 | (, 4096) | 16781312 | 4096x4096+4096 |
| 21 | fullc_2 | (, 1000) | 4097000 | 4096x1000+1000 |
| 22 | 总计 | add | 138,357,544 | add1+ add2 + ⋯ \cdots ⋯ + add21 |
t o t a l − p a r a m s = a d d 1 + a d d 2 + ⋯ + a d d 21 = 138 , 357 , 544 total_-params = add1+ add2 + \cdots + add21=138,357,544 total−params=add1+add2+⋯+add21=138,357,544
4 总结
- VGGNet16卷积神经网络共有5个卷机组,5个最大池化层,3个全连接层;
- 卷积层的滑动窗口(卷积核与池化窗口)使用全0填充,造成的结果:卷积计算只改变图像的层深,不改变图像尺寸;池化层只改变图像尺寸,不改变图像深度;
- 卷积层滑动窗口不使用全0填充,在卷积层计算时,就可能改变图像尺寸,若原图尺寸为 n × n n\times n n×n,卷积核尺寸 3 × 3 3\times3 3×3,移动步长为1,卷积层计算后,图像尺寸为 ( n − 3 ) + 1 (n-3)+1 (n−3)+1,如 n = 7 n=7 n=7,不使用全0填充,滑动窗口,最终会滑到最后三个网格上,减去3个格子,还剩4个格子,滑动步长为1,则可以滑动5次,即滑动后的尺寸为 5 × 5 5\times 5 5×5;
- 参数即为权重和偏置个数;
[参考文献]
[1]Very Deep Convolutional Networks for Large-sacle Image Recognition
[2]https://blog.csdn.net/Xin_101/article/details/81917134
[3]https://blog.csdn.net/dta0502/article/details/79654931
[4]https://blog.csdn.net/u014281392/article/details/75152809