conda使用干货笔记
之前用时做的笔记,只存在网易云笔记里,觉得挺好用的就发出来了
pycharm已有项目上使用conda环境或切换为conda其他环境:
点击settings,选择project:项目名->project interpret ->show all。如果没有点击+号添加一个,base interpreter选择miniconda3根目录下的python.exe,或者也可以选其他虚拟环境下的就可以切换环境了。
另外为了pycharm避免编程界面错误的给包名画红线(),要将第三方包文件site-packeges那个文件夹加入。注意用非base环境的话site-packeges在envs\环境名\Lib\site-packages下
=======下面都是我在使用过程中记录的满满的干货=========
miniconda的下载安装
Miniconda的下载网址为https://conda.io/miniconda.html
anaconda包含了500M的现成包,mini只包含了基本的东西。不过现成包里的版本不一定比mini版更符合你的需求。conda会根据计算机环境下载优化版本的软件包,并且自动解决依赖问题,所以如果安装tensorflow之类的,比pip下的好用。
下载exe装完后,老规矩,需要配置环境变量:高级系统配置里设置系统变量path添加几条,根目录D:\Miniconda3依据自己的情况修改:
D:\Miniconda3
D:\Miniconda3\Scripts
D:\Miniconda3\lib\site-packages\
原来的纯python就没用了,建议删除原来python的相关path,避免新老版本pip用得混乱。
使用conda环境
查看安装情况
设好后cmd输入python,可以看到版本号和提示
Python 3.7.4 (default, Aug 9 2019, 18:34:13) [MSC v.1915 64 bit (AMD64)] :: Anaconda, Inc. on win32 Warning: This Python interpreter is in a conda environment, but the environment has not been activated. Libraries may fail to load. To activate this environment
这样就到了conda的python环境。并提示当前没有激活特定环境。
也可以用Anaconda Prompt 工具,优点是关键字有颜色,并默认进入base环境。
由于众所周知的原因,我们先换下下载源:
换源:(如果默认官方的没用的话)
conda config --add channels https://mirrors.tuna.tsinghua.edu.cn/anaconda/pkgs/main/
conda config --add channels https://mirrors.tuna.tsinghua.edu.cn/anaconda/pkgs/free/
conda config --add channels https://mirrors.tuna.tsinghua.edu.cn/anaconda/cloud/conda-forge/
conda config --add channels https://mirrors.tuna.tsinghua.edu.cn/anaconda/cloud/pytorch/
# 设置搜索时显示通道地址
conda config --set show_channel_urls yes
虚拟环境
conda的优点之一是可以多python环境切换
新安装的conda默认有个base环境。
输入
conda env list
可以看到目前的环境列表。带星号的表示当前所处环境。
手工加虚拟环境:
conda create --name huangly python=3.7,tensorflow=1.13.2这条命令创建一个test1的开发环境,并预先下载python3.6。
conda activate test1 #进入环境

conda deactivate test1 #退出

conda remove --name test1 --all #彻底删除环境上面激活了这个test1环境。之后安装的第三方包会装在envs\test1\Lib\site-packages 文件夹。
另外base环境下的会装在lib\site-packages下。
pycharm加虚拟环境:
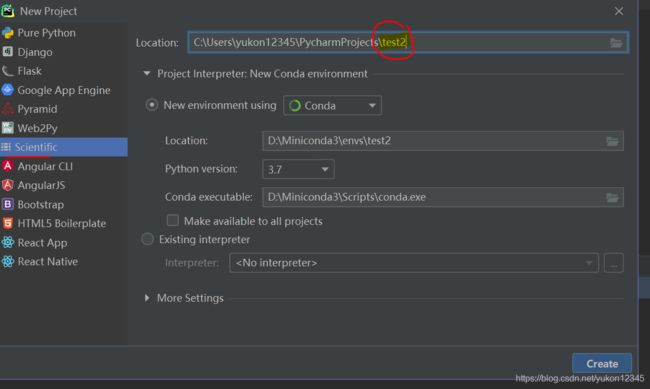
新建项目时选择scientific,修改项目名后会自动生成一个虚拟环境,也可以点location选现成的。
使用关键命令
然后可以安装一下指定版本numpy, 去掉版本号安装最新版
conda install numpy=1.8.1查询下存在ts的版本
conda search tensorflow
conda install tensorflow=1.5.1其他常用命令
conda list 查看安装的各种包

conda remove 卸载某个包

conda update conda (或特定包名)跟新包 conda update --all 更新所有

conda clean 清除安装失败或失效的包缓存

conda info 查看各种环境信息、源、配置文件、文件路径
jupyter notebook 在多虚拟环境的使用
如何在Jupyter Notebook中使用Python虚拟环境? - 简书
conda install jupyter

conda install nb_conda

#跳到虚拟环境后,再安装一个

conda create --name yukon

conda activate yukon

conda install ipykernel
conda批量导出包含环境中所有组件的requirements.txt文件
conda list -e > requirements.txtconda批量安装requirements.txt文件中包含的组件依赖
conda install --yes --file requirements.txt


